Orchids are among the most elegant indoor plants, but they can also be among the most misunderstood. Their flowers look delicate, their roots grow in unusual ways, and their potting mix is very different from normal houseplant soil. Many people treat orchids like ordinary potted plants, then wonder why the leaves turn yellow, the roots become mushy, or the plant stops blooming. One simple care idea that many orchid lovers use is adding a small amount of clean horticultural charcoal or activated charcoal to the orchid root zone.
This is not a magic powder that makes flowers appear overnight. It is better understood as a cleanliness and root-care support trick. Charcoal can help keep the potting environment fresher, reduce stale smells, absorb some impurities, and make the surface around the roots look cleaner. When used correctly, it can become part of a more balanced orchid routine: better airflow, cleaner roots, stable moisture, and a neater display.
The beauty of this method is that it fits perfectly with the way orchids naturally grow. Many popular indoor orchids, especially Phalaenopsis orchids, do not enjoy heavy, compact soil. They prefer a loose, airy medium where roots can breathe. A small amount of charcoal mixed with bark or placed as a light top layer can improve the overall look and hygiene of the pot without making the plant feel buried or suffocated.
What This Orchid Charcoal Trick Is Really About
The main goal of the charcoal trick is root freshness. Orchid roots are sensitive to old, soggy, compacted growing material. When the potting mix stays wet for too long, roots can lose oxygen and begin to rot. A clean orchid setup should allow air to move around the roots while still holding enough moisture for the plant to stay hydrated.
Charcoal is often used in orchid mixes because it is lightweight, porous, and clean-looking. It can help create small air pockets in the medium. It can also help the potting mix feel less stale, especially when combined with bark chips and proper drainage. In decorative orchid care, it gives the pot a tidy dark finish that makes green leaves and pale roots stand out beautifully.
The trick should be done lightly. Orchids do not need to be buried under a thick layer of black powder. Too much fine charcoal dust can block airflow, hold excess moisture in the wrong places, and make the pot messy. The best approach is to use small chunks or a thin dusting, depending on the purpose. For most home growers, chunky horticultural charcoal is safer than a heavy powder.
Why Orchids Appreciate a Cleaner Root Zone
Orchid roots are not just hidden plant parts; they are active, living structures that absorb water, breathe, and sometimes photosynthesize. Healthy orchid roots are usually firm and plump. They may appear silvery when dry and green after watering. When roots become brown, hollow, slimy, or mushy, the plant often struggles to support leaves and blooms.
A clean root zone helps the plant stay balanced. When old bark breaks down, it can become dense and hold water too long. This creates a stressful environment for orchid roots. Adding clean bark, leca, perlite, sphagnum moss in moderation, and small charcoal pieces can help keep the medium more open.
Charcoal is especially useful when the potting medium smells sour or looks overly wet, but it should not be used as a cover-up for serious root rot. If the roots are already rotten, the plant needs to be inspected, cleaned, trimmed with sterile scissors, and repotted into a fresh orchid mix. Charcoal can support cleanliness after that, but it cannot save roots that are already dead.
The Best Type of Charcoal to Use for Orchids
For orchids, the best choice is horticultural charcoal or activated charcoal that is safe for plants. Avoid barbecue charcoal, lighter-fluid charcoal, scented charcoal, charcoal briquettes with additives, and ashes from unknown materials. Many barbecue products contain chemicals, binders, or residues that are not suitable for orchid roots.
Horticultural charcoal usually comes in small chunks. These pieces are ideal for mixing with orchid bark because they keep the medium airy. Activated charcoal is finer and more absorbent, but it should be used carefully. If it is a powder, apply only a tiny amount and avoid packing it around the crown or roots.
Wood ash is not the same as charcoal. Ash can be very alkaline and may affect the growing medium too strongly. It should not be casually poured onto orchids. When people talk about charcoal for orchid care, they usually mean clean charcoal pieces, not ash.
How to Use Charcoal as a Light Top Layer
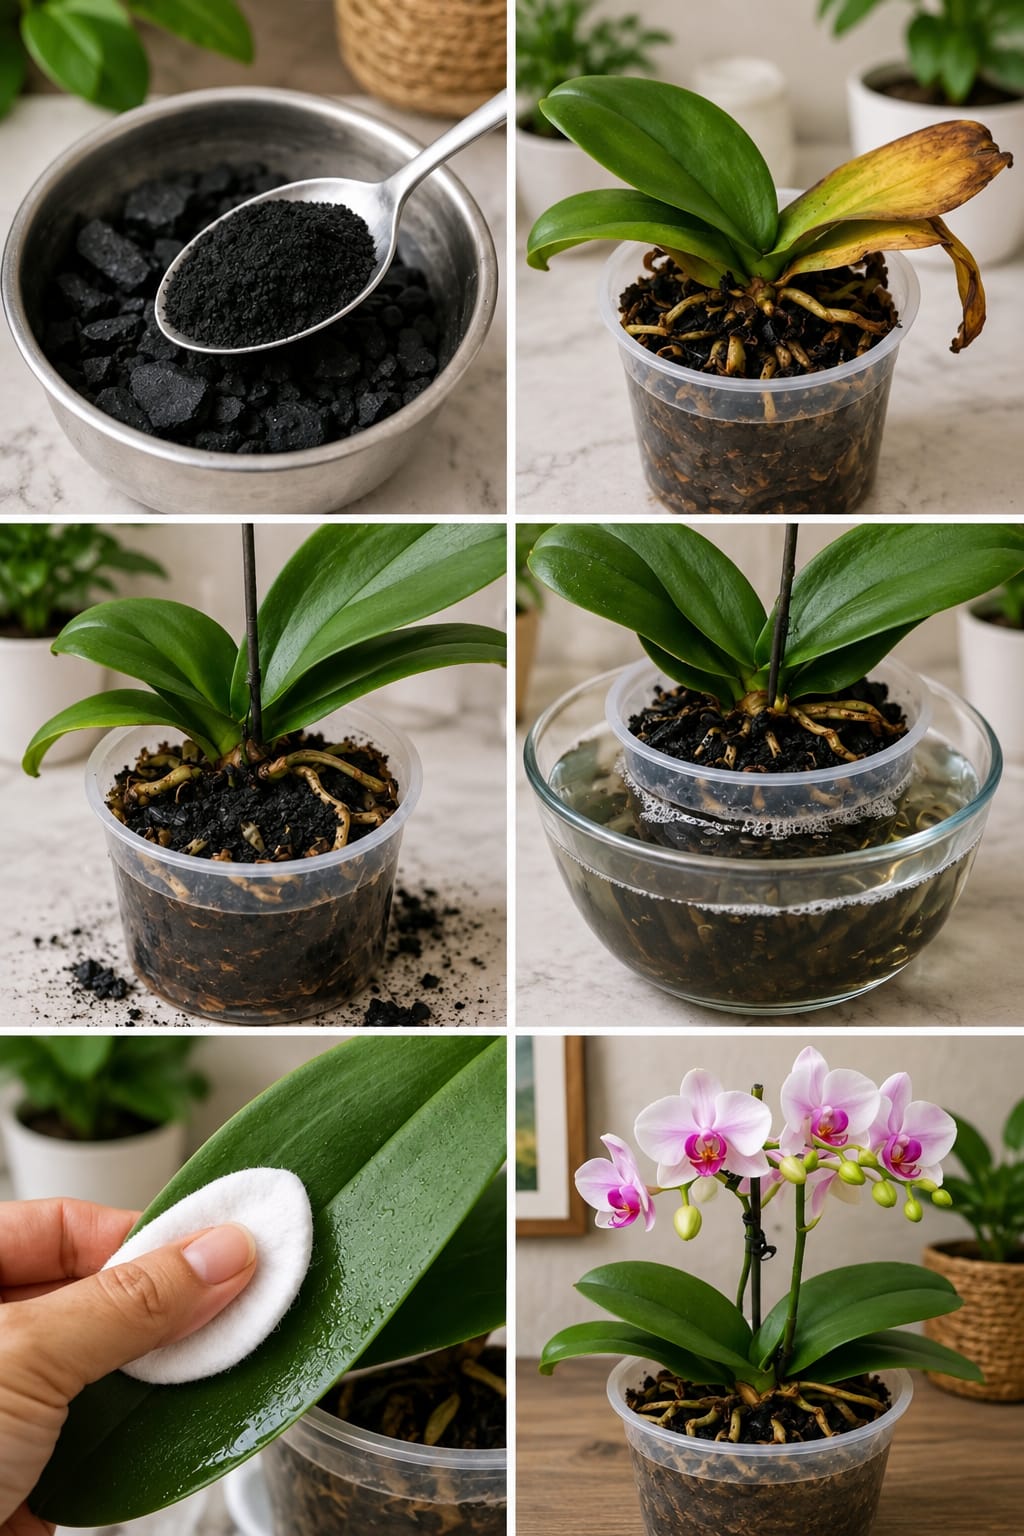
A simple way to use charcoal is as a very light top layer around the root zone. First, check that the orchid is in a pot with drainage holes. If the plant is sitting in a decorative cover pot without drainage, remove it before watering and never allow water to remain trapped around the roots.
Sprinkle a small amount of clean horticultural charcoal pieces around the surface of the potting mix. Keep the charcoal away from the crown, which is the central point where leaves meet. The crown should stay dry and open because trapped moisture there can cause crown rot.
Do not cover all visible roots. Orchid aerial roots are normal and should not be forced under the mix. Place the charcoal lightly around the base, leaving space for airflow. The result should look tidy, not heavy. Think of it as a freshening layer, not a thick blanket.
How to Use Charcoal When Repotting an Orchid
The best time to add charcoal is during repotting. Remove the orchid from its old pot and gently shake away broken-down bark. Rinse the roots lightly if needed. Trim dead, mushy, or hollow roots with clean scissors. Keep firm green, white, or silvery roots.
Prepare a fresh orchid mix using bark chips as the main material. Add a small portion of horticultural charcoal pieces. You can also add perlite or a little sphagnum moss depending on your home’s humidity. In dry homes, a small amount of moss can help hold moisture. In humid homes, bark and charcoal may be enough.
Place the orchid into the pot and fill around the roots gently. Do not press the medium too tightly. Orchids need air around the roots. After repotting, water lightly and let excess water drain fully. The charcoal becomes part of the airy structure, helping the pot remain cleaner and fresher.
Why a Water Bowl Soak Can Help After Freshening the Mix
Many orchid owners water by soaking the inner pot in a bowl of water for a short time. This method can hydrate bark and roots evenly without constantly pouring water through the top. When charcoal is used in the medium, soaking also helps rinse dust and settle the pieces naturally.
To do this safely, place the orchid’s nursery pot in a bowl of room-temperature water for about 10 to 15 minutes. The water should reach the lower part of the pot but should not cover the leaves or crown. After soaking, lift the pot and let it drain completely before returning it to its decorative container.
Never leave an orchid standing in water for hours. Long soaking can reduce oxygen around the roots. The goal is to hydrate, then drain. This rhythm supports healthier roots and keeps the display cleaner.
Cleaning Orchid Leaves for a More Polished Look
Healthy orchid care is not only about roots. Leaf cleaning also makes a big difference. Orchid leaves collect dust, water spots, and residue from indoor air. When the leaves are clean, the plant looks more refined and can absorb light more efficiently.
Use a soft damp cotton pad or microfiber cloth to wipe the leaves gently. Support each leaf from underneath while wiping the top surface. Avoid using oily leaf shine products because they can block pores and attract dust. Plain water is usually enough. For stubborn mineral spots, use a very diluted gentle solution, then wipe again with clean water.
Do not leave water sitting in the crown or between leaves. After cleaning, check the center of the plant and dab away any trapped moisture. This small habit keeps the orchid looking glossy and elegant without stressing the plant.
How Charcoal Improves the Decor Side of Orchid Care
Charcoal gives orchid pots a clean, dramatic contrast. The dark surface makes pale roots, green leaves, and soft blooms look more luxurious. In a clear pot, charcoal pieces mixed with bark add texture and depth. In a white ceramic pot, the dark medium creates a modern spa-like look.
This is especially helpful for orchids displayed on coffee tables, windowsills, shelves, dining sideboards, or bathroom counters with bright indirect light. A messy potting surface can make even a beautiful orchid look neglected. A neat charcoal-and-bark surface makes the plant feel intentional and styled.
For an expensive-looking display, pair orchids with simple pots. White ceramic, matte black, terracotta, glass, or stone-textured containers work beautifully. Avoid overly busy pots if the orchid is blooming because the flowers should remain the focus.
Best Light Conditions for Orchids After the Trick
Charcoal can help with the root environment, but light is what supports flowering. Phalaenopsis orchids usually prefer bright indirect light. A spot near an east-facing window is often ideal. A north-facing window can work if it is bright enough. South or west windows may need a sheer curtain to prevent leaf burn.
If the leaves are very dark green and the plant never blooms, it may need more light. If the leaves become yellowish with scorched patches, the light may be too strong. The best leaf color is usually a healthy medium green.
Good light and healthy roots work together. When roots are clean and leaves receive enough gentle light, the orchid has a better chance of producing strong flower spikes.
Watering Routine After Adding Charcoal
After adding charcoal, do not automatically water more often. Charcoal does not mean the orchid needs extra water. Watering should still depend on root color, pot weight, and the dryness of the medium. In many homes, orchids are watered about once a week, but this can change depending on temperature, humidity, pot size, and growing medium.
Check the roots through the clear pot if possible. Silvery roots usually mean the plant is ready for water. Green roots usually mean the plant is still hydrated. If the pot feels heavy and the bark looks wet, wait longer.
Overwatering is one of the most common orchid problems. A clean charcoal layer will not protect the plant if the pot stays constantly wet. The roots still need a wet-dry rhythm.
When This Trick Is Helpful
This trick is helpful when the orchid potting mix looks tired but the plant is not severely damaged. It is also useful after repotting, when you want a cleaner and more breathable mix. It works well for orchids that have healthy roots but need a fresher-looking surface.
It can also help with orchids displayed in clear pots because the medium looks more organized. For plant lovers who care about decor, charcoal gives a neat finishing touch while still serving a practical purpose.
This method is also useful for people who grow orchids in warm, humid rooms where organic material can become stale faster. The charcoal pieces help maintain a cleaner feel in the potting mix.
When Not to Use This Trick
Do not use charcoal powder heavily on orchids with already damaged roots. If the roots are black, slimy, or collapsing, the orchid needs a full root check. Remove the plant, cut away dead roots, disinfect tools, and repot in fresh orchid bark. A sprinkle on top will not solve deep rot.
Do not use charcoal from fireplaces, grills, incense, or unknown burned materials. These may contain salts, chemicals, or residues. Also avoid packing fine powder around the base of the plant because it can become dense when wet.
Do not place charcoal directly into the crown or leaf joints. The crown must stay dry and open. Any material trapped there can hold moisture and cause problems.
Continue to Page 2
Continue to page 2 for more details about this article and the key points many readers miss on the first page.
Simple Charcoal Orchid Routine
Start by checking the orchid roots. If the roots look mostly firm and healthy, remove any old loose debris from the top of the pot. Add a light layer of clean horticultural charcoal around the surface, keeping it away from the crown. Water the orchid by soaking the pot briefly, then drain completely.
Wipe the leaves with a damp cotton pad to remove dust. Place the orchid in bright indirect light. Check the pot weekly and water only when the roots and medium show they are ready. This simple routine supports a cleaner plant without overcomplicating care.
If the plant is weak, combine this with better lighting, proper watering, and fresh orchid mix. Charcoal is most useful as part of a complete care system, not as a single cure.
How to Style the Orchid After Care
Once the orchid is cleaned and refreshed, styling becomes easy. Place it in a simple decorative pot that hides the nursery pot but still allows drainage after watering. A white pot gives a clean spa look. A terracotta pot adds warmth. A black pot creates a dramatic contrast with pale flowers. A clear pot feels modern and botanical.
For a bright windowsill, group the orchid with one or two smaller plants, such as a fern or peperomia, but avoid crowding. Orchids look best when they have breathing room. On a dining table, use one orchid as a centerpiece and keep the surrounding decor minimal.
If the orchid has flower spikes, use thin support stakes and gentle clips. Keep the clips loose and avoid forcing the spike into an unnatural shape. A graceful arch often looks more elegant than a stiff upright line.
How This Trick Supports Blooming Indirectly
Charcoal does not directly force blooms. However, it can support the conditions that help orchids bloom. Cleaner roots, better airflow, and a fresher potting mix reduce stress. A less stressed orchid can use its energy more efficiently.
Blooming also depends on light, maturity, temperature changes, and overall plant health. Many Phalaenopsis orchids respond to a slight drop in nighttime temperature for a few weeks. If the plant is mature, healthy, and receiving good light, it is more likely to produce a flower spike.
Think of the charcoal trick as part of the foundation. It helps keep the roots and display clean, while light and seasonal care encourage flowers.
Extra Root-Care Tips for Better Results
Use a pot with drainage holes. Clear nursery pots are excellent because they allow you to watch root health. Avoid heavy garden soil. Orchids need bark, leca, moss, charcoal, or a specialized orchid mix, depending on the plant and environment.
Repot orchids when the bark breaks down, usually every one to two years. Old bark becomes soft and compact, which can suffocate roots. Repotting after flowering is usually best, unless the plant has urgent root rot.
Do not cut healthy aerial roots just because they look messy. Aerial roots are normal. You can guide them gently into the pot during repotting, but never force them if they resist. Their presence often means the orchid is actively growing.
A Cleaner Orchid Display for Small Homes
This method is especially useful in small homes where every visible plant needs to look tidy. Orchids are often placed on windowsills, shelves, and tables. When the potting surface is messy, the whole area can look less polished. A clean charcoal layer makes the pot look intentional and well maintained.
For apartments, choose one or two orchids and keep their pots coordinated. Add charcoal and bark for texture, wipe the leaves regularly, and keep the display uncluttered. This creates the feeling of a small indoor garden without making the room feel crowded.
In modern decor, orchids look beautiful with glass, ceramic, wood, and stone. The dark charcoal surface pairs especially well with white flowers, pink blooms, and glossy green leaves.
Final Thoughts
A small charcoal layer can be a useful orchid-care trick when used carefully. It supports a cleaner root zone, improves the look of the potting surface, and works well with orchid bark and proper drainage. It is not a miracle cure, but it can make orchid care feel fresher, neater, and more decorative.
The best results come from balance. Use clean horticultural charcoal, avoid heavy powder, keep the crown dry, water only when needed, and give the orchid bright indirect light. Combine this with regular leaf cleaning and occasional repotting, and your orchid display can look healthier, cleaner, and more refined.
For anyone who wants orchids that look elegant even between blooming cycles, this simple charcoal idea is worth trying. It helps the plant area feel organized while giving the roots a more breathable environment. With the right care, your orchid can become more than a plant—it can become a polished indoor centerpiece.