ZZ plants are some of the easiest and most stylish indoor plants you can grow. Their glossy green leaves, upright stems, and strong root system make them perfect for homes, offices, bedrooms, kitchens, and plant shelves. They tolerate low light better than many houseplants, need little water, and can survive with simple care.
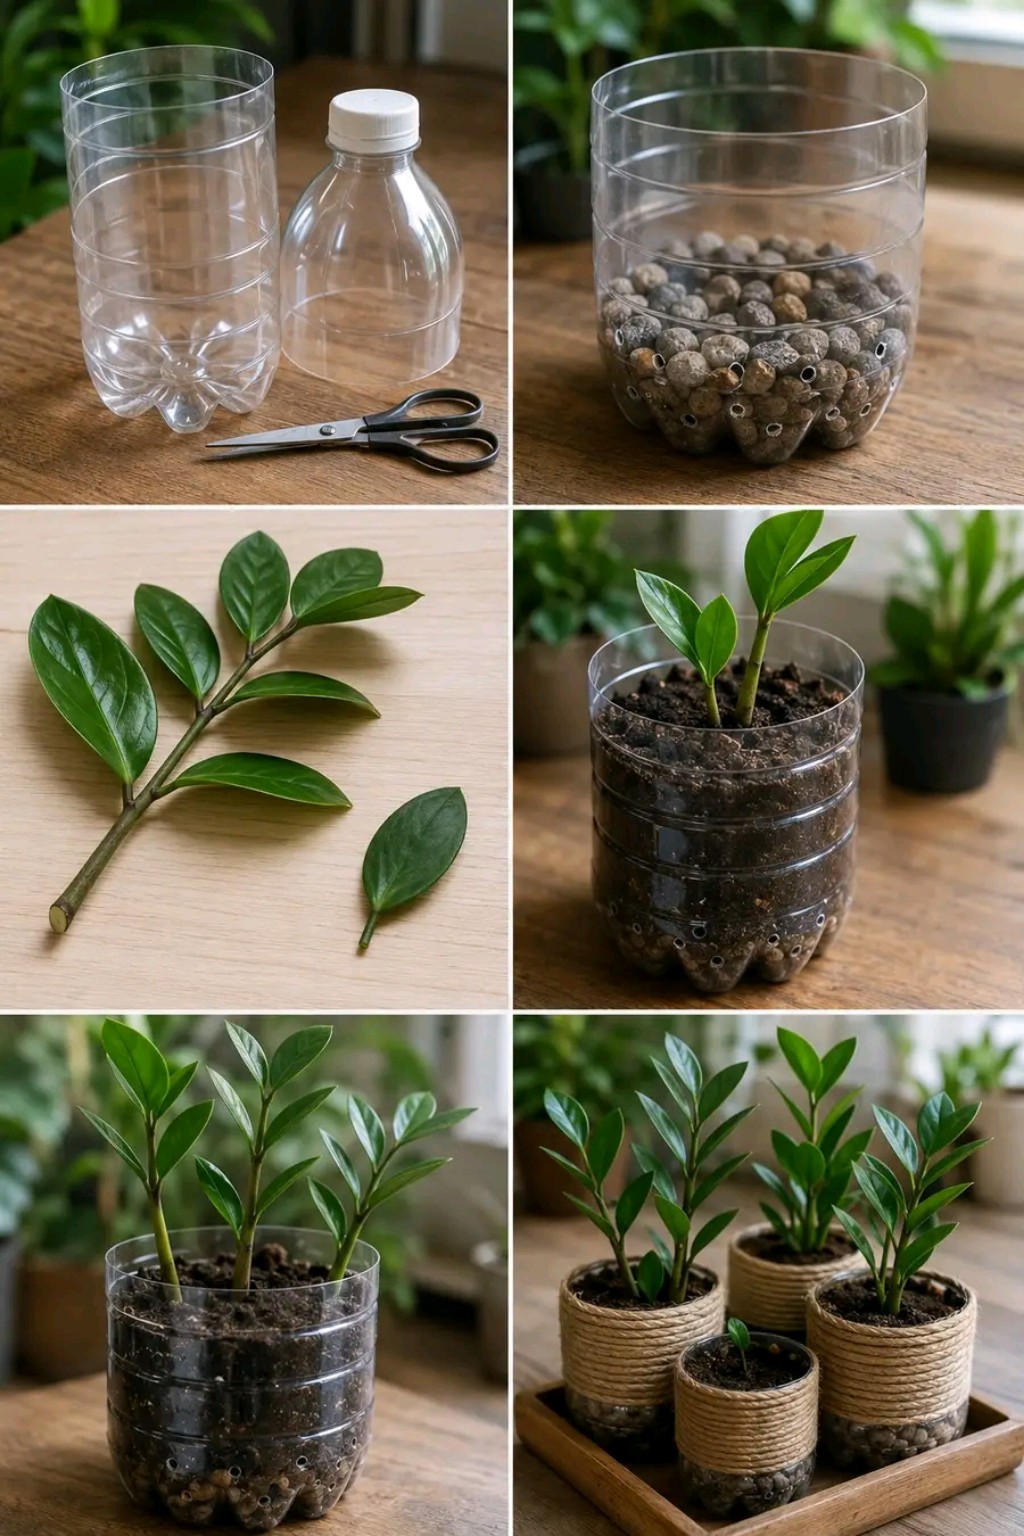
The image shows a creative way to grow ZZ plants using recycled plastic bottles. The bottle is cut, small drainage holes are made, pebbles are added at the bottom, soil is placed above the stones, and ZZ plant cuttings are planted inside. Later, the bottle planters are wrapped with rope to create a rustic decorative look.
This is a smart and affordable propagation idea. It reuses plastic bottles, saves money on pots, and gives ZZ cuttings a small controlled space to grow. But ZZ plants grow slowly, so patience is very important. You may not see fast results in a few days. A healthy ZZ cutting can take weeks or months to form roots and new shoots.
What Is a ZZ Plant?
ZZ plant, also known as Zamioculcas zamiifolia, is a tropical houseplant with thick shiny leaves and underground rhizomes. These rhizomes store water, which is why the plant can handle dry soil and missed watering. ZZ plants are popular because they are tough, elegant, and beginner-friendly.
The plant grows from thick stems that rise from the soil. Each stem holds smooth oval leaflets. A mature ZZ plant can look full, sculptural, and very clean in modern indoor decor.
Why Use Plastic Bottles for ZZ Plant Propagation?
Plastic bottles are useful for propagation because they are lightweight, clear, and easy to cut. You can see moisture levels, root development, and drainage layers. They also make a good temporary home for small cuttings before moving them into permanent pots.
They are affordable.
They reuse waste material.
They are easy to cut and shape.
Clear plastic helps you see root growth.
They work well for small cuttings.
They can be decorated with rope or fabric.
They are useful for small indoor plant projects.
Important Safety Note
ZZ plants are toxic if eaten by pets or children. Keep cuttings, leaves, and pots away from cats, dogs, and small children. Also, when cutting plastic bottles, use sharp tools carefully. Cut slowly and keep your hands away from the blade.
What You Need
Clean plastic bottle
Sharp scissors or craft knife
Small pebbles or LECA balls
Fast-draining potting mix
Perlite or pumice
Healthy ZZ plant stem cutting or leaf cutting
Water
Small scoop
Rope or twine for decoration, optional
Tray or saucer
Step 1: Choose a Healthy ZZ Plant Cutting
Start with a healthy ZZ plant. The leaves should be firm, glossy, and green. Avoid cuttings with yellow leaves, mushy stems, black spots, or signs of rot. A strong cutting gives you a better chance of success.
Good Cutting Signs
- Firm stem
- Glossy green leaves
- No soft spots
- No bad smell
- No pest damage
- No yellow or black sections
You can propagate ZZ plants from a full stem cutting, a smaller stem section, or even individual leaves. Stem cuttings usually create a fuller plant faster than single leaf cuttings.
Step 2: Cut and Clean the Plastic Bottle
Wash the bottle with clean water and remove any label. Let it dry. Then cut the bottle into the shape you want. For a simple planter, cut off the top part and keep the bottom section as the pot.
Make sure the cut edge is not too sharp. You can trim rough edges with scissors. If desired, wrap the top edge with tape, rope, or fabric for a cleaner look.
Step 3: Make Drainage Holes
Drainage is very important for ZZ plants. They do not like wet soil. Without drainage holes, water can collect at the bottom and rot the roots or rhizomes.
Use scissors, a hot nail, or a small tool to make holes near the bottom of the plastic bottle. In the image, holes are visible around the lower section. These help extra water escape and improve airflow.
Drainage Tips
- Make several small holes.
- Do not make holes too large.
- Place the bottle on a tray after watering.
- Never let the bottle sit in standing water.
Step 4: Add Pebbles or LECA
Add a layer of pebbles, small stones, or LECA balls to the bottom of the bottle. This creates a decorative base and helps keep the lower soil layer from becoming too compact.
Remember that pebbles do not replace drainage holes. The bottle still needs proper holes so water can escape.
Step 5: Add Fast-Draining Soil
ZZ plants need soil that drains quickly. Heavy soil holds too much water and can cause root rot. A light mix is best.
Simple ZZ Plant Soil Mix
- 2 parts cactus or succulent mix
- 1 part perlite
- 1 part pumice or coarse sand
- A small amount of orchid bark, optional
This mix keeps the roots airy and helps prevent soggy soil. If you only have regular potting soil, add plenty of perlite to improve drainage.
Step 6: Plant the ZZ Cutting
Place the ZZ cutting into the soil. If using a stem cutting, bury the lower end deep enough to stand upright. If using a leaf cutting, insert the cut end lightly into the soil.
Press the soil gently around the base. Do not pack it too tightly. Roots need air as well as moisture.
Step 7: Water Lightly
After planting, water lightly. The soil should become slightly moist, not soaked. ZZ cuttings can rot if the soil stays too wet.
After the first light watering, wait until the soil becomes dry before watering again. This may take several days or even weeks depending on light, temperature, and bottle size.
Step 8: Place in Bright Indirect Light
ZZ cuttings root best in bright indirect light. They can tolerate low light, but rooting may be slower. Avoid harsh direct sun because clear plastic can heat up quickly and damage roots.
Best Locations
- Bright windowsill with filtered light
- Near an east-facing window
- A few feet from a south-facing window
- Bright plant shelf
- Room with soft natural light
Step 9: Be Patient
ZZ plant propagation is slow. A cutting may take a long time to show visible growth. Under the soil, it may first build a small rhizome. This rhizome stores water and energy before new shoots appear.
Do not keep pulling the cutting out to check roots. This can damage new growth. Wait patiently and watch for signs of firmness and new leaves.
Step 10: Decorate the Bottle Planter
Once the plant is stable, you can decorate the bottle. In the image, the planters are wrapped with rope, creating a warm rustic style. This makes recycled plastic look more natural and decorative.
Decoration Ideas
- Wrap with jute rope
- Use twine for a rustic look
- Paint the lower bottle
- Add a small label
- Place several bottles on a wooden tray
- Use fabric ribbon around the top edge
Watering ZZ Plants in Plastic Bottles
Watering is the most important part of ZZ plant care. ZZ plants store water in their rhizomes, so they prefer to dry out between waterings.
Watering Rule
Water only when the soil is completely dry. If you are not sure, wait a few more days.
Signs the Plant Needs Water
- Soil is fully dry
- Planter feels light
- Leaves look slightly dull
- Stems begin to wrinkle slightly
Signs of Overwatering
- Yellow leaves
- Mushy stem base
- Wet soil for many days
- Bad smell from the bottle
- Black or soft roots
- Leaves dropping suddenly
Best Light for ZZ Plants
ZZ plants are famous for tolerating low light, but they grow better in bright indirect light. If you want faster propagation and healthier leaves, give the plant more brightness without direct burning sun.
Good Light Conditions
- Bright indirect light
- Filtered window light
- Medium indoor light
- Grow light for dark rooms
Avoid These Conditions
- Hot direct sun through glass
- Dark corners with no natural light
- Cold windows in winter
- Clear bottles heating in strong sun
Can ZZ Plants Grow in Water?
ZZ plants can root in water, but they are often safer in well-draining soil once rooted. Water propagation is possible, but the cuttings can take a long time. If the water becomes dirty, stems may rot.
If you root ZZ in water, change the water weekly and keep the cutting in bright indirect light. Once roots and a small rhizome appear, move it to soil.
Stem Cutting vs Leaf Cutting
Stem Cutting
A stem cutting is faster and gives a fuller plant. It already has several leaves and can look decorative sooner.
Leaf Cutting
A leaf cutting is slower. It may take months to grow a rhizome and even longer to produce a new shoot. It is still a fun method, but patience is needed.
How Long Does ZZ Propagation Take?
ZZ plants grow slowly. Rooting can take several weeks to several months. New shoots may take even longer. Warm temperatures, bright indirect light, and correct watering can help, but there is no instant result.
Typical Timeline
- First few weeks: cutting settles
- 1 to 3 months: roots may begin forming
- 2 to 6 months: rhizome develops
- Several months later: new shoot may appear
Best Temperature for ZZ Cuttings
ZZ plants like warmth. Cold temperatures slow growth and can increase rot risk if the soil is wet.
- Best range: 65 to 80°F
- Best range: 18 to 27°C
- Avoid cold drafts
- Avoid frost
- Avoid placing near air conditioners
Humidity Needs
ZZ plants do not need high humidity. Average indoor humidity is fine. Do not mist often. Moist leaves and wet soil are not necessary for this plant.
Fertilizer for ZZ Plant Cuttings
Do not fertilize fresh cuttings immediately. Wait until the cutting has roots and shows new growth. Fertilizer does not create roots faster if the cutting is not ready.
Safe Feeding Routine After Growth Begins
- Use balanced houseplant fertilizer
- Dilute to half strength
- Feed once in spring
- Feed once in summer
- Do not feed in winter
- Do not fertilize wet or stressed cuttings
When to Move ZZ Cuttings to a Bigger Pot
Move the plant when roots fill the bottle, the plant becomes top-heavy, or new shoots need more space. Do not rush repotting. ZZ plants like a slightly snug pot.
Signs It Is Time to Repot
- Roots circle the bottle
- Soil dries too fast
- New shoots crowd the container
- Plant becomes unstable
- Bottle cracks or bends
How to Repot From Bottle to Pot
- Water lightly a day before repotting if soil is very dry.
- Gently squeeze the plastic bottle.
- Slide the plant out carefully.
- Do not break the rhizomes.
- Place into a pot with drainage holes.
- Use fast-draining soil.
- Wait a few days before watering heavily.
Common Problems
Cutting Turns Yellow
This often means too much water, low light, or stress. Check soil moisture first.
Stem Becomes Soft
A soft stem usually means rot. Remove the cutting and check the base. Save firm healthy sections if possible.
No Growth for Months
This is normal for ZZ plants. They may be building roots and rhizomes before sending up shoots.
Leaves Wrinkle
Wrinkled leaves may mean the cutting is too dry or roots are not developed yet. Water lightly, but do not soak.
Soil Smells Bad
Bad smell means the soil is staying too wet. Remove the plant, clean the bottle, and repot in fresh dry mix.
Root Rot Rescue
If your ZZ cutting starts to rot, act quickly.
Remove the cutting from the bottle.
Shake away wet soil.
Cut off mushy parts with clean scissors.
Keep only firm healthy sections.
Let the cut dry for 1 to 2 days.
Replant in fresh dry soil.
Water very lightly after several days.
Keep in bright indirect light.
Pests on ZZ Plants
ZZ plants are usually pest-resistant, but pests can still appear.
- Mealybugs
- Scale
- Spider mites
- Fungus gnats
Pest Care
- Isolate the plant.
- Wipe leaves with a damp cloth.
- Remove visible pests.
- Use insecticidal soap if needed.
- Let soil dry properly.
- Repeat treatment weekly until clear.
Continue to Page 2
Continue to page 2 for more details about this article and the key points many readers miss on the first page.