
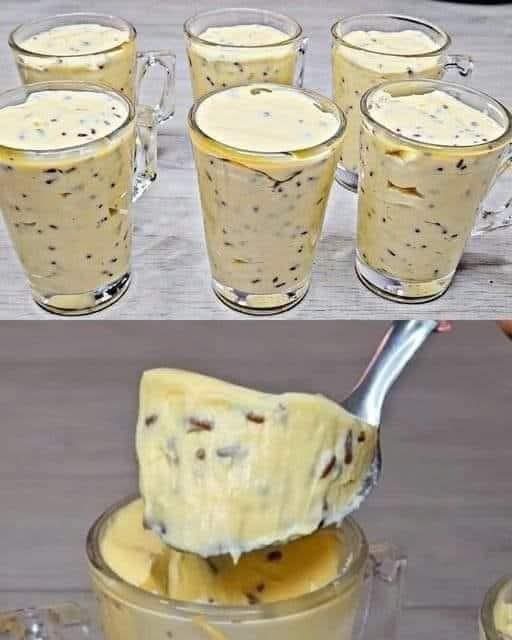
In a world of complicated baking recipes and lengthy ingredient lists, there’s something truly magical about a dessert that delivers incredible taste with almost zero effort. Imagine a dessert that’s impossibly rich, luxuriously smooth, and endlessly versatile, requiring no oven, no special skills, and just a handful of pantry staples. This isn’t a fantasy—it’s the reality of this simple creamy dessert, a foolproof formula that belongs in every home cook’s repertoire.
Whether you need a last-minute dessert for guests, a satisfying sweet treat after a weeknight dinner, or a fun cooking project with kids, this recipe is your saving grace. It’s the culinary equivalent of a blank canvas: a perfectly creamy, sweet base that you can dress up a hundred different ways. From fresh berries to espresso powder, from citrus zest to crushed cookies, your imagination is the only limit.
I call this “3-Ingredient Magic” because at its core, that’s all you need: cream, condensed milk, and vanilla. The optional powdered sugar and gelatin are just tools for fine-tuning texture and sweetness. This dessert is a celebration of simplicity, proving that you don’t need to be a pastry chef to create something truly delightful and impressive. Let’s whip up some magic.
Why This Is The Ultimate “Emergency” Dessert Recipe
Every cook needs a reliable, go-to recipe for unexpected moments, and this is it. It requires minimal ingredients you likely already have, comes together in under 15 minutes of active work, and needs only a few hours to chill. There’s no risk of over-baking, under-proofing, or complicated techniques. It’s a guaranteed crowd-pleaser that looks far more sophisticated than the effort suggests, making it the perfect secret weapon for smart hosts and busy families alike.
The Simple Science: How Three Ingredients Create Perfection
The elegance of this dessert lies in its ingredient synergy:
· Heavy Cream: When whipped, it traps air bubbles, creating a light, airy structure and rich mouthfeel.
· Sweetened Condensed Milk: This is the sweetener and the stabilizer. Its thick, syrupy consistency sweetens the cream perfectly and helps maintain the whipped structure, preventing it from collapsing or weeping liquid.
· Vanilla Extract: The flavor enhancer that provides a warm, aromatic depth, elevating the dessert from simple sweet cream to a gourmet treat.
Your Minimalist Ingredient List, Explained
The Core Trinity:
· Heavy Cream (or Whipping Cream): Must be cold. The high fat content (36% or more) is essential for it to whip up into stiff, stable peaks.
· Sweetened Condensed Milk: Not to be confused with evaporated milk. It provides the sweetness and body.
· Pure Vanilla Extract: For the best flavor, avoid artificial imitation vanilla.
The Supporting Cast (Optional but Recommended):
· Powdered Sugar: Adds a slight extra sweetness and can help stabilize the cream further.
· Gelatin: The secret for a mousse-like, sliceable texture. A tiny amount, dissolved properly, transforms the dessert from a soft cream into a firm, elegant parfait or pie filling.
· Garnishes: This is where personality shines—fresh fruit, shaved chocolate, toasted nuts, crushed candy, or a drizzle of caramel.
The Non-Negotiable First Step: Chilling Everything
Success starts with cold. The bowl, the beaters, and especially the cream must be thoroughly chilled (at least 30 minutes in the fridge, or 15 in the freezer). Cold fat whips better and faster, incorporating more air and reducing the risk of over-whipping into butter. This is the single most important tip for perfect texture.
- Step-by-Step: Mastering the Whip and Fold
- Whip to Soft Peaks: In your chilled bowl, whip the cold cream on medium-high speed until it thickens and the beaters leave a trail. When you lift the beater, the peak should form and then gently curl over—this is the “soft peak” stage. Do not whip to stiff peaks yet.
- The Gentle Fold: Add the condensed milk, vanilla, and powdered sugar (if using). Now, switch to a spatula. Folding—a gentle, turning-over motion—is crucial here. It preserves the air you just whipped into the cream. Mix until just combined and smooth. If you continue beating with the mixer, you risk over-whipping.
- The Gelatin Key: How to Use It for a Perfect Set (Optional)
For a dessert that holds its shape perfectly for pies or layered glasses, gelatin is a game-changer.
- Sprinkle the 1/2 tsp gelatin over 2 tablespoons of cold water in a small dish. Let it “bloom” for 5 minutes until it looks like wet sand.
- Microwave for 5-10 seconds OR place the dish in a pan of simmering water until it becomes a clear liquid. Let it cool slightly (1 minute).
- Take a spoonful of your creamy mixture and vigorously whisk it into the liquid gelatin. This tempers it. Then, fold this combined mixture back into the main bowl. This ensures the gelatin distributes evenly without forming lumps.
- Chilling & Setting: Patience Makes Perfect
Transfer the creamy mixture to your desired serving dishes: elegant glasses, a large trifle bowl, or a prepared graham cracker crust for a no-bake pie. Cover with plastic wrap (letting it touch the surface prevents a skin from forming) and refrigerate for at least 2 hours, but ideally 4-6 or overnight. This allows the flavors to meld and the structure to firm up beautifully.
Garnish Like a Pro: Presentation Ideas That Wow
The garnish is your finishing touch. Apply it just before serving for maximum freshness and texture contrast.
· Fresh & Fruity: Berries, mango chunks, sliced peaches, or a mint sprig.
· Chocolate Lover’s Dream: Chocolate shavings, cocoa powder, chocolate sauce drizzle, or crushed Oreos.
· Nutty & Crunchy: Toasted almond slices, chopped pistachios, or caramelized pecans.
· Festive Flair: A sprinkle of espresso powder, citrus zest, crushed peppermint, or edible flowers.
Pro Tips for a Flawless Dessert Every Single Time
· Watch the Cream: Over-whipped cream becomes grainy, then turns to butter. Stop at soft peaks before adding the condensed milk.
· Taste as You Go: Condensed milk sweetness can vary. Fold, then taste. You can add a touch more powdered sugar or vanilla if desired.
· Use Full-Fat: Low-fat cream or milk alternatives will not whip properly. For the right texture, full-fat heavy cream is non-negotiable.
· Layer for Drama: In clear glasses, alternate the cream with layers of fruit compote, crumbled cake, or cookie crumbs for a stunning parfait effect.
- 5 Incredible Flavor Variations to Try Immediately
- Lemon Berry Bliss: Add 2 tbsp lemon zest and 1 tbsp lemon juice to the base. Layer with a quick berry compote.
- Salted Caramel Pretzel: Fold in 1/3 cup salted caramel sauce. Garnish with crushed salted pretzels.
- Tropical Coconut: Use 1 tsp coconut extract instead of vanilla. Fold in 1/2 cup toasted coconut flakes.
- Mocha Chip: Dissolve 1 tbsp instant espresso powder into the condensed milk before folding. Add 1/4 cup mini chocolate chips.
- Cookies & Cream: Fold in 1 cup of finely crushed Oreo cookies (filling included).
- Make-Ahead & Storage Secrets
This is a perfect make-ahead dessert. It can be prepared, covered, and stored in the refrigerator for up to 3 days. The flavors improve, though the texture is best within the first 48 hours. It does not freeze well, as thawing will cause it to separate and become watery.
FAQs: Your Creamy Dessert Questions Answered
Q: Can I use regular milk instead of cream?
A:No. Milk does not contain enough fat to whip and hold air. The dessert will not set.
Q: My mixture is runny. What happened?
A:The cream was likely not cold enough, was under-whipped, or the dish wasn’t chilled long enough. Next time, ensure everything is ice-cold and chill the final product for a minimum of 4 hours.
Q: Is there a dairy-free alternative?
A:Yes, but results vary. Use full-fat coconut cream (chilled, solid part only) and sweetened condensed coconut milk. Whip the cold coconut cream first, then fold in the condensed coconut milk.
Q: Can I make this without an electric mixer?
A:It is possible with a very strong whisk and a lot of elbow grease, but an electric mixer or stand mixer is highly recommended to achieve the right texture efficiently.
- Serving Suggestions: The Perfect Occasion
This dessert is incredibly versatile. Serve it as:
· A light summer patio dessert in individual cups.
· A holiday potluck contribution in a large bowl.
· The filling for a no-bake pie in a chocolate cookie crust.
· A fancy dinner party finale with an elegant garnish.
- Why This Recipe Beats Store-Bought Desserts
Homemade means you control the quality of ingredients, the level of sweetness, and avoid preservatives and artificial flavors. The texture is fresher, lighter, and infinitely more satisfying than any pre-packaged mousse or pudding. It’s real food, made with love, in minutes.
The Final Scoop: Your Journey to Effortless Desserts Starts Now
This simple creamy dessert is more than a recipe; it’s a foundation for confidence in the kitchen. It demonstrates that incredible taste doesn’t require complexity. It’s a reminder to enjoy the process and share the delicious results.
So, the next time a sweet craving strikes or guests are on their way, remember this three-ingredient magic. Whip it up, customize it, and get ready to accept the compliments for your “complicated” homemade dessert. Your secret is safe with us.
Recipe Card: 3-Ingredient No-Bake Cream Delight
Yield: 6 Servings Prep Time: 15 mins Chill Time: 2+ hours Total Time: 2 hours 15 mins
Ingredients
· 2 cups (480 ml) heavy cream or whipping cream, VERY cold
· 1/2 cup (120 ml) sweetened condensed milk
· 1 teaspoon pure vanilla extract
· 1/4 cup (30g) powdered sugar (optional, for extra sweetness)
· 1/2 teaspoon unflavored gelatin, dissolved in 2 tbsp water (optional, for a firmer set)
· Fresh fruit, chocolate shavings, or nuts, for garnish
Instructions
- Chill: Ensure cream, mixing bowl, and beaters are thoroughly chilled (30 mins in fridge).
- Whip Cream: In the chilled bowl, whip the cold cream with an electric mixer until soft peaks form.
- Combine: Gently fold in the condensed milk, vanilla, and powdered sugar (if using) with a spatula until just combined and smooth.
- Add Gelatin (Optional): If using, dissolve gelatin in water, melt, cool slightly, and fold into the cream mixture.
- Chill: Divide mixture among serving glasses or a bowl. Cover and refrigerate for at least 2 hours, preferably 4-6.
- Serve: Garnish with your favorite toppings just before serving.
Did you create your own signature version of this easy dessert? Share a photo of your beautiful creation and your favorite flavor twist in the comments below! Don’t forget to save this recipe for your next dessert emergency.
More Recipes You Might Like
-
The Easy Garden Hack That Guarantees Straight, Healthy Carrots
Say goodbye to crooked, stunted carrots! Discover the simple seed paste hack that ensures perfect spacing and straight roots. This easy planting technique will transform your carrot harvest. Let me tell you about the gardening trick that turned my carrot patch from a tangle of twisted roots into a picture-perfect harvest. I love growing carrots.…
-

Grow 3X More Sweet Potatoes at Home with This Simple Soil Bag Trick
Want to grow 3 times more sweet potatoes in a small space? This clever soil bag trick is a game-changer. Learn how to plant sweet potatoes in bags for a massive harvest—perfect for small gardens and patios. Let me tell you about the gardening trick that turned my tiny patio into a sweet potato factory.…