Chocolate Swiss roll cakes are the perfect blend of soft, fluffy cake and creamy filling, all wrapped up in a beautiful spiral. Whether you’re a novice baker or a seasoned pro, this recipe will guide you through the process of creating a show-stopping dessert that will wow your family and friends. In this blog post, we’ll walk you through every step of making this delicious chocolate Swiss roll, from gathering your ingredients to serving it up at the table.
1. Why You’ll Love This Chocolate Swiss Roll Cake
There’s something undeniably indulgent about the combination of chocolate cake and creamy filling. The cake is soft yet perfectly structured, with just the right amount of sweetness. When rolled up with the luscious filling, it creates an irresistible treat. Here are a few reasons why you’ll love this recipe:
Easy to make: The process is simple, even for beginners, as the steps are straightforward.
Perfect for any occasion: It’s ideal for birthdays, holidays, or just an afternoon treat.
Customizable: You can add fruit or different fillings to make it your own.
2. Ingredients You’ll Need for the Cake
To create the perfect chocolate Swiss roll cake, you’ll need the following ingredients:
For the Cake:
¾ cup all-purpose flour
1½ cup unsweetened cocoa powder
1 tsp salt
4 large eggs
⅔ cup granulated sugar
2 tbsp milk
2 tbsp vegetable oil
For the Filling:
1 cup heavy cream
1½ tsp powdered sugar
For the Topping:
Chocolate syrup (as desired)
3. The Equipment You’ll Need
Before diving into the recipe, make sure you have all the necessary equipment on hand. Here’s what you’ll need:
Mixing bowls – For combining the dry and wet ingredients.
Electric mixer – A hand or stand mixer will be required to whisk the egg mixture to perfection.
Sifter – For sifting the cocoa powder and flour together.
Baking sheet – A rimmed sheet to bake the cake on.
Parchment paper – To line the baking sheet for easy removal of the cake.
Cooling rack – To cool the cake evenly after baking.
Spatula – For spreading the cream filling.
Sharp knife – To slice the cake after rolling.
4. Preparing the Cake Batter
Start by preparing your cake batter. Begin by preheating your oven to 350°F (175°C) and lining a 15×10-inch baking sheet with parchment paper. Sifting the cocoa powder, flour, and salt together in a medium-sized bowl ensures there are no lumps in your dry ingredients, giving your cake the smooth texture it deserves.
In a separate bowl, whisk the eggs and sugar together using an electric mixer. Beat until the mixture becomes light and fluffy, which should take about 5-7 minutes. This process is essential for creating a soft and airy sponge.
Once the egg mixture is ready, fold in the dry ingredients carefully, followed by the milk and vegetable oil. Gently mix until just combined.
5. Baking the Cake
After preparing the batter, pour it into the prepared baking sheet. Use a spatula to spread it evenly, ensuring that the batter reaches all corners of the sheet. Bake the cake for 10-12 minutes or until it’s fully cooked through. The cake is done when it bounces back slightly when touched.
Once out of the oven, immediately invert the cake onto a clean kitchen towel that has been dusted with powdered sugar. Peel off the parchment paper and begin rolling the cake gently while it’s still warm. Let it cool in this rolled position for about 15 minutes to help maintain the shape.
6. Preparing the Cream Filling
While the cake is cooling, it’s time to prepare the filling. Place the heavy cream in a chilled mixing bowl and add the powdered sugar. Using an electric mixer, beat the cream until it forms soft peaks. You want the cream to be thick but still spreadable. Be careful not to overwhip it, as it could turn into butter.
7. Unrolling the Cake and Adding the Filling
Once your cake has cooled slightly, carefully unroll it from the towel. The cake should have maintained its shape and shouldn’t crack. Spread an even layer of whipped cream over the entire surface, making sure to cover all the edges. Leave a small border around the edges to prevent the filling from spilling out when you roll the cake back up.
8. Rolling the Cake Back Up
Now that the filling is evenly spread, it’s time to roll the cake back up. Start from one edge, using the parchment paper as a guide. Roll it up tightly, ensuring that it forms a perfect swirl. Be gentle as you roll to prevent cracking, but make sure it’s tight enough so that the filling doesn’t spill out.
Once rolled, place the Swiss roll seam-side down on a serving platter and allow it to set in the refrigerator for at least 30 minutes. This will help the shape hold, and the filling will firm up.
9. Decorating Your Swiss Roll
After chilling, it’s time for the fun part – decorating! Drizzle chocolate syrup over the top of the rolled cake to create an eye-catching design. You can be as creative as you like, or keep it simple with a classic drizzle.
If you want to take it a step further, you can sprinkle the top with some extra cocoa powder, or even dust the sides with powdered sugar for a touch of elegance.
10. Serving and Enjoying Your Cake
Once your cake is fully decorated, slice it into individual servings and enjoy! This chocolate Swiss roll is perfect for any occasion, whether it’s a birthday party, an afternoon tea, or a family dinner. The light, fluffy texture paired with the creamy filling makes it an irresistible dessert that everyone will love.
11. Tips for Making the Perfect Swiss Roll Cake
Use a serrated knife to slice the cake into perfect portions. This will prevent the cake from squashing and help you achieve smooth, clean cuts.
Chill the cake before serving – This allows the filling to firm up and helps the roll maintain its shape.
Try adding fruits or different fillings – You can mix things up by adding strawberries, raspberries, or even a layer of custard in addition to the cream.
Store leftovers properly – Keep the Swiss roll in an airtight container in the fridge for up to 2 days. It may lose a bit of its texture but will still taste delicious.
12. Conclusion: Why This Chocolate Swiss Roll Cake is a Must-Try
This chocolate Swiss roll cake recipe is a fun and rewarding bake that will surely impress anyone who gets to taste it. Its delicate, light texture and creamy filling make it a perfect dessert for any celebration. With just a few simple ingredients, you can create a masterpiece that’s both visually stunning and mouth-wateringly delicious.
Whether you’re baking for a special occasion or just looking to treat yourself, this chocolate Swiss roll cake will not disappoint. So, gather your ingredients, follow the steps carefully, and get ready to enjoy one of the most delightful cakes you’ve ever made!
More Recipes You Might Like
-

Christmas Cactus Care Guide: How to Use Lemon Water Safely Without Damaging Roots, Buds, or Beautiful Winter Blooms
Christmas cactus is one of the most charming flowering houseplants because it brings color at a time when many other indoor plants are quiet. Its flat green segments, arching shape, and bright flowers make it perfect for windowsills, shelves, hanging baskets, and cozy rooms. When the plant is healthy, the tips can fill with buds…
-

Christmas Cactus Care Guide: How to Grow a Full Hanging Basket With Healthy Segments, Strong Buds, and Bright Flowers
Christmas cactus is one of the most loved flowering houseplants because it can turn a quiet indoor corner into a bright display of color. Its soft green segmented stems hang gracefully over the edge of a pot, and when the plant is happy, the tips fill with buds that open into beautiful flowers. Many people…
-

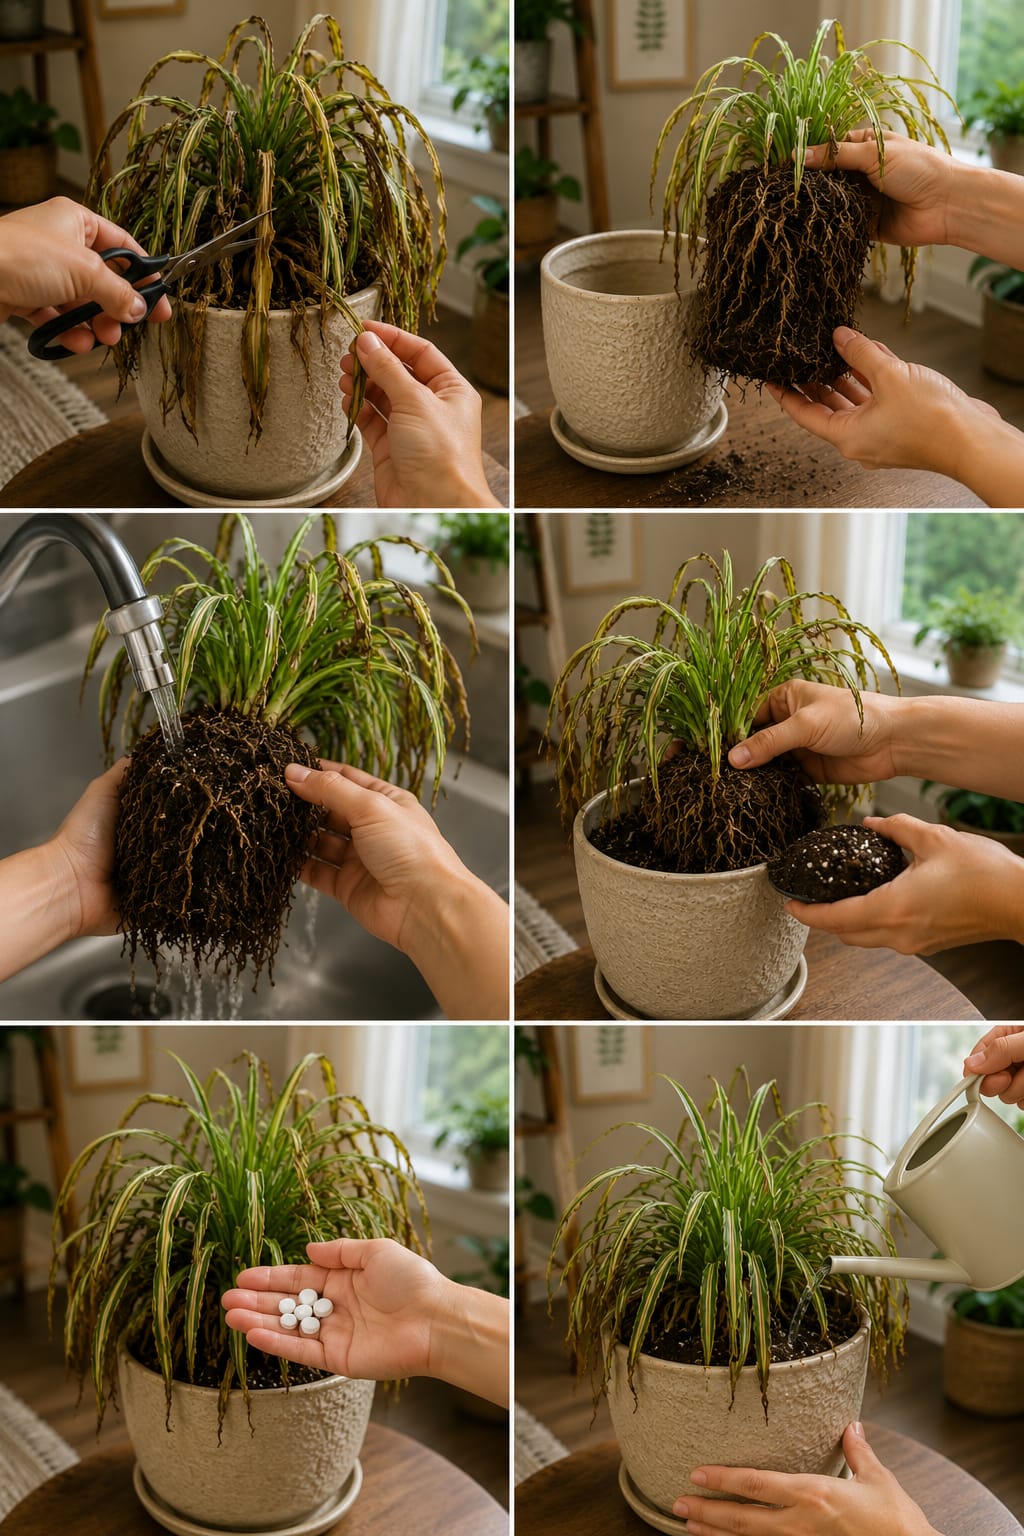
Spider Plant Rescue Guide: How to Revive a Tired Spider Plant With Pruning, Root Care, Fresh Soil, and Safe Watering
Spider plants are usually known as easy, forgiving, and fast-growing houseplants, but even this strong plant can begin to look tired when its roots, soil, water, and light are out of balance. The image shows a struggling spider plant with drooping leaves, brown tips, dry edges, and weak growth being rescued step by step. The…