There are some recipes that carry with them more than just the taste of delicious food; they bring with them memories of family, laughter, and the warmth of being together. One such recipe is Peanut Butter Balls, a treat many of us remember from childhood holiday parties. For those who’ve been lucky enough to taste them, they’re more than just a sweet snack—they are a cherished tradition.
Recently, you might have come across a recipe or perhaps a photo that took you back in time, bringing with it the same warmth and comfort that only grandma’s cooking could provide. For many, this Peanut Butter Ball recipe is that memory—a recipe that’s passed down through generations and one that’s impossible to forget.
Whether it’s the creamy peanut butter center covered in smooth chocolate or the pure joy of sneaking a few more when no one is watching, this treat holds a special place in our hearts. Let’s dive into how you can recreate this delicious holiday treat that has been a part of your family’s traditions, and perhaps make some new memories along the way.
1. The Heartwarming History of Peanut Butter Balls
For many, Peanut Butter Balls have been a holiday staple for years. Originally, they were likely introduced as a quick, no-bake treat that would satisfy the sweet tooth while keeping up with the hustle and bustle of the holiday season. Often, these little morsels of joy would be placed alongside fudge, cookies, and other holiday treats, making their way onto dessert trays at family gatherings, holiday parties, and festive events.
There’s something so special about the combination of peanut butter and chocolate—two ingredients that have stood the test of time in the world of desserts. The balance of creamy, salty peanut butter and the richness of chocolate is a flavor combination that’s hard to beat. Add in a little nostalgia from childhood memories, and you’ve got the perfect holiday treat.
2. The Ingredients You’ll Need for Peanut Butter Balls
Making these peanut butter balls is easy, and you probably already have most of the ingredients in your kitchen. Here’s what you’ll need to recreate the sweet, nostalgic treat that your grandma used to make:
1 cup creamy peanut butter: The base of this treat is creamy peanut butter, which gives the balls their smooth texture and rich flavor.
1 cup powdered sugar: This helps sweeten the peanut butter filling and gives the balls that melt-in-your-mouth consistency.
1 ½ cups crushed graham crackers: This adds texture and helps bind the peanut butter and sugar together.
1 ½ cups milk chocolate chips: For coating, milk chocolate works best for that sweet, smooth covering, but dark chocolate can also be used for those who prefer a slightly more bitter flavor.
1-2 tablespoons of vegetable shortening: This helps the chocolate melt smoothly and coat the peanut butter balls evenly.
3. How to Make Peanut Butter Balls: Step-by-Step Instructions
Making Peanut Butter Balls is easy and fun—perfect for getting the whole family involved! Here’s how you can recreate this classic treat from scratch:
Step 1: Mix the Peanut Butter Filling
In a medium-sized mixing bowl, combine the peanut butter and powdered sugar. Start by adding the powdered sugar slowly and mixing with a spoon or your hands until it’s well incorporated. The mixture will start to come together and form a thick, sweet dough. Once mixed, add the crushed graham crackers. The graham crackers give the filling a nice texture and enhance the flavor.
Step 2: Form the Balls
Once the filling is ready, it’s time to shape the peanut butter balls. Use a spoon or your hands to roll small amounts of the mixture into balls about 1 to 1 ½ inches in diameter. Place the balls on a baking sheet lined with wax paper or parchment paper. Make sure to leave a little space between the balls to prevent them from sticking together while they chill.
Step 3: Chill the Peanut Butter Balls
After forming the balls, place the tray in the refrigerator for at least 30 minutes. Chilling the balls will help them firm up, making them easier to dip in the melted chocolate later.
Step 4: Melt the Chocolate
While the peanut butter balls are chilling, it’s time to melt the chocolate. Place the chocolate chips and vegetable shortening in a heatproof bowl. You can melt the chocolate using a microwave or a double boiler. If you’re using a microwave, heat the mixture in 20-30 second intervals, stirring after each round until fully melted and smooth. If you’re using a double boiler, heat the chocolate over simmering water while stirring until it melts completely.
Step 5: Dip the Peanut Butter Balls
Once the peanut butter balls have chilled and the chocolate is ready, it’s time to dip! Using a fork or toothpick, carefully dip each peanut butter ball into the melted chocolate, covering it completely. Let any excess chocolate drip off, and then return the chocolate-coated balls to the tray.
Step 6: Set the Peanut Butter Balls
Once all the balls are coated, place the tray back into the refrigerator for another 30 minutes to allow the chocolate coating to set. Afterward, your peanut butter balls will be ready to serve!
4. Storing and Serving Peanut Butter Balls
Once the peanut butter balls are set, they can be stored in an airtight container in the refrigerator for up to a week. If you want to keep them longer, you can freeze them for up to 2-3 months. Just make sure to separate the layers of peanut butter balls with wax paper to prevent them from sticking together.
When serving, you can arrange the peanut butter balls on a decorative plate or in festive boxes as holiday gifts for friends and family. These treats are perfect for sharing during holiday parties, or just as a special sweet snack to enjoy with loved ones.
5. Why These Peanut Butter Balls Are a Family Favorite
The magic of these peanut butter balls goes beyond their taste. It’s about the memories they evoke. For many, these treats were a holiday tradition passed down through the generations. The smell of chocolate and peanut butter melting together is enough to take you back to childhood memories, reminding you of the joy of family gatherings, laughter, and the sweet indulgence of sneaking a treat or two before anyone noticed.
Whether you’re making these for a holiday celebration or just because you want to recreate an old family tradition, Peanut Butter Balls are the perfect way to bring everyone together. They’re simple, delicious, and a true guilty pleasure that will always have a special place in your heart.
6. Variations You Can Try with Peanut Butter Balls
While the classic version of these peanut butter balls is unbeatable, there are several ways you can mix things up to make them even more fun and creative! Here are a few variations to try:
Dark Chocolate Coating: For those who love a richer, slightly bitter flavor, you can dip the balls in dark chocolate instead of milk chocolate.
Add Nuts: Add chopped peanuts or almonds to the peanut butter filling for extra crunch and flavor.
Holiday Spice: Add a dash of cinnamon, nutmeg, or even a little bit of pumpkin spice to the filling for a warm, festive twist.
Swirls of White Chocolate: For an extra decadent touch, drizzle white chocolate over the milk chocolate coating for a beautiful, sweet contrast.
7. Why This Recipe Will Make Your Heart Happy
Sometimes, the simplest things can bring the most joy—especially when they are tied to memories of loved ones. Recreating this peanut butter ball recipe is more than just about making a treat; it’s about bringing a bit of the past into the present, reliving memories of family gatherings, and sharing those traditions with the next generation.
As you bite into these smooth, chocolate-covered peanut butter balls, you’re not just savoring a delicious treat—you’re savoring a part of your family’s story, passed down through time and made anew with every batch.
Conclusion:
There’s nothing quite like the sweet satisfaction of biting into a Peanut Butter Ball, with its creamy peanut butter center and smooth chocolate coating. Whether it’s a holiday tradition, a guilty pleasure, or just a way to share a little love with friends and family, these treats will always have a special place in your heart. So, go ahead—make the recipe, share the joy, and create some new memories while enjoying the old ones.
More Recipes You Might Like
-

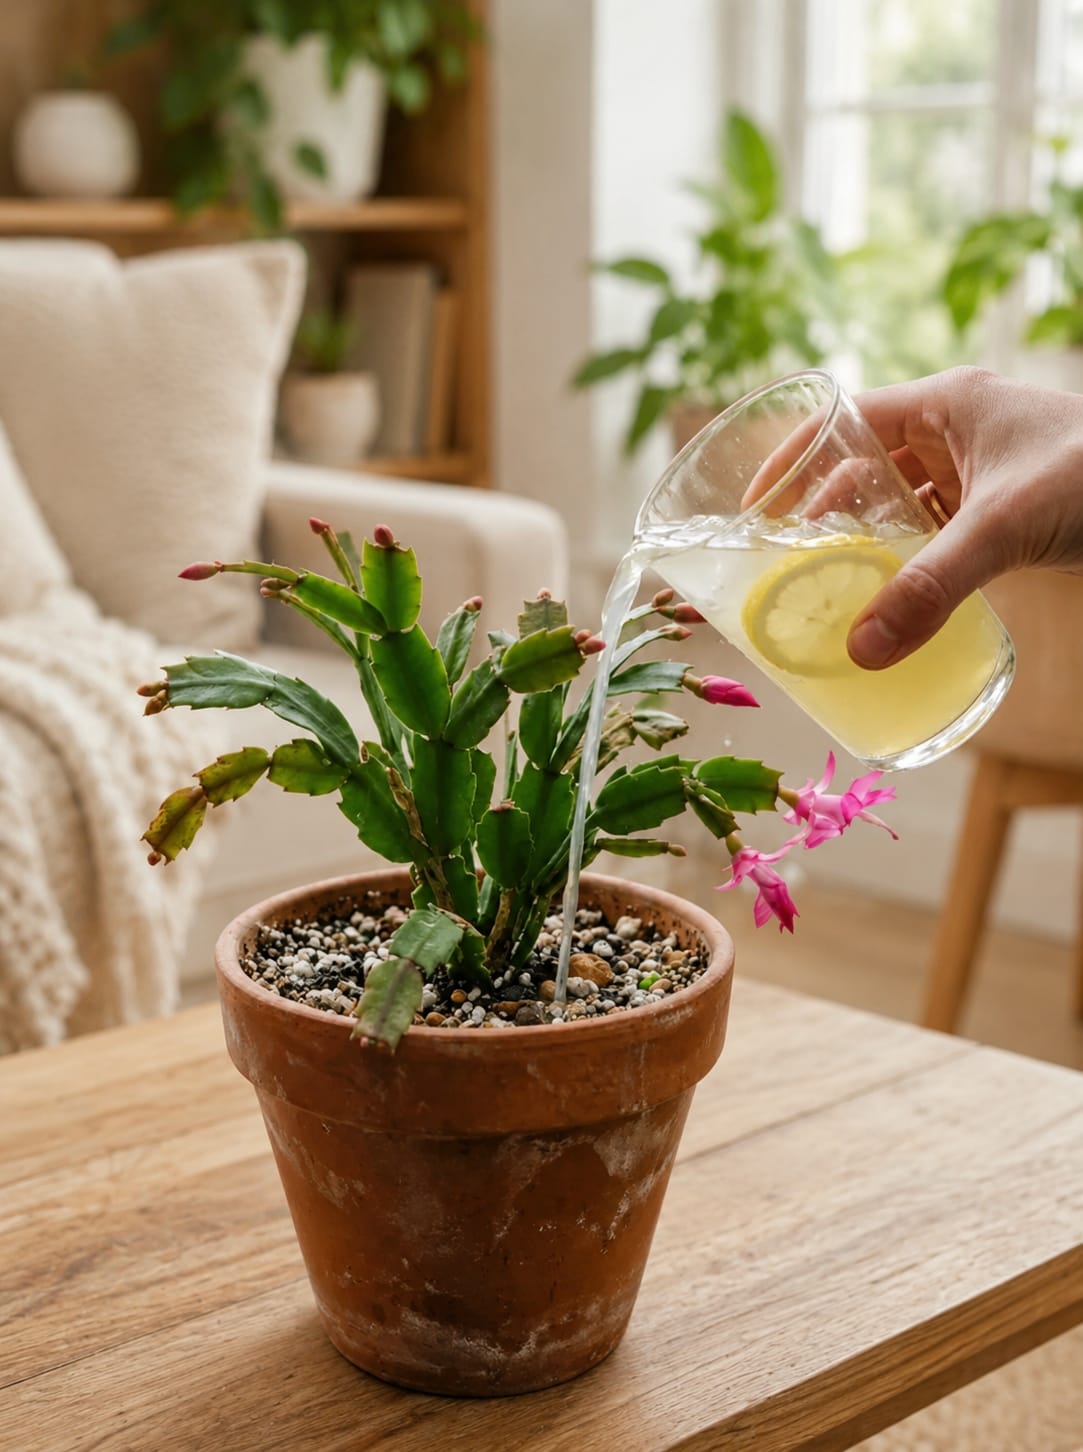
Christmas Cactus Care Guide: How to Use Lemon Water Safely Without Damaging Roots, Buds, or Beautiful Winter Blooms
Christmas cactus is one of the most charming flowering houseplants because it brings color at a time when many other indoor plants are quiet. Its flat green segments, arching shape, and bright flowers make it perfect for windowsills, shelves, hanging baskets, and cozy rooms. When the plant is healthy, the tips can fill with buds…
-

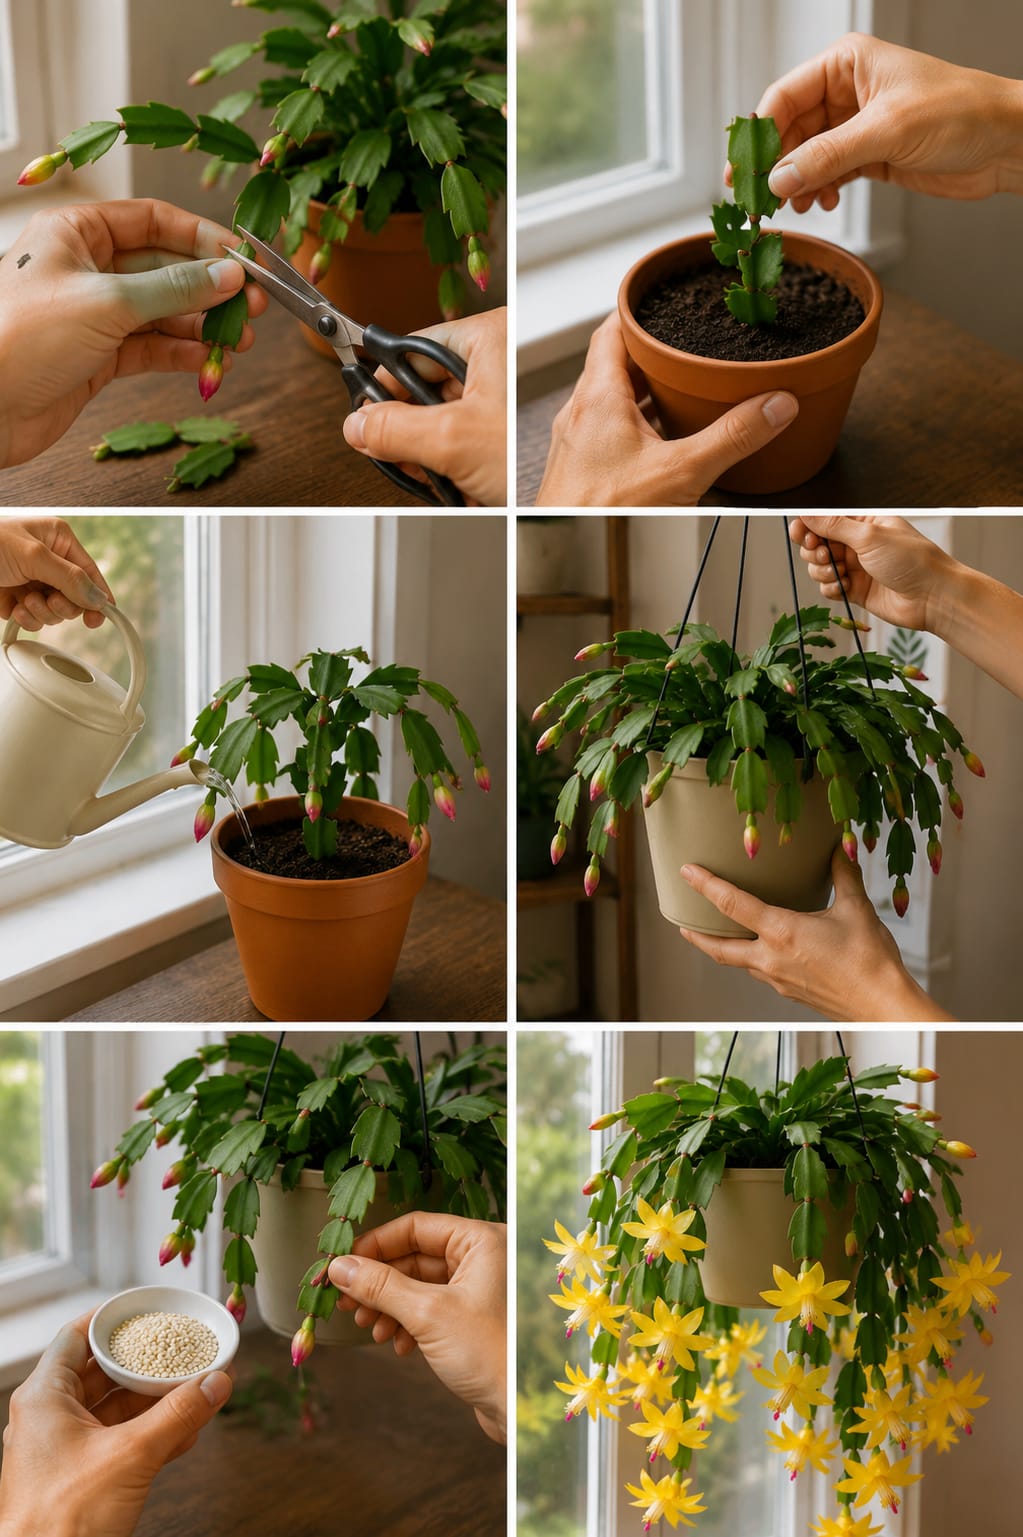
Christmas Cactus Care Guide: How to Grow a Full Hanging Basket With Healthy Segments, Strong Buds, and Bright Flowers
Christmas cactus is one of the most loved flowering houseplants because it can turn a quiet indoor corner into a bright display of color. Its soft green segmented stems hang gracefully over the edge of a pot, and when the plant is happy, the tips fill with buds that open into beautiful flowers. Many people…
-

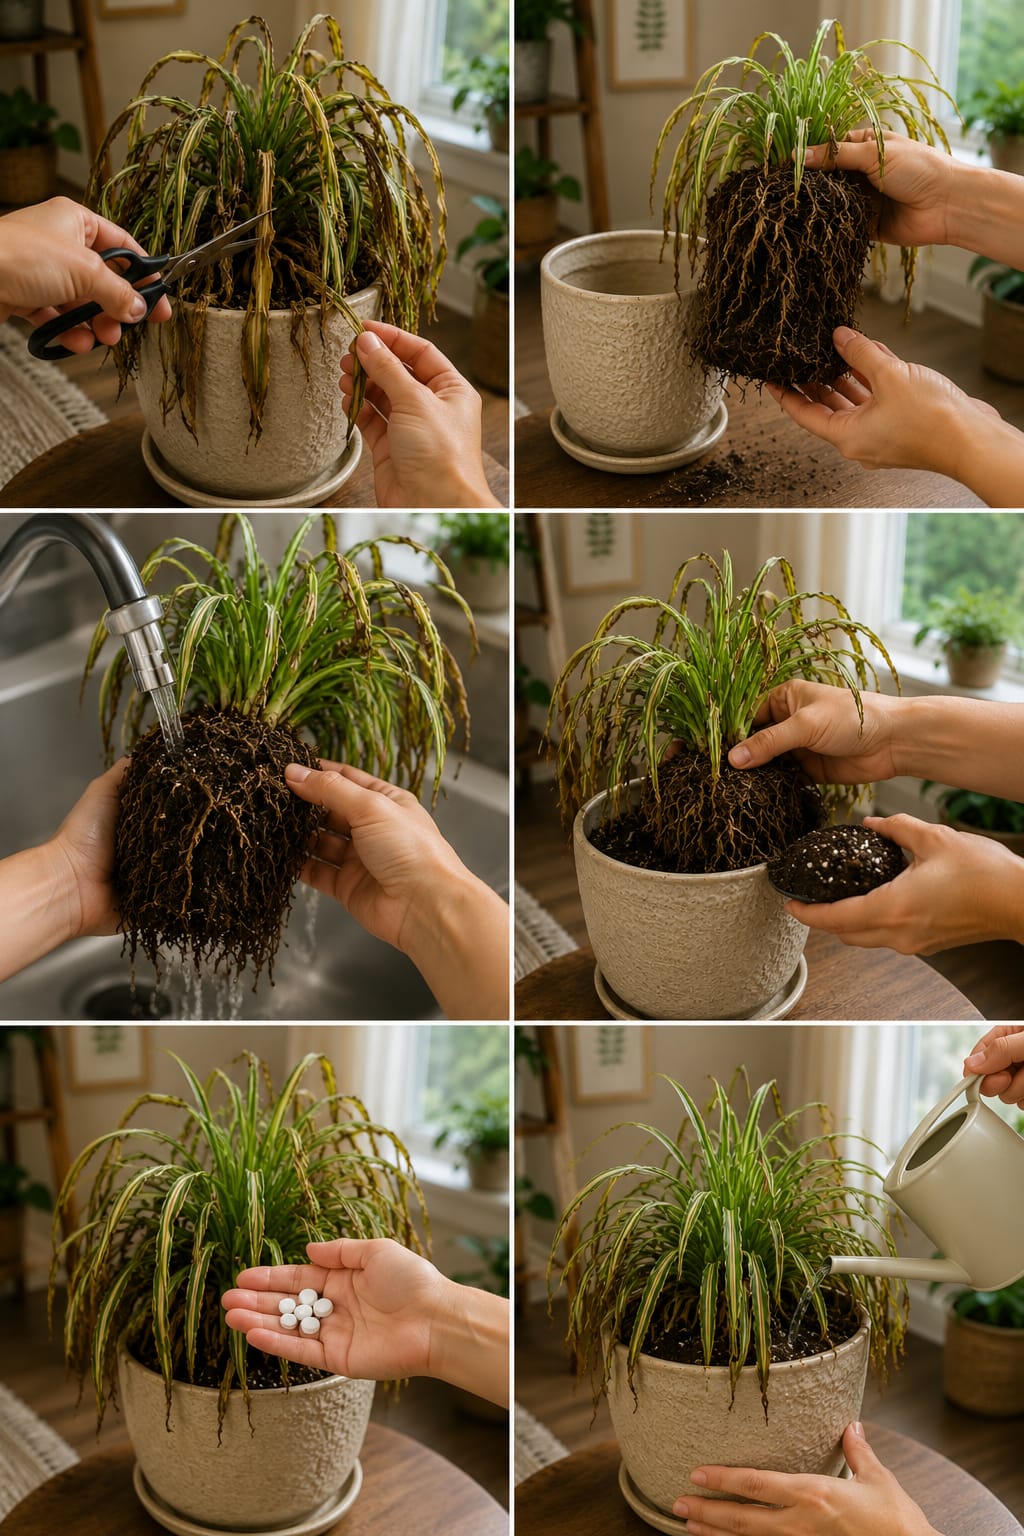
Spider Plant Rescue Guide: How to Revive a Tired Spider Plant With Pruning, Root Care, Fresh Soil, and Safe Watering
Spider plants are usually known as easy, forgiving, and fast-growing houseplants, but even this strong plant can begin to look tired when its roots, soil, water, and light are out of balance. The image shows a struggling spider plant with drooping leaves, brown tips, dry edges, and weak growth being rescued step by step. The…