This easy-to-make diabetic-friendly cake is smooth, creamy, and melts in your mouth, perfect for satisfying your sweet tooth without the sugar overload.
Finding a dessert that satisfies a craving for something sweet while being mindful of sugar intake can be a challenge. This diabetic-friendly cake is a game-changer. It’s made with low-carb ingredients, sugar substitutes, and delicious flavors that won’t spike your blood sugar levels. Best of all, it’s super quick to make!
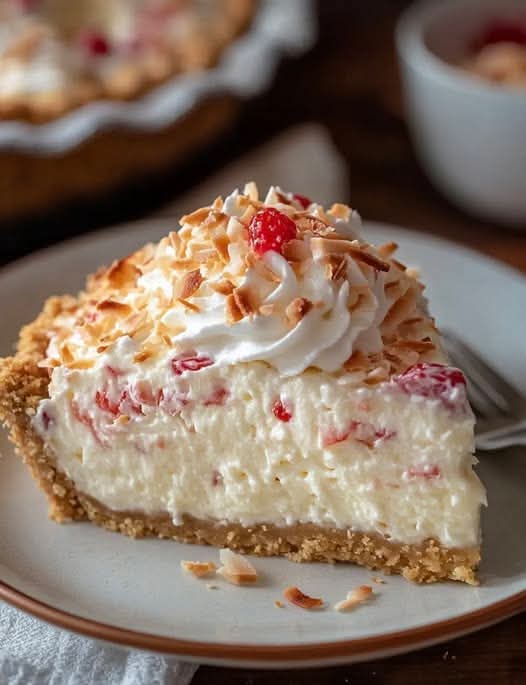
This no-bake cake has a smooth, creamy filling and a crunchy, diabetic-friendly crust that will melt in your mouth. The cake is also customizable with different flavors like fruit or chocolate, but the base recipe is as simple and indulgent as it gets.
Whether you’re looking for a dessert for yourself or something to share with others who are watching their sugar intake, this cake is sure to please everyone. Let’s dive into how to make this delicious treat!
2. Ingredients
For the Crust:
1 ½ cups almond flour (a low-carb alternative to regular flour)
2 tablespoons unsweetened coconut flakes (optional, for added flavor)
2 tablespoons melted butter
1 tablespoon stevia or monk fruit sweetener (to taste)
For the Creamy Filling:
8 ounces cream cheese, softened
1 cup heavy whipping cream
2 tablespoons stevia or monk fruit sweetener (adjust to taste)
1 teaspoon vanilla extract
1 teaspoon lemon zest (optional, for a refreshing flavor)
½ cup sugar-free fruit preserves or fresh berries (optional, for topping)
3. Equipment Needed
| Equipment | Purpose |
|---|---|
| Mixing bowl | For combining crust and filling ingredients. |
| Hand mixer or stand mixer | For whipping the filling until smooth. |
| Pie or tart pan | For assembling the cake. |
| Measuring cups & spoons | For accurate ingredient measurements. |
| Spatula or spoon | For spreading the filling evenly. |
| Cooling rack | To help the cake set if needed (though this cake can be eaten immediately after prep). |
4. Step-by-Step Instructions
Step 1: Prepare the Crust
Mix the crust ingredients: In a bowl, combine the almond flour, unsweetened coconut flakes, melted butter, and sweetener. Stir until everything is fully incorporated and the mixture has a crumbly texture.
Press into the pan: Transfer the crust mixture to a pie pan or tart pan. Use your fingers or the back of a spoon to press it down evenly to form a smooth base.
Set the crust: Refrigerate the crust while you make the filling. This helps it firm up and set, making it easier to slice once the cake is assembled.
Step 2: Prepare the Creamy Filling
Beat the cream cheese: In a mixing bowl, beat the cream cheese until smooth and free of lumps. You can use a hand mixer or stand mixer for this.
Add the sweetener and vanilla: Add the sweetener, vanilla extract, and lemon zest (if using). Beat until combined and smooth.
Whip the cream: In a separate bowl, whip the heavy cream until soft peaks form. You can use an electric mixer or whisk by hand.
Fold the cream into the cream cheese: Gently fold the whipped cream into the cream cheese mixture until fully combined. The filling should be thick, creamy, and light.
Step 3: Assemble the Cake
Spread the filling: Spoon the creamy filling over the chilled crust and spread it evenly with a spatula.
Chill the cake: Refrigerate the assembled cake for at least 2 hours to allow the flavors to meld and the filling to firm up. If you’re short on time, you can serve it right away, but chilling it will improve the texture.
Optional topping: Before serving, you can top the cake with sugar-free fruit preserves or fresh berries for added flavor and decoration.
Step 4: Serve and Enjoy
Once chilled, slice the cake into pieces and serve immediately. The crust will have a slight crunch, and the creamy filling will melt in your mouth.
Enjoy your diabetic-friendly cake guilt-free!
5. Tips for the Perfect Diabetic-Friendly Cake
Choose the right sweetener: Since this is a diabetic-friendly recipe, make sure you use a sugar substitute that suits your dietary needs, such as stevia, monk fruit sweetener, or erythritol. These alternatives won’t spike blood sugar.
Make it your own: You can add different flavors to the filling by using cocoa powder for a chocolate version or cinnamon for a warm, spicy touch.
Use a firm cream cheese: Ensure that the cream cheese is fully softened so it blends well with the other ingredients. You can also use light cream cheese for a slightly lighter version.
Serve chilled: This cake is best served after it has been refrigerated for a few hours, as the filling sets and becomes smoother and more cohesive.
Customize the crust: Feel free to experiment with the crust by adding a pinch of cinnamon or using ground walnuts or pecans instead of coconut flakes for added flavor.
6. Variations of Diabetic-Friendly Cake
While the base recipe is simple and delicious, here are some variations to consider:
1. Chocolate Diabetic-Friendly Cake
Add unsweetened cocoa powder to the cream cheese mixture for a rich chocolate flavor. You can also add sugar-free chocolate chips for added texture and sweetness.
2. Lemon Cheesecake Cake
Mix lemon juice into the cream cheese filling for a fresh, tangy twist. Top with fresh lemon zest for extra citrus flavor.
3. Strawberry Swirl Cake
Blend in sugar-free strawberry jam into the cream cheese filling and swirl it around to create a beautiful pattern. Top with fresh strawberries for an added touch.
4. Spiced Pumpkin Cake
For a fall-inspired version, fold in pumpkin puree and pumpkin spice into the filling. This adds a seasonal flavor and makes the cake even more comforting.
7. How to Store and Freeze the Cake
Storing:
Refrigeration: Store any leftover cake in an airtight container in the fridge for up to 5 days. The cake will maintain its creamy texture and delicious flavor.
Freezing:
To freeze the cake, slice it into individual portions and wrap each slice in plastic wrap and aluminum foil. Store the slices in a freezer-safe container or bag.
You can freeze the cake for up to 1 month. When ready to eat, simply thaw it in the refrigerator or at room temperature.
8. Nutritional Information (Per Slice)
Here’s an approximate breakdown of the calories and nutrients in one slice of this diabetic-friendly cake:
| Nutrient | Amount (per slice) |
|---|---|
| Calories | 180 kcal |
| Protein | 4 g |
| Carbohydrates | 7 g |
| Fat | 15 g |
| Saturated Fat | 9 g |
| Fiber | 1 g |
| Sodium | 150 mg |
(Note: Nutritional values are approximate and will vary depending on the specific ingredients used and portion sizes.)
9. Final Thoughts
This diabetic-friendly cake is the perfect solution for those looking for a sweet treat without the guilt. It’s simple, creamy, and full of flavor, and the best part is that it’s customizable to your tastes. Whether you prefer a classic cheesecake flavor or want to experiment with chocolate or fruit swirls, this recipe is both versatile and easy to make.
With just a few simple ingredients, you can enjoy a delicious, low-carb dessert that satisfies your sweet tooth. So, grab your ingredients and get baking—or rather, mixing! You’ll love how quickly this cake comes together and how it melts in your mouth.
More Recipes You Might Like
- The One Simple Ingredient Secret for Stronger ZZ Plants and Faster Indoor Growth
- The Simple Humidity Trick That Makes Pothos Plants Look Fuller, Greener, and Faster Growing
- The Hidden ZZ Plant Root Trick Smart Gardeners Use for Faster Growth and Stronger New Shoots
- This Dark Homemade Plant Fertilizer Is Making Pothos Leaves Grow Faster Than Ever
- Don’t Throw Away Egg Water for Plants Until You See What It Does to Pothos Growth