The Danish Dream Cake, known in Denmark as Drømmekage, is a beloved dessert that has stood the test of time. Its origins trace back to the 1960s, where it became a staple in Danish homes, especially during holidays like Christmas. The cake is known for its moist, soft texture and its irresistible coconut topping, which caramelizes perfectly into a sweet, golden crust. The combination of buttery cake and crunchy, sugary coconut topping makes this dessert a comforting, indulgent treat for any occasion.
In this blog, we will dive into the story behind Danish Dream Cake, share the recipe, and explore why this cake has become a family tradition in so many homes, just as it has for generations in Denmark. If you’ve never tried it before, get ready to fall in love with this simple, yet elegant dessert.
1. What Makes Danish Dream Cake Special?
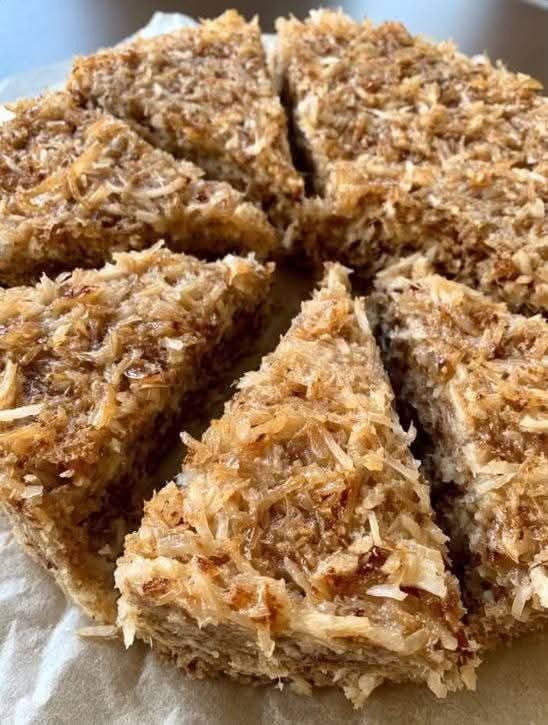
The magic of Danish Dream Cake lies in its two distinct layers: the moist, buttery cake and the sweet, crunchy coconut topping. While the cake itself is simple and made with basic ingredients like butter, sugar, and flour, it’s the topping that truly sets it apart. Made from butter, brown sugar, milk, and coconut, the topping is poured over the cake before baking, which results in a caramelized finish that adds texture and a delightful sweetness.
This cake is known for its rich flavor without being overly sweet, making it an ideal dessert for both casual gatherings and more formal occasions. It has become a Christmas tradition for many families, but its light and airy texture make it perfect for year-round enjoyment.
2. The History of Danish Dream Cake (Drømmekage)
The story of Drømmekage dates back to 1960s Denmark, where it became a household favorite. The cake was developed by a Danish baker, and its popularity quickly spread across the country. The recipe is said to have originated from a bakery in the small town of Svendborg on the island of Funen. The cake’s name, “Drømmekage,” translates to “dream cake,” which aptly describes the heavenly experience of biting into its moist texture and sweet coconut topping.
Over the years, Danish Dream Cake has evolved from a simple, everyday dessert to a cherished family recipe, passed down through generations. Today, it’s not just a holiday treat — it’s also a go-to dessert for birthdays, gatherings, and even casual afternoons with coffee.
3. Key Ingredients for Danish Dream Cake
For the Cake:
2 cups all-purpose flour: The base of the cake, which gives it a light and tender crumb.
1 ½ teaspoons baking powder: This helps the cake rise and gives it a fluffy texture.
1/2 teaspoon salt: Enhances the flavor of the cake.
1 cup unsalted butter, softened: The butter adds richness and moisture to the cake.
1 cup granulated sugar: Sweetens the cake while keeping it light and soft.
2 large eggs: Provides structure to the cake.
1 teaspoon vanilla extract: Adds a pleasant flavor to the cake.
1 cup milk: Helps keep the cake moist and tender.
For the Topping:
1 cup unsalted butter: The key ingredient for the rich, caramelized topping.
1 cup packed brown sugar: Adds sweetness and helps the topping caramelize perfectly.
1/2 cup whole milk: Gives the topping a creamy consistency.
1 ½ cups shredded coconut: This is what makes the topping so special, providing texture and flavor.
1 teaspoon vanilla extract: Adds depth to the topping’s flavor.
4. Step-by-Step Instructions for Danish Dream Cake
Making Danish Dream Cake is easy, but the result is nothing short of heavenly. Let’s break down the steps to create this classic Danish treat.
Step 1: Prepare the Cake Batter
Preheat your oven to 350°F (175°C). Grease a 9×13-inch baking pan or line it with parchment paper to prevent the cake from sticking.
In a medium-sized bowl, combine the flour, baking powder, and salt. Set this aside.
In a large mixing bowl, use a hand mixer or stand mixer to beat the butter and sugar together until light and fluffy. This should take about 2-3 minutes.
Add the eggs, one at a time, beating well after each addition. Then, add the vanilla extract and mix until combined.
Alternately add the dry ingredients (flour mixture) and milk to the butter mixture, starting and ending with the dry ingredients. Mix until just combined, being careful not to overmix.
Step 2: Bake the Cake
Pour the cake batter into the prepared baking pan and smooth the top with a spatula. Bake for 25-30 minutes, or until a toothpick inserted into the center of the cake comes out clean. The cake should be golden brown and firm to the touch.
Once baked, remove the cake from the oven and allow it to cool slightly in the pan.
Step 3: Prepare the Coconut Topping
While the cake is cooling, make the topping. In a saucepan over medium heat, melt the butter. Add the brown sugar, milk, and vanilla extract, stirring until the sugar has dissolved and the mixture is smooth. Bring the mixture to a gentle simmer for 2-3 minutes to thicken slightly.
Remove from heat and stir in the shredded coconut. The mixture should be thick and glossy.
Step 4: Add the Topping
Once the cake has cooled for about 10 minutes, spread the coconut topping evenly over the surface of the cake. Be generous with the topping — it’s one of the key features of the cake!
Step 5: Final Bake
Return the cake to the oven and bake for an additional 10-12 minutes, or until the coconut topping is golden brown and bubbly. The topping should be caramelized and slightly crispy on top.
Step 6: Cool and Serve
Allow the cake to cool completely before cutting it into squares or slices. This gives the topping time to set and prevents it from being too runny when sliced.
Serve the cake at room temperature or slightly chilled. Pair it with a cup of coffee or tea for the ultimate treat.
5. Tips for Perfect Danish Dream Cake
Don’t Overmix the Batter: When combining the wet and dry ingredients, mix until just combined. Overmixing can lead to a denser cake.
Use Room Temperature Ingredients: Make sure your butter and eggs are at room temperature before starting. This ensures a smooth, well-blended batter.
Toast the Coconut: If you prefer a deeper coconut flavor, you can toast the shredded coconut in a dry skillet for a few minutes before adding it to the topping mixture.
Monitor the Topping: Keep an eye on the topping while it bakes. It can burn quickly, so check it often during the final bake.
6. Why You’ll Love Danish Dream Cake
Easy to Make: With only a few simple steps, this cake is quick to prepare and doesn’t require advanced baking skills.
Perfect for Sharing: Danish Dream Cake is a great dessert for gatherings, potlucks, or family celebrations. Everyone will be asking for the recipe!
Rich and Indulgent: The combination of moist cake and crispy, sweet coconut topping makes for a satisfying treat that isn’t overly sweet, just perfectly balanced.
Traditional and Nostalgic: If you have Danish roots or enjoy cultural traditions, this cake brings a taste of Denmark right into your kitchen.
7. Serving Suggestions
Danish Dream Cake is delicious on its own, but you can elevate the experience by serving it with a few extras:
Whipped Cream or Ice Cream: For added richness, serve with a dollop of whipped cream or a scoop of vanilla ice cream.
Berries: A side of fresh berries adds a refreshing contrast to the cake’s sweetness.
Coffee or Tea: This cake pairs beautifully with a strong cup of coffee or tea, making it a perfect addition to afternoon tea or a cozy brunch.
8. Variations on Danish Dream Cake
While the traditional version of Danish Dream Cake is made with coconut, there are several variations you can try:
Chocolate Dream Cake: Add cocoa powder to the cake batter for a rich, chocolatey twist.
Fruit Topping: Top the cake with fresh fruit, such as sliced strawberries, raspberries, or even a few dollops of jam, before adding the coconut topping.
Nutty Dream Cake: Add chopped nuts like almonds, walnuts, or pecans to the coconut topping for a crunchy texture.
9. Storing and Freezing Danish Dream Cake
If you have any leftovers (though it’s unlikely!), you can store Danish Dream Cake in an airtight container at room temperature for up to 3 days. To keep it fresh, you can also refrigerate it for longer storage. The cake will last up to a week when properly stored.
Freezing: To freeze the cake, cut it into slices and wrap each slice tightly in plastic wrap. Then, place the wrapped slices in a freezer-safe bag and freeze for up to 3 months. Thaw at room temperature before serving.
10. Why Danish Dream Cake is the Perfect Holiday Dessert
Danish Dream Cake is the ultimate holiday dessert. Its simple yet rich flavor makes it ideal for festive gatherings like Christmas or New Year’s Eve. The cake is easy to prepare in advance, leaving you more time to enjoy your holiday festivities. Plus, the light, airy texture and caramelized topping make it a crowd-pleaser that everyone will love.
11. Conclusion: A Piece of Denmark in Every Bite
Making Danish Dream Cake is a delightful way to honor a long-standing tradition from Denmark while enjoying a deliciously moist and sweet dessert. The perfect balance of flavors, from the buttery cake to the caramelized coconut topping, makes this cake a treat worth sharing with loved ones. Whether you’re celebrating a holiday or simply want to enjoy something special, this cake will always hit the spot.
So why not bring a little bit of Danish tradition into your home? Whip up a batch of this mouthwatering cake and enjoy a piece of Denmark with every bite!
More Recipes You Might Like
-

Why Some Homeowners Are Using Onion Water Around Orchids and What Usually Helps More for Strong Roots, Healthy Leaves, and Long-Lasting Blooms
Orchids are among the most elegant indoor flowering plants for homeowners who want graceful stems, glossy green leaves, long-lasting blooms, and a refined decorative display that fits beautifully in living rooms, bedrooms, apartments, home offices, bright kitchens, windowsills, covered patios, commercial interiors, luxury home staging, and premium indoor plant styling. A healthy orchid can turn…
-

Why Some Homeowners Are Pouring Aloe Water Around Orchids and What Usually Helps More for Strong Roots, Healthy Leaves, and Long-Lasting Blooms
Orchids are among the most elegant indoor flowering plants for homeowners who want graceful blooms, sculptural roots, glossy leaves, and a premium decorative display that fits beautifully in living rooms, bedrooms, apartments, home offices, bright kitchens, balcony gardens, covered patios, commercial interiors, luxury home staging, and refined indoor plant styling. A healthy orchid can make…
-
Why Some Homeowners Are Adding Brown Powder Around Snake Plants and What Usually Helps More for Strong Roots, Fuller Growth, and Healthy Indoor Leaves
Snake plant is one of the most dependable indoor plants for homeowners who want strong upright leaves, bold green patterning, yellow-edged variegation, easy maintenance, and a clean decorative display that fits beautifully in living rooms, bedrooms, apartments, home offices, bright kitchens, entry corners, sunny windowsills, plant shelves, commercial interiors, luxury home staging, and premium indoor…


