There’s nothing quite like the smell of freshly baked bread filling your home. Old-fashioned soft yeast rolls are a timeless favorite that’s been passed down through generations. These rolls are incredibly fluffy, light, and perfect for any occasion, whether you’re making them for a holiday dinner, a casual meal, or just because you want a delicious homemade treat.
This recipe for soft yeast rolls will teach you how to make bread that rises beautifully and has a delicate, airy texture. These rolls will melt in your mouth, offering the perfect combination of soft and slightly chewy. Plus, the best part? They’re so simple to make!
Why You’ll Love These Soft Yeast Rolls:
Fluffy Texture: These rolls rise beautifully and are incredibly soft, with just the right amount of chewiness. The lightness of the bread is what sets it apart from many other types of bread.
Classic Recipe: This old-fashioned recipe has been tried and tested for years. The bread-making process has been refined to give you the perfect, buttery rolls every time.
Versatile: You can serve these rolls as a side to any meal. Whether it’s a holiday dinner, a family meal, or just a cozy weeknight, these rolls complement any dish perfectly.
Perfect for Beginners: Even if you’re new to bread-making, this recipe is beginner-friendly. You’ll learn the basics of working with yeast and dough while creating something amazing.
Ingredients You’ll Need:
This recipe uses simple ingredients that you probably already have in your kitchen. Here’s what you’ll need to make these soft yeast rolls:
1 packet active dry yeast (or 2 1/4 teaspoons) – This is the ingredient that will make your dough rise and give your rolls that fluffy texture.
1 cup warm water – The warm water helps activate the yeast, but it shouldn’t be too hot. About 110°F (43°C) is perfect.
1/4 cup sugar – This will feed the yeast, helping it activate and rise, and it will add a subtle sweetness to the rolls.
1/2 cup warm milk – Milk adds richness to the dough, helping it become soft and tender.
1/4 cup melted butter – Butter adds flavor and moisture to the rolls.
3 1/2 cups all-purpose flour – This will form the dough. You can substitute some of it with whole wheat flour for a slightly denser texture.
1 teaspoon salt – To balance the sweetness and flavor of the dough.
1 egg – This adds richness and color to the dough, helping it rise and giving the rolls a nice texture.
Instructions:
Step 1: Activate the Yeast
To start, activate the yeast by dissolving the sugar in the warm water in a small bowl. Sprinkle the yeast over the water and let it sit for 5-10 minutes. You’ll see it bubble up and become foamy, which means it’s activated and ready to use.
Step 2: Prepare the Dough
In a large bowl, combine the warm milk, melted butter, and salt. Stir to combine. Add the activated yeast mixture and 1 1/2 cups of flour. Stir until everything is well combined. Then, add the egg and gradually add the remaining flour, 1/4 cup at a time, until the dough begins to come together.
Step 3: Knead the Dough
Turn the dough out onto a lightly floured surface and knead it for about 5-7 minutes until it becomes smooth and elastic. If the dough feels too sticky, you can add a little more flour, but be careful not to add too much. The dough should be soft but not too sticky.
Step 4: First Rise
Place the dough in a lightly greased bowl, covering it with a clean kitchen towel or plastic wrap. Let it rise in a warm place for about 1 hour, or until it has doubled in size. If your kitchen is cool, you can preheat your oven to about 200°F (93°C) for a few minutes and then turn it off. Place the dough inside the warm oven to help it rise faster.
Step 5: Shape the Rolls
Once the dough has risen, punch it down gently to release any air bubbles. Turn the dough out onto a floured surface again. Divide the dough into 12 equal portions and shape each portion into a smooth ball. Place the dough balls into a greased 9×9-inch baking dish or round cake pan.
Step 6: Second Rise
Cover the pan with a towel and let the rolls rise for another 30-45 minutes, or until they’ve doubled in size and are touching each other in the pan. This is where the magic happens – the dough will puff up and create those soft, fluffy rolls.
Step 7: Bake the Rolls
Preheat your oven to 350°F (175°C). Once the rolls have risen, bake them for 20-25 minutes, or until they are golden brown on top. The rolls should sound hollow when tapped on the bottom.
Step 8: Brush with Butter
Once out of the oven, immediately brush the rolls with melted butter for a glossy finish and extra richness. This will also keep them soft and add a bit of flavor.
Step 9: Let Them Cool and Serve
Allow the rolls to cool slightly before serving. They’re best enjoyed warm, but they’ll stay soft and fluffy for a few hours at room temperature.
Tips for Perfect Soft Yeast Rolls:
Use Fresh Yeast: Make sure your yeast is fresh and active. If the yeast doesn’t foam after being mixed with warm water, it may be expired and you’ll need to try a new packet.
Don’t Overwork the Dough: When kneading, be gentle. Over-kneading can make the dough dense. Just knead until it’s smooth and elastic.
Allow for Enough Rising Time: Patience is key! The dough needs time to rise, so don’t rush the process. If you’re in a hurry, try placing the dough in a warm spot to speed up the rising process.
Fluffiness Tip: If you prefer super light rolls, don’t over-bake them. Keep an eye on the rolls as they bake so they stay soft.
Why These Rolls Are So Special:
Fluffiness: The dough rises beautifully, creating an incredibly soft and airy texture that’s perfect for pulling apart and enjoying.
Rich Flavor: The addition of butter and milk makes these rolls rich and flavorful, without being too heavy or greasy.
Versatile: You can enjoy these rolls with anything, from soup and salad to sandwiches and barbecue.
Great for Beginners: If you’re new to baking, this recipe is a great starting point. You get the satisfaction of making homemade bread, but the process is simple and straightforward.
Storage Tips:
Room Temperature: Store the rolls in an airtight container at room temperature for up to 3 days. To keep them soft, you can place a slice of bread in the container with the rolls. It helps to maintain moisture.
Freezing: You can freeze these rolls for longer storage. Once baked, allow them to cool completely before wrapping them in plastic wrap and storing them in a freezer-safe bag. They can last up to 3 months in the freezer. When ready to eat, thaw them at room temperature or warm them in the oven.
Conclusion:
Old-fashioned soft yeast rolls are a timeless classic that’s perfect for any meal. They’re light, fluffy, and full of rich flavor, making them the ideal addition to any dinner table. Whether you’re making them for a holiday meal or just because, these rolls are sure to become a family favorite. With just a few ingredients and a little patience, you can enjoy homemade bread that’s as comforting as it is delicious.
So, give this recipe a try and enjoy the heavenly taste of freshly baked soft yeast rolls!
Happy baking! Enjoy your fluffy, homemade bread! 🍞✨
More Recipes You Might Like
-

Christmas Cactus Care Guide: How to Use Lemon Water Safely Without Damaging Roots, Buds, or Beautiful Winter Blooms
Christmas cactus is one of the most charming flowering houseplants because it brings color at a time when many other indoor plants are quiet. Its flat green segments, arching shape, and bright flowers make it perfect for windowsills, shelves, hanging baskets, and cozy rooms. When the plant is healthy, the tips can fill with buds…
-

Christmas Cactus Care Guide: How to Grow a Full Hanging Basket With Healthy Segments, Strong Buds, and Bright Flowers
Christmas cactus is one of the most loved flowering houseplants because it can turn a quiet indoor corner into a bright display of color. Its soft green segmented stems hang gracefully over the edge of a pot, and when the plant is happy, the tips fill with buds that open into beautiful flowers. Many people…
-

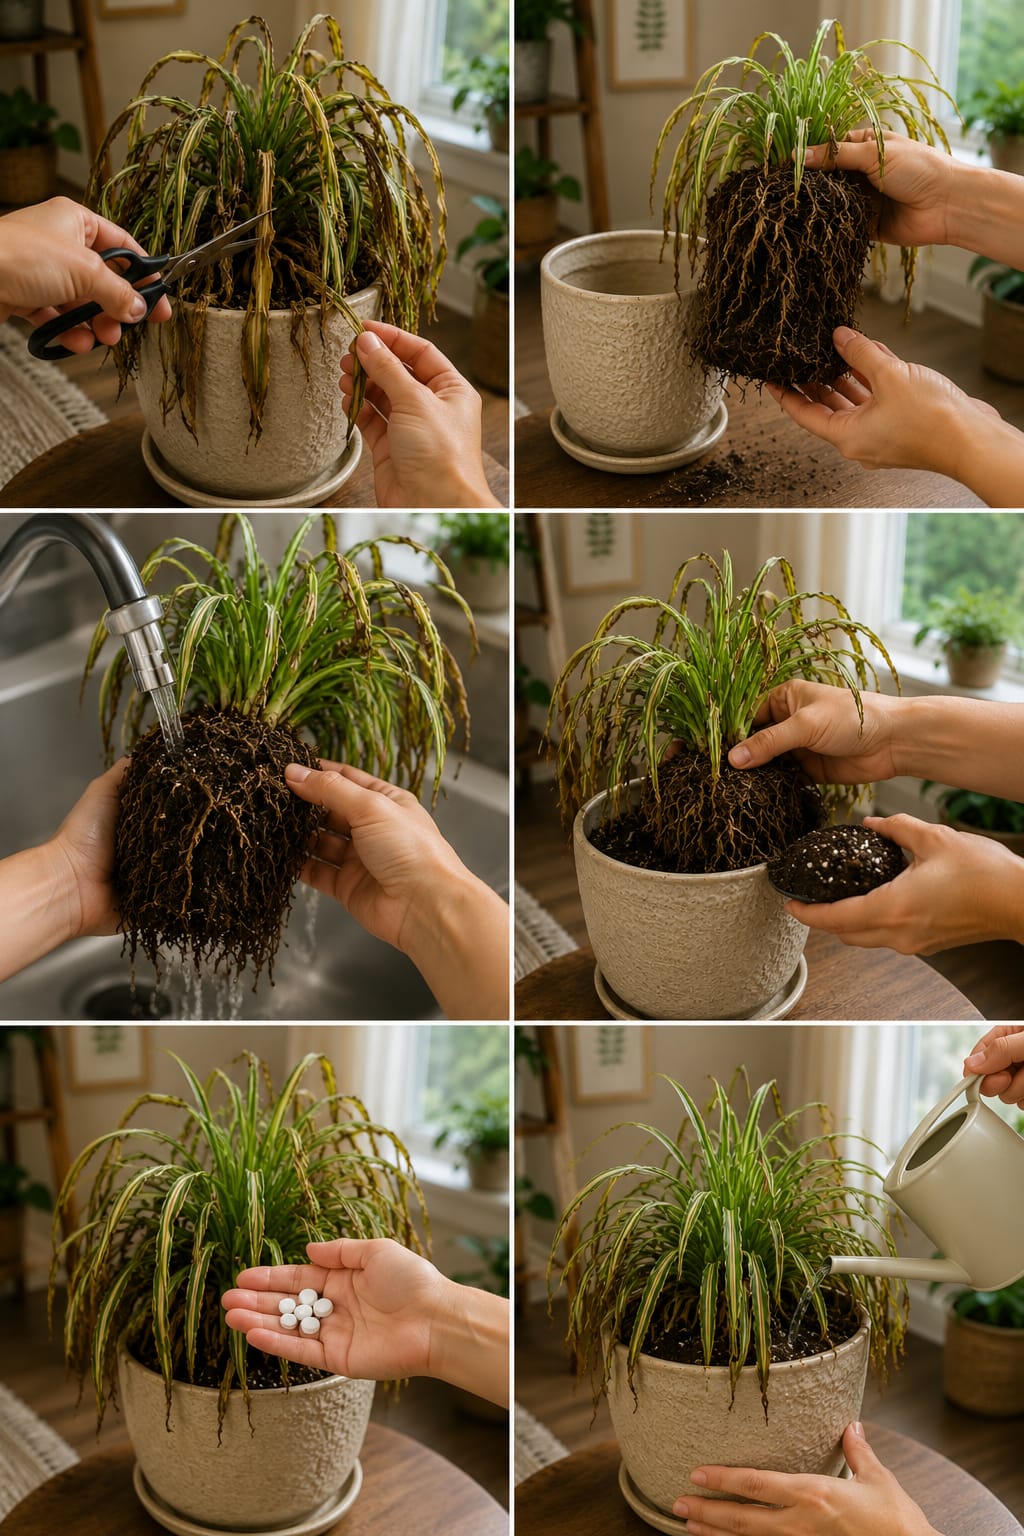
Spider Plant Rescue Guide: How to Revive a Tired Spider Plant With Pruning, Root Care, Fresh Soil, and Safe Watering
Spider plants are usually known as easy, forgiving, and fast-growing houseplants, but even this strong plant can begin to look tired when its roots, soil, water, and light are out of balance. The image shows a struggling spider plant with drooping leaves, brown tips, dry edges, and weak growth being rescued step by step. The…