The quest for the perfect chocolate cake is a sacred journey in home baking. It’s the benchmark, the celebration centerpiece, the comfort food we crave. We dream of a cake that is profoundly rich and chocolatey, yet light and tender; a cake with a moist, velvety crumb that stays that way for days; a cake impressive enough for a birthday but simple enough for a Tuesday. If you’ve been searching for that holy grail recipe—the one that is foolproof, universally beloved, and consistently spectacular—your search is over.
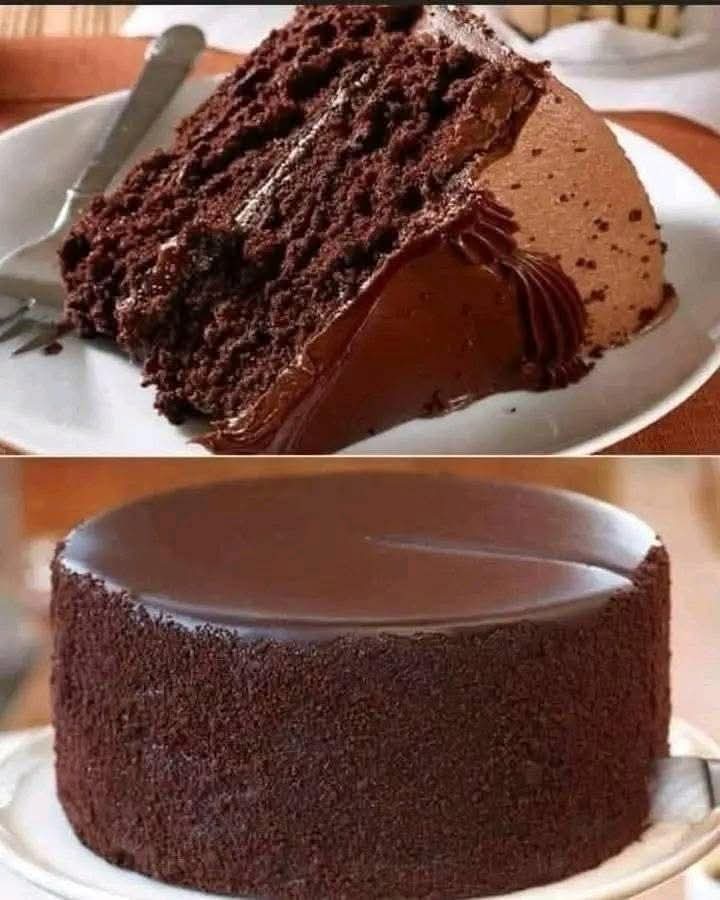
This is The Ultimate One-Bowl Chocolate Cake. It’s the kind of recipe that gets passed down, scribbled on notecards, and baked from memory. With its deep, dark color and unfussy method, it delivers everything you want: intense chocolate flavor, a cloud-like texture, and the kind of moistness that makes every single forkful a delight. The secret? A surprising, almost magical ingredient: boiling water.
Whether you’re a seasoned baker or a nervous first-timer, this recipe is your trusted friend. It comes together in minutes with just a bowl and a whisk, requires no special equipment, and bakes into two flawless layers ready for your favorite frosting. Let’s dive in and create the chocolate cake of your dreams.
Why This Recipe is the Only Chocolate Cake You’ll Ever Need
Before we preheat the oven, let’s talk about what makes this specific formula a timeless classic.
· Unbeatable, One-Bowl Simplicity: You can literally mix the entire batter in one bowl with a whisk. No creaming butter and sugar, no alternating dry and wet ingredients. It’s the ultimate easy homemade cake.
· The Secret to Supreme Moistness: Boiling Water. This is the game-changer. The hot water “blooms” the cocoa powder, intensifying its flavor, and it partially cooks the flour’s starch, creating a uniquely tender, moist crumb that stays moist for days.
· Perfect Pantry-Staple Ingredients: You likely have everything you need right now. No buttermilk, no specialty flours—just simple, accessible ingredients that work in harmony.
· The Ideal Canvas for Any Frosting: This cake’s robust flavor and sturdy-yet-tender crumb can handle anything: a glossy chocolate ganache, a mountain of vanilla buttercream, a tangy cream cheese frosting, or a simple dusting of powdered sugar.
· Consistently Reliable Results: This recipe is famously forgiving. It rises evenly, releases from pans beautifully, and delivers perfect results every single time, making it the best foolproof chocolate cake for any occasion.
The Science of the Boiling Water: Why It Works Magic
You might hesitate when you see “1 cup boiling water” added to a batter. It seems counterintuitive! But this step is the heart of the cake’s success.
Blooms the Cocoa: Just like blooming spices in oil, hot water opens up the cocoa powder, releasing its full, deep, and complex flavor. It transforms it from dry powder into a rich, liquid chocolate essence.
Activates the Leaveners: The heat gives the baking soda and baking powder an immediate boost, helping create a strong initial rise and an airy texture.
Creates a Unique Batter: The batter will be very thin—almost like chocolate soup. This is perfect. This thin batter allows the cakes to bake up incredibly level and moist, as the water turns to steam during baking, leaving behind those tender pockets.
Gathering Your Ingredients: The Foundation of Flavor
The simplicity of this list is its strength. For the best flavor, use a good-quality cocoa powder.
For the Cake:
· 1 ¾ cups (220g) All-Purpose Flour
· ¾ cup (75g) Unsweetened Cocoa Powder (Natural or Dutch-processed both work)
· 2 cups (400g) Granulated Sugar
· 1 ½ tsp Baking Powder
· 1 ½ tsp Baking Soda
· 1 tsp Salt
· 2 Large Eggs, at room temperature
· 1 cup (240ml) Milk (whole or 2% preferred), at room temperature
· ½ cup (120ml) Vegetable Oil (or any neutral oil)
· 2 tsp Pure Vanilla Extract
· 1 cup (240ml) Boiling Water
For the Classic Chocolate Buttercream (Optional but Recommended):
· 1 ½ cups (3 sticks / 340g) Unsalted Butter, softened
· 1 cup (95g) Unsweetened Cocoa Powder, sifted
· 5 cups (600g) Powdered Sugar, sifted
· ⅓ cup (80ml) Milk or Heavy Cream
· 2 tsp Pure Vanilla Extract
· Pinch of Salt
Step-by-Step Instructions: Foolproof Perfection
Follow these simple steps for a flawless, bakery-quality cake.
Step 1: Preheat and Prepare
Preheat your oven to 350°F (175°C). This is crucial for proper rise. Grease and flour two 9-inch round cake pans, then line the bottoms with parchment paper circles. This guarantees effortless release.
Step 2: The One-Bowl Mix
In a large heatproof bowl (you’ll add boiling water later), sift together the flour, cocoa powder, sugar, baking powder, baking soda, and salt. Whisk thoroughly to combine and eliminate any lumps.
Step 3: Add Wet Ingredients
Make a well in the center. Add the eggs, milk, vegetable oil, and vanilla extract. Using a hand whisk or electric mixer on medium speed, beat the mixture for about 2 minutes until it is smooth, well-blended, and slightly thickened.
Step 4: The Magic Boiling Water
Carefully and slowly pour in the 1 cup of freshly boiled water. Start by whisking a small amount into the batter, then gradually add the rest. The batter will be very thin. This is exactly what you want. Don’t be alarmed!
Step 5: Bake to Perfection
Divide the thin batter evenly between the two prepared pans. Bake for 30-35 minutes, or until a toothpick inserted into the center of the cakes comes out clean or with a few moist crumbs (not wet batter).
Step 6: Cool Completely
Let the cakes cool in their pans on a wire rack for 10 minutes. Then, run a knife around the edges, invert them onto the rack, peel off the parchment, and let them cool completely before frosting. This is non-negotiable—frosting a warm cake is a recipe for meltdown.
Step 7: Frost & Decorate
Once cakes are completely cool, prepare your frosting. For the buttercream: Beat the softened butter until creamy. Add the sifted cocoa and beat until combined. Gradually add the powdered sugar, milk, vanilla, and salt, beating on medium-high speed for 3-4 minutes until light and fluffy.
Place one cake layer on a plate,spread with frosting, top with the second layer, and frost the top and sides. Decorate as desired.
Expert Tips & Troubleshooting for Cake Success
· Room Temperature Matters: Using room-temperature eggs and milk helps them emulsify seamlessly into the batter, creating a smooth, cohesive mixture.
· Don’t Skip the Parchment: This is the best insurance against sticking. Grease, flour, and parchment is the triple guarantee.
· My Batter is Too Thin! It’s supposed to be! Trust the process. This is what creates the exceptionally moist texture.
· Avoid Overbaking: Check at 30 minutes. An overbaked cake is the main cause of dryness. The cakes will also slightly pull away from the sides of the pan when done.
· For an Even More Intense Chocolate Flavor: Use hot, strongly brewed coffee instead of boiling water. You won’t taste the coffee—it will only deepen the chocolate flavor.
· Make Cupcakes: This recipe makes 24 perfect cupcakes. Bake at 350°F for 18-22 minutes.
Serving & Storage
· Serving: Slice with a hot, clean knife for beautiful slices. Serve at room temperature.
· Storage: Store covered at room temperature for 2-3 days, or in the refrigerator for up to 5 days due to the frosting. Bring to room temperature before serving for the best texture and flavor.
Frequently Asked Questions (FAQ)
Q: Can I make this cake in a different pan?
A:Yes! A 9×13-inch pan: Bake for 35-40 minutes. Three 8-inch pans: Bake for 25-30 minutes. Bundt pan: Bake for 45-55 minutes. Always check for doneness with a toothpick.
Q: Is this cake vegan?
A:It’s very close! To make it vegan, substitute the eggs with ½ cup unsweetened applesauce or commercial egg replacer, and use a plant-based milk. The results are excellent.
Q: Can I use butter instead of oil?
A:Oil creates a moister crumb that stays moist longer. Butter adds flavor but can result in a slightly denser cake. For the signature texture, stick with oil.
Q: Why did my cake sink in the middle?
A:This is usually due to underbaking, opening the oven door too early, or an issue with leavening (old baking soda/powder). Ensure your ingredients are fresh and your oven is fully preheated.
Q: Can I freeze this cake?
A:Absolutely. Wrap unfrosted, cooled cake layers tightly in plastic wrap and foil. Freeze for up to 3 months. Thaw overnight in the refrigerator before frosting.
There you have it—the definitive guide to The Ultimate Chocolate Cake. This recipe is more than just instructions; it’s a promise of chocolatey joy, of shared moments, and of baking success. It’s the cake you’ll make for milestones and for no reason at all, knowing it will always, always deliver.
Now, it’s your turn! What’s your favorite frosting to pair with this classic cake? Do you have a special twist? Share your creations and stories in the comments below!
More Recipes You Might Like
-

Why Some Homeowners Are Using Onion Water Around Orchids and What Usually Helps More for Strong Roots, Healthy Leaves, and Long-Lasting Blooms
Orchids are among the most elegant indoor flowering plants for homeowners who want graceful stems, glossy green leaves, long-lasting blooms, and a refined decorative display that fits beautifully in living rooms, bedrooms, apartments, home offices, bright kitchens, windowsills, covered patios, commercial interiors, luxury home staging, and premium indoor plant styling. A healthy orchid can turn…
-

Why Some Homeowners Are Pouring Aloe Water Around Orchids and What Usually Helps More for Strong Roots, Healthy Leaves, and Long-Lasting Blooms
Orchids are among the most elegant indoor flowering plants for homeowners who want graceful blooms, sculptural roots, glossy leaves, and a premium decorative display that fits beautifully in living rooms, bedrooms, apartments, home offices, bright kitchens, balcony gardens, covered patios, commercial interiors, luxury home staging, and refined indoor plant styling. A healthy orchid can make…
-
Why Some Homeowners Are Adding Brown Powder Around Snake Plants and What Usually Helps More for Strong Roots, Fuller Growth, and Healthy Indoor Leaves
Snake plant is one of the most dependable indoor plants for homeowners who want strong upright leaves, bold green patterning, yellow-edged variegation, easy maintenance, and a clean decorative display that fits beautifully in living rooms, bedrooms, apartments, home offices, bright kitchens, entry corners, sunny windowsills, plant shelves, commercial interiors, luxury home staging, and premium indoor…


