The Crispy, Creamy, Butter-Bathed Side Dish That Upstages Every Main Course
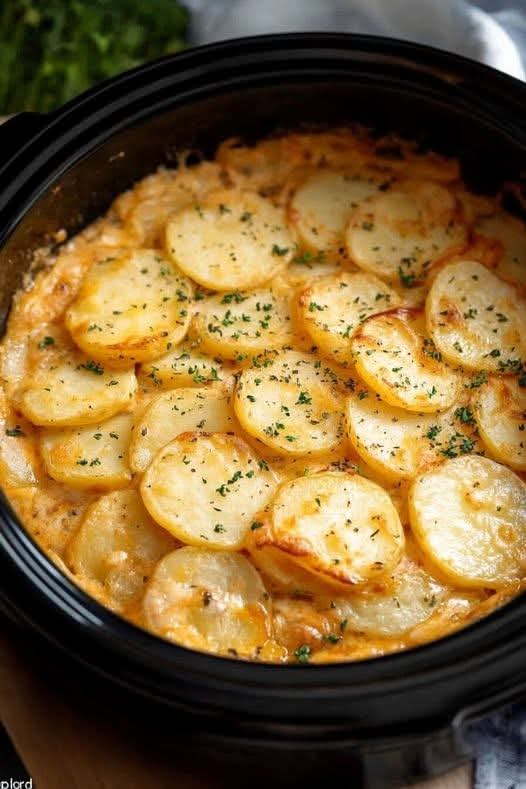
Imagine a potato so perfectly cooked that its exterior shatters with a crispy, golden-brown crust, while its interior surrenders to a creamy, almost custardy tenderness that literally melts on your tongue. This isn’t just a roasted potato; this is the phenomenon known as Melting Potatoes—a dish with a cult following for its shocking contrast of textures and its deep, herb-infused, buttery flavor. One bite, and you’ll understand the hype: it’s the ultimate potato side dish, a guaranteed crowd-pleaser, and a technique that will forever change how you cook potatoes.
The magic lies in a simple, two-step method: a high-heat roast to create an impossibly crisp crust, followed by a simmer in an aromatic broth that gently steams the insides to a velvety consistency. As the broth reduces, it transforms into a glossy, flavor-packed sauce that cloaks each slice. These potatoes are the star of the holiday table, the perfect partner for a weeknight roast chicken, and an impressive yet easy side dish that looks like it came from a steakhouse.
Whether you’re a potato purist or a skeptic of yet another viral food trend, this recipe is a masterclass in transforming a humble ingredient into something extraordinary. Let’s dive into the simple secrets behind creating these unforgettable potatoes.
Why Melting Potatoes Deserve a Permanent Spot in Your Recipe Rotation
Before we preheat the oven, let’s talk about what makes this specific method a game-changer.
· The Ultimate Texture Paradox: They achieve the impossible: a shatteringly crisp exterior with a center so soft and uniform, it evokes the richness of warm butter or a delicate flan. It’s this jaw-dropping contrast that makes them so memorable.
· Effortless Elegance: With just a handful of pantry staples and one skillet, you create a side dish that looks and tastes incredibly sophisticated. It’s a simple gourmet recipe anyone can master.
· Built-In, Flavor-Packed Sauce: Unlike dry roasted potatoes, these bathe in and absorb a savory broth, infusing them with garlic, thyme, and butter from the inside out. The reduced broth becomes a delicious gravy you’ll want to spoon over everything.
· Foolproof and Forgiving: The method is straightforward—sear, simmer, rest. It’s much harder to overcook and dry out these potatoes than traditional roasted ones, thanks to the protective braising step.
· Versatile & Customizable: While classic with thyme and garlic, the flavor profile is a blank canvas for rosemary, parmesan, smoked paprika, or a splash of white wine.
The Science Behind the “Melt”: How Two Cooking Methods Create Magic
The genius of melting potatoes is the combination of two fundamental cooking techniques:
High-Heat Roasting (The Maillard Reaction): Starting in a very hot oven with oil creates a deep, golden-brown, crispy crust. This is the Maillard reaction at work—the chemical process that creates complex, savory flavors and appealing color.
Gentle Braising (Gelatinization): Adding hot broth and covering the pan traps steam. This moist heat gently cooks the potato’s starch granules all the way through, causing them to swell and soften uniformly. The liquid penetrates, making the interior incredibly moist and tender without washing away the crispy exterior you worked so hard to create.
The result is a potato that is neither simply roasted nor boiled, but the best of both worlds.
Gathering Your Ingredients: Simple Staples, Spectacular Results
The ingredient list is beautifully short. Quality here makes a difference.
· 2 lbs Yukon Gold or Russet Potatoes: Yukon Golds are the champion for their naturally buttery flavor and creamy texture that truly “melts.” Russets will give you a fluffier interior and a more dramatic crisp.
· 3-4 tbsp High-Heat Oil: Avocado, grapeseed, or refined olive oil.
· 4 tbsp Unsalted Butter: For rich, savory depth.
· 1 ½ cups Chicken or Vegetable Broth: The braising liquid that becomes the sauce. Good-quality broth is key.
· 4-5 cloves Garlic, smashed but kept whole
· 4-6 sprigs Fresh Thyme or Rosemary (or 1 tsp dried)
· Salt and Black Pepper to taste
· Optional Finish: Fresh chopped parsley, chives, or a grating of Parmesan cheese.
Step-by-Step Instructions: Crafting Your Masterpiece
Follow these steps for perfectly crispy, creamy melting potatoes every time.
Step 1: Preheat and Prep
Preheat your oven to 450°F (230°C). This high initial heat is non-negotiable for the crust.
Peel your potatoes.For the classic “melting” presentation, cut them into 1-inch thick rounds. This large, uniform size is crucial for the textural contrast. Pat them completely dry with paper towels—this ensures they sear instead of steam.
Step 2: The Initial Sear (Building the Crust)
In a large, heavy, oven-safe skillet (cast iron is perfect), heat the oil over medium-high heat on the stovetop. Season both sides of the potato rounds generously with salt and pepper.
Carefully place the potatoes in the hot oil in a single layer,without crowding. Sear for 4-5 minutes on the first side, until a deep golden-brown crust forms. Flip and sear the other side for another 4-5 minutes.
Step 3: The Braise (Creating the Melt)
Remove the skillet from the heat. Tuck the butter, smashed garlic cloves, and herb sprigs around the potatoes.
Carefully pour in the hot broth—it will bubble vigorously.The liquid should come about halfway up the sides of the potatoes.
Immediately transfer the uncovered skillet to the preheated oven.Roast for 15 minutes.
Step 4: The Flip & Final Roast
After 15 minutes, remove the skillet (careful, the handle is hot!). Flip each potato round over. They should be starting to soften and the broth will have reduced slightly.
Return the skillet to the oven for another15-20 minutes, or until the potatoes are fork-tender, the tops are re-crisped, and the broth has reduced to a few tablespoons of thick, buttery sauce.
Step 5: The Rest & Serve
Remove from the oven. Let the potatoes rest in the skillet for 5 minutes. This allows them to absorb a bit more of the remaining sauce and firm up slightly for serving.
Discard the herb stems.Spoon the glorious garlic-infused buttery sauce from the pan over the potatoes. Garnish with fresh herbs and serve immediately.
Expert Tips & Troubleshooting for Potato Perfection
· The Right Pan is Key: An oven-safe skillet (cast iron, stainless steel) is essential for moving from stovetop to oven. A 12-inch skillet usually fits 2 lbs of potatoes in a single layer.
· Don’t Rush the Sear: That initial crust is your flavor foundation. Let the potatoes sit undisturbed to get properly brown. If they stick, they’re not ready to flip.
· My Potatoes Aren’t Tender Inside: This means they needed more braising time. Ensure your broth was hot when added, and don’t be afraid to add a splash more broth and return them to the oven for an extra 5-10 minutes.
· My Potatoes are Soggy: The oven temperature might have been too low, or the potatoes were overcrowded in the pan, steaming instead of roasting. Ensure your oven is fully preheated and use a large enough skillet.
· Flavor Variations:
· Lemon-Herb: Add thin slices of lemon to the braising liquid.
· Parmesan Crust: Sprinkle grated parmesan over the potatoes for the last 5 minutes of roasting.
· Spicy: Add a pinch of red pepper flakes to the broth.
Serving Suggestions: What to Serve with Melting Potatoes
These potatoes are rich and deserve a complementary main.
· With Roasted Meats: Perfect with herb-crusted roast chicken, pan-seared steak, pork tenderloin, or simple baked salmon.
· For a Vegetarian Feast: Serve alongside a hearty lentil loaf or stuffed portobello mushrooms.
· With Greens: A simple arugula salad with a lemon vinaigrette cuts through the richness beautifully.
Storage and Reheating
· Storage: Store leftovers in an airtight container in the refrigerator for up to 3 days.
· Reheating: To restore crispness, reheat on a baking sheet in a 400°F oven for 10-15 minutes. The microwave will make them soft.
Frequently Asked Questions (FAQ)
Q: Can I make these without an oven-safe skillet?
A:Yes. Sear the potatoes in any skillet, then transfer them and all the ingredients to a baking dish for the oven step. You’ll lose some of the flavorful fond, but it will still work.
Q: Can I use small potatoes or fingerlings?
A:You can, but the iconic “melting” texture is best achieved with thick slices. For small potatoes, halve them lengthwise and reduce the braising time slightly.
Q: Are these gluten-free and dairy-free?
A:The recipe is naturally gluten-free. For dairy-free, substitute the butter with vegan butter or more olive oil.
Q: Can I prepare these ahead of time?
A:You can peel and slice the potatoes a few hours ahead; keep them submerged in cold water. Pat very dry before searing. For best results, cook fully just before serving.
Q: Why are they called “melting” potatoes?
A:The name comes from the unique, ultra-tender, almost spreadable interior texture that contrasts so dramatically with the crispy shell—it seems to “melt” in your mouth.
There you have it—the complete guide to achieving potato nirvana. Melting Potatoes are more than a side dish; they are a culinary experience, a testament to how technique can elevate a simple ingredient into something truly spectacular.
Now, it’s your turn! What’s your favorite herb or flavoring to use with melting potatoes? Have you tried a successful variation? Share your tips and triumphs in the comments below!
More Recipes You Might Like
-

Why Some Homeowners Are Using Onion Water Around Orchids and What Usually Helps More for Strong Roots, Healthy Leaves, and Long-Lasting Blooms
Orchids are among the most elegant indoor flowering plants for homeowners who want graceful stems, glossy green leaves, long-lasting blooms, and a refined decorative display that fits beautifully in living rooms, bedrooms, apartments, home offices, bright kitchens, windowsills, covered patios, commercial interiors, luxury home staging, and premium indoor plant styling. A healthy orchid can turn…
-

Why Some Homeowners Are Pouring Aloe Water Around Orchids and What Usually Helps More for Strong Roots, Healthy Leaves, and Long-Lasting Blooms
Orchids are among the most elegant indoor flowering plants for homeowners who want graceful blooms, sculptural roots, glossy leaves, and a premium decorative display that fits beautifully in living rooms, bedrooms, apartments, home offices, bright kitchens, balcony gardens, covered patios, commercial interiors, luxury home staging, and refined indoor plant styling. A healthy orchid can make…
-
Why Some Homeowners Are Adding Brown Powder Around Snake Plants and What Usually Helps More for Strong Roots, Fuller Growth, and Healthy Indoor Leaves
Snake plant is one of the most dependable indoor plants for homeowners who want strong upright leaves, bold green patterning, yellow-edged variegation, easy maintenance, and a clean decorative display that fits beautifully in living rooms, bedrooms, apartments, home offices, bright kitchens, entry corners, sunny windowsills, plant shelves, commercial interiors, luxury home staging, and premium indoor…


