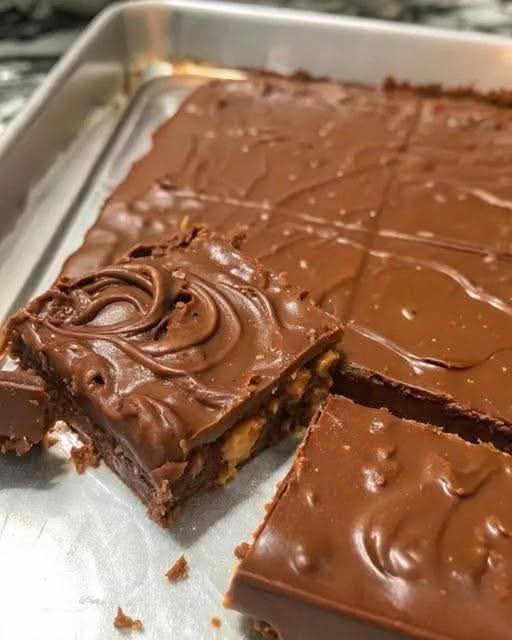
There is something truly magical about breaking a piece from a glossy, perfectly tempered chocolate bar. The sharp snap, the rich aroma that wafts up, and the slow melt of creamy cocoa on your tongue—it’s a multisensory experience. But what if you could create this experience in your own kitchen? Not just melting and molding store-bought chocolate, but truly crafting chocolate bars from raw ingredients, controlling every nuance of flavor, texture, and sweetness? Welcome to the rewarding world of homemade chocolate bars.
Moving beyond simple candy melts, this guide will empower you to create artisan-quality chocolate bars that are free from preservatives, customizable to your exact taste, and profoundly satisfying to give as gifts or savor yourself. Whether you’re a baking enthusiast looking for a new challenge, someone with dietary restrictions seeking clean-ingredient treats, or simply a chocolate lover yearning for a deeper connection to your favorite food, this journey is for you.
We’ll explore two paths: the simplified “shortcut” method using high-quality chocolate (perfect for beginners and flavor infusions), and the from-scratch method starting with cocoa beans or cocoa mass for the ultimate adventure. Let’s unlock the craft of chocolate making.
Why Homemade Chocolate Bars Are a Game-Changer
Store-bought chocolate, even premium brands, is a mass-produced product. When you make it yourself, you become the master chocolatier. You decide the cocoa percentage, the type of sweetener (coconut sugar, maple syrup, honey), the quality of dairy or milk alternatives, and the unique add-ins. You eliminate emulsifiers like soy lecithin and preservatives. The result is a purer, more intense chocolate flavor and the unparalleled pride of creating something exquisite from simple ingredients.
Understanding Chocolate: Beans, Butter, Liquor, and Cocoa
To make chocolate from scratch, you need to know the core components:
· Cacao/Cocoa Nibs: The roasted, crushed beans. They contain both cocoa solids and cocoa butter.
· Cocoa Butter: The natural, edible fat extracted from the nibs. It’s what gives chocolate its melt-in-your-mouth texture.
· Cocoa Solids: The non-fat part of the nib, ground into cocoa powder.
· Chocolate Liquor/Mass: The paste produced by grinding nibs. It contains both cocoa butter and solids in their natural ratio (about 50/50). This is the base of all chocolate.
· Sugar & Milk (or none): For sweetening and creating milk or dark chocolate profiles.
Method 1: The Simplified “Couverture” Method (Ideal for Beginners & Flavoring)
This is the best place to start. You begin with already-tempered, high-quality couverture chocolate (chocolate with a high cocoa butter content for superior melting and molding).
Ingredients:
· 200g high-quality dark, milk, or white couverture chocolate (chopped)
· Optional add-ins: Sea salt, toasted nuts, dried fruit, spices, freeze-dried berries.
Process:
Temper the Chocolate: This is the crucial step for a shiny finish and sharp snap. Use the “seed” method: Melt 2/3 of the chocolate to 115-120°F (46-49°C) for dark, or 110°F (43°C) for milk/white. Remove from heat and stir in the remaining 1/3 (the “seed”) until melted and the temperature drops to 89-90°F (31-32°C) for dark, 86-88°F (30-31°C) for milk/white.
Flavor & Mold: Stir in your chosen add-ins. Pour into clean, room-temperature bar molds. Tap firmly to release air bubbles.
Set: Allow to crystallize at cool room temperature (65-68°F / 18-20°C) for 10-15 minutes, then transfer to the fridge for 10 minutes only to fully harden. Avoid prolonged cold storage to prevent bloom.
Method 2: The From-Scratch “Bean-to-Bar” Approach
For the ultimate project, you’ll need some specialized equipment: a spice grinder or food processor, and ideally a stone melanger (like those from Cocoatown or Premier) for ultra-smooth refinement.
Basic Bean-to-Bar Recipe (70% Dark Chocolate):
· 200g roasted cacao nibs
· 120g organic cane sugar (finely ground in a blender)
· 60g additional cocoa butter (optional, for extra silkiness)
· 1 tsp pure vanilla powder (optional)
· Pinch of salt
Process Overview:
Winnowing & Grinding: If starting with whole beans, roast, then winnow (remove husks) to get clean nibs. Grind nibs in a powerful grinder until they form a warm, liquid paste (chocolate liquor). This can take 10-15 minutes in bursts.
Refining & Conching: Transfer the liquor to a melanger. Add sugar and optional cocoa butter. Let it grind for 12-48 hours. This “conching” process develops flavor, smooths texture, and coats every particle with cocoa butter.
Tempering & Molding: Follow the tempering process outlined in Method 1. The temperature windows are the same. Mold and set.
The Art & Science of Tempering: Non-Negotiable for Perfection
Tempering is the controlled crystallization of cocoa butter. It ensures your bar is:
· Snappy with a clean break
· Glossy and visually appealing
· Stable at room temperature, resisting melt and fat bloom
The “Shortcut” Seed Method (as described above) is the most reliable for home cooks. Use an instant-read thermometer for precision.
Choosing the Right Molds & Achieving a Professional Finish
Silicone bar molds are ideal. They are flexible, easy to clean, and come in myriad designs.
· Prep: Ensure molds are completely clean, dry, and at room temperature.
· Pouring: Fill each cavity, then use an offset spatula to scrape excess chocolate off the top for a perfectly flat back.
· Tapping: Tap the mold firmly on the counter 20-30 times to release trapped air bubbles for a smooth surface.
Pro Tips for Impeccable Homemade Chocolate Bars
· No Water! Even a drop can cause chocolate to “seize” into a grainy mass. Ensure all tools are completely dry.
· Low & Slow Melting: Use a double boiler or microwave in 20-second bursts at 50% power, stirring between each.
· Quality Ingredients: The flavor of your bar is only as good as your cocoa. Source ethical, high-quality couverture or cocoa beans/nibs.
· Patient Setting: Don’t rush the set. Moving tempered chocolate to a fridge that’s too cold can cause condensation and sugar bloom.
10 Incredible Flavor Combination Ideas
Salted Almond Toffee: Dark chocolate + crushed toffee bits + flaky sea salt.
Orange Spice: Dark chocolate + candied orange peel + a hint of cinnamon.
Coconut Matcha: White chocolate + matcha powder + toasted coconut flakes.
Mocha Crunch: Milk chocolate + espresso beans + roasted cacao nibs.
Pink Himalayan & Raspberry: Dark chocolate + freeze-dried raspberry powder + pink Himalayan salt.
S’mores: Milk chocolate + graham cracker crumbs + mini marshmallows.
Spicy Maya: Dark chocolate + cayenne pepper + cinnamon + a touch of orange oil.
Cookies & Cream: White chocolate + crushed oreo pieces.
Honeycomb: Milk or dark chocolate + pieces of honeycomb candy (cinder toffee).
Tropical: White chocolate + dried pineapple + macadamia nuts.
Dietary Adaptations: Vegan, Sugar-Free, Paleo
· Vegan: Use dark chocolate (check for dairy) or make your own with cocoa mass, cocoa butter, and a plant-based sweetener like coconut sugar. For “milk” chocolate, use powdered oat or coconut milk.
· Sugar-Free: Use a sugar-free chocolate base or make from scratch with erythritol/monk fruit blends. Note: texture may differ.
· Paleo: Use 100% cacao mass, cocoa butter, and a paleo-approved sweetener like pure maple sugar or raw honey (which will add flavor).
Troubleshooting Common Chocolate Issues
· Bloom (White film): Fat Bloom (stored too warm) or Sugar Bloom (condensation). It’s safe to eat but imperfect. Proper tempering and storage prevent it.
· Grainy Texture: Chocolate was not tempered properly, or it seized from moisture/overheating.
· Won’t Release from Mold: Chocolate wasn’t fully set, or the mold needs a light polish with a soft cloth.
· Dull Finish: Chocolate was not in temper when molded.
Packaging & Gifting: The Final Presentation
Homemade chocolate bars make extraordinary gifts. Wrap cooled bars in cellophane or wax paper, seal with a sticker, and place in a small box or bag. Add a custom label with the flavor, cocoa percentage, and date.
Storage: Keeping Your Creations Perfect
Store in an airtight container in a cool, dark, dry place (60-68°F / 15-20°C). Do not refrigerate unless your environment is very warm, and then only in a sealed container to avoid odors and condensation. Properly tempered and stored bars can last 4-6 weeks.
The Final Verdict: Your Journey to Chocolate Mastery
Creating homemade chocolate bars is a blend of precise science and creative artistry. It’s a deeply satisfying craft that yields delicious rewards. Start with the couverture method to build confidence, then dare to go bean-to-bar. Each batch will teach you something new about this incredible ingredient.
Your Invitation to Become a Chocolatier
The path to extraordinary chocolate begins with a single bean—or a single bar of good couverture. Embrace the process, experiment fearlessly, and share the results. The world needs more small-batch, made-with-love chocolate.
Basic Recipe Card: Simplified Dark Chocolate Bars
Yield: 3-4 standard bars Prep Time: 20 mins Setting Time: 1 hour Total Time: 1 hour 30 mins
Ingredients
· 300g high-quality dark couverture chocolate (70%), finely chopped
· Optional Add-Ins (Choose One):
· 1 tsp flaky sea salt
· 1/2 cup toasted nuts (hazelnuts, almonds, pecans)
· 1/4 cup chopped dried fruit or candied ginger
· 2 tbsp cacao nibs
Instructions
- Prepare: Set up a double boiler. Have your molds ready and a thermometer handy. Reserve 100g of chopped chocolate as your “seed.”
- Melt: Melt 200g of chocolate over simmering water, stirring until it reaches 115°F (46°C). Remove bowl from heat.
- Temper: Immediately add the reserved 100g “seed” chocolate. Stir gently and constantly until all pieces are melted and the chocolate cools to 90°F (32°C).
- Test Tempering: Dip a knife tip or parchment paper into the chocolate. It should set within 3-5 minutes at room temperature, be glossy, and snap.
- Add-In & Mold: Stir in your chosen add-in. Pour into molds, tap vigorously to remove bubbles, and scrape the backs flat.
- Set: Let set at cool room temperature until firm (about 1 hour). Unmold and enjoy or package.
Have you crafted your own signature chocolate bar? Share a photo of your glossy creations and your favorite flavor combination in the comments below! The world of homemade chocolate is waiting for you.
More Recipes You Might Like
-

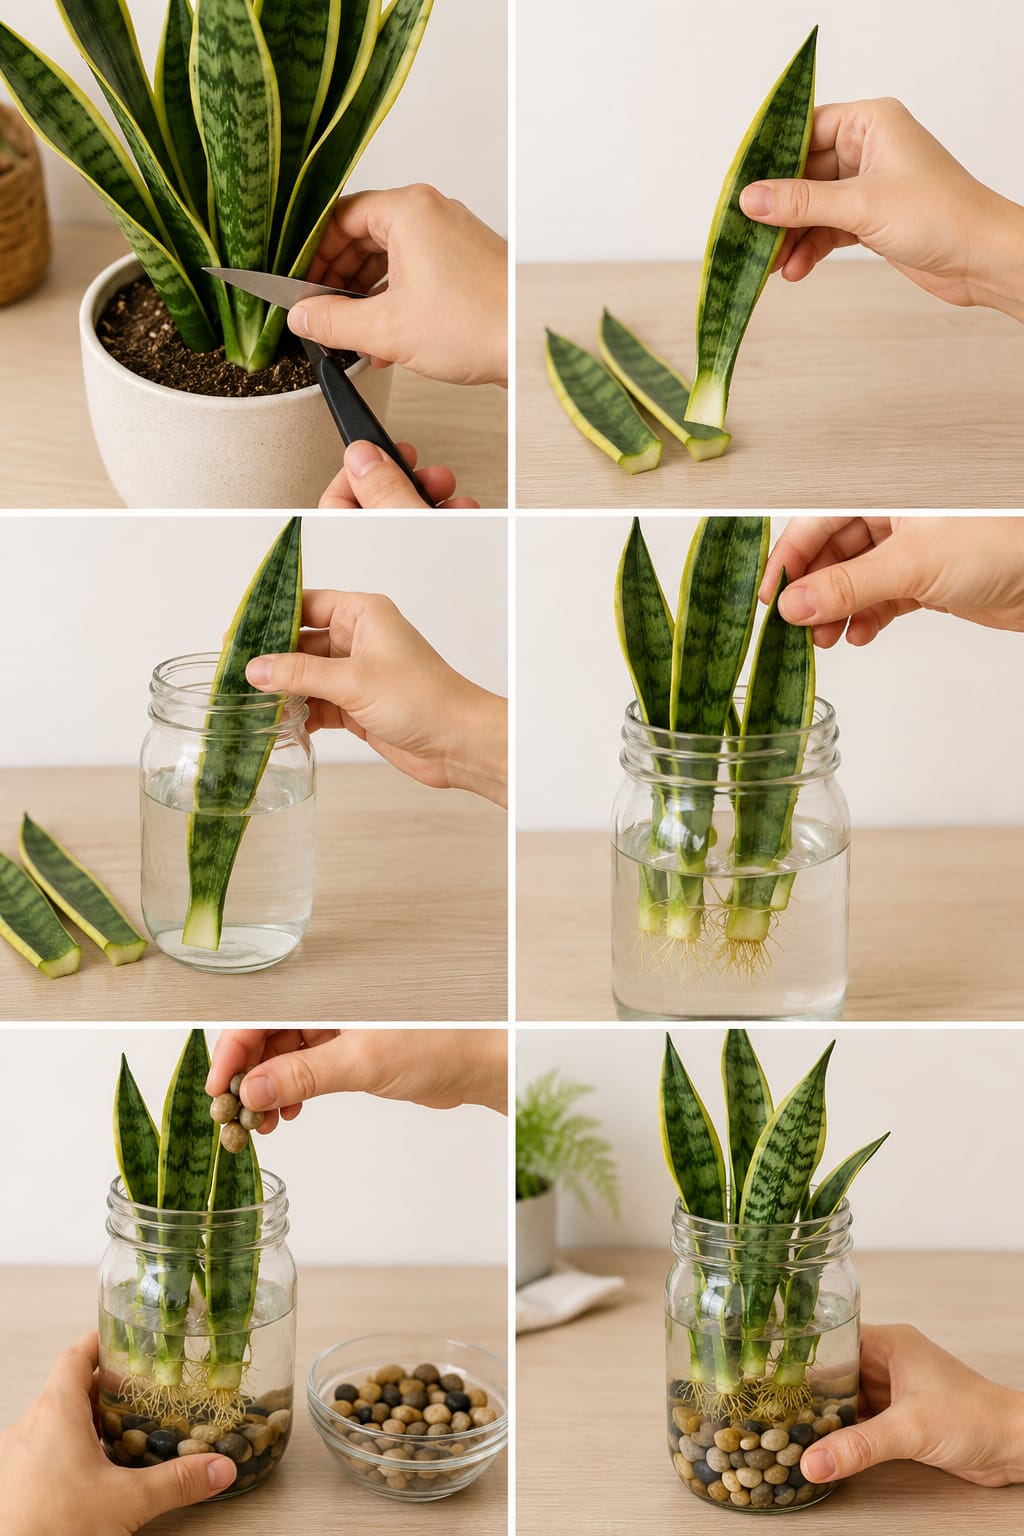
How to Grow Snake Plant Cuttings in Water: A Complete Guide for Strong Roots, Healthy Leaves, Clean Jar Displays, and Easy Indoor Propagation
Snake plants are some of the easiest, strongest, and most stylish houseplants you can grow indoors. Their tall sword-shaped leaves, bold green patterns, yellow edges, and modern upright shape make them perfect for living rooms, bedrooms, offices, shelves, windowsills, and plant corners. They are famous for being low-maintenance, drought-tolerant, and beginner-friendly. The image shows a…
-

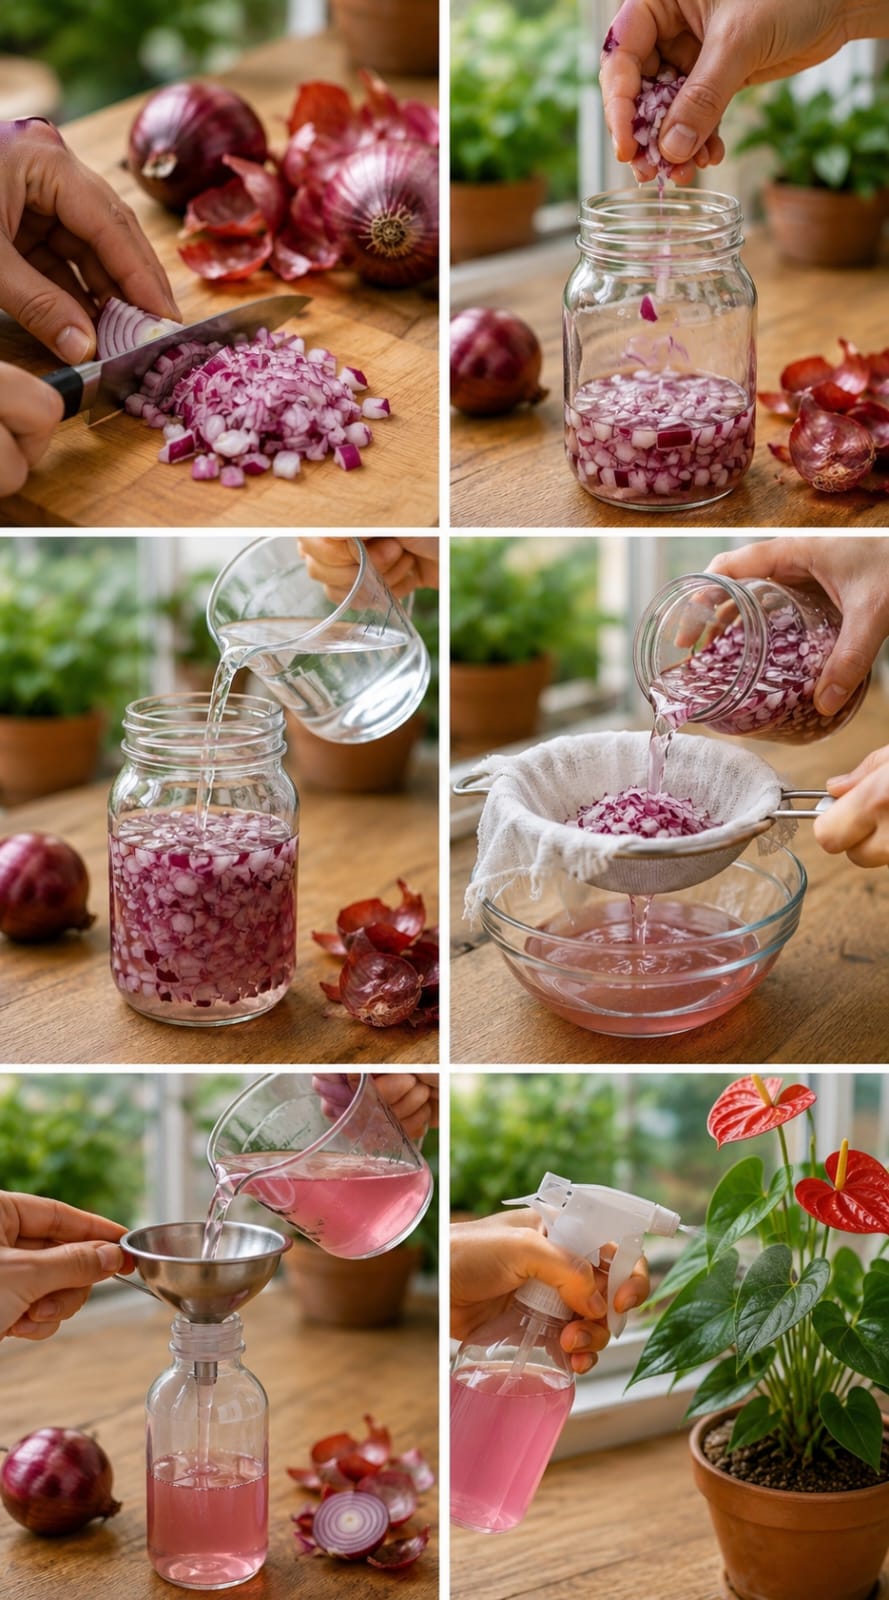
Onion Water for Anthuriums: A Complete Guide for Glossy Leaves, Strong Roots, Bright Flowers, and Safe Indoor Plant Care
Anthuriums are some of the most beautiful tropical plants you can grow indoors. Their glossy heart-shaped leaves, colorful spathes, and elegant upright flowers can make any room feel fresh, bright, and luxurious. Red, pink, white, purple, and orange Anthuriums are often used as living decorations because they can bloom for a long time when the…
-

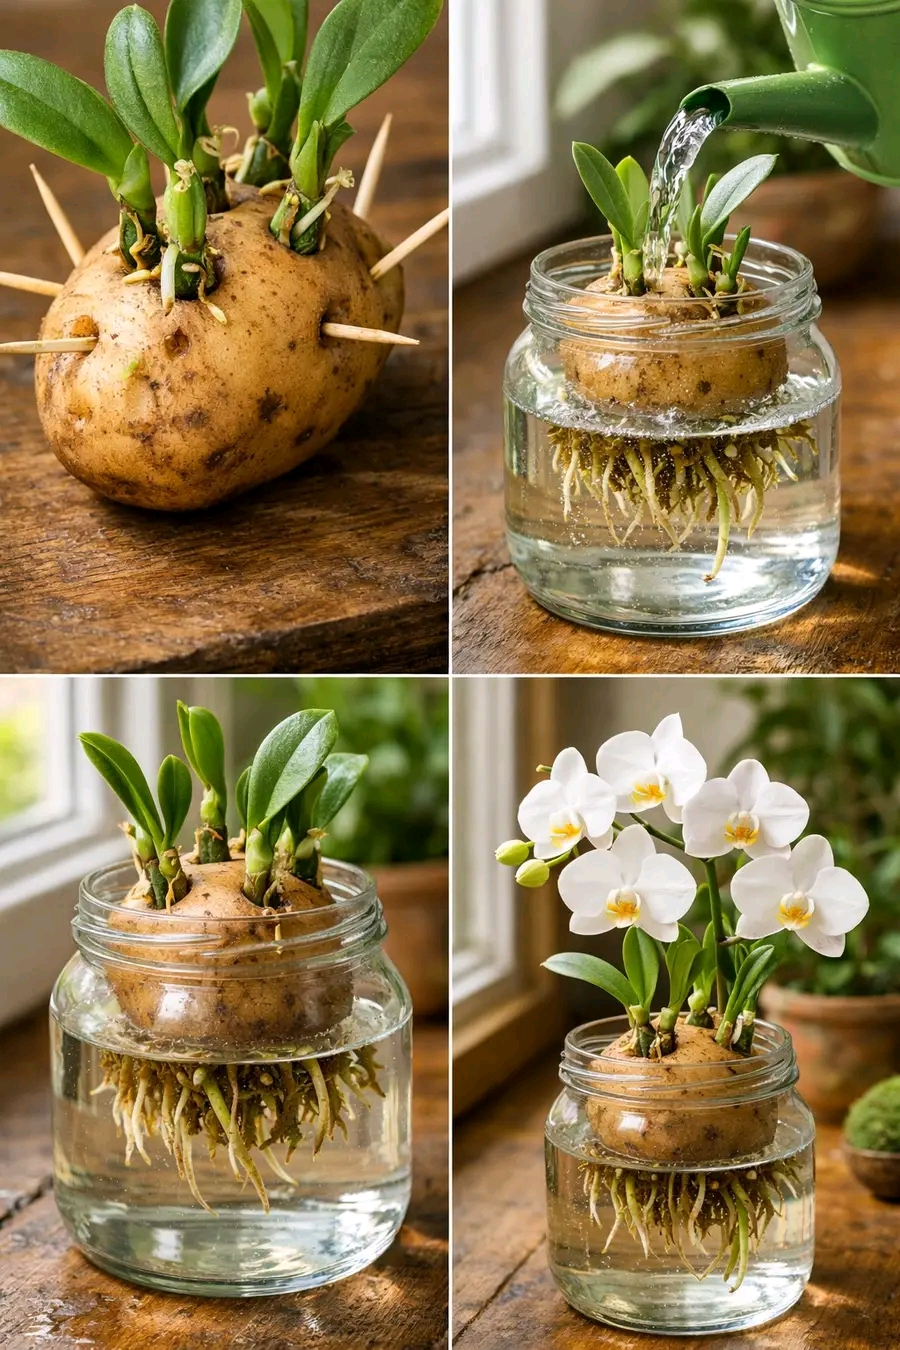
Potato Method for Orchids: A Complete Guide for Strong Roots, Healthy Leaves, Beautiful Blooms, and Safe Indoor Orchid Care
Orchids are some of the most elegant flowering plants you can grow indoors. Their smooth green leaves, graceful flower spikes, and long-lasting blooms make them a favorite for windowsills, plant shelves, living rooms, kitchens, offices, and bright indoor corners. A healthy orchid can bloom for weeks, sometimes months, when the care routine is right. But…