The clove tree (Syzygium aromaticum) is the source of one of the world’s most prized and aromatic spices. Growing your own clove tree from seed is a rewarding, long-term project for any serious gardener or spice enthusiast. While it requires patience and specific conditions, the journey from a single dried clove spice to a fragrant, flowering tree is incredibly fulfilling.
This complete guide walks you through every stage, from selecting the right seed to nurturing a mature tree, complete with professional tips to maximize your success.
Understanding the Clove Tree: Patience is Key
Before you begin, it’s crucial to set the right expectations. A clove tree is a tropical evergreen native to Indonesia’s “Spice Islands.” It thrives in consistently warm, humid conditions and is not frost-tolerant. From seed, a tree takes at least 7-10 years to produce its first flower buds (the cloves), and it reaches full production after 15-20 years. This is a legacy plant, grown for the joy of the process and the beauty of the tree itself.
Why Grow from Seed?
· Cost-Effective: A packet of viable seeds is cheaper than a sapling.
· Greater Satisfaction: There’s unmatched pride in growing a tree from its very beginning.
· Adaptation: Seedlings can sometimes adapt slightly better to your specific local microclimate over time.
Part 1: Sourcing & Preparing Your Seeds
The most common challenge is starting with non-viable seeds.
Step 1: Seed Selection
· Source: Your best chance is with fresh, viable seeds from a reputable specialty seed supplier. The whole cloves found in your kitchen spice cabinet are almost always heat-treated and irradiated during processing, which destroys their ability to germinate.
· Appearance: Viable clove seeds are fresh, plump, and have a slight greyish-purple hue, not the uniform brown of dried spice cloves.
Step 2: Pre-Germination Soak (The Pro-Tip)
Soak your seeds in lukewarm water for 24-48 hours. This helps rehydrate the seed coat and signals it to break dormancy.
Discard any seeds that float, as they are likely not viable.
For an extra boost, add a pinch of fulvic acid or a weak solution of seaweed extract to the soaking water.
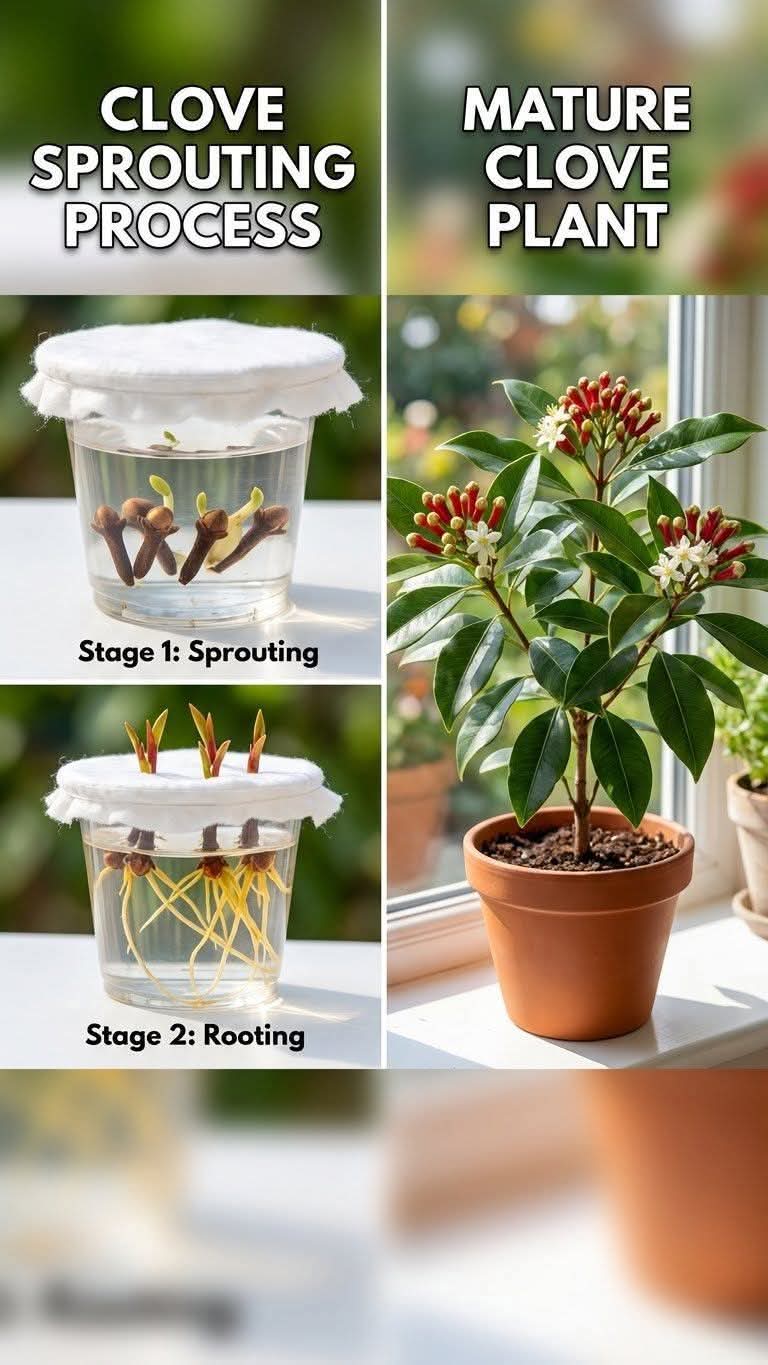
Part 2: The Germination Process (Stage 1: Sprouting)
Clove seeds need warm, consistent moisture to sprout.
Method: The Baggy Method (Highly Recommended)
Medium: Moisten a handful of sphagnum moss, coco coir, or a paper towel. Wring it out so it’s damp but not dripping.
Setup: Place the moist medium in a clear resealable plastic bag. Bury the soaked seeds within the medium.
Environment: Seal the bag and place it in a very warm location (80-85°F / 27-29°C is ideal), such as on top of a refrigerator or using a seedling heat mat.
Check: Open the bag daily for fresh air and check for mold or sprouting. Keep the medium consistently damp.
Timeline: Germination can take 4-6 weeks. You are waiting for the radical (first root) to emerge.
Part 3: Potting & The Seedling Stage (Stage 2: Rooting)
Once your seed has sprouted a small root (about 1/4 inch), it’s time to pot it.
Potting Mix Recipe:
· 2 parts high-quality potting soil
· 1 part perlite or coarse sand (for critical drainage)
· 1 part coco coir (to retain moisture without waterlogging)
· A handful of orchid bark for aeration (optional pro tip)
Potting Process:
Choose a small pot (4-6 inches) with excellent drainage holes.
Fill with your pre-moistened potting mix.
Make a small hole and place the sprouted seed root-down, just barely covered with soil. The top of the seed should be near the surface.
Water gently to settle the soil.
Create a Mini Greenhouse: Cover the pot with a clear plastic bag or place it in a propagator to maintain high humidity (70-80%).
Seedling Care (The First Critical Months):
· Light: Provide bright, indirect light. A north or east-facing window is good. Avoid direct, harsh sun which will scorch the tender seedling.
· Temperature: Maintain a steady 70-85°F (21-29°C). Never below 60°F (15°C).
· Water: Keep the soil consistently moist but never soggy. Use a spray bottle to mist the soil surface and leaves frequently.
· Fertilizer: After the first true leaves appear, feed with a very dilute (1/4 strength), balanced liquid fertilizer every 4-6 weeks.
Part 4: The Growing-On & Maturation Process
As your seedling grows, its needs will evolve.
Repotting:
· Repot into a slightly larger container each year in spring. Clove trees have a taproot, so prefer deeper pots to wider ones.
· Gradually increase the pot size until it’s in its final large container (if growing in a pot) or ready for the ground.
Mature Tree Care (Once Established):
· Light: Mature trees can tolerate partial to full sun, but in very hot climates, afternoon shade is beneficial.
· Water: Water deeply when the top inch of soil feels dry. They enjoy consistent moisture but despise “wet feet.”
· Soil: They thrive in rich, loamy, well-draining soil with a slightly acidic to neutral pH (5.5-7.0).
· Fertilizer: Feed in the growing season (spring/summer) with a balanced, slow-release organic fertilizer or a formula for citrus/ fruit trees.
· Humidity: This remains crucial. If you live in a dry climate, regular misting, a humidity tray, or a nearby humidifier is essential.
· Pruning: Prune only to remove dead or diseased branches and to shape the tree after the flowering season.
The Big Reward: Flowering & Harvest
· Your tree will first produce delicate, fragrant yellow flowers in clusters at the branch tips.
· The cloves are the unopened flower buds. Harvest them when they turn from green to a pinkish-red hue.
· Dry the buds in a cool, dark, well-ventilated place until they are dark brown and hard.
Pro Tips & Troubleshooting
· The Biggest Secret: Consistency. Fluctuations in temperature, moisture, or humidity are the main causes of failure.
· Container Growing: In non-tropical climates, growing in a large, movable container is ideal. You can bring it indoors to a bright sunroom or greenhouse during winter.
· Pests: Watch for spider mites (in low humidity) and scale. Treat with insecticidal soap or neem oil.
· Yellowing Leaves: Usually a sign of overwatering, poor drainage, or nutrient deficiency.
· Slow Growth: Clove trees are naturally slow-growing. Ensure it has enough warmth, light, and humidity.
Frequently Asked Questions (FAQ)
Q: Can I really grow a tree from grocery store cloves?
A: It is highly unlikely.Processing methods destroy the embryo. For any real chance of success, purchase specifically intended for planting from a specialty nursery.
Q: How large will a potted clove tree get?
A:With annual repotting, a container-grown tree can reach 6-8 feet over many years, which is manageable indoors with pruning.
Q: What is the ideal USDA growing zone for clove trees?
A:They are only hardy outdoors in USDA Zones 11-12 (tropical, frost-free climates like South Florida or Hawaii). Elsewhere, they must be grown in containers.
Q: My seedling damped off. What happened?
A:”Damping off” is a fungal disease caused by overly wet, cool soil and poor air circulation. Always use sterile potting mix, ensure perfect drainage, and provide bottom heat.
Q: Can I propagate clove trees from cuttings?
A:Yes, semi-hardwood cuttings can be rooted with high humidity and rooting hormone, but seeds are the most common method for home growers.
Conclusion: A Journey of Aromatic Patience
Growing a clove tree from seed is the ultimate test of a gardener’s patience and care. It connects you to centuries of spice trade history right from your windowsill or garden. While you may wait years for that first harvest, you’ll be rewarded with a beautiful, glossy-leaved tree that fills the air with a subtle, spicy fragrance.
Start with viable seeds, master the humid microclimate, and embrace the slow, steady rhythm of tropical growth. The day you pinch your first home-grown clove bud will make the decade of waiting profoundly worth it.
Ready to start your spice garden journey? Share your clove-growing progress or questions in the comments below!
More Recipes You Might Like
-

Why Some Homeowners Are Using Onion Water Around Orchids and What Usually Helps More for Strong Roots, Healthy Leaves, and Long-Lasting Blooms
Orchids are among the most elegant indoor flowering plants for homeowners who want graceful stems, glossy green leaves, long-lasting blooms, and a refined decorative display that fits beautifully in living rooms, bedrooms, apartments, home offices, bright kitchens, windowsills, covered patios, commercial interiors, luxury home staging, and premium indoor plant styling. A healthy orchid can turn…
-

Why Some Homeowners Are Pouring Aloe Water Around Orchids and What Usually Helps More for Strong Roots, Healthy Leaves, and Long-Lasting Blooms
Orchids are among the most elegant indoor flowering plants for homeowners who want graceful blooms, sculptural roots, glossy leaves, and a premium decorative display that fits beautifully in living rooms, bedrooms, apartments, home offices, bright kitchens, balcony gardens, covered patios, commercial interiors, luxury home staging, and refined indoor plant styling. A healthy orchid can make…
-
Why Some Homeowners Are Adding Brown Powder Around Snake Plants and What Usually Helps More for Strong Roots, Fuller Growth, and Healthy Indoor Leaves
Snake plant is one of the most dependable indoor plants for homeowners who want strong upright leaves, bold green patterning, yellow-edged variegation, easy maintenance, and a clean decorative display that fits beautifully in living rooms, bedrooms, apartments, home offices, bright kitchens, entry corners, sunny windowsills, plant shelves, commercial interiors, luxury home staging, and premium indoor…


