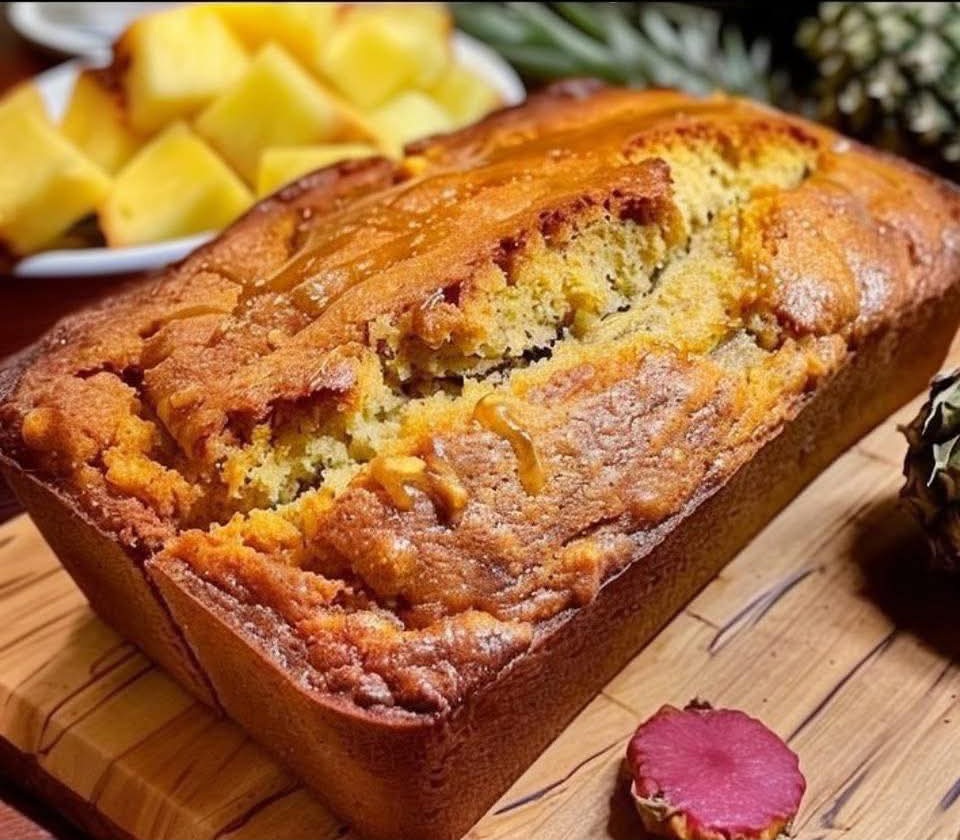
Close your eyes and imagine the best banana bread you’ve ever had. Now, transport it to a sun-drenched Hawaiian beach. Infuse it with the sweet-tart punch of ripe pineapple, the rich, buttery crunch of toasted macadamia nuts, and the fragrant, creamy whisper of coconut. This is Hawaiian Banana Bread—not just a quick bread, but a slice of edible aloha. It transforms the familiar, comforting classic into a vibrant, tropical-inspired bake that’s perfect for brunch, gifting, or turning an ordinary afternoon into a mini-vacation. This recipe is a celebration of abundance, where the moist, tender crumb of traditional banana bread becomes a canvas for the iconic flavors of the islands.
This guide is your comprehensive journey to mastering this tropical treat. We’ll delve into the precise techniques for balancing moisture from the fruit, explore the essential baking tools that ensure perfect texture, and provide a master recipe that’s adaptable for any dietary need. Get ready to fill your kitchen with the unforgettable aroma of paradise baking.
The Tropical Baker’s Toolkit: Equipment for Moisture Management and Texture
Hawaiian banana bread incorporates extra moisture from pineapple and ripe bananas. The right tools are crucial for handling this without ending up with a gummy, dense loaf. It’s all about precision and control.
The Digital Kitchen Scale: The Guardian Against Sogginess
This is the most critical tool.Weighing your mashed bananas and crushed pineapple is non-negotiable. “One cup” of mashed banana can vary by ounces, introducing unpredictable moisture. A digital kitchen scale ensures you use the perfect 340-360g of banana pulp and 120g of drained pineapple, guaranteeing a moist but structured loaf every single time.
The Potato Ricer or Fine-Mesh Sieve: For Perfect Pineapple Prep
Canned crushed pineapple packed in juice is convenient,but it’s too wet. The pro method: drain it in a fine-mesh sieve, then press firmly with the back of a spoon or a potato ricer to remove as much excess juice as possible. This concentrated pineapple flavor won’t waterlog your batter. Reserve the juice for a glaze!
The Stand Mixer & Paddle Attachment: For the Ideal Batter Consistency
While mixing by hand is possible,a stand mixer fitted with the paddle attachment makes the creaming process—beating room-temperature butter and sugar—effortless and perfect. This aeration is the primary leavening agent for a tender crumb. It also makes incorporating the thick, fruit-laden batter smooth and uniform without overmixing.
Loaf Pans and Cooling Racks: For the Perfect Bake and Release
For classic loaves,use 9×5-inch light-colored metal loaf pans (like Nordic Ware). Their even heat promotes a beautiful rise. For easier release and cleanup, parchment paper slings are a must. Once baked, immediate cooling on a wire rack is essential. This stops the cooking process and allows steam to escape, preventing a soggy bottom and ensuring the crust stays perfectly tender-crisp.
The Toaster Oven or Small Skillet: For Unleashing Nutty Flavor
Raw macadamia nuts are good;toasted macadamia nuts are transcendent. Spread them on a small baking sheet and toast in a toaster oven at 325°F for 8-10 minutes, or shake them in a dry skillet over medium heat until golden and fragrant. Toasting deepens their flavor and adds a crucial textural contrast.
The Essential Tropical Baking Kit:
- · Digital kitchen scale (buy it from here)
- · Fine-mesh sieve or potato ricer (buy it from here)
- · Stand mixer (or sturdy hand mixer) (buy it from here)
- · Two 9×5-inch metal loaf pans & parchment paper (buy it from here)
- · Wire cooling racks (buy it from here)
- · Box grater (for fresh coconut, if using) (buy it from here)
The Master Recipe: Ultimate Hawaiian Banana Bread
This recipe is engineered to be intensely flavorful and moist, with a tight yet tender crumb that can support the hefty tropical add-ins without collapsing.
Prep Time: 20 minutes | Bake Time: 55-65 minutes | Cool Time: 2 hours | Yields: 2 loaves
Ingredients:
For the Bread:
· 360g (about 1 ½ cups) mashed very ripe bananas (about 3-4 large)
· 120g (about ¾ cup) crushed pineapple, thoroughly drained and pressed dry
· 280g (2 ⅓ cups) all-purpose flour
· 1 tsp baking soda
· ½ tsp baking powder
· 1 tsp fine sea salt
· 1 tsp ground cinnamon
· 115g (½ cup) unsalted butter, room temperature
· 150g (¾ cup) granulated sugar
· 100g (½ cup packed) light brown sugar
· 2 large eggs, room temperature
· 1 tsp pure vanilla extract
· ½ tsp coconut extract (optional but recommended)
· 80ml (⅓ cup) full-fat coconut milk (or whole milk)
· 100g (1 cup) sweetened shredded coconut
· 120g (1 cup) macadamia nuts, toasted and roughly chopped
For the Coconut Glaze (Optional):
· 120g (1 cup) powdered sugar, sifted
· 2-3 tbsp coconut milk or reserved pineapple juice
· ½ tsp vanilla or coconut extract
· Pinch of salt
Step-by-Step Instructions:
PART 1: PREPARE THE FRUIT & DRY INGREDIENTS
Prep Fruit: Mash bananas and measure 360g into a bowl. In a fine-mesh sieve, drain the canned pineapple, then press firmly to remove excess liquid. Measure 120g of the pressed pineapple. Set both aside.
Prep Pans & Oven: Preheat oven to 350°F (175°C). Grease and line your loaf pans with parchment slings.
Whisk Dry Ingredients: In a medium bowl, whisk together the flour, baking soda, baking powder, salt, and cinnamon. Set aside.
PART 2: CREATE THE BATTER
Cream Butter and Sugars: In your stand mixer fitted with the paddle, beat the butter, granulated sugar, and brown sugar on medium-high speed for 3-4 minutes, until light and fluffy.
Incorporate Eggs and Flavor: Add the eggs one at a time, beating well after each. Scrape down the bowl. Beat in the vanilla and coconut extract.
Add Fruit: With mixer on low, add the mashed bananas and drained pineapple. Mix until just combined (it may look slightly curdled—this is fine).
Combine Wet and Dry: With the mixer on low, add the dry ingredients in three parts, alternating with the coconut milk in two parts, beginning and ending with the dry ingredients. Mix only until the last streaks of flour disappear.
Fold in Mix-Ins: Use a silicone spatula to gently fold in the shredded coconut and toasted macadamia nuts.
PART 3: BAKE, COOL, & GLAZE
Bake: Divide the batter evenly between the prepared pans. Bake for 55-65 minutes, or until a cake tester or instant-read thermometer inserted into the center of the loaf reads 200-205°F (93-96°C), and the top is deep golden brown.
Cool Completely: Let the loaves cool in the pans on a wire rack for 15 minutes. Then, use the parchment slings to lift them out onto the rack to cool completely (at least 2 hours). Glazing or slicing a warm loaf will cause it to tear.
Glaze (Optional): Whisk the glaze ingredients until smooth. Drizzle over the fully cooled loaves. Let set for 15 minutes before slicing.
The Science of Tropical Moisture: Why This Recipe Works
· Banana & Pineapple Synergy: Both fruits are high in moisture and natural sugars. By weighing the bananas and vigorously draining the pineapple, we control the exact liquid content. The acids in the pineapple also react with the baking soda, providing an extra lift.
· Fat Balance: The butter provides flavor and a tender crumb, while the coconut milk adds a specific tropical richness and additional moisture that doesn’t harden when chilled like butter does.
· The Macadamia Nut Advantage: Their high oil content means they stay softer than, say, almonds or walnuts after baking, contributing to a luxurious, buttery bite rather than a hard crunch.
Creative Variations & Dietary Twists
· Vegan Hawaiian Bread: Use vegan butter, flax eggs (2 tbsp ground flax + 5 tbsp water), and ensure sugar is vegan. The fruit provides all the necessary moisture.
· Gluten-Free: Substitute the all-purpose flour with a 1:1 gluten-free baking blend that contains xanthan gum.
· Piña Colada Bread: Add ½ cup of white chocolate chips and 3 tablespoons of finely chopped dried pineapple with the coconut. Up the coconut extract to 1 tsp.
· Mango Macadamia: Replace the pineapple with an equal weight of finely diced ripe mango (blotted very dry).
· Chocolate-Dipped: Dip one end of each cooled slice in melted dark chocolate and sprinkle with extra toasted coconut.
Troubleshooting & FAQ
· My bread is soggy/gummy in the middle. This is the #1 issue, caused by: 1) Under-baking (use the thermometer!), 2) Undrained pineapple, 3) Over-mixing the batter after adding flour, or 4) Slicing before it’s completely cool.
· My crust is too dark before the inside is done. Your oven runs hot, or you’re using dark metal pans. Invest in an oven thermometer. If it browns too quickly, tent the loaves loosely with aluminum foil for the last 15-20 minutes of baking.
· Can I use fresh pineapple? Yes, but you must cook it first. Fresh pineapple contains an enzyme (bromelain) that breaks down protein and can prevent the bread from setting. Simmer 1 cup of finely chopped fresh pineapple with a tablespoon of sugar until soft and most liquid has evaporated. Cool and blot before using.
· How do I store it? Wrap cooled loaves tightly in plastic wrap. They will keep at room temperature for 3 days, in the fridge for up to a week, or can be frozen for up to 3 months.
· Can I make muffins? Absolutely. Fill lined muffin cups ⅔ full and bake at 375°F for 18-22 minutes. Yields about 18-24 muffins.
Conclusion: The Aloha Spirit in a Loaf Pan
Hawaiian Banana Bread is more than a recipe; it’s an experience. It captures the generosity and joy of the islands in a simple, shareable form. By mastering the balance of its lush, tropical ingredients, you’re not just baking—you’re crafting a moment of escape and indulgence.
So, weigh your fruit, toast your nuts, and preheat your oven. Let the aromas of coconut, pineapple, and banana weave their magic. When you pull those perfectly domed, golden loaves from the oven, you’ll have created something truly special: a taste of Hawaiian sunshine, perfect for sharing with ohana (family) and friends.
More Recipes You Might Like
-

Why Some Homeowners Are Using Onion Water Around Orchids and What Usually Helps More for Strong Roots, Healthy Leaves, and Long-Lasting Blooms
Orchids are among the most elegant indoor flowering plants for homeowners who want graceful stems, glossy green leaves, long-lasting blooms, and a refined decorative display that fits beautifully in living rooms, bedrooms, apartments, home offices, bright kitchens, windowsills, covered patios, commercial interiors, luxury home staging, and premium indoor plant styling. A healthy orchid can turn…
-

Why Some Homeowners Are Pouring Aloe Water Around Orchids and What Usually Helps More for Strong Roots, Healthy Leaves, and Long-Lasting Blooms
Orchids are among the most elegant indoor flowering plants for homeowners who want graceful blooms, sculptural roots, glossy leaves, and a premium decorative display that fits beautifully in living rooms, bedrooms, apartments, home offices, bright kitchens, balcony gardens, covered patios, commercial interiors, luxury home staging, and refined indoor plant styling. A healthy orchid can make…
-
Why Some Homeowners Are Adding Brown Powder Around Snake Plants and What Usually Helps More for Strong Roots, Fuller Growth, and Healthy Indoor Leaves
Snake plant is one of the most dependable indoor plants for homeowners who want strong upright leaves, bold green patterning, yellow-edged variegation, easy maintenance, and a clean decorative display that fits beautifully in living rooms, bedrooms, apartments, home offices, bright kitchens, entry corners, sunny windowsills, plant shelves, commercial interiors, luxury home staging, and premium indoor…


