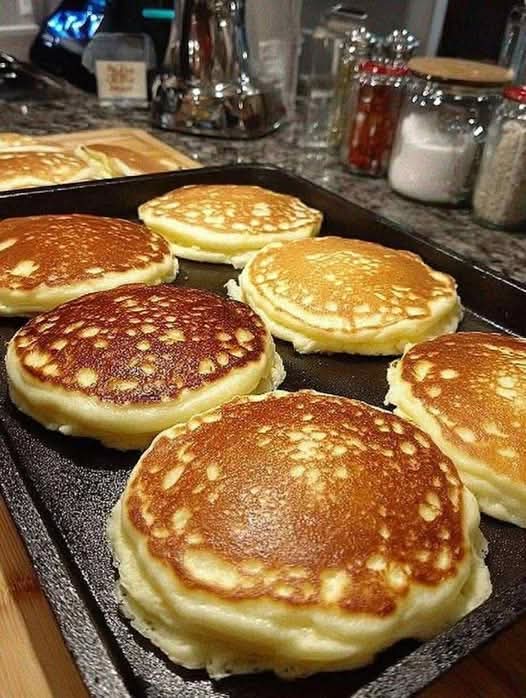
There’s a special kind of kitchen magic that happens when you combine the timeless tradition of sourdough with the humble, beloved pancake. The result? Fluffy sourdough pancakes with a depth of flavor you simply can’t get from a box mix—a perfect balance of subtle tang, buttery richness, and an airy, tender crumb that soaks up maple syrup like a dream.
If you’ve been nurturing a sourdough starter, you know the weekly dilemma: what to do with the discard? Throwing it away feels like wasting a little piece of your culinary heart. The solution is here, and it might just become your new Saturday morning ritual. This sourdough discard pancake recipe transforms that “waste” into the most coveted breakfast on the block. These aren’t just pancakes; they’re a revelation—a make-ahead breakfast that’s both an ancient baking technique and the ultimate family-friendly comfort food.
Get ready to fall in love with your starter all over again. This recipe delivers the ultimate easy sourdough recipe for beginners and experts alike, promising a stack of pancakes that are deliciously light, satisfyingly hearty, and 100% worth getting out of bed for.
Why Sourdough Makes the Ultimate Pancake
You might wonder what all the fuss is about. What does sourdough actually do to a pancake? The benefits are both scientific and sensual:
· Unbeatable Flavor: The natural fermentation process develops a complex, slightly tangy flavor that makes plain pancakes taste one-dimensional in comparison.
· Incredible Texture: The active starter and overnight rest work together to create an exceptionally tender and fluffy interior with a delightfully crisp edge.
· Better for You: Fermentation helps break down phytic acid and pre-digests some of the grains, making the nutrients more accessible and the pancakes easier on your stomach.
· Zero Waste Cooking: This is the holy grail for sourdough bakers. Your faithful starter discard finally gets a starring role, eliminating guilt and adding flavor.
· Make-Ahead Magic: The batter comes together in minutes the night before, meaning breakfast is practically ready when you stumble into the kitchen. It’s the perfect easy weekend breakfast.
Your Sourdough Pancake Ingredients: Simple & Wholesome
This recipe uses simple pantry staples, letting the sourdough flavor shine. Here’s your grocery list:
The Sourdough Foundation:
· 1 cup (about 230g) unfed sourdough starter – This is your discard, straight from the fridge. It can be at peak or hungry; it all works here!
· 1 cup (240ml) buttermilk, milk, or a plant-based alternative – Buttermilk is highly recommended for extra tang and tenderness.
· 1 large egg – Bring it to room temperature for best incorporation.
The Dry Goods:
· 1 cup (125g) all-purpose flour – The workhorse flour that gives the perfect structure.
· 1 tablespoon granulated sugar – Just a touch to balance the tang and aid browning.
· ½ teaspoon baking soda – Our leavening powerhouse that creates the lift.
· ½ teaspoon fine sea salt – Essential for enhancing all the flavors.
· 1 teaspoon baking powder – For an extra boost of fluffiness in the morning.
The Finishing Touches:
· 3 tablespoons unsalted butter, melted (and slightly cooled), plus more for cooking – For richness and flavor.
· 1 teaspoon pure vanilla extract – The aromatic cherry on top.
Essential Equipment for Pancake Perfection
You don’t need anything fancy, but a few key tools make the process seamless:
Ingredients
Two Mixing Bowls (One Large, One Medium): For keeping wet and dry ingredients separate until the final mix.
Whisk and Spatula: A whisk for beating the wet ingredients and blending the dry, and a spatula for gently folding everything together.
Non-Stick Skillet or Griddle: A large, heavy-bottomed skillet or an electric griddle heated to 375°F (190°C) is ideal for even cooking.
Thin, Flexible Spatula: For effortlessly flipping those golden-brown pancakes.
Ladle or Measuring Cup: A ¼ or ⅓ cup measure is perfect for pouring consistent, perfectly-sized pancakes.
Cooling Rack (Optional but Helpful): Placing cooked pancakes in a single layer on a rack in a warm oven prevents them from getting soggy while you cook the whole batch.
The Step-by-Step Guide to Sourdough Pancake Bliss
This process is beautifully simple, with most of the work happening while you sleep.
Part 1: The Overnight Rest (The Secret to Flavor & Fluff)
Step 1: Combine the Foundation.
In your large mixing bowl,whisk together the sourdough starter, buttermilk (or milk), and flour until you have a thick, shaggy batter. It’s okay if there are a few lumps. This is your “sponge.”
Step 2: Rest and Ferment.
Cover the bowl tightly with plastic wrap or a clean kitchen towel and let it sit at room temperature forat least 2 hours, or ideally overnight (8-12 hours). You’ll know it’s ready when the surface is bubbly and the batter has risen slightly. This fermentation is where the magic happens!
Part 2: Morning Batter-Up & Cook
Step 3: Wake Up the Batter.
In the morning,give your rested sponge a stir. You’ll see all those lovely bubbles! In a separate medium bowl, whisk the egg, then stir in the melted (and cooled) butter and vanilla extract. Add this mixture to your sourdough sponge and mix until just combined.
Step 4: Add the Leaveners.
To the same medium bowl(no need to wash it!), whisk together all the dry ingredients: sugar, baking soda, salt, and baking powder. Sprinkle this dry mix over the wet batter in the large bowl.
Step 5: The Gentle Fold.
Here’s the key to tenderness:GENTLY fold the dry ingredients into the wet batter using your spatula. Stop as soon as the flour disappears. The batter will be thick and full of bubbles, with some small lumps remaining. DO NOT OVERMIX. Let this final batter rest for 5-10 minutes while you heat your pan.
Step 6: Cook to Golden Perfection.
Heat your skillet or griddle over medium heat.Add a small pat of butter or a drizzle of neutral oil. Once hot, use your ladle to pour batter onto the cooking surface. Cook until the edges look set and bubbles form on the surface and begin to pop, about 2-4 minutes.
Step 7: The Flip.
Carefully slide your spatula underneath and flip the pancake.It should be a beautiful golden brown. Cook on the second side for another 1-2 minutes, until cooked through and golden.
Step 8: Serve Immediately!
Serve stacks hot off the griddle with your favorite toppings.Classic butter and pure maple syrup are a divine pairing.
Pro Tips for Pancake Perfection Every Time
· Batter Consistency is Key: This batter is thicker than traditional pancake batter. That’s normal! It leads to fluffier pancakes. If it feels too thick, you can fold in a single tablespoon of milk at a time to loosen.
· The Pan Temperature Test: Sprinkle a few drops of water on the hot pan. If they sizzle and dance, it’s ready. If they evaporate instantly, it’s too hot. If they just sit there, it needs more time.
· Don’t Press the Pancakes! Resist the urge to press down with the spatula after flipping. You’ll squeeze out all the precious air we worked so hard to create.
· Keeping Pancakes Warm: Preheat your oven to 200°F (95°C). As pancakes come off the griddle, place them in a single layer on a baking sheet or cooling rack inside the oven to keep warm for up to 30 minutes.
· Using a Fresh, Active Starter: If you want an extra tangy punch, you can use 1 cup of fed, active starter and reduce the flour and water/milk in the initial sponge by ½ cup each. The result will be even bubblier!
Frequently Asked Questions (FAQs)
Can I make the batter completely the night before?
Yes!You can mix the entire batter (including the egg, butter, and leaveners) and store it covered in the refrigerator overnight. In the morning, let it sit at room temp for 20 minutes, give it one gentle stir, and start cooking. The rise may be slightly less, but they’ll still be delicious.
My batter is too thin/runny. What happened?
This can happen with a very hydrated(runny) starter. Next time, reduce the milk/buttermilk by 2 tablespoons. For now, you can sprinkle in a little extra flour, 1 tablespoon at a time, until it thickens to a scoopable consistency.
My pancakes aren’t fluffy. Why?
Two common culprits:1) Overmixing the batter after adding the baking soda/powder. Be gentle! 2) Old baking soda or powder. Check the expiration dates; they lose potency over time.
Can I freeze sourdough pancakes?
Absolutely!Let cooked pancakes cool completely, then place them in a single layer on a baking sheet to freeze solid (about 1 hour). Transfer to a freezer bag for up to 3 months. Reheat in a toaster or oven for a quick weekday breakfast.
Can I make these without buttermilk?
Yes!Use regular milk or a plant-based milk. For a tangy substitute, add 1 tablespoon of lemon juice or white vinegar to your 1-cup measure, then fill the rest with milk. Let it sit for 5 minutes to curdle before using.
Delicious Variations & Serving Ideas
Mix-In Madness (Add to batter before cooking):
· Classic Blueberry: Fold in 1 cup fresh or frozen blueberries.
· Chocolate Chip: A family favorite—add ½ cup semi-sweet chocolate chips.
· Lemon Poppyseed: Add the zest of one lemon and 1 tablespoon poppy seeds.
Gourmet Toppings to Elevate Your Stack:
· Maple Whipped Ricotta: Fold maple syrup into whipped ricotta for a creamy, sweet topping.
· Berry Compote: Simmer mixed berries with a little sugar and lemon juice until syrupy.
· Candied Nuts: Sprinkle with toasted pecans or walnuts tossed in butter and brown sugar.
· Savory Twist: Skip the sugar in the batter and top with a fried egg, avocado, and hot sauce for an incredible savory brunch.
The Final Flip
These sourdough pancakes are more than just a meal; they’re a celebration of a living ingredient and a testament to the power of patience. That overnight wait is rewarded with a breakfast that feels special, tastes extraordinary, and turns your sourdough discard from a chore into a cherished ingredient.
So tonight, take five minutes to mix that sponge. Tomorrow morning, you’ll be greeted not just by the promise of a new day, but by the aroma of bubbling, fermented batter ready to transform into the most satisfying, flavorful pancakes you’ve ever made. Your starter—and your family—will thank you.
Happy cooking, and enjoy every delicious, fluffy, tangy-sweet bite
More Recipes You Might Like
-

Why Some Homeowners Are Using Onion Water Around Orchids and What Usually Helps More for Strong Roots, Healthy Leaves, and Long-Lasting Blooms
Orchids are among the most elegant indoor flowering plants for homeowners who want graceful stems, glossy green leaves, long-lasting blooms, and a refined decorative display that fits beautifully in living rooms, bedrooms, apartments, home offices, bright kitchens, windowsills, covered patios, commercial interiors, luxury home staging, and premium indoor plant styling. A healthy orchid can turn…
-

Why Some Homeowners Are Pouring Aloe Water Around Orchids and What Usually Helps More for Strong Roots, Healthy Leaves, and Long-Lasting Blooms
Orchids are among the most elegant indoor flowering plants for homeowners who want graceful blooms, sculptural roots, glossy leaves, and a premium decorative display that fits beautifully in living rooms, bedrooms, apartments, home offices, bright kitchens, balcony gardens, covered patios, commercial interiors, luxury home staging, and refined indoor plant styling. A healthy orchid can make…
-
Why Some Homeowners Are Adding Brown Powder Around Snake Plants and What Usually Helps More for Strong Roots, Fuller Growth, and Healthy Indoor Leaves
Snake plant is one of the most dependable indoor plants for homeowners who want strong upright leaves, bold green patterning, yellow-edged variegation, easy maintenance, and a clean decorative display that fits beautifully in living rooms, bedrooms, apartments, home offices, bright kitchens, entry corners, sunny windowsills, plant shelves, commercial interiors, luxury home staging, and premium indoor…


