This Honey Garlic Baked Drumsticks recipe is the ultimate easy dinner! Sticky, sweet, savory & crispy skin with 5 min prep. Perfect for busy weeknights & picky eaters!
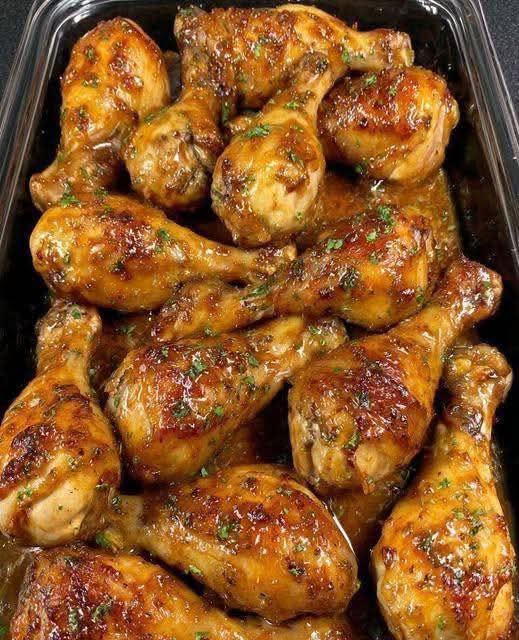
Picture this: tender, juicy chicken with impossibly crispy skin, glazed in a sticky, shimmering sauce that’s the perfect balance of sweet honey, punchy garlic, and savory soy. It’s a dish that fills your kitchen with an aroma so tantalizing, your family will be hovering by the oven door. Welcome to Honey Garlic Baked Drumsticks, the easy weeknight dinner that consistently delivers restaurant-quality flavor with minimal effort and maximal payoff. If you’re searching for a healthy chicken recipe that’s a guaranteed crowd-pleaser for both busy weeknights and casual weekend gatherings, your search ends right here.
In the world of family-friendly meals, chicken drumsticks are the unsung heroes. They’re affordable, hard to overcook, and their built-in handles make them a fun, kid-approved dinner. But when you elevate them with a simple, homemade honey garlic sauce and the magic of a hot oven, they transform into something truly spectacular. This recipe is the epitome of simple gourmet cooking—no fancy techniques, no obscure ingredients, just pure, delicious alchemy that turns a few pantry staples into a sticky, finger-licking masterpiece.
Whether you need a last-minute dinner idea, a high-protein meal prep option, or a game-day appetizer that will disappear in minutes, these drumsticks are your answer. They’re naturally gluten-free (with one simple swap), require just 5 minutes of active prep, and bake hands-off in the oven, freeing you up to tackle the rest of your evening. Let’s dive into how to make the most addictive, crispy baked chicken you’ll ever taste.
Why This Honey Garlic Drumstick Recipe is a Total Game-Changer
Before we preheat the oven, let’s talk about what makes this recipe a permanent fixture in your rotation. First, it’s the ultimate set-it-and-forget-it meal. Unlike fussy pan-frying, baking allows the drumsticks to cook evenly, their skin to render and crisp beautifully, and the sauce to thicken and caramelize into a glossy glaze—all without you having to stand over the stove.
Second, the flavor-to-effort ratio is unmatched. The sauce is a powerhouse blend of just five core ingredients: honey, garlic, soy sauce, a touch of acidity, and a hint of spice. Together, they create a complex, umami-rich glaze that clings to every nook and cranny of the chicken, creating that signature sticky honey garlic chicken experience.
Finally, it’s endlessly adaptable and universally loved. This recipe is a perfect blueprint. Love heat? Add Sriracha. Want a deeper flavor? Use coconut aminos. It’s a one-pan wonder that pairs with virtually any side dish, making it the ultimate versatile family dinner. This isn’t just a chicken recipe; it’s your new secret weapon for stress-free, delicious dinners.
Gathering Your Ingredients: The Sweet & Savory Symphony
The magic is in the simplicity and quality of these ingredients. Here’s your short list for this easy family dinner:
For the Drumsticks & Crispy Skin:
· 8-10 chicken drumsticks (about 3-3.5 lbs), skin-on
· 1 tablespoon olive oil or avocado oil
· 1 ½ teaspoons kosher salt
· 1 teaspoon black pepper
· 1 teaspoon paprika (smoked or regular)
· ½ teaspoon garlic powder
For the Legendary Honey Garlic Sauce:
· ⅓ cup pure honey (raw or regular)
· ¼ cup low-sodium soy sauce (or tamari for gluten-free)
· 4-5 large cloves garlic, minced (about 2 tablespoons)
· 2 tablespoons rice vinegar or apple cider vinegar
· 1 tablespoon fresh ginger, grated (or 1 tsp ground ginger)
· 1 tablespoon sriracha or ½ teaspoon red pepper flakes (optional, for heat)
· 1 tablespoon cornstarch mixed with 2 tablespoons cold water (slurry, for thickening)
For Garnish:
· Sliced green onions
· Sesame seeds
· Fresh chopped cilantro or parsley
Ingredient Spotlight & Smart Substitutions
· The Chicken: Skin-on, bone-in drumsticks are essential. The skin protects the meat, keeping it incredibly juicy, and crisps up beautifully. Pat them very dry with paper towels before seasoning—this is the #1 secret for crispy skin.
· The Honey: Use a good-quality, pure honey. In a pinch, pure maple syrup can work, but it will have a different flavor profile.
· The Soy Sauce: Low-sodium soy sauce is recommended so you can control the salt level. Coconut aminos are a great soy-free, slightly sweeter alternative.
· Fresh Garlic & Ginger: Please, do not substitute powdered here (except for the sprinkle on the chicken skin). The fresh, pungent bite is what makes the sauce sing.
· The Thickener: The cornstarch slurry is optional but recommended for a thick, restaurant-style glaze that clings to the chicken.
Essential Kitchen Tools: The Equipment for Effortless, Crispy Results
You don’t need anything fancy, but a few key tools will ensure perfectly cooked chicken and easy cleanup.
- The Baking Vessel: Your Sheet Pan
A large, rimmed baking sheet (half-sheet pan) is non-negotiable. The rim contains any juices. For the crispiest skin and easiest cleanup, fit the pan with a wire cooling rack. Elevating the drumsticks allows hot air to circulate all around them, so the skin crisps evenly instead of steaming in its juices. If you don’t have a rack, just bake directly on the pan—it will still be delicious.
- The Prep & Basting Station:
· Large Mixing Bowl: For tossing the drumsticks with oil and seasonings.
· Small Saucepan or Whisking Bowl: For combining and simmering the honey garlic sauce.
· Whisk & Basting Brush: A whisk to emulsify the sauce ingredients, and a silicone basting brush for applying the glaze during baking.
· Microplane or Box Grater: The easiest way to grate fresh ginger and garlic into a fine paste that melts seamlessly into the sauce.
· Tongs: For safely flipping and moving the hot drumsticks.
- The Helpful Extras:
· Instant-Read Thermometer: The only foolproof way to know your chicken is perfectly cooked and safe. Drumsticks are done when they reach an internal temperature of 175-180°F (79-82°C) at the thickest part, near the bone.
· Parchment Paper or Foil: Lining your baking sheet (under the rack, if using) makes cleanup from any sticky glaze drips a breeze.
Step-by-Step Instructions: How to Achieve Sticky, Crispy Perfection
Follow this sequence for drumsticks with crackling-crisp skin and a flawlessly glossy glaze.
Step 1: Prep & Season the Chicken (The Crispy Skin Foundation)
Dry the Chicken: Thoroughly pat each drumstick dry with paper towels. This is the most critical step for crispy skin.
Season: In a large bowl, toss the drumsticks with olive oil, salt, pepper, paprika, and garlic powder until evenly coated.
Arrange for Crispness: Place the drumsticks on a wire rack set inside a rimmed baking sheet, ensuring they are not touching. Let them sit at room temperature for 20-30 minutes while you preheat the oven to 400°F (200°C). This helps the skin dry further.
Step 2: Make the Honey Garlic Sauce
Combine: While the oven heats, add the honey, soy sauce, minced garlic, grated ginger, vinegar, and sriracha (if using) to a small saucepan. Whisk to combine.
Simmer: Bring to a simmer over medium heat, then reduce to low and let it simmer gently for 5-8 minutes, allowing the garlic to cook and the flavors to meld.
Thicken (Optional): In a small bowl, make a slurry by mixing the cornstarch with cold water until smooth. Whisk this slurry into the simmering sauce. Cook for 1-2 more minutes, whisking constantly, until the sauce thickens slightly. Remove from heat. (Reserve about ¼ cup of sauce for serving).
Step 3: Bake & Glaze to Perfection
Initial Bake: Bake the seasoned drumsticks (on the rack) at 400°F for 25 minutes.
First Glaze: After 25 minutes, remove the pan from the oven. Carefully brush each drumstick generously with the honey garlic sauce.
Second Bake & Glaze: Return to the oven and bake for 10 more minutes. Remove and brush again with more sauce.
Final Crisp: Bake for a final 5-10 minutes, or until the drumsticks are deeply golden, the skin is crispy, and the internal temperature reaches 175-180°F. The sauce should be caramelized and sticky.
Step 4: Rest, Sauce & Serve
Rest: Let the drumsticks rest on the pan for 5-10 minutes. This allows the juices to redistribute, ensuring every bite is moist.
Final Touch: Drizzle with the reserved, un-cooked sauce (or reheat the remaining glaze) for an extra hit of fresh garlic flavor and shine.
Garnish: Sprinkle with sliced green onions and sesame seeds. Serve immediately.
Chef’s Pro-Tips for Flawless Drumsticks Every Time
· The High Heat Secret: Starting at a high temperature (400°F) is key for rendering the fat under the skin and jump-starting the crisping process.
· Glaze in Layers: Applying the glaze in the last 15-20 minutes of cooking prevents the sugars in the honey from burning. The multiple layers build flavor and that perfect sticky coating.
· Don’t Crowd the Pan: Giving space between the drumsticks is crucial for air circulation. If they’re too close, they’ll steam instead of roast.
· Broiler Finish: For extra caramelization, switch your oven to broil for the final 1-2 minutes, watching CLOSELY to prevent burning.
· Easy Cleanup: If sauce drips and burns on the pan, pour a little hot water and a dish soap tablet onto it after removing the food. Let it sit while you eat—it will wipe clean easily.
Serving Suggestions: What to Pair with Your Sticky Chicken
These drumsticks are a complete meal powerhouse, but they love good company:
· For a Healthy Plate: Serve with steamed broccoli, roasted green beans, or a crisp Asian-inspired cucumber salad.
· To Soak Up the Sauce: Fluffy white rice, brown rice, or cauliflower rice are mandatory for catching every drop of that incredible glaze.
· For Ultimate Comfort: Pair with creamy mashed potatoes or buttery corn on the cob.
How to Store, Reheat, and Meal Prep
· Storage: Let cool completely, then store in an airtight container in the refrigerator for up to 4 days.
· Reheating for Crispy Skin: Reheat in an air fryer or a 375°F oven for 8-10 minutes until hot and the skin re-crisps. The microwave will make the skin soft.
· Meal Prep: This is a fantastic weekly meal prep recipe. Prepare a double batch of drumsticks and sauce. Store with a side of rice and veggies for easy high-protein lunches all week.
Final Thoughts: The Dinner That Feels Like a Celebration
Honey Garlic Baked Drumsticks are more than just a recipe; they’re a confidence-builder in the kitchen. They prove that with a handful of ingredients and a trusty oven, you can create a meal that feels special, tastes incredible, and brings everyone to the table with eager hands and happy smiles.
It’s the kind of dish that turns an ordinary Tuesday into a mini-feast, a surefire hit for new cooks and seasoned chefs alike. So, grab that sheet pan, mix up that magical sauce, and get ready for the simplest, most satisfying chicken dinner of your life.
Don’t forget to pin this recipe, rate it, and leave a comment below telling me how your family devoured them! What’s your favorite side dish to serve with sticky chicken?
More Recipes You Might Like
-

Why Some Homeowners Are Using Onion Water Around Orchids and What Usually Helps More for Strong Roots, Healthy Leaves, and Long-Lasting Blooms
Orchids are among the most elegant indoor flowering plants for homeowners who want graceful stems, glossy green leaves, long-lasting blooms, and a refined decorative display that fits beautifully in living rooms, bedrooms, apartments, home offices, bright kitchens, windowsills, covered patios, commercial interiors, luxury home staging, and premium indoor plant styling. A healthy orchid can turn…
-

Why Some Homeowners Are Pouring Aloe Water Around Orchids and What Usually Helps More for Strong Roots, Healthy Leaves, and Long-Lasting Blooms
Orchids are among the most elegant indoor flowering plants for homeowners who want graceful blooms, sculptural roots, glossy leaves, and a premium decorative display that fits beautifully in living rooms, bedrooms, apartments, home offices, bright kitchens, balcony gardens, covered patios, commercial interiors, luxury home staging, and refined indoor plant styling. A healthy orchid can make…
-
Why Some Homeowners Are Adding Brown Powder Around Snake Plants and What Usually Helps More for Strong Roots, Fuller Growth, and Healthy Indoor Leaves
Snake plant is one of the most dependable indoor plants for homeowners who want strong upright leaves, bold green patterning, yellow-edged variegation, easy maintenance, and a clean decorative display that fits beautifully in living rooms, bedrooms, apartments, home offices, bright kitchens, entry corners, sunny windowsills, plant shelves, commercial interiors, luxury home staging, and premium indoor…


