These thick & chewy Chocolate Oatmeal Cookies are packed with rolled oats, cocoa, & chocolate chips! An easy, healthier cookie recipe your whole family will love.
Close your eyes and imagine the perfect cookie. It’s not cakey, nor is it brittle. It’s substantial, with a hearty chew from wholesome oats. It’s deeply chocolatey, with pockets of melty chips in every bite. It has a slightly crisp edge that gives way to a soft, almost fudgy center. This is the magic of a perfect Chocolate Oatmeal Cookie—a treat that seamlessly bridges the gap between indulgent dessert and satisfying snack. If you’re searching for a healthy cookie recipe that doesn’t taste like health food, a crowd-pleasing bake sale winner, or simply the ultimate chewy oatmeal cookie to enjoy with a glass of cold milk, your recipe journey ends here.
In a world of fleeting food trends, the Chocolate Oatmeal Cookie stands as a timeless testament to thoughtful baking. It takes the comforting, fiber-rich goodness of old-fashioned rolled oats and marries it with the rich, undeniable allure of cocoa and chocolate. The result is a cookie with complex texture and depth of flavor that a standard chocolate chip cookie can only dream of. It’s a one-bowl wonder (mostly!), requires no fancy equipment, and fills your home with an aroma that is pure, warm, chocolatey bliss.
Whether you need a lunchbox-friendly treat, a meal-prep snack for energy, or a simple dessert that feels both nostalgic and gourmet, this recipe is your blueprint. It’s naturally more wholesome, endlessly adaptable to be gluten-free or vegan, and forgiving enough for bakers of all levels. Let’s explore how to bake a batch of cookies that are sure to become a cherished family favorite.
Why This Chocolate Oatmeal Cookie Recipe is Your New Go-To
Before we preheat the oven, let’s appreciate what sets this recipe apart. First, it’s engineered for the ideal texture. Through careful balancing of wet and dry ingredients, and the use of rolled oats (not quick oats!), we achieve a cookie that is dense and chewy without being heavy, and tender without being crumbly. This is the ultimate chewy cookie recipe.
Second, it’s a sneakily nutritious option. The oats provide soluble fiber, making these cookies more satisfying and giving them a better glycemic impact than a flour-based treat. By using dark cocoa powder and controlling the sugar, you create a dessert with antioxidants and less refined sweetness. It’s a better-for-you dessert you can feel good about.
Finally, its versatility is unmatched. This dough is a perfect canvas. Need dairy-free chocolate oatmeal cookies? Use coconut oil and vegan chocolate chips. Want a protein boost? Add a scoop of collagen or stir in some nuts. It’s a make-ahead dough that freezes beautifully, ready for fresh-baked cookies at a moment’s notice. This isn’t just a cookie recipe; it’s a foundational formula for endless delicious possibilities.
Gathering Your Ingredients: The Symphony of Chew & Chocolate
The quality of your ingredients directly influences the final product. Here’s your list for these family-friendly chocolate cookies:
For the Dry Ingredients:
· 1 ½ cups (188g) all-purpose flour (spooned & leveled)
· ½ cup (50g) unsweetened cocoa powder (Dutch-process or natural)
· 1 teaspoon baking soda
· ½ teaspoon baking powder
· 1 teaspoon fine sea salt
· 3 cups (270g) old-fashioned rolled oats (do not use quick or instant oats)
For the Wet Ingredients:
· 1 cup (2 sticks / 227g) unsalted butter, softened to room temperature
· 1 cup (215g) packed light or dark brown sugar
· ½ cup (100g) granulated sugar
· 2 large eggs, at room temperature
· 1 tablespoon pure vanilla extract
For the Chocolate & Optional Mix-Ins:
· 1 ½ cups (255g) semi-sweet chocolate chips or chunks
· Optional: 1 cup chopped walnuts, pecans, or dried cherries
Ingredient Spotlight & Pro Substitutions
· The Oats: Old-Fashioned Rolled Oats are non-negotiable for the proper chewy, textured bite. Quick oats will turn to mush, and steel-cut will be too hard.
· The Cocoa: Dutch-process cocoa powder will yield a darker, richer cookie with a more mellow chocolate flavor. Natural cocoa powder is more acidic and pairs well with baking soda for a slight lift. Both work!
· The Butter: Properly softened butter (cool to the touch but easily indented) is key for creaming. For a chewier, denser cookie, use melted and cooled butter.
· Brown Sugar: This is the secret to moisture and chew. The molasses content in brown sugar attracts and retains water, keeping the cookies soft for days.
· Chocolate: A mix of chocolate chips and chopped bar chocolate gives you the best of both worlds—uniform chips and melty, irregular shards.
Essential Kitchen Tools: The Equipment for Cookie Perfection
Simple tools yield spectacular results. Here’s your baking equipment checklist.
- The Mixing Powerhouse: Stand or Hand Mixer
While you can mix by hand, a hand mixer or stand mixer is highly recommended for properly creaming the butter and sugars. This step incorporates air, which is essential for the perfect texture. The paddle attachment for a stand mixer is ideal.
- The Baking Foundation: Sheet Pans & Parchment
· Light-Colored Aluminum Baking Sheets: Two large, rimmed half-sheet pans (18″x13″) are perfect. Dark pans can cause over-browning on the bottoms.
· Parchment Paper or Silicone Baking Mats: Essential for non-stick baking, easy cleanup, and ensuring the cookies don’t spread too thinly. Parchment paper is the gold standard for cookies.
- The Prep & Portioning Tools:
· Large Mixing Bowls: One for dry ingredients (flour, cocoa, oats, etc.), and the bowl of your mixer for the wet.
· Whisk & Rubber Spatula: A whisk for thoroughly combining dry ingredients. A sturdy rubber spatula for scraping down the bowl and ensuring even mixing.
· Measuring Cups & Spoons + Kitchen Scale: For accuracy. A digital kitchen scale is the most precise way to measure flour and oats.
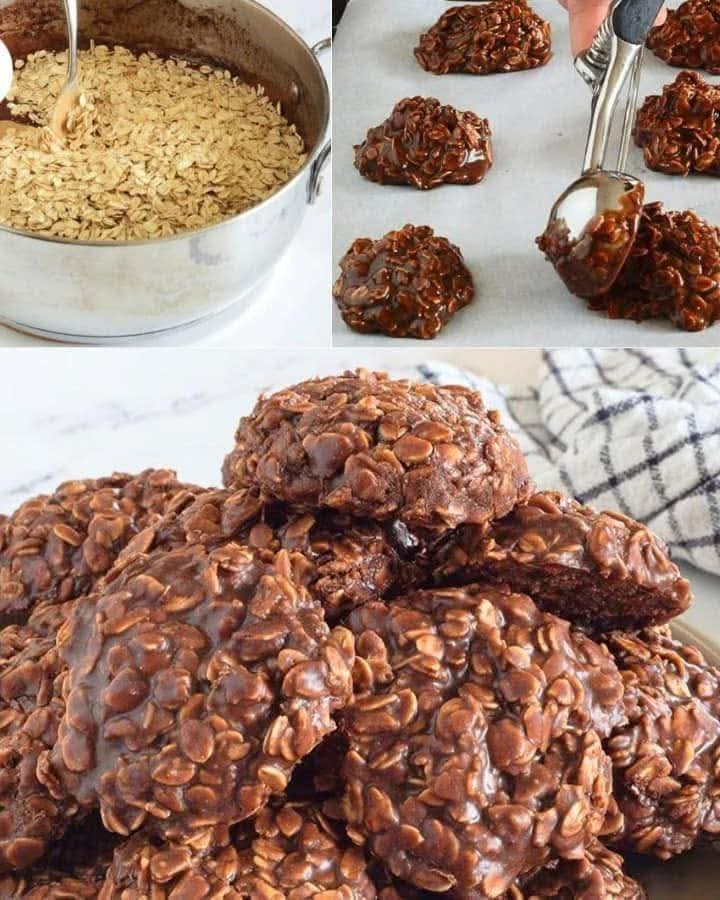
· Cookie Scoop (Size #40 or 1.5 Tbsp): This is a game-changer for uniformly sized cookies that bake evenly. It also keeps your hands clean and makes the process fast.
- Helpful Extras:
· Cooling Racks: Allowing air to circulate under the baked cookies prevents the bottoms from getting soggy.
· Fine Mesh Sieve: For sifting the cocoa powder and flour together to eliminate lumps and ensure a smooth dough.
Step-by-Step Instructions: Baking the Ultimate Chewy Cookie
Follow this sequence for a foolproof process. Chilling the dough is highly recommended for thicker, chewier cookies.
Step 1: Combine Dry Ingredients & Prep
Whisk Dry Ingredients: In a large bowl, whisk together the flour, cocoa powder, baking soda, baking powder, and salt. Add the rolled oats and stir to combine. Set aside.
Prep Pans & Preheat: Line your baking sheets with parchment paper. Preheat your oven to 350°F (175°C).
Step 2: Cream Butter & Sugars (The Foundation of Flavor & Texture)
Cream: In the bowl of your stand mixer fitted with the paddle attachment (or using a hand mixer), beat the softened butter, brown sugar, and granulated sugar on medium-high speed for 2-3 full minutes. The mixture should be light, fluffy, and pale in color. Scrape down the bowl.
Step 3: Incorporate Eggs & Vanilla
Add Eggs One at a Time: Beat in the eggs, one at a time, on medium speed, ensuring each is fully incorporated before adding the next. Beat in the vanilla extract. The mixture may look slightly curdled—this is fine.
Step 4: Combine Wet & Dry
Mix on Low: With the mixer on low speed, gradually add the dry oat mixture to the wet ingredients. Mix just until the last streaks of flour disappear. Do not overmix.
Fold in Chocolate: Using your rubber spatula, gently fold in the chocolate chips and any nuts or dried fruit.
Step 5: Chill & Portion (The Secret to Perfect Shape)
Chill (Optional but Recommended): For best results, cover the bowl and chill the dough for at least 30 minutes, up to 72 hours. Chilling solidifies the butter, preventing cookie spread and allowing flavors to meld.
Scoop: Using your cookie scoop, portion the dough onto the prepared baking sheets, leaving about 2 inches between each for spreading. Gently press the dough balls down slightly if you desire a less domed cookie.
Step 6: Bake & Cool
Bake: Bake for 10-12 minutes. The cookies are done when the edges look set, but the centers still appear soft, puffed, and slightly underbaked. They will firm up as they cool.
· Oven Note: Rotate the pans halfway through baking for even browning.
Cool on Pan: Let the cookies cool on the baking sheet for 5 minutes. This allows them to set enough to move.
Transfer to Rack: Carefully transfer the cookies to a wire rack to cool completely. They will be very soft when warm but will develop the perfect chew as they cool.
Chef’s Pro-Tips for Bakery-Quality Cookies Every Time
· The Underbake is Key: Remove the cookies when they look almost underdone. Carryover cooking on the hot pan will finish them perfectly, yielding a soft center.
· Weigh Your Flour: The most common baking mistake is using too much flour. 1 cup of all-purpose flour should weigh 125g. Fluff, spoon, and level if you don’t have a scale.
· Brown Your Butter (Next Level Flavor): For an insane flavor boost, brown the two sticks of butter before adding to the sugars. Let it cool to room temperature before proceeding. It adds a nutty, caramel note.
· For a Richer Chocolate Hit: Replace 1-2 tablespoons of flour with an equal amount of extra cocoa powder.
· The Freezer Trick: For spontaneous cookie cravings, scoop the dough balls onto a tray, freeze solid, then transfer to a freezer bag. Bake from frozen, adding 1-2 minutes to the bake time.
Serving Suggestions & Enjoyment Ideas
These cookies are sublime on their own, but here’s how to elevate them:
· The Classic: A tall glass of cold milk is the only companion it truly needs.
· Dessert Upgrade: Crumble over vanilla ice cream for an instant chocolate oatmeal cookie sundae.
· Gift Them Beautifully: Stack in a cellophane bag with a ribbon for a heartfelt homemade gift.
· After-School Special: Pair with an apple for a balanced after-school snack.
How to Store & Keep Them Chewy
· Storage at Room Temperature: Keep in an airtight container at room temperature for up to 5 days. Adding a piece of bread to the container will help maintain moisture and chewiness (the cookies absorb moisture from the bread).
· Freezing Baked Cookies: Freeze fully cooled cookies in a single layer, then transfer to an airtight container for up to 3 months. Thaw at room temperature.
· Freezing Cookie Dough: As noted above, portioned dough balls can be frozen for up to 3 months and baked directly from frozen.
Final Thoughts: The Cookie That Truly Has It All
The Chocolate Oatmeal Cookie is more than a recipe; it’s a balancing act. It’s hearty yet indulgent, healthy-ish yet decadent, simple yet deeply flavorful. It’s a cookie that satisfies a sweet tooth while providing substance, a rare treat that parents and kids can agree on. Baking a batch is an act of love—for yourself, for your family, for the simple joy of creating something wonderful from a handful of humble ingredients.
So, roll up your sleeves, get out that bag of oats, and bake a batch of these timeless treats. Your kitchen will smell incredible, your heart will feel full, and you’ll have discovered what might just be the only cookie recipe you ever really need.
Don’t forget to pin this recipe, rate it, and leave a comment below telling me your secret to the perfect chewy cookie!
More Recipes You Might Like
-

Why Some Homeowners Are Using Onion Water Around Orchids and What Usually Helps More for Strong Roots, Healthy Leaves, and Long-Lasting Blooms
Orchids are among the most elegant indoor flowering plants for homeowners who want graceful stems, glossy green leaves, long-lasting blooms, and a refined decorative display that fits beautifully in living rooms, bedrooms, apartments, home offices, bright kitchens, windowsills, covered patios, commercial interiors, luxury home staging, and premium indoor plant styling. A healthy orchid can turn…
-

Why Some Homeowners Are Pouring Aloe Water Around Orchids and What Usually Helps More for Strong Roots, Healthy Leaves, and Long-Lasting Blooms
Orchids are among the most elegant indoor flowering plants for homeowners who want graceful blooms, sculptural roots, glossy leaves, and a premium decorative display that fits beautifully in living rooms, bedrooms, apartments, home offices, bright kitchens, balcony gardens, covered patios, commercial interiors, luxury home staging, and refined indoor plant styling. A healthy orchid can make…
-
Why Some Homeowners Are Adding Brown Powder Around Snake Plants and What Usually Helps More for Strong Roots, Fuller Growth, and Healthy Indoor Leaves
Snake plant is one of the most dependable indoor plants for homeowners who want strong upright leaves, bold green patterning, yellow-edged variegation, easy maintenance, and a clean decorative display that fits beautifully in living rooms, bedrooms, apartments, home offices, bright kitchens, entry corners, sunny windowsills, plant shelves, commercial interiors, luxury home staging, and premium indoor…


