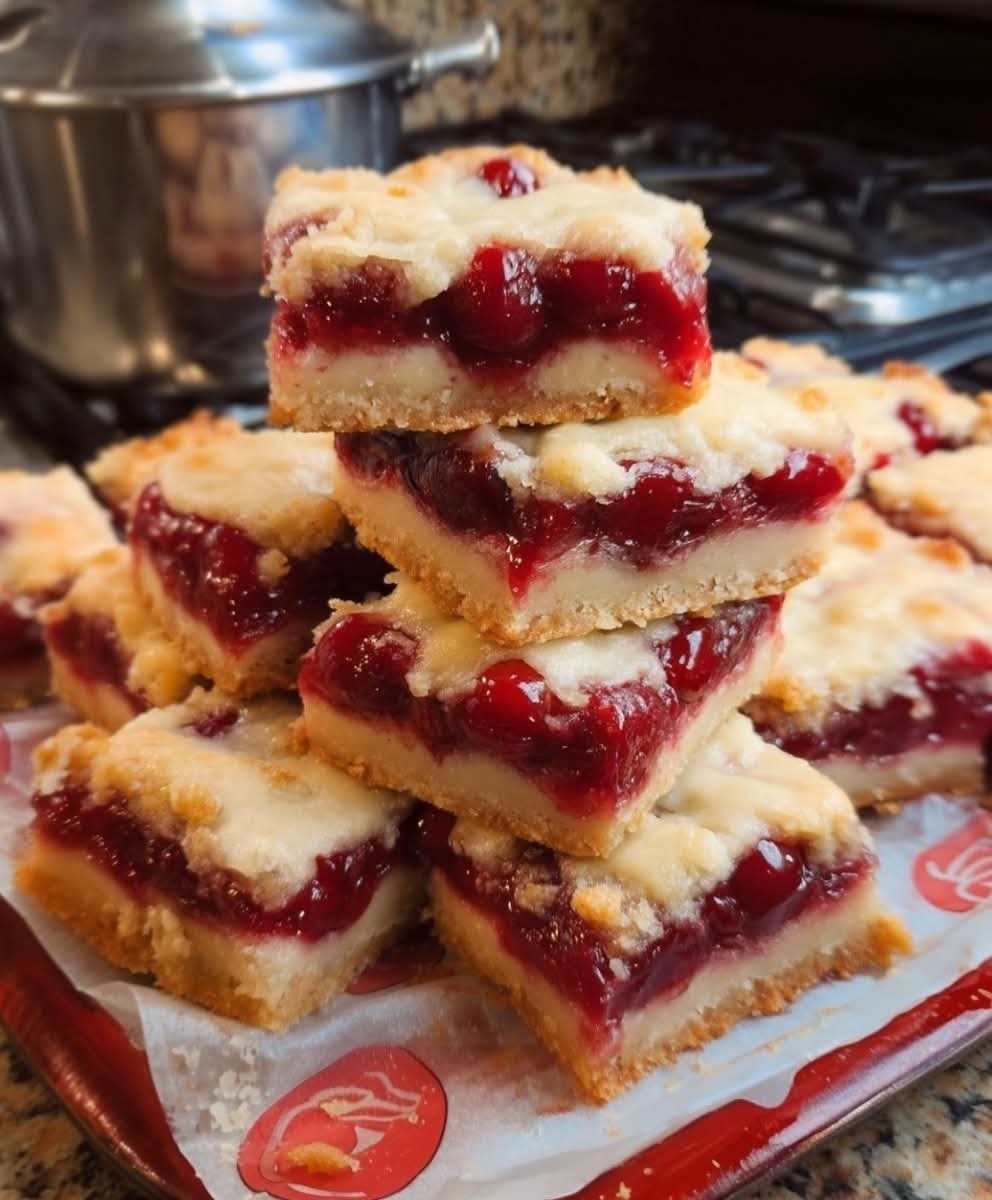
These easy Cherry Crumble Bars have a buttery oat crust, sweet cherry pie filling & crunchy crumble topping! The perfect no-mixer dessert for potlucks, holidays & summer baking.
Imagine a dessert that captures the very essence of a homemade cherry pie and a rustic fruit crisp, but in a portable, fuss-free bar form. Picture a buttery, shortbread-like oat crust, a layer of sweet-tart cherry filling bubbling with juicy flavor, and a generous blanket of crunchy, cinnamon-spiked crumble topping. This is the magic of Cherry Crumble Bars—the ultimate easy dessert recipe that delivers maximum comfort and flavor with minimal effort. If you’re craving a crowd-pleasing potluck dessert, a simple summer bake, or a make-ahead treat that makes your kitchen smell like a dream, your recipe search ends here.
In the world of simple fruit desserts, crumble bars reign supreme. They offer all the homestyle satisfaction of a pie or crisp without the need for a rolling pin or any special pie-making skills. The crust and topping are one gloriously simple mixture, divided and pressed into layers. The filling? Often as easy as opening a can of cherry pie filling, though we’ll explore a quick homemade option that takes it over the top. The result is a dessert bar with a perfect textural contrast: firm yet tender base, gooey fruity center, and a crispy, craggy top.
Whether you’re a beginner baker looking for a guaranteed win, hosting a holiday gathering and need a reliable dessert, or just want to enjoy the taste of cherry pie bars without the work, this recipe is your blueprint. It’s forgiving, adaptable, and universally loved. Let’s bake a batch of these buttery, fruity, crumbly delights.
Why This Cherry Crumble Bar Recipe is a Total Keeper
Before we preheat the oven, let’s talk about what makes this recipe so special. First, it’s the epitome of easy, no-fuss baking. With a one-bowl crumble mixture that doubles as the crust and topping, there’s no separate dough to chill, no complicated steps. You don’t even need an electric mixer—a fork and your fingers will do. This is the definition of a simple dessert recipe.
Second, the textural harmony is absolute perfection. The bottom layer bakes into a firm, cookie-like base that can support the juicy filling without getting soggy. The crumble topping bakes up crisp and golden, providing that irresistible crunch in every bite. It’s the ideal marriage of soft, gooey, and crunchy.
Finally, its versatility is its superpower. While cherry is a classic, this recipe is a master formula. Swap in blueberry, apple, or peach pie filling. Add nuts to the crumble, or a drizzle of almond glaze. It’s a perfect picnic dessert that travels well and a fantastic holiday cookie plate addition. This isn’t just a recipe; it’s your new go-to framework for any fruit crumble bar you can imagine.
Gathering Your Ingredients: Simple Staples, Stellar Results
The beauty is in the short, simple ingredient list. Quality matters, especially in the butter and oats.
For the Crumble Crust & Topping:
· 1 ½ cups (188g) all-purpose flour, spooned & leveled
· 1 ½ cups (135g) old-fashioned rolled oats (not quick oats)
· 1 cup (200g) packed light brown sugar
· ¼ teaspoon salt
· ¼ teaspoon baking soda
· 1 cup (2 sticks / 227g) unsalted butter, cold and cubed
· 1 teaspoon vanilla extract
For the Cherry Filling:
· 2 (21 oz) cans cherry pie filling OR 5 cups homemade cherry filling (see below)
· 1 tablespoon lemon juice
· 1 tablespoon cornstarch (if using canned filling, to thicken)
· ½ teaspoon almond extract (optional, but amazing with cherry)
Quick Homemade Cherry Filling Option:
· 5 cups pitted fresh, frozen, or jarred tart cherries
· ⅔ cup (135g) granulated sugar
· 3 tablespoons cornstarch
· 2 tablespoons lemon juice
· ¼ teaspoon almond extract
Ingredient Spotlight & Pro Substitutions
· The Oats: Old-Fashioned Rolled Oats are a must for the right chewy-crunchy texture. Quick oats will become mushy, and steel-cut will be too hard.
· Cold Butter: This is the secret to a crisp, crumbly texture. The cold butter melts in the oven, creating steam pockets and flakiness. Don’t use softened or melted butter.
· Brown Sugar: Adds moisture and a subtle molasses flavor that pairs perfectly with the oats and cherries. For a deeper flavor, use dark brown sugar.
· Cherry Pie Filling: Using a high-quality canned filling is the ultimate shortcut. Look for ones with more cherries and less gel. Adding a little cornstarch and lemon juice to the canned filling vastly improves its texture and brightness.
· Almond Extract: A tiny splash (¼-½ tsp) in the filling is a game-changer. It’s the classic partner to cherry flavor.
Essential Kitchen Tools for Easy Bar Baking
You need very little to make these bars a success.
- The Baking Pan: Your Foundation
A 9×13 inch metal baking pan is standard. For perfect bars and effortless cleanup, line the pan with parchment paper, leaving an overhang on two sides. This creates a “sling” to lift the entire baked slab out for clean, easy cutting. A light-colored pan prevents over-browning.
- The Mixing & Cutting Tools
· Large Mixing Bowl: For combining the crumble mixture.
· Pastry Cutter, Fork, or Your Fingers: To cut the cold butter into the dry ingredients until crumbly. Clean hands are often the best tool.
· Medium Bowl: For mixing the cherry filling ingredients.
· Rubber Spatula: For spreading the filling and later, pressing the crust.
· Sharp Knife or Bench Scraper: For cutting the cooled bars cleanly. Run the knife under hot water and wipe dry between cuts.
· Measuring Cups & Spoons: For accuracy.
- Helpful Extras
· Cooling Rack: Allows air to circulate under the pan so the bottom doesn’t steam.
· Fine Mesh Sieve: If making homemade filling, this is useful for mixing the cornstarch and sugar to prevent lumps.
Step-by-Step Instructions: How to Build Perfect Layers
The process is wonderfully straightforward: make the crumble, press the base, add filling, sprinkle topping, and bake.
Step 1: Make the Crumble Mixture (Crust & Topping)
Preheat & Prep: Preheat your oven to 350°F (175°C). Line your 9×13 pan with parchment paper.
Combine Dry Ingredients: In your large bowl, whisk together the flour, oats, brown sugar, salt, and baking soda.
Cut in Butter: Add the cold, cubed butter and vanilla extract. Using a pastry cutter, a fork, or your fingertips, work the butter into the dry ingredients until the mixture is crumbly and no dry flour remains. You should have a variety of pea-sized lumps and sandy bits. Do not over-mix into a paste.
Step 2: Prepare the Filling
· For Canned Filling: In a medium bowl, stir the cherry pie filling with lemon juice, cornstarch, and almond extract (if using) until well combined.
· For Homemade Filling: In a saucepan, combine cherries, sugar, cornstarch, and lemon juice. Cook over medium heat, stirring constantly, until the mixture thickens and bubbles, about 5-7 minutes. Remove from heat, stir in almond extract, and let cool slightly.
Step 3: Assemble the Bars
Press the Base: Reserve about 1 ½ cups of the crumble mixture for the topping. Dump the remaining mixture into the prepared pan. Press it down firmly and evenly into a compact layer using your hands or the bottom of a measuring cup.
Spread the Filling: Pour the cherry filling over the crust and spread it into an even layer.
Add the Topping: Sprinkle the reserved crumble mixture evenly over the cherry layer. Don’t press it down.
Step 4: Bake to Golden-Bubbly Perfection
Bake: Place the pan in the preheated oven. Bake for 40-50 minutes, until the top is golden brown and the cherry filling is bubbling actively around the edges.
Cool Completely: This is the most important step! Let the pan cool completely on a wire rack—at least 2-3 hours, or even overnight. This allows the filling to set so you can cut clean bars.
Step 5: Cut & Serve
Lift and Slice: Use the parchment paper sling to lift the entire slab onto a cutting board. Use a sharp knife to cut into squares or rectangles.
Serve: Serve at room temperature. A dollop of whipped cream or a scoop of vanilla ice cream is sublime.
Chef’s Pro-Tips for Flawless, Non-Soggy Bars
· Press the Base Firmly: A well-compacted crust is your barrier against a soggy bottom. Take your time to press it down evenly.
· Cool Completely: Cutting into warm bars is the #1 cause of a messy, juicy disaster. The filling needs time to set up. Patience is rewarded with perfect bars.
· Use Cold Butter: Warm butter will create a greasy, dense base, not a crumbly one.
· Adjust Baking Time: If your topping is browning too quickly but the filling isn’t bubbling, tent the pan loosely with foil for the last 10-15 minutes of baking.
· For a Nutty Crunch: Add ½ cup of chopped almonds or pecans to the crumble mixture.
Serving Suggestions & Next-Level Variations
These bars are fantastic on their own, but here’s how to customize them:
· The Classic: Dust with powdered sugar just before serving.
· A La Mode: Serve warm with a scoop of vanilla ice cream for an instant dessert.
· Drizzle: Finish with a simple vanilla or almond glaze (powdered sugar + milk + extract).
· Flavor Twists:
· Apple Crumble Bars: Use apple pie filling and add 1 tsp cinnamon to the crumble.
· Mixed Berry Bliss: Use a mix of blueberry and raspberry pie filling.
· Peach Almond: Use peach pie filling and add sliced almonds to the topping.
How to Store, Freeze, and Make-Ahead
· Storage: Store in an airtight container at room temperature for 2 days, or in the refrigerator for up to 5 days. They are delicious cold!
· Freezing: These bars freeze exceptionally well. Arrange cooled bars in a single layer on a parchment-lined tray to freeze solid, then transfer to a freezer bag or container. Freeze for up to 3 months. Thaw at room temperature or in the fridge.
· Make-Ahead: You can prepare and bake the bars 1-2 days ahead of an event. Store covered at room temperature or in the fridge.
Frequently Asked Questions (FAQ)
· Can I use fresh or frozen cherries? Absolutely! Use the homemade filling recipe provided. No need to thaw frozen cherries; just add a few minutes to the cooking time.
· Can I use quick oats? It’s not recommended, as they absorb more moisture and can make the texture gummy or mushy.
· My filling is too runny. This usually means it needed to bake longer to activate the thickener (cornstarch), or it wasn’t cooled completely before cutting. Next time, ensure the filling is bubbling at the edges and let it cool fully.
· Can I make these gluten-free? Yes! Use a 1:1 gluten-free flour blend and certified gluten-free oats.
Final Thoughts: The Simple Bar That Steals the Show
Cherry Crumble Bars are more than a dessert; they are a testament to the power of simple, honest ingredients combined with a clever, easy technique. They deliver the deep satisfaction of a from-scratch pie with the convenience of a bar cookie, making them a perfect treat for any day of the week or any special occasion.
So, grab that bag of oats and a can of cherries, and get ready to make a pan of buttery, fruity, crumbly magic. They’re sure to become a requested favorite in your home, just as they have in kitchens for generations.
Don’t forget to pin this recipe, rate it, and leave a comment below telling me your favorite fruit for crumble bars!
I add new delicious, easy-bake recipes regularly! Your feedback fuels my kitchen creativity. 👇
What classic, comforting dessert should we transform into an easy bar or snack next?Let me know your request
More Recipes You Might Like
-

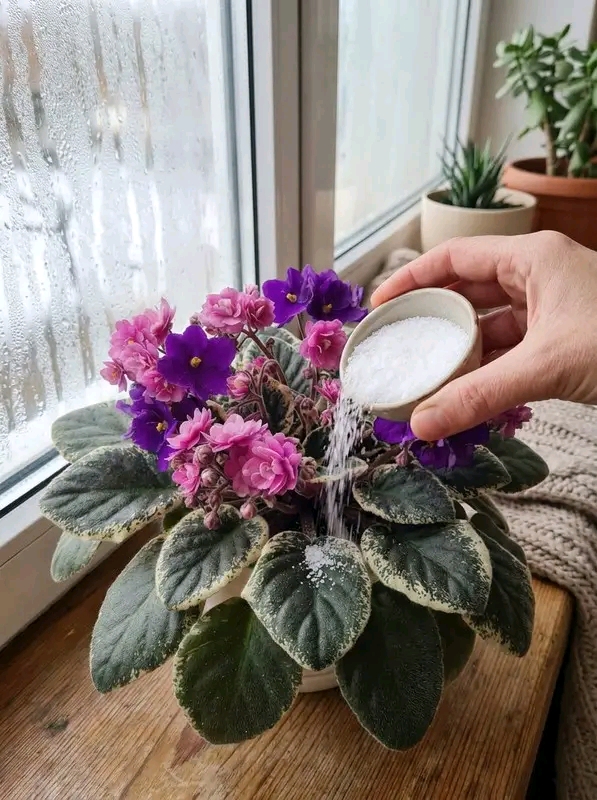
Easy African Violet Care: Simple Tips for Lush Growth and Vibrant Blooms
African violets are small, elegant, and full of charm. Their soft fuzzy leaves, compact shape, and bright purple, pink, white, blue, or double flowers make them one of the most loved indoor flowering plants. They look beautiful on windowsills, shelves, kitchen counters, bedroom tables, office desks, and cozy plant corners. Even one healthy African violet…
-

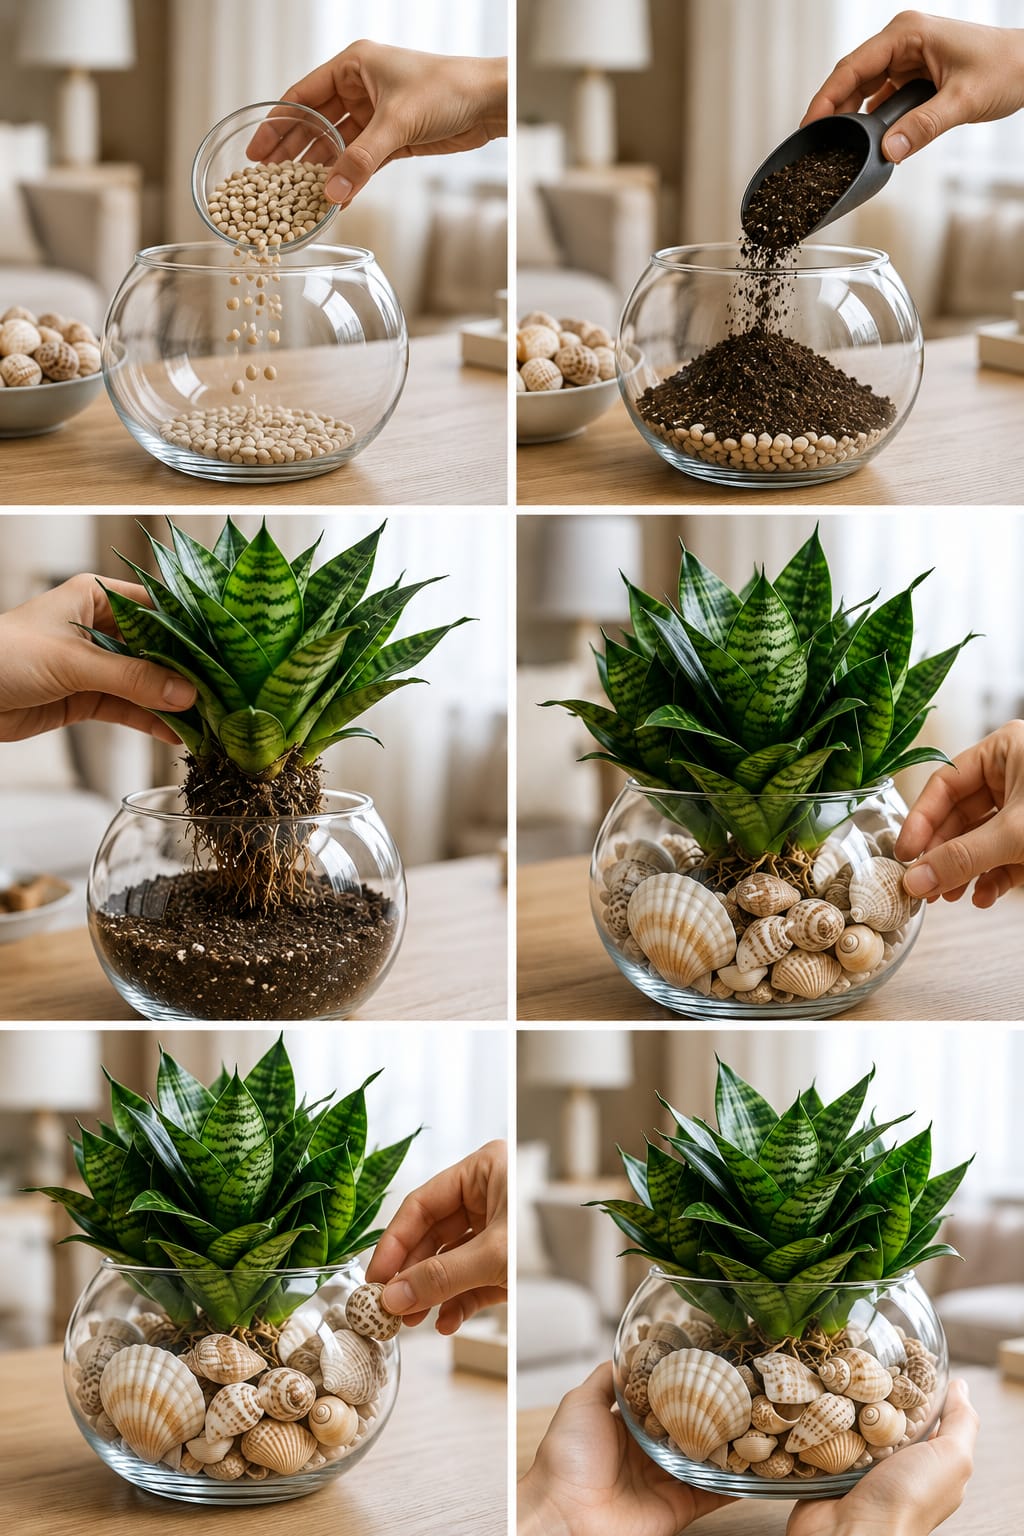
Bird’s Nest Snake Plant Fishbowl Garden: A Complete Guide to Creating a Beautiful Glass Bowl Display With Shells, Strong Roots, Healthy Leaves, and Stylish Indoor Decor
Bird’s Nest Snake Plant is one of the most beautiful compact houseplants for small indoor spaces. Its short rosette shape, thick patterned leaves, and elegant green form make it perfect for tables, shelves, desks, windowsills, bedrooms, offices, and living room displays. Unlike tall snake plants that grow like upright swords, Bird’s Nest Snake Plant grows…
-

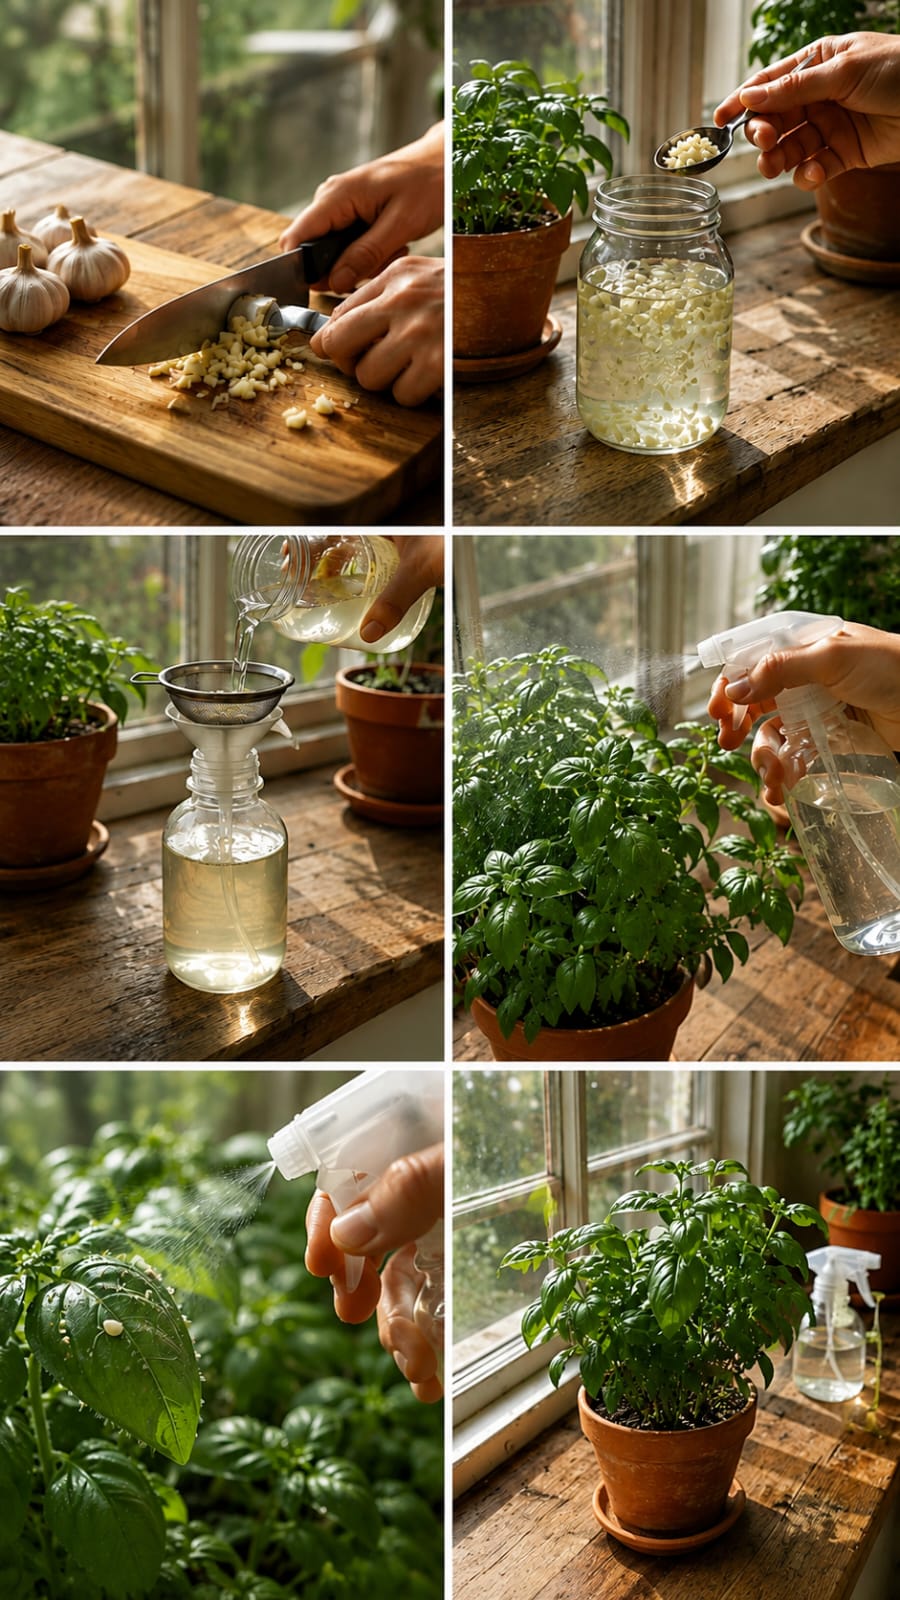
Garlic Spray for Indoor Plants: A Complete Guide to Making a Natural Garlic Water Spray for Basil, Herbs, Houseplants, Pest Prevention, Leaf Care, and Healthy Indoor Growth
Indoor plants bring freshness, color, scent, and life into the home. A sunny windowsill filled with basil, mint, parsley, pothos, peppers, flowers, and leafy houseplants can make any room feel warmer and more natural. But indoor plants also face problems. Leaves can become dusty. Tiny pests can appear. Soil can stay too wet. Basil can…