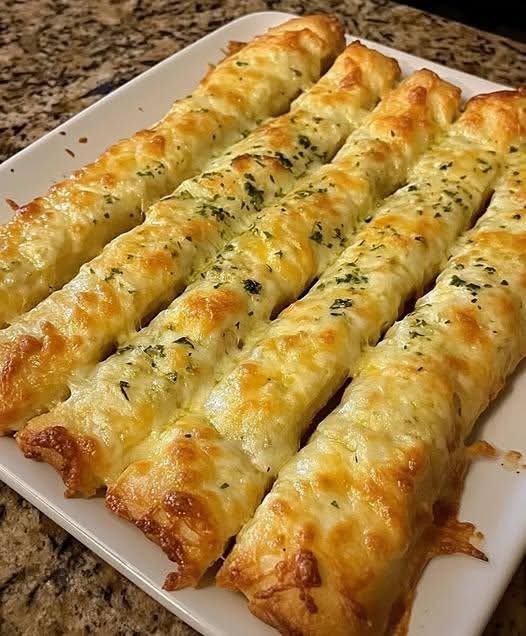
Make the BEST Cheesy Garlic Breadsticks at home in just 20 minutes! Our easy recipe uses pizza dough for a crispy, garlicky, melty treat that’s perfect with pasta or as a party appetizer.
There’s a moment of pure, unadulterated joy that occurs when a basket of hot, cheesy garlic breadsticks lands at the center of the table. The conversation pauses. Eyes widen. Hands reach in unison. It’s the sound of a collective, satisfied sigh as everyone pulls apart a stick, revealing that perfect, steamy, cheese-pulled interior, and dips it into a side of vibrant marinara. This isn’t just a side dish; it’s an experience—a catalyst for connection and comfort. But what if you could recreate that iconic restaurant-style breadstick magic in your own kitchen, on a random Tuesday, with minimal effort and maximum payoff? This, friends, is your culinary cheat code.
Welcome to the ultimate easy Cheesy Garlic Breadsticks recipe, a 20-minute masterpiece that will forever change your relationship with weeknight dinners, last-minute parties, and pizza night at home. This recipe is a triumph of smart cooking over hard cooking. We bypass the hours of dough-rising by leveraging a brilliant shortcut—store-bought pizza dough—and focus all our energy on building layers of explosive flavor. The result? Breadsticks that are crispy and golden on the bottom, fluffy and tender within, and lavished with a rich, homemade garlic-herb butter and a decadent blanket of melted, stretchy cheeses.
Whether you’re a novice cook looking for a foolproof appetizer, a busy parent in need of a crowd-pleasing side dish for spaghetti night, or a seasoned host wanting a quick game day snack that disappears in minutes, this recipe is your golden ticket. It’s affordable, adaptable, and so deliciously satisfying that it often upstages the main course. Let’s dive into the simple art of creating these irresistible, cheesy wonders.
Why This Cheesy Garlic Breadstick Recipe is a Total Game-Changer
Before we preheat the oven, let’s break down exactly what makes this specific formula a cut above the rest. First and foremost, it respects your time without compromising on quality. In a world of complicated baking projects, this recipe is a beacon of quick and easy cooking. The active preparation time is under 10 minutes, and from fridge to table, you’re looking at about 20. This is faster than most delivery times, and the results are infinitely fresher and more flavorful.
Second, this recipe understands the science of flavor layering. We don’t just sprinkle some garlic powder on top. We create a potent, aromatic compound butter using fresh garlic, savory herbs, and a touch of Parmesan. This butter is applied twice: once before baking to infuse the dough, and once immediately after baking as a finishing gloss. This double-hit technique ensures every single bite is permeated with buttery, garlicky goodness from the surface down to the very base.
Finally, it delivers textural perfection. Baking at a high temperature (425°F) on a parchment-lined sheet pan ensures the bottom of the dough crisps up beautifully, providing a sturdy, satisfying crunch. Meanwhile, the layer of cheese on top acts as a protective shield, steaming the dough underneath just enough to keep it soft and chewy. The contrast is nothing short of magical. This isn’t just a recipe; it’s a reliable blueprint for guaranteed culinary applause.
Gathering Your Ingredients: Simple Staples, Spectacular Results
The beauty of this recipe lies in its short, accessible ingredient list. Each component plays a specific role in building the final flavor and texture, so quality matters. Here’s your shopping list for these family-friendly cheesy sticks:
For the Breadstick Foundation:
· 1 lb (16 oz) store-bought pizza dough (refrigerated or fresh from the deli counter)
· 2 tablespoons olive oil
· All-purpose flour, for dusting
For the Garlic-Herb Butter (The Flavor Engine):
· 6 tablespoons (¾ stick) unsalted butter
· 4-5 large cloves fresh garlic, finely minced or pressed (about 1 ½ tablespoons)
· 2 tablespoons finely chopped fresh parsley
· 1 teaspoon dried Italian seasoning
· ¼ teaspoon kosher salt
· ¼ teaspoon freshly ground black pepper
· 2 tablespoons finely grated Parmesan cheese
For the Cheesy Topping:
· 1 ½ cups (6 oz) shredded whole-milk, low-moisture mozzarella cheese
· ½ cup (2 oz) shredded Parmesan cheese
· Optional Mix-Ins: ½ teaspoon red pepper flakes, ¼ cup finely chopped pepperoni
For Serving:
· 1 cup warm marinara sauce, for dipping
· Optional Garnish: Flaky sea salt, additional chopped fresh parsley, grated Parmesan
Ingredient Spotlight & Pro Substitutions
· The Dough: Store-bought pizza dough is the ultimate timesaver. Look for it in the refrigerated section near the canned biscuits or ask your local pizzeria if they sell it. Let it come to room temperature for 20-30 minutes; it will be much easier to shape. For a homemade touch, use your favorite pizza dough recipe.
· The Garlic: Fresh is non-negotiable. The sharp, pungent aroma of freshly minced garlic cooked in butter is the soul of this dish. Do not substitute with garlic powder for this component.
· The Butter: Unsalted butter allows you to control the salt level. The butter will be melted to mix with the garlic and herbs.
· The Cheeses: Shred your own. Pre-shredded bags of cheese are coated with anti-caking agents like potato starch or cellulose, which can prevent them from melting smoothly into that perfect, creamy pull. Buying a block of mozzarella and a wedge of Parmesan to grate yourself is the single best upgrade you can make.
· The Herbs: Fresh parsley adds a bright, clean finish. If you only have dried parsley, use 2 teaspoons. The dried Italian seasoning provides an herby backbone.
Essential Kitchen Tools for Effortless Breadstick Success
You don’t need any fancy equipment, but having the right tools on hand makes the process seamless, quick, and enjoyable.
- The Baking Foundation: Sheet Pan & Parchment
A large, rimmed half-sheet pan (18″x13″) provides ample space for the dough to spread and crisp up. Lining it with parchment paper is a non-negotiable step for two reasons: it guarantees no sticking (cheese can be unforgiving), and it makes cleanup an absolute breeze. A silicone baking mat is a great reusable alternative.
- The Prep & Shaping Station
· Rolling Pin: While you can stretch the dough with your hands, a rolling pin is the fastest way to get an even, rectangular shape. A clean wine bottle works in a pinch!
· Pizza Cutter or Sharp Chef’s Knife: The easiest tool for slicing the dough into perfect, even breadsticks before baking. A bench scraper also works wonderfully.
· Pastry Brush: Essential for evenly applying the olive oil and that glorious garlic butter. A silicone brush is easy to clean.
· Microplane or Box Grater: For finely grating the Parmesan cheese for the butter and the topping. A microplane creates a light, fluffy grate that melts instantly.
- The Mixing & Melting Tools
· Small Saucepan or Microwave-Safe Bowl: For melting the butter and infusing it with the garlic and herbs.
· Small Mixing Bowl: For combining the two cheeses.
· Measuring Spoons and Cups: For accuracy.
Step-by-Step Instructions: How to Make Perfect Breadsticks in 20 Minutes
Follow this sequence for flawless results. The key is working quickly while the dough is pliable and the oven is hot.
Step 1: Prep the Dough & Oven
Temperature is Key: Remove the pizza dough from the refrigerator and let it sit, still wrapped, on the counter for 20-30 minutes. This takes the chill off and makes it elastic and easy to shape.
Preheat: While the dough rests, preheat your oven to 425°F (218°C). This high heat is crucial for the crispy bottom.
Line the Pan: Line your half-sheet pan with parchment paper.
Step 2: Make the Garlic-Herb Butter
Melt Butter: In a small saucepan over low heat, melt the 6 tablespoons of butter. Once melted, remove from heat immediately.
Infuse: Stir in the minced garlic, chopped parsley, Italian seasoning, salt, pepper, and the 2 tablespoons of grated Parmesan. The residual heat will cook the garlic just enough to mellow its bite without burning it. Set aside.
Step 3: Shape & Flavor the Dough
Shape: On a lightly floured surface, roll or stretch the pizza dough into a large rectangle, roughly 10×13 inches. Don’t stress about perfection; rustic is charming! Transfer the shaped dough to the parchment-lined baking sheet.
First Flavor Layer: Using your pastry brush, coat the entire surface of the dough with the 2 tablespoons of olive oil, leaving a tiny border around the edges.
Butter Up: Spoon and spread half of your prepared garlic-herb butter evenly over the oiled dough.
Step 4: Add Cheese & Slice
Cheese It: In a bowl, combine the shredded mozzarella and ½ cup Parmesan. Sprinkle this cheese mixture evenly over the buttered dough, covering it completely.
Pre-Slice (The Pro Move): Using your pizza cutter or sharp knife, cut the dough vertically into 12-14 even strips, about 1-inch wide. Do not separate the strips. This pre-cutting allows you to pull apart perfect breadsticks after baking without struggling with a melted cheese barrier.
Step 5: Bake to Golden Perfection
Bake: Place the pan in the preheated oven. Bake for 12-15 minutes, rotating the pan halfway through. The breadsticks are done when the cheese is fully melted, bubbly, and spotted with golden brown, and the exposed dough edges are a rich golden color.
The Final Butter Bomb: As soon as you pull the pan from the oven, immediately brush the remaining half of the garlic-herb butter over the top of the hot breadsticks. This is the step that makes them glisten, adds a final punch of fresh garlic flavor, and keeps them incredibly moist.
Step 6: Serve & Devour
Separate: After brushing with butter, let the breadsticks cool for exactly 2-3 minutes. Then, using a spatula or your hands, gently separate them along the pre-cut lines.
Garnish & Serve: Transfer to a serving platter, sprinkle with optional flaky salt and more parsley, and serve immediately with a bowl of warm marinara sauce for dipping.
Chef’s Pro-Tips for the Absolute Best Breadsticks Ever
· Fresh Garlic is Mandatory: We cannot emphasize this enough. The flavor profile of fresh garlic cooked gently in butter is complex and aromatic, while garlic powder can taste harsh and one-dimensional in this application.
· Shred Your Own Cheese: The 60 seconds it takes to grate cheese from a block is the difference between good breadsticks and legendary, photogenically-stringy breadsticks. The melt is superior.
· Don’t Skip the Post-Bake Butter: This isn’t just for looks. Adding the second layer of butter on top of the hot cheese seals in moisture and allows the herbs and garlic to adhere to the surface, ensuring every square inch is flavorful.
· The Pre-Cut is Crucial: Cutting before baking ensures clean, defined breadsticks. If you try to cut after baking, the melted cheese will stretch and tear, creating a messy (albeit delicious) cheesy mass.
· Customize Your Flavor: Add ½ cup of mini pepperoni before the cheese for “pepperoni stick” vibes. Sprinkle with everything bagel seasoning after the final butter brush. Add a layer of pesto under the cheese for an herby twist.
Serving Suggestions: Beyond the Marinara Dip
While marinara is the classic partner, these breadsticks are versatile stars:
· The Ultimate Pasta Side: Serve alongside spaghetti and meatballs, baked ziti, or fettuccine alfredo.
· Game Day Appetizer: Cut them into shorter sticks and serve with marinara, ranch dressing, and extra cheese sauce for a decadent spread.
· Soup’s Best Friend: Dunk them into a bowl of tomato soup, minestrone, or tortilla soup.
· Party Platter: Arrange them on a large board with charcuterie, olives, and roasted vegetables for a stunning, edible centerpiece.
How to Store, Reheat, and Freeze for Later
· Storage: Store leftover, cooled breadsticks in an airtight container in the refrigerator for up to 3 days.
· Reheating for Crispness: Never use the microwave (it makes them rubbery). Reheat in a toaster oven or regular oven at 375°F for 5-8 minutes, or until hot and the cheese is melty again. An air fryer at 350°F for 3-4 minutes works miracles.
· Freezing: You can freeze baked breadsticks. Let them cool completely, then wrap individually in plastic wrap and place in a freezer bag. Freeze for up to 2 months. Reheat from frozen in a 375°F oven for 10-12 minutes.
Frequently Asked Questions (FAQ)
· Can I make these ahead of time? Yes! You can assemble the breadsticks up to the point of baking (through Step 4). Cover the pan tightly with plastic wrap and refrigerate for up to 12 hours. Bake directly from the fridge, adding 1-2 minutes to the bake time.
· My dough is too sticky to handle. Lightly flour your hands and the rolling pin. If it’s aggressively sticky, let it rest a few more minutes; as it comes to room temp, the gluten relaxes and it becomes more manageable.
· Can I use garlic powder? In an absolute pinch, you can. Use 1 ½ teaspoons of garlic powder in the butter mixture. However, the flavor will lack the fresh, aromatic depth of real garlic.
· What kind of pizza dough is best? Plain, white pizza dough is perfect. Whole wheat or herb dough will also work but will alter the flavor profile slightly.
· Why are my breadsticks soggy on the bottom? This usually means the oven wasn’t hot enough, or the dough was placed on a cold, un-preheated pan. Ensure your oven is fully preheated and you’re using a parchment-lined sheet pan.
Final Thoughts: The Simple Joy of Sharing Something Incredible
Cheesy Garlic Breadsticks are more than just a recipe; they’re a gesture. They’re a tangible way to say, “Let’s slow down, share this plate, and enjoy each other’s company.” In a world of complicated meals, they stand as a testament to the power of simplicity, quality ingredients, and a little bit of melted cheese. They prove that you don’t need to be a professional baker or spend hours in the kitchen to create something that feels special, celebratory, and deeply satisfying.
So, the next time you’re planning a pasta night, hosting friends for the game, or simply need a guaranteed smile from your family, remember this 20-minute miracle. Grab that dough, mince that garlic, and get ready to bake a pan of golden, cheesy, garlicky happiness. The only thing better than the aroma filling your kitchen will be the sight of the empty platter at the end of the meal.
Don’t forget to save this recipe, rate it, and leave a comment below telling us what you love to serve with your perfect breadsticks!
More Recipes You Might Like
-

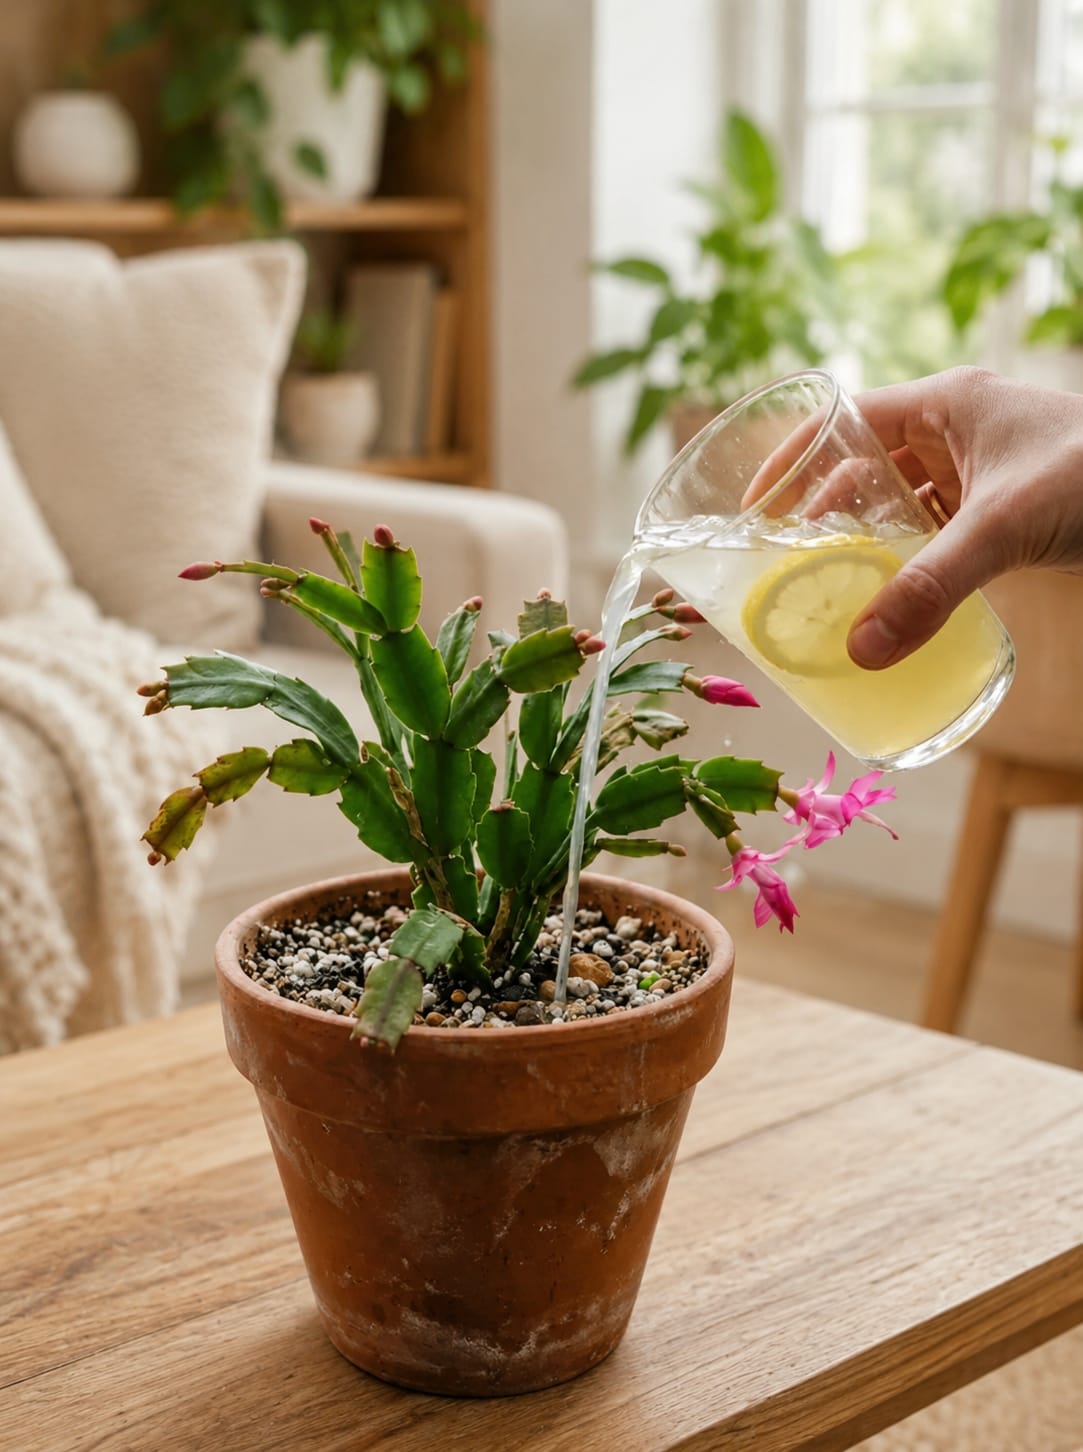
Christmas Cactus Care Guide: How to Use Lemon Water Safely Without Damaging Roots, Buds, or Beautiful Winter Blooms
Christmas cactus is one of the most charming flowering houseplants because it brings color at a time when many other indoor plants are quiet. Its flat green segments, arching shape, and bright flowers make it perfect for windowsills, shelves, hanging baskets, and cozy rooms. When the plant is healthy, the tips can fill with buds…
-

Christmas Cactus Care Guide: How to Grow a Full Hanging Basket With Healthy Segments, Strong Buds, and Bright Flowers
Christmas cactus is one of the most loved flowering houseplants because it can turn a quiet indoor corner into a bright display of color. Its soft green segmented stems hang gracefully over the edge of a pot, and when the plant is happy, the tips fill with buds that open into beautiful flowers. Many people…
-

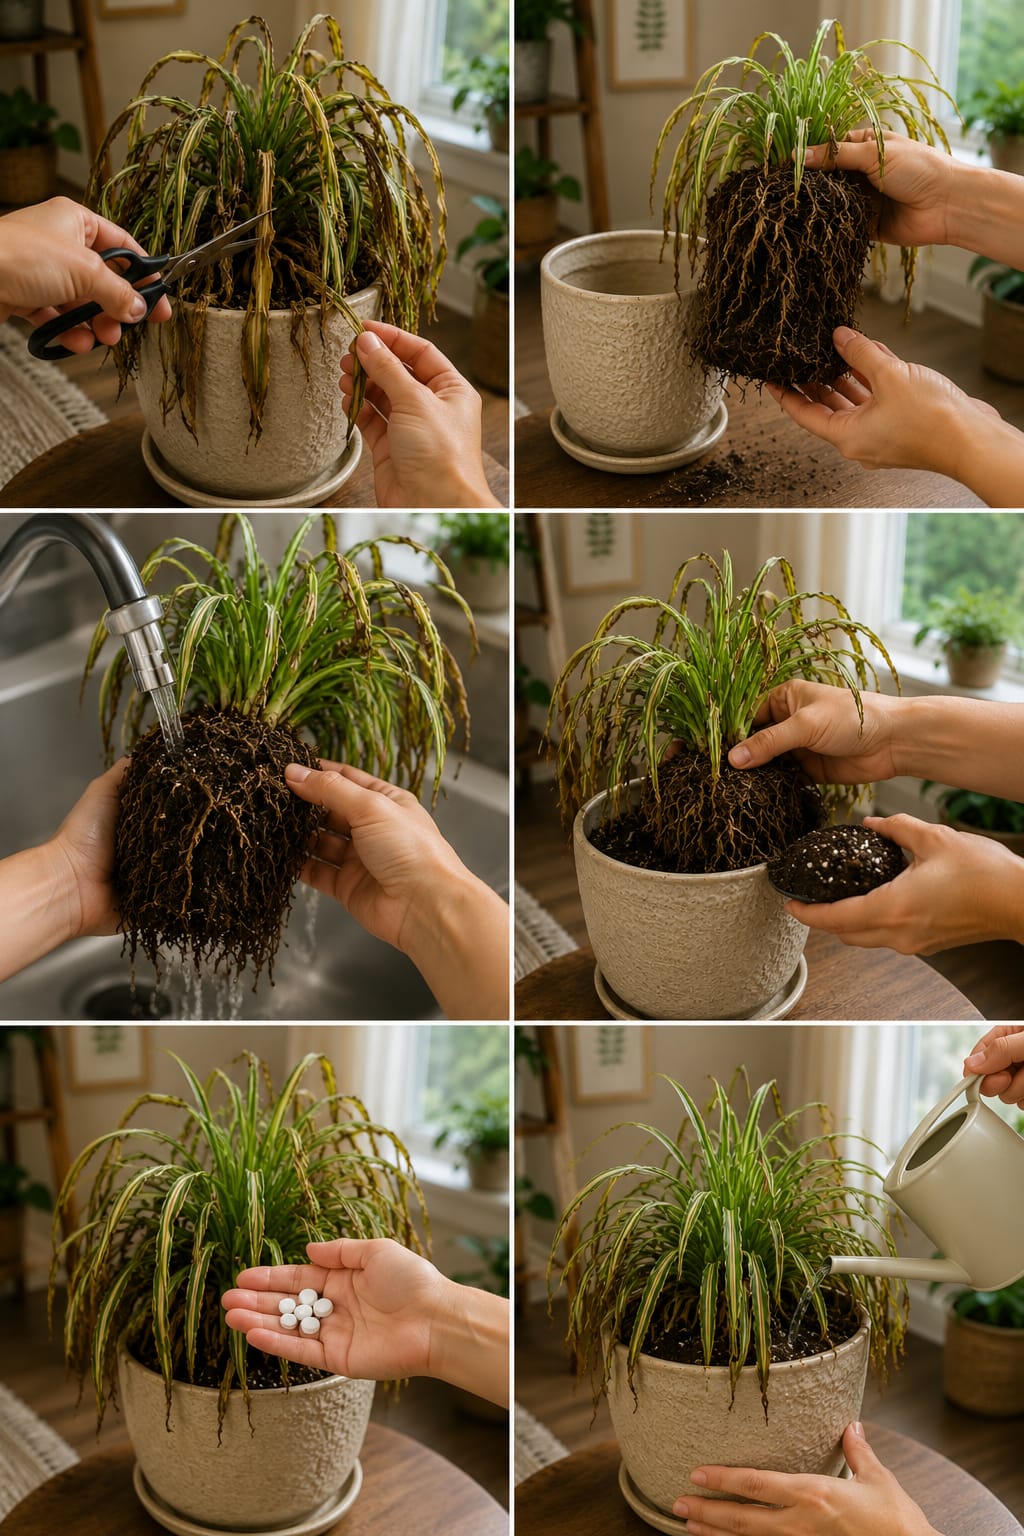
Spider Plant Rescue Guide: How to Revive a Tired Spider Plant With Pruning, Root Care, Fresh Soil, and Safe Watering
Spider plants are usually known as easy, forgiving, and fast-growing houseplants, but even this strong plant can begin to look tired when its roots, soil, water, and light are out of balance. The image shows a struggling spider plant with drooping leaves, brown tips, dry edges, and weak growth being rescued step by step. The…