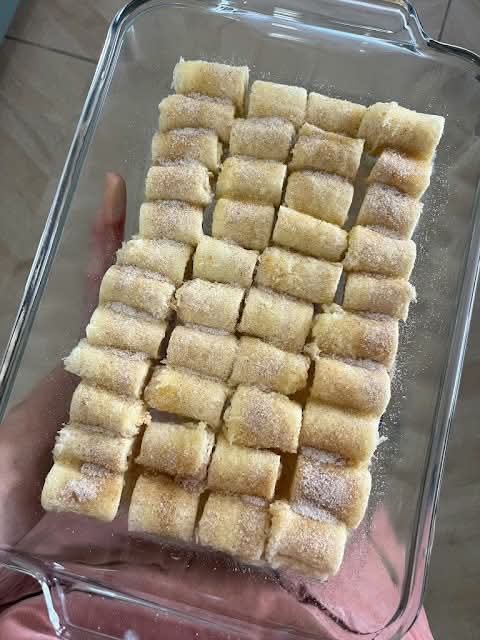
Learn how to make classic Sugar Snails—soft, buttery yeast pastry swirled with cinnamon sugar & topped with sweet glaze. An easier, stunning alternative to cinnamon rolls!
Imagine pulling apart a warm, tender coil of golden-brown pastry to reveal a spiral of shimmering cinnamon sugar within, each bite offering a perfect balance of fluffy dough, buttery sweetness, and a hint of spice. This is the simple, sublime joy of a Sugar Snail—a beloved European pastry that’s less fussy than a cinnamon roll but every bit as delicious. If you’re craving a homemade sweet breakfast, a show-stopping coffee companion, or a fun baking project that yields impressive, gorgeous results, this timeless treat is your perfect recipe.
Often found in German bakeries (Zimtschnecken) or Danish pastry shops, Sugar Snails are the elegant, less-frosted cousin of the American cinnamon roll. They are a masterpiece of yeast baking that showcases how a few humble ingredients—flour, butter, milk, sugar, and yeast—can be transformed into something truly special. The process of rolling, slicing, and coiling the dough is meditative and rewarding, resulting in individual pastries that are as beautiful to look at as they are to eat.
Whether you’re a beginner baker looking to master enriched dough, a seasoned cook seeking a new weekend brunch star, or simply someone who loves the comforting aroma of baking spices and yeast filling your home, this recipe is for you. It’s a forgiving process that teaches essential baking skills and delivers a product that’s perfect for sharing. Let’s unlock the secrets to creating these soft, sweet, swirled delights.
Why This Sugar Snail Recipe is a Must-Try for Any Baker
Before we warm the milk, let’s talk about what makes this recipe so special and worthy of your time. First, it offers a perfect introduction to yeast doughs. This is a rich, “enriched” dough thanks to the butter, milk, and eggs, which makes it more forgiving and slower to proof than a lean bread dough. It’s an ideal training ground for understanding how yeast works, how to knead properly, and how to achieve that coveted light, tender crumb.
Second, the flavor and texture are utterly timeless. The dough itself is lightly sweet and incredibly soft. The filling is a pure, unadulterated mix of butter, sugar, and spice that caramelizes slightly as it bakes, creating pockets of gooey sweetness within the swirl. Unlike a cream cheese-frosted cinnamon roll, a Sugar Snail lets the quality of the dough and the simplicity of the filling shine.
Finally, its versatility and elegance are unmatched. These pastries feel special enough for a holiday morning or a fancy coffee break, yet they’re simple enough for a casual Saturday. You can customize the spice, add nuts or raisins, or even dip them in a simple glaze or icing. This isn’t just a recipe; it’s a foundational skill that opens the door to a world of sweet, rolled pastries.
Gathering Your Ingredients: The Simple Alchemy of Sweet Dough
The magic lies in the quality of simple ingredients. Using good butter, fresh yeast (or active dry), and real vanilla will make a noticeable difference.
For the Sweet Yeast Dough:
· 1 cup (240ml) whole milk, lukewarm (about 110°F)
· 2 ¼ teaspoons (1 standard packet) active dry yeast
· ½ cup (100g) granulated sugar, divided
· 4 ¼ to 4 ½ cups (530-560g) all-purpose flour, divided
· 2 large eggs, at room temperature
· 1 teaspoon fine sea salt
· 1 teaspoon pure vanilla extract
· ½ cup (1 stick / 113g) unsalted butter, softened to room temperature
For the Cinnamon-Sugar Filling:
· ½ cup (1 stick / 113g) unsalted butter, very soft
· 1 cup (220g) packed light or dark brown sugar
· 2 tablespoons ground cinnamon
· ¼ teaspoon ground cardamom or nutmeg (optional)
For the Egg Wash & Topping:
· 1 large egg beaten with 1 tablespoon milk or water
· Pearl sugar or coarse sugar, for sprinkling (optional but traditional)
For the Simple Glaze (Optional):
· 1 cup (120g) powdered sugar
· 2-3 tablespoons milk or cream
· ½ teaspoon vanilla extract
Ingredient Spotlight & Pro Substitutions
· The Yeast: Active dry yeast is called for here. Ensure it is fresh by proofing it in the warm milk with a pinch of sugar. If it doesn’t foam within 5-10 minutes, it’s dead and you need new yeast. You can substitute instant yeast; simply add it directly to the dry ingredients and use warm (not hot) milk.
· The Flour: Bread flour can be used for a slightly chewier texture. Start with the lower amount of flour and add more only as needed during kneading. The dough should be soft and slightly tacky, but not sticky.
· The Butter: Room-temperature butter is crucial for properly creaming with the sugar for the filling and for incorporating into the dough. For the dough, it should be soft but not melted.
· The Sugar: Brown sugar in the filling provides moisture and a deeper, molasses-like flavor that pairs perfectly with cinnamon. Pearl sugar is a non-melting sugar used in Scandinavian baking that provides a delightful crunch on top.
· The Spices: Cinnamon is the star. For a more complex flavor, a touch of cardamom is a classic Nordic addition.
Essential Kitchen Tools for Pastry Success
While you don’t need professional equipment, a few key tools will make the process smoother and more enjoyable.
- The Mixing Powerhouse: Stand Mixer
A stand mixer fitted with a dough hook is the easiest way to knead this rich, sticky dough to smooth, elastic perfection. It can take 8-10 minutes. You can absolutely knead by hand on a floured surface; it will take 12-15 minutes of active kneading and is a wonderful, tactile process.
- The Rolling & Cutting Station
· Rolling Pin: A standard rolling pin is essential for rolling the dough into a large, even rectangle.
· Pastry Brush: For applying the egg wash, which gives the snails their beautiful, glossy golden-brown finish.
· Sharp Chef’s Knife, Bench Scraper, or Unflavored Dental Floss: For cleanly slicing the rolled dough log into individual snails without squishing them. Dental floss slipped underneath and pulled up in a crossing motion works brilliantly.
· Ruler or Measuring Tape: To help roll the dough to the correct dimensions and slice it evenly.
- The Baking & Proofing Setup
· Two Rimmed Baking Sheets: Lined with parchment paper or silicone baking mats.
· Large, Clean Bowl & Plastic Wrap: For the dough’s first rise.
· Warm, Draft-Free Spot: A turned-off oven with the light on, or a spot near a warm radiator, is ideal for proofing.
Step-by-Step Instructions: The Art of the Swirl
This process takes time, mostly hands-off for rising. Don’t rush the proofs—they are essential for flavor and texture.
Step 1: Make & Proof the Dough (First Rise)
Proof the Yeast: In the bowl of your stand mixer (or a large bowl), combine the lukewarm milk, yeast, and 1 tablespoon of the granulated sugar. Stir and let sit for 5-10 minutes until foamy.
Make the Dough: To the yeast mixture, add the remaining sugar, 4 cups of flour, eggs, salt, and vanilla. Using the dough hook on low speed, mix until a shaggy dough forms. With the mixer running, add the softened butter a few pieces at a time, waiting for each addition to be incorporated before adding the next.
Knead: Increase speed to medium and knead for 8-10 minutes, adding the remaining ¼-½ cup flour only if the dough is sticking excessively to the sides of the bowl. The dough is ready when it is smooth, elastic, and pulls away from the sides but remains soft and slightly tacky to the touch.
First Rise: Form the dough into a ball. Place it in a lightly greased bowl, turning to coat. Cover with plastic wrap or a damp kitchen towel. Let rise in a warm, draft-free place for 1 to 1.5 hours, or until roughly doubled in size.
Step 2: Shape the Snails
Punch & Chill: Gently punch down the risen dough. For easier handling, you can wrap it and refrigerate it for 20-30 minutes.
Roll Out: On a lightly floured surface, roll the dough out into a large rectangle, about 18×24 inches. Try to keep the thickness even.
Spread Filling: In a small bowl, mix the brown sugar and cinnamon (and cardamom if using). Spread the ½ cup of very soft butter evenly over the entire surface of the dough, leaving a ½-inch border along one long edge. Sprinkle the cinnamon-sugar mixture evenly over the butter, patting it down gently.
Roll Up Tightly: Starting from the long edge opposite the clean border, tightly roll the dough into a log, finishing seam-side down. Pinch the seam to seal. Gently roll the log back and forth to even it out.
Slice: Using a sharp knife, bench scraper, or dental floss, cut the log into 12-16 even pieces (about 1.5 inches thick).
Step 3: Proof & Bake (Second Rise)
Arrange & Proof: Place the swirls cut-side up on your parchment-lined baking sheets, spacing them about 2 inches apart as they will expand. Cover loosely with plastic wrap or a clean kitchen towel. Let rise in a warm place for 30-45 minutes, until noticeably puffed.
Preheat & Prep: While they proof, preheat your oven to 375°F (190°C).
Egg Wash: Gently brush the tops of the proofed snails with the egg wash. Sprinkle generously with pearl or coarse sugar.
Bake: Bake for 18-22 minutes, rotating the pans halfway through, until the snails are deep golden brown and the filling is bubbling.
Cool: Let cool on the baking sheets for 5 minutes before transferring to a wire rack.
Step 4: Glaze & Serve
Optional Glaze: If desired, whisk together the powdered sugar, milk, and vanilla to make a thin glaze. Drizzle over the warm snails.
Serve: Enjoy warm or at room temperature. They are best the day they are made but will keep for a day or two in an airtight container.
Chef’s Pro-Tips for Flawless, Tender Snails
· Temperature is Key: The milk must be lukewarm, not hot, to activate the yeast without killing it. Similarly, butter and eggs should be at room temperature to incorporate smoothly into the dough.
· Don’t Over-Flour: The dough should be soft and slightly tacky. Adding too much flour during kneading will make the final pastries dry and dense.
· Roll Tightly: A tight roll ensures distinct, beautiful swirls that won’t unravel during baking.
· Use a Sharp Tool to Slice: A dull knife will squish the log. A bench scraper or dental floss gives the cleanest cuts, preserving the spiral shape.
· Don’t Skip the Second Proof: This shorter rise, called the “final proof,” is what gives the snails their final light and airy texture. They should look puffy and filled with air before going in the oven.
Serving Suggestions & Delicious Variations
These snails are sublime with a cup of coffee or tea, but here’s how to customize them:
· The Classic: Serve plain or with a simple glaze, as directed.
· With a Spread: Offer softened butter, clotted cream, or a fruit compote on the side.
· Flavor Twists:
· Cardamom Snails: Replace half the cinnamon with ground cardamom.
· Apple Snails: Scatter finely diced apples over the butter before adding the sugar.
· Almond Snails: Spread a thin layer of almond paste over the butter before adding the sugar.
· Sticky Bun Style: Before placing the snails in the pan, sprinkle the bottom with a mix of melted butter, brown sugar, and chopped pecans.
How to Store, Reheat, and Freeze
· Storage: Store completely cooled snails in an airtight container at room temperature for up to 2 days.
· Reheating for Freshness: Reheat in a 350°F oven for 5-8 minutes or in a toaster oven. The microwave will make them rubbery.
· Freezing: Freeze unglazed, baked snails. Wrap tightly in plastic and foil, or place in a freezer bag. Freeze for up to 2 months. Thaw at room temperature and reheat in the oven. You can also freeze the shaped, unbaked snails on a tray, then transfer to a bag. Proof from frozen (allow extra time) and bake as directed.
Frequently Asked Questions (FAQ)
· Can I make these with puff pastry? Yes, for a quick version. Use thawed store-bought puff pastry, roll it out, spread with butter and sugar, roll, slice, and bake at 400°F for 15-18 minutes. The texture will be flaky, not soft and yeasted.
· Why are they called “snails”? The name comes from the spiral shape, which resembles a snail’s shell.
· My dough didn’t rise. What went wrong? Likely culprit: yeast was dead (didn’t foam), liquid was too hot and killed the yeast, or the proofing environment was too cold.
· Can I make the dough the night before? Yes! After the first rise, punch it down, wrap tightly, and refrigerate overnight. The next day, let it sit at room temp for 30 minutes, then proceed with rolling and shaping. This slow fermentation can deepen the flavor.
Final Thoughts: The Simple Joy of a Handmade Pastry
Sugar Snails are more than a recipe; they are a lesson in patience and reward. They teach you to feel the dough, to appreciate the slow magic of yeast, and to take joy in creating something beautiful and delicious from simple ingredients. In a world of instant gratification, baking a batch of these sweet swirls is a meditative, fulfilling act that results in a treat meant to be shared slowly, with good company and a hot beverage.
So, clear your counter, dust off your rolling pin, and dedicate a morning to this classic baking project. The aroma alone will be worth the effort, and the first bite of a warm, homemade Sugar Snail will make you feel like a master baker.
Don’t forget to save this recipe, rate it, and leave a comment below telling us about your first swirled pastry success
More Recipes You Might Like
-

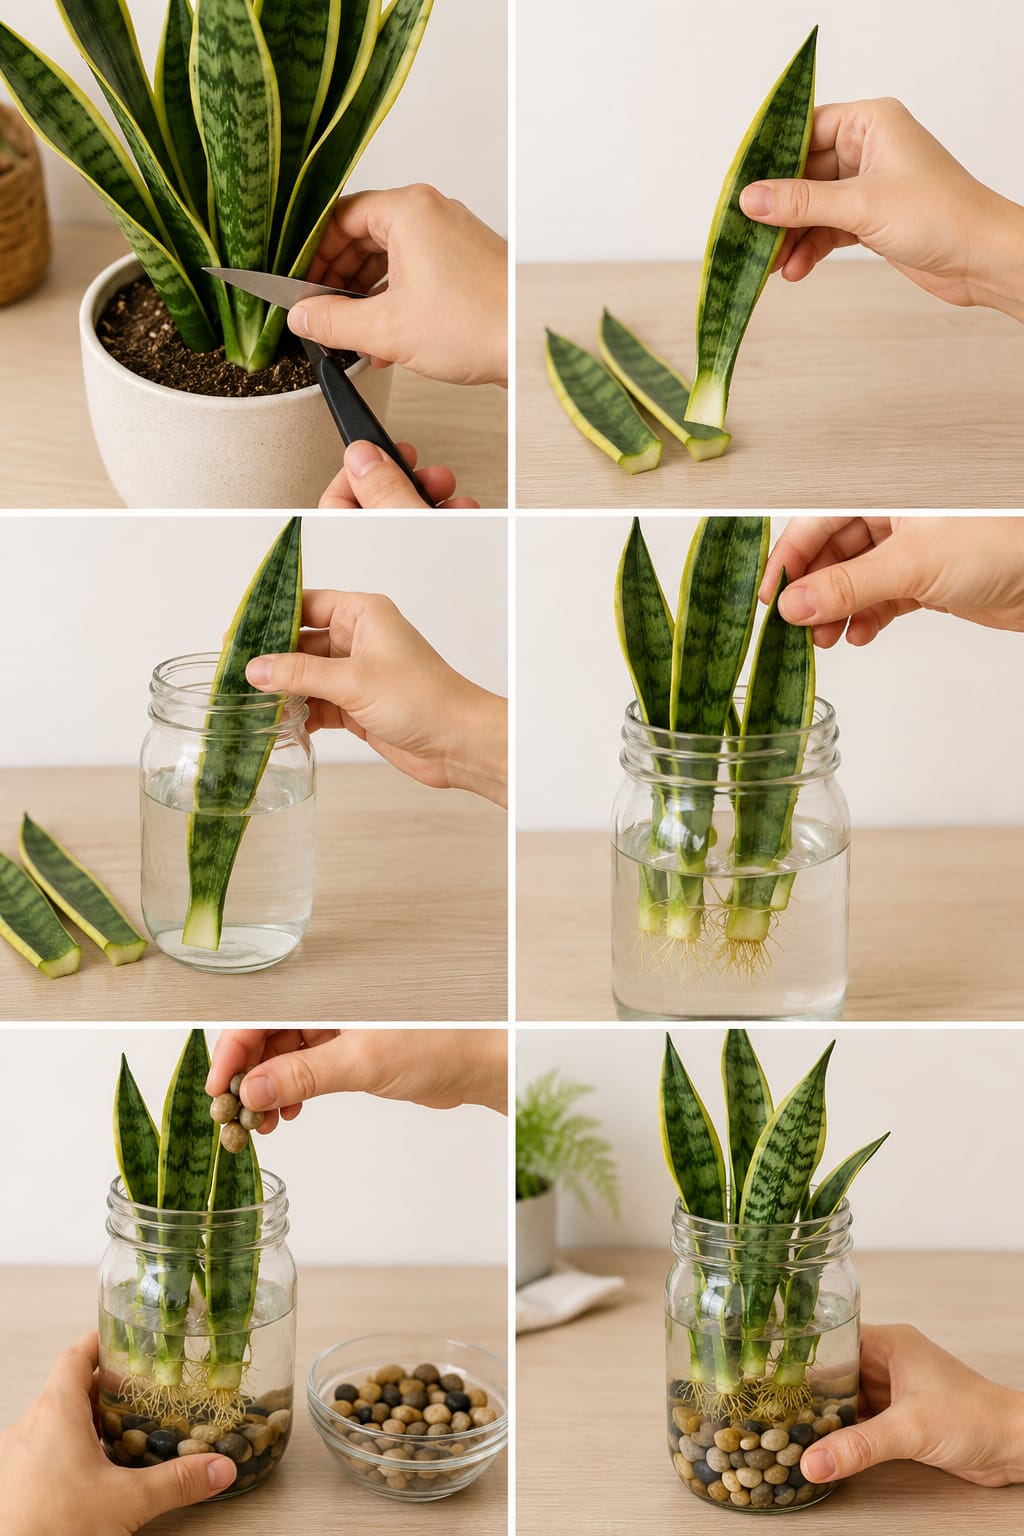
How to Grow Snake Plant Cuttings in Water: A Complete Guide for Strong Roots, Healthy Leaves, Clean Jar Displays, and Easy Indoor Propagation
Snake plants are some of the easiest, strongest, and most stylish houseplants you can grow indoors. Their tall sword-shaped leaves, bold green patterns, yellow edges, and modern upright shape make them perfect for living rooms, bedrooms, offices, shelves, windowsills, and plant corners. They are famous for being low-maintenance, drought-tolerant, and beginner-friendly. The image shows a…
-

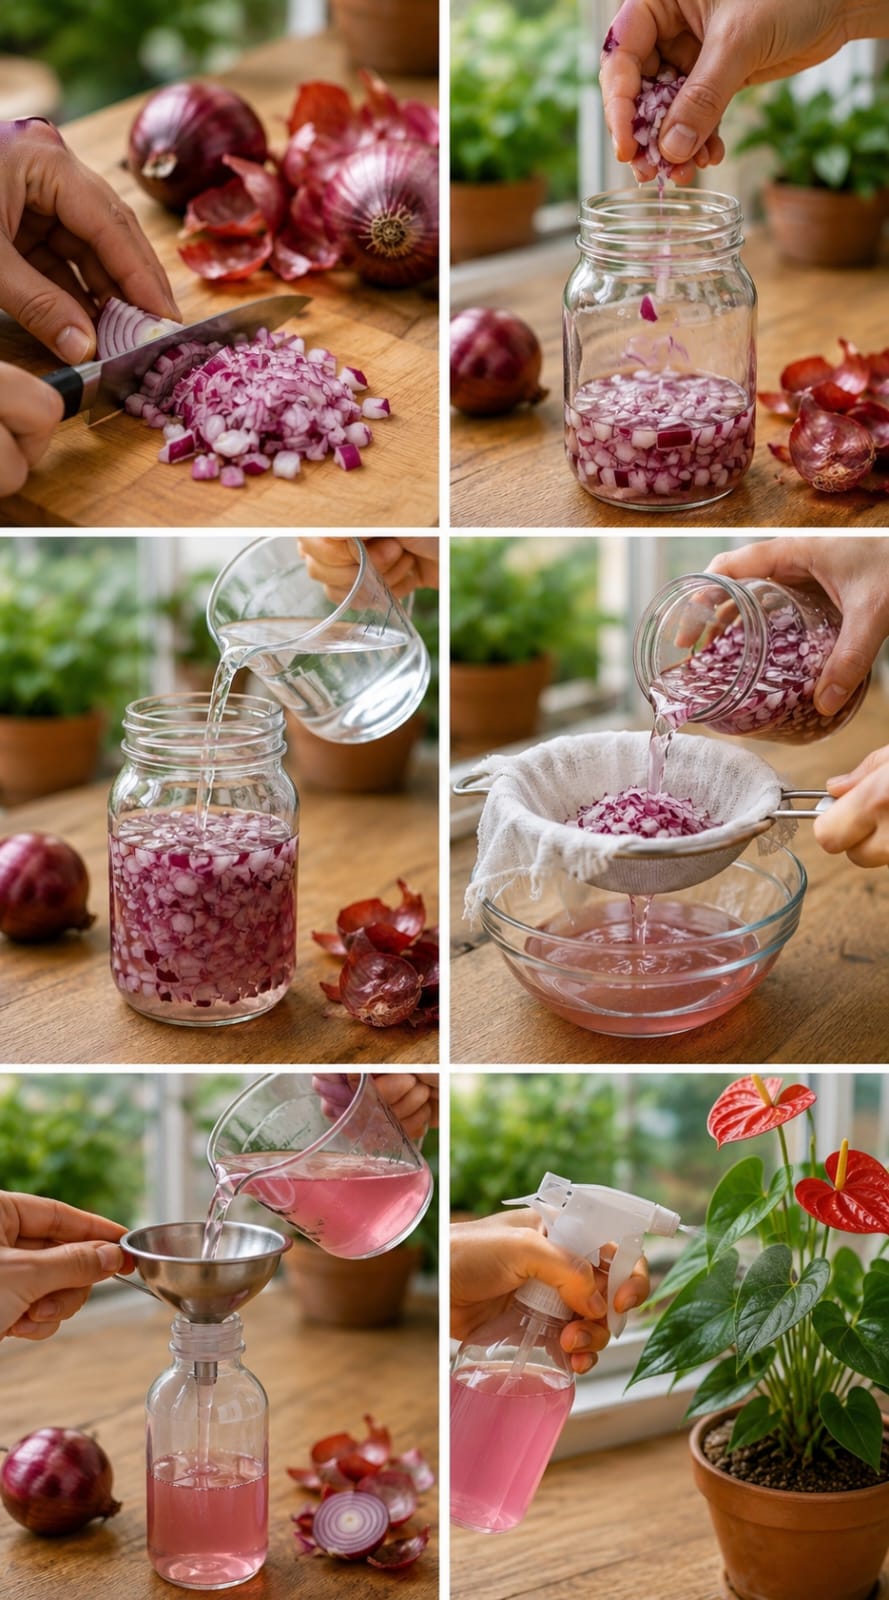
Onion Water for Anthuriums: A Complete Guide for Glossy Leaves, Strong Roots, Bright Flowers, and Safe Indoor Plant Care
Anthuriums are some of the most beautiful tropical plants you can grow indoors. Their glossy heart-shaped leaves, colorful spathes, and elegant upright flowers can make any room feel fresh, bright, and luxurious. Red, pink, white, purple, and orange Anthuriums are often used as living decorations because they can bloom for a long time when the…
-

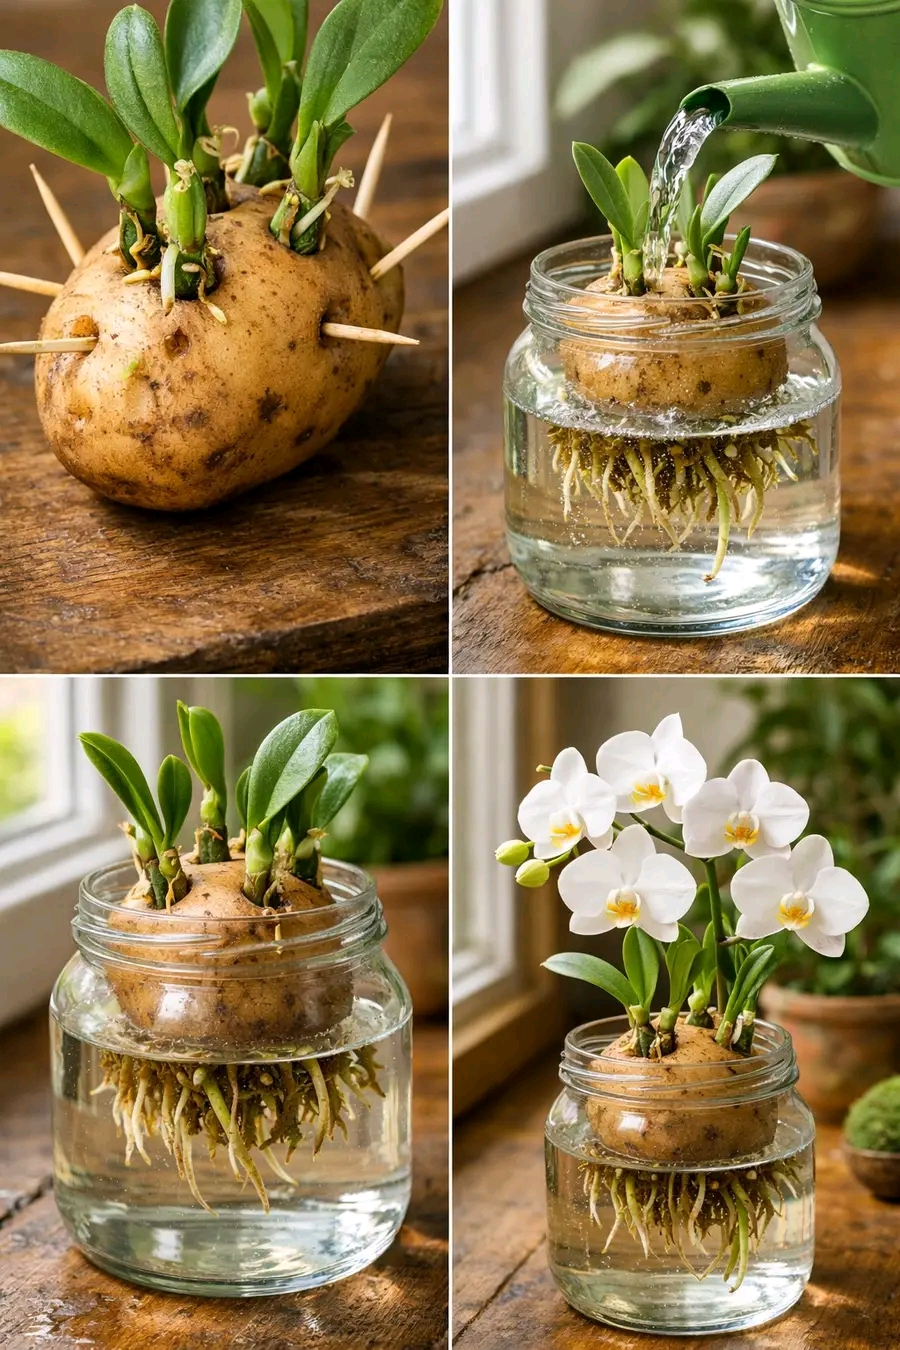
Potato Method for Orchids: A Complete Guide for Strong Roots, Healthy Leaves, Beautiful Blooms, and Safe Indoor Orchid Care
Orchids are some of the most elegant flowering plants you can grow indoors. Their smooth green leaves, graceful flower spikes, and long-lasting blooms make them a favorite for windowsills, plant shelves, living rooms, kitchens, offices, and bright indoor corners. A healthy orchid can bloom for weeks, sometimes months, when the care routine is right. But…