Orchids have a special way of making any indoor corner feel refined, calm, and expensive. Their sculptural leaves, graceful flower spikes, and long-lasting blooms make them one of the most loved plants for windowsills, balcony corners, living rooms, and bright kitchen shelves. But orchids can also be frustrating. One month they look beautiful, and the next month the roots appear tired, the leaves lose shine, and the plant refuses to bloom again.
That is why many plant lovers become interested in gentle homemade orchid care tricks. One simple idea uses dried potato peels turned into a light powder or soft root-supporting mix. Potato peels are often thrown away, but when prepared carefully and used in a very small amount, they can become part of a natural orchid-care routine. The goal is not to force flowers overnight. The real goal is to support cleaner root care, encourage a healthier growing environment, and help the orchid look more refreshed over time.
Orchids are not like ordinary soil plants. Most popular indoor orchids, especially Phalaenopsis orchids, grow naturally with roots exposed to air, moisture, bark, and filtered light. Their roots need oxygen as much as they need water. This means any homemade trick must be used gently. A heavy layer of food scraps, wet paste, or strong mixture can damage the plant instead of helping it. But a light, dry, carefully prepared potato peel powder can be used as a mild organic supplement when the orchid is already growing in a suitable bark mix.
The Potato Peel Orchid Trick
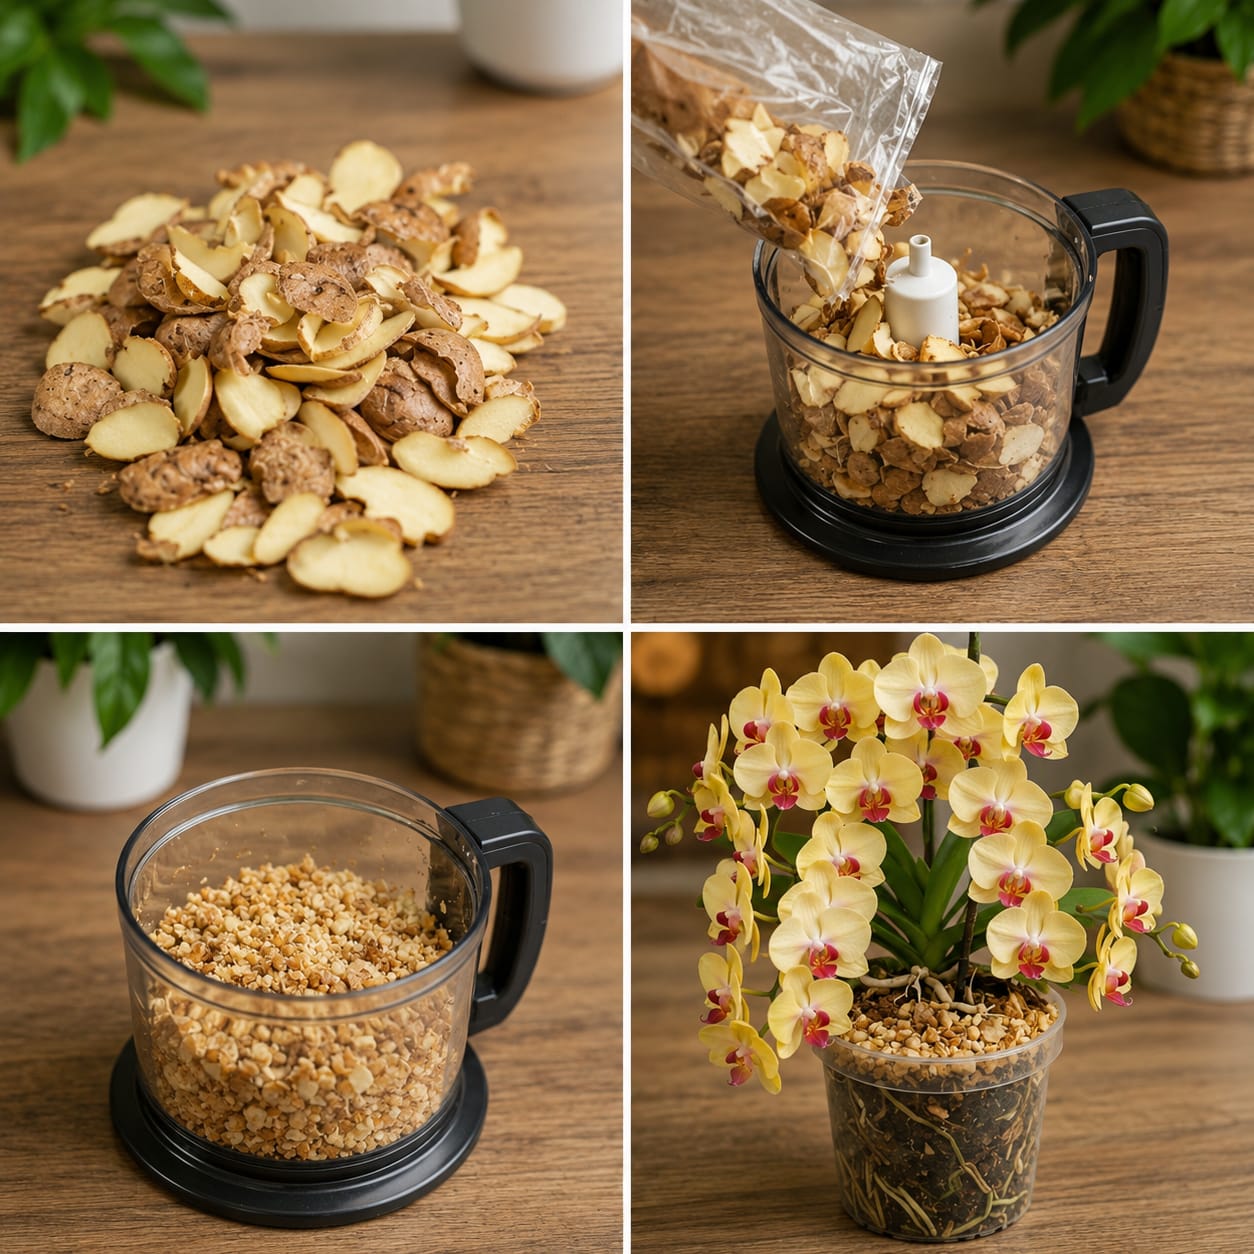
The basic idea is simple: potato peels are cleaned, dried completely, crushed into small flakes or powder, and used sparingly around the orchid’s growing medium. This gives the plant a gentle organic touch without burying the roots in heavy material. Because orchids dislike dense, soggy conditions, the powder should never be packed into the pot. It should only be sprinkled lightly on the surface of bark or mixed into a watering soak in a very diluted way.
Potato peels contain organic matter and small amounts of minerals that can slowly break down. In garden soil, organic matter can feed microbial life and improve texture. In orchid pots, however, the situation is different. Orchid bark is airy and loose, and it should not become muddy. That is why the potato peel method must be treated more like a small seasonal refresh, not a daily fertilizer.
The safest version is to use dried peels, not fresh wet peels. Fresh potato peels can rot quickly, attract insects, create odor, and hold too much moisture around the roots. Dried peels are cleaner, easier to store, and easier to use in controlled amounts. When crushed into small pieces, they can sit on top of the bark without turning the pot into a compost bin.
Why Orchid Roots Need Gentle Care
Healthy orchid roots are thick, firm, and usually silvery-green when dry. After watering, they often turn bright green. This color change is normal and helps show whether the roots are absorbing moisture. Weak roots may look brown, hollow, mushy, black, or dry and stringy. Once roots decline, the whole orchid becomes weaker. Leaves soften, flower spikes stop appearing, and buds may drop before opening.
Many orchid problems begin with the potting medium. If bark breaks down and becomes compacted, air cannot move freely around the roots. If the plant is watered too often, the roots stay wet and begin to rot. If the orchid is left dry for too long, the roots shrink and stop absorbing water properly. A homemade trick cannot replace proper root conditions. It can only support an orchid that already has good drainage, fresh bark, and correct watering.
This is why the potato peel powder should be used carefully. It should never cover the roots completely or block air pockets. Orchids need a light, breathable environment. A small sprinkle is enough. If you cannot still see bark after applying the powder, you have used too much.
How to Prepare Potato Peel Powder Safely
Start with clean potato peels from plain potatoes. Avoid peels that are moldy, green, spoiled, oily, salted, cooked with spices, or mixed with kitchen scraps. The cleaner the peels, the safer the routine will be for an indoor orchid.
Rinse the peels well under clean water to remove soil and residue. Pat them dry with a towel. Then spread them in a thin layer on a tray. They must dry completely before being used. You can air-dry them in a warm, ventilated place for several days, or dry them gently at a low temperature until they become crisp. The peels should snap or crumble easily. If they bend or feel soft, they are not dry enough.
Once fully dry, crush them by hand, with a mortar, or with a small food processor. The texture should be like coarse flakes or a light powder. Do not make a wet paste. Wet paste is too heavy for orchid roots and can create rot. Store the powder in a dry jar with a lid, and use it within a reasonable time. If it smells strange, shows mold, or becomes damp, throw it away.
How Much to Use on Orchids
For a medium orchid pot, use only half a teaspoon to one teaspoon of dried potato peel powder. That is enough. Sprinkle it lightly over the bark, mostly near the outer edge of the pot rather than directly on the crown of the plant. The crown is the central area where the leaves meet. Keeping this part wet or covered can cause crown rot.
After sprinkling, water the orchid normally with room-temperature water. Let the water run through the pot and drain completely. Never leave the orchid sitting in a full saucer. If the orchid is in a decorative cover pot, remove it after watering and empty extra water before placing it back.
Use this method only once every six to eight weeks during active growth. Do not use it every week. Orchids are sensitive, and too much organic matter in the pot can invite fungus gnats, mold, and root problems. Less is better.
A Gentle Potato Peel Soak Option
Another gentle method is to create a very light potato peel soak. Place one teaspoon of dried potato peel flakes into one cup of warm water. Let it sit for several hours, then strain very well. The liquid should be pale and mild, not thick. Dilute it with another cup of clean water before using.
Use this diluted liquid to water the orchid once, allowing it to flow through the bark and drain away. Do not let the orchid sit in the liquid for a long time. A quick soak of ten to fifteen minutes can be enough if the plant is dehydrated, but the roots must drain well afterward.
This liquid option should also be occasional. Once every two months is enough for most orchids. If the plant is stressed, recently repotted, or suffering from root rot, skip homemade tonics and focus on root recovery first.
When Not to Use This Trick
Do not use potato peel powder on orchids with mushy roots, black roots, sour-smelling bark, or heavy mold in the pot. These plants need cleaning, repotting, and better airflow before any extra organic material is added. Adding powder to an already unhealthy pot can make the problem worse.
Do not use it on orchids growing in dense soil. Most indoor orchids should not be planted in regular garden soil. If the potting mix looks muddy, compact, and wet for many days, the plant needs a better orchid bark mix. Potato peel powder will not fix bad soil.
Also avoid using this trick during cold, dark months if the orchid is not actively growing. When light is low and the plant slows down, moisture stays longer in the pot. Organic additives can break down slowly and create problems. The best time is during spring or warmer growth periods when the orchid is producing new roots or leaves.
How to Tell If the Orchid Likes the Routine
A happy orchid will show gradual signs of improvement. Roots may look firmer after watering. New root tips may appear bright green. Leaves may feel stronger and smoother. The plant may hold itself better in the pot. Over time, with correct light and care, the orchid may produce a new flower spike.
Do not expect instant blooms. Orchid flowering is controlled by maturity, light, temperature changes, root health, and overall energy. A natural powder cannot replace those needs. The best sign that the routine is working is steady root and leaf improvement, not overnight flowers.
If you notice mold, bad smell, tiny flies, or bark staying wet too long, stop using the powder. Remove any visible residue, improve airflow, and allow the orchid to dry properly between watering. Plant care should always respond to what the plant is showing.
The Best Orchid Medium for This Trick
Potato peel powder works best when the orchid is growing in a chunky, airy medium. A good orchid mix usually includes bark chips, charcoal, perlite, and sometimes sphagnum moss. Bark gives structure and air. Charcoal helps keep the mix fresher. Perlite improves drainage. Sphagnum moss holds moisture, but too much moss can stay wet for too long in some homes.
If your home is humid, use more bark and less moss. If your home is very dry, a small amount of moss can help the roots stay hydrated. The mix should dry gradually, not remain soaked for a week. When the medium is correct, small natural supplements are less risky because water can still move through the pot.
Repot orchids every one to two years, or whenever the bark breaks down. Old bark becomes soft and compact, which reduces airflow. A fresh mix often improves orchid health more than any fertilizer trick. If your orchid has not bloomed for a long time, checking the bark is one of the first things to do.
Watering Orchids the Right Way
Orchids should be watered deeply but not constantly. The best method is to water until the roots turn green and the bark is evenly moist, then allow the pot to drain fully. Wait until the roots become silvery again and the bark feels lighter before watering again.
A clear plastic pot is helpful because you can see the roots. If the roots are green and there is condensation inside the pot, wait. If the roots are silver and the pot feels light, water. This is better than watering on a strict calendar.
Always use room-temperature water. Very cold water can shock roots. Water in the morning so the plant has time to dry before night. Avoid leaving water trapped in the crown or between leaves. If water collects there, blot it gently with a tissue.
Light: The Secret Behind Orchid Blooms
Orchids need bright indirect light to bloom well. A plant can survive in a dim corner, but it may not flower. Place the orchid near a bright window with filtered light. East-facing windows are often excellent. South or west windows may work if the light is softened with a curtain.
Leaves can tell you a lot about light. Deep dark green leaves may mean the orchid is not getting enough light. Yellowish leaves or burned patches may mean the light is too strong. A healthy orchid leaf is usually medium green and firm.
If your orchid grows leaves but never blooms, increase light gradually. Do not move it suddenly into harsh sun. A slow adjustment helps the plant adapt without burning.
Temperature and Blooming
Many Phalaenopsis orchids need a slight difference between daytime and nighttime temperatures to trigger flower spikes. A gentle cool period at night can encourage blooming, especially after the plant has grown healthy leaves and roots. This does not mean exposing the orchid to cold drafts. It simply means keeping it in a comfortable room where nights are a little cooler than days.
Avoid placing orchids near heaters, air conditioners, or drafty windows. Sudden temperature changes can cause bud blast, where flower buds dry up and fall before opening. Stable conditions are better for long-lasting blooms.
How to Make Orchid Roots Look Cleaner
One reason orchids look expensive is their visible root structure. Healthy roots make the whole plant look sculptural. To keep the display clean, remove dead roots during repotting. Use sterilized scissors and cut only roots that are clearly hollow, mushy, or black. Do not cut firm silver or green roots.
After trimming, repot into fresh bark and keep the plant slightly drier for a few days. This allows cuts to settle. Avoid strong fertilizers or homemade mixes immediately after root trimming. The plant needs time to recover.
For a decorative look, use a clear inner pot inside a ceramic cover pot. The clear pot lets you monitor roots, while the outer pot gives a polished appearance. Just make sure water never collects inside the cover pot.
Decor Styling for a More Elegant Orchid Display
Orchids look best when the styling is simple. Their flowers already provide drama, so the container should support the plant without competing with it. White ceramic pots, soft beige planters, matte black containers, glass bowls, and natural wood trays all work beautifully.
For a luxury look, group orchids with clean textures: a stone tray, a wooden shelf, a linen curtain, or a neutral wall. Avoid clutter around the plant. A single blooming orchid on a clean table can look more expensive than many plants crowded together.
If the orchid has yellow flowers, pair it with warm materials like terracotta, rattan, or light wood. If it has white or pink flowers, a white or pale gray pot creates a softer, spa-like effect. For purple orchids, black or charcoal planters can make the blooms look richer.
Continue to Page 2
Continue to page 2 for more details about this article and the key points many readers miss on the first page.