

Let’s be honest: getting excited about vegetables can sometimes feel like a chore. But what if you could transform a humble bag of carrots into a golden, cheesy, utterly irresistible flatbread that everyone—yes, even the pickiest eaters—begs for? Enter the Cheesy Carrot Flatbread: a culinary sleight of hand that’s part nutritious wizardry, part comfort food masterpiece.
Imagine a flatbread with a subtly sweet, incredibly soft interior, lightly crisp edges, and a top layer of bubbling, perfectly browned cheese. It’s a cross between a fluffy focaccia, a savory pancake, and the best grilled cheese you’ve ever had. This isn’t just a way to “hide” veggies; it’s a celebration of them. Grated carrots melt into the dough, imparting moisture, a beautiful golden hue, and a nutrition boost without a strong “vegetable” flavor. They simply make the bread better—softer, more flavorful, and downright addictive.
Ready in about 30 minutes with no yeast and no waiting, this recipe is your secret weapon for busy weeknights, impressive last-minute appetizers, or a lunchbox game-changer. Let’s turn that bag of carrots into the most delicious flatbread you’ll make all week.
Why You’ll Become Obsessed with This Recipe
· Stealthy Nutrition: A serving of vegetables in every delicious slice. It’s the ultimate “hidden veg” win for parents.
· Unbeatable Texture: The carrots create an incredibly moist, tender crumb with a satisfyingly crisp exterior when pan-fried or baked.
· 30-Minute Miracle: From bowl to plate in half an hour. No rising, no complicated techniques.
· Wildly Versatile: Serve it as a main with a salad, cut into strips for dipping, or use as a base for more toppings.
The Science of Sweetness: Why Carrots Work
Carrots are the secret superstar here. When grated finely, they disperse evenly in the dough. As they cook, their natural sugars caramelize slightly, offering a gentle sweetness that balances the savory cheese and salt. Furthermore, they release moisture into the dough, which, when it hits the heat of your pan or oven, turns to steam. This steam creates pockets of air, resulting in a lighter, softer flatbread. It’s a simple, natural trick for amazing texture.
Essential Equipment for Flatbread Success
Having the right tools makes this quick recipe even easier and guarantees perfect results. Here’s your kitchen toolkit:
· Box Grater or Food Processor: A standard box grater is perfect for grating the carrots finely enough to blend seamlessly into the dough. For ultimate speed and uniformity, use a food processor fitted with the grating disc attachment.
· Large Mixing Bowl: A wide, shallow mixing bowl makes combining the wet and dry ingredients easy without creating a flour cloud.
· Cast Iron Skillet or Non-Stick Pan: This is the ideal cooking vessel. A 10 or 12-inch cast iron skillet provides unparalleled, even heat distribution for a perfect golden-brown crust. A high-quality non-stick skillet is a foolproof alternative for easy flipping and cleanup.
· Spatula & Turner: A flexible silicone spatula is great for mixing, and a wide, thin metal or nylon turner is essential for safely flipping the flatbread.
· Measuring Tools: Use dry measuring cups for flour and a kitchen scale for the most accurate results (highly recommended for baking). A liquid measuring cup is needed for milk or water.
· Rolling Pin (Optional): While you can pat and stretch the dough with your hands, a wooden rolling pin helps achieve a more uniform thickness quickly.
· Pastry Brush: Handy for brushing the flatbread with a little oil or melted butter before and after cooking for extra flavor and crispness.
· Cooling Rack: Letting the flatbread rest on a wire rack for a minute after cooking prevents the bottom from getting soggy.
Ingredient Deep Dive & Smart Substitutions
The Flatbread Foundation:
· All-Purpose Flour: The standard. For a whole-grain version, substitute up to half with whole wheat flour or white whole wheat flour. For gluten-free, use a 1:1 gluten-free baking blend.
· Greek Yogurt or Thick Dahi: This is the magic ingredient that replaces yeast. Its acidity and thickness create a tender, pliable dough without waiting. Full-fat yields the best texture, but low-fat works. Vegan? Use a thick, unsweetened plant-based yogurt.
· Grated Carrot: The star! Use the fine side of your grater. No need to peel if you wash them well. Pro Tip: After grating, squeeze the carrots gently in a clean kitchen towel to remove excess moisture. This prevents a soggy dough.
The Flavor & Rise:
· Baking Powder: Our leavening agent for instant lift and airiness.
· Garlic Powder & Onion Powder: These umami-packed powders distribute flavor evenly throughout the dough better than fresh here.
· Salt: Crucial for balancing the sweetness of the carrots.
The Cheesy Glory:
· Melty Cheese: A blend works wonders. Use mozzarella for stretch, cheddar for sharpness, and a sprinkle of Parmesan for a salty, savory kick. A pre-shredded “pizza blend” is convenient, but freshly grated cheese melts more smoothly.
Optional Boosters:
· Fresh Herbs: Chopped chives, dill, or cilantro mixed into the dough or sprinkled on top.
· Spices: A pinch of smoked paprika, cumin, or chili flakes in the dough or topping.
· Toppings After Cooking: A drizzle of garlic-herb oil, a dollop of tzatziki or raita, or a sprinkle of everything bagel seasoning.
Step-by-Step Instructions: From Bowl to Golden Brown
Part 1: Prepare the Dough
Grate & Prep: Grate your carrots finely. Place them in a clean tea towel and gently squeeze over the sink to remove excess liquid. This step is key for perfect dough consistency.
Mix Dry Ingredients: In your large mixing bowl, whisk together the flour, baking powder, garlic powder, onion powder, and salt.
Combine Wet & Dry: Add the grated carrot and Greek yogurt to the dry ingredients. Use your spatula or clean hands to mix until a shaggy dough forms. It may seem dry at first, but the moisture from the yogurt and carrots will incorporate as you knead.
Knead Briefly: Turn the dough out onto a lightly floured surface. Knead gently for just 1-2 minutes until it becomes smooth and pliable. Avoid over-kneading, which can make the flatbread tough.
Rest (Briefly!): Cover the dough ball with the inverted mixing bowl or a damp cloth and let it rest for 10 minutes. This allows the gluten to relax, making it easier to roll out.
Part 2: Shape & Cook
Divide & Shape: Divide the dough into 4 equal portions for medium flatbreads or 2 for larger ones. Roll each portion into a ball.
Roll Out: On a lightly floured surface, roll each ball into a circle/oval about 1/4-inch thick. You can also press and stretch it with your hands for a more rustic look.
Heat the Pan: Place your cast iron or non-stick skillet over medium heat. Add a tiny drizzle of oil or brush the pan lightly.
Cook the First Side: Carefully place one rolled flatbread in the hot skillet. Cook for 2-3 minutes, until the bottom is golden brown with darker spots and the top looks dry and puffed in places.
Flip & Cheese: Flip the flatbread. Immediately sprinkle a generous handful of cheese evenly over the entire surface. Reduce heat to medium-low.
Melt & Crisp: Cover the skillet with a lid (this traps heat and melts the cheese quickly). Cook for another 1-2 minutes until the second side is golden and the cheese is fully melted and bubbly.
Final Touch: For extra crispy cheese edges, remove the lid for the last 30 seconds. You can also pop the skillet under a broiler for a minute if your cheese isn’t browning.
Repeat & Serve: Transfer the finished flatbread to a wire rack. Repeat with remaining dough. Brush the hot flatbreads with a little melted butter or garlic oil and slice into wedges. Serve immediately!
Serving Suggestions: Beyond the Basics
This flatbread is a complete meal or a versatile component.
· The Dipping Platter: Cut into strips and serve with marinara sauce, hummus, creamy ranch, or a spicy yogurt dip.
· The Hearty Meal: Top with a fried egg, a pile of sautéed greens or mushrooms, or some shredded roast chicken for extra protein.
· The Salad Companion: Serve alongside a simple arugula salad with lemon vinaigrette for a perfect light lunch.
· The Appetizer Star: Cut into small squares, garnish with a fresh herb, and serve on a platter for parties.
FAQs: Your Cheesy Carrot Flatbread Questions Answered
Q: Can I bake these instead of pan-frying?
A:Absolutely! Preheat your oven to 425°F (220°C). Place rolled-out flatbreads on a parchment-lined baking sheet. Bake for 5 minutes, remove, add cheese, and bake for another 5-7 minutes until golden and cheese is melted. Baking yields a slightly less crisp but equally delicious result, great for batch cooking.
Q: How do I store and reheat leftovers?
A:Store cooled flatbreads in an airtight container in the fridge for up to 3 days. Reheat in a toaster oven, air fryer, or skillet over medium heat to regain crispness. The microwave will make them soft.
Q: My dough is too sticky/wet. What do I do?
A:This usually means the carrots were too moist. Next time, squeeze them more thoroughly. For now, just add a tablespoon of flour at a time to the dough until it’s manageable.
Q: Can I use other vegetables?
A:Yes! Zucchini (squeezed VERY well), sweet potato, or even finely chopped spinach are fantastic. The principle remains the same: grate fine and manage moisture.
The Final Slice: A New Kitchen Staple
The Cheesy Carrot Flatbread is more than a recipe; it’s a paradigm shift. It proves that healthy eating can be indulgent, quick cooking can be impressive, and a simple vegetable can be the star of the show. It’s forgiving, fast, and endlessly adaptable to your tastes and what’s in your fridge.
So, grab that grater and that bag of carrots. In the time it takes to debate what’s for dinner, you could be pulling a golden, cheesy, veggie-packed masterpiece out of your skillet. Don’t forget to PIN the image below to your ‘Quick Meals’ and ‘Kid-Friendly Recipes’ boards so you always have this trick up your sleeve.
Now, get cooking. Your new favorite flatbread—and a clever new way to enjoy your veggies—is just moments away.
More Recipes You Might Like
-
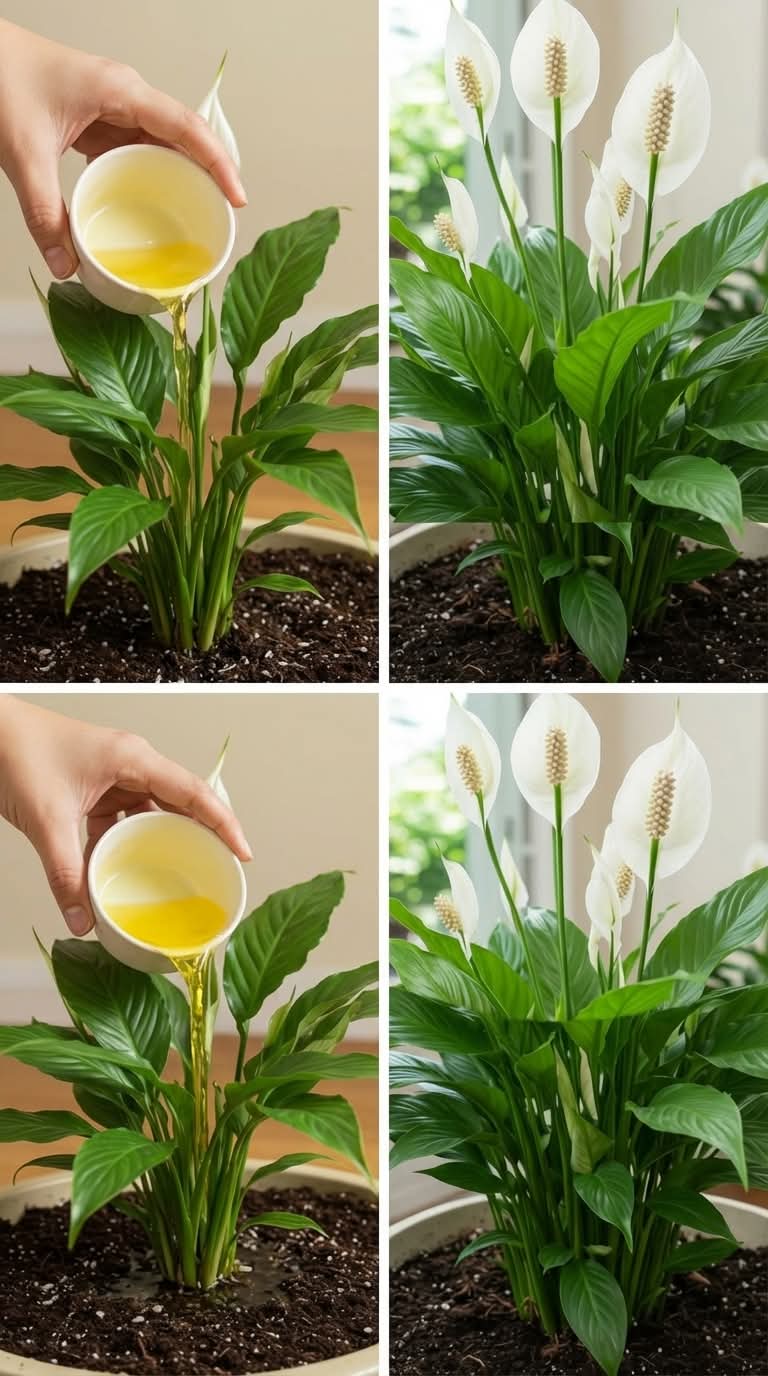
Just One Cup of This Kitchen Liquid… And Your Peace Lily Explodes With Flowers!
If you’ve ever struggled to get your peace lily to bloom, you’re not alone. Many plant lovers find that their lush green plant looks healthy—but those beautiful white flowers just don’t appear as often as expected. The good news? There’s a simple, natural plant fertilizer you can make right from your kitchen that may help…
-
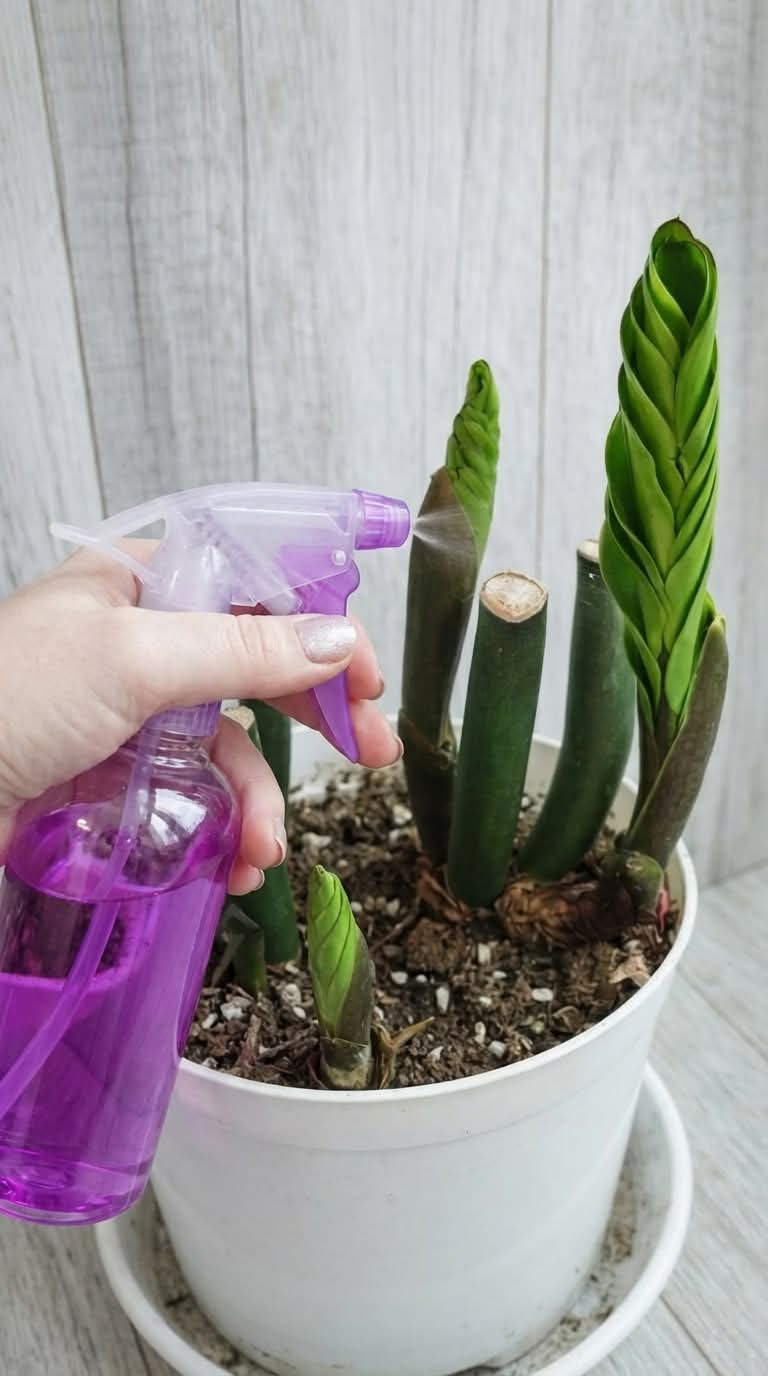
Just a Few Sprays of This Simple Mix… And Your ZZ Plant Wakes Up!
Is your ZZ plant looking stuck or slow to grow? This simple homemade leaf spray cleans dust, adds shine, and supports healthier growth. Easy recipe with neem oil for pest protection. Let me share the simple spray that brought my once‑dormant ZZ plant back to life. ZZ plants (Zamioculcas zamiifolia) are famous for being nearly…
-
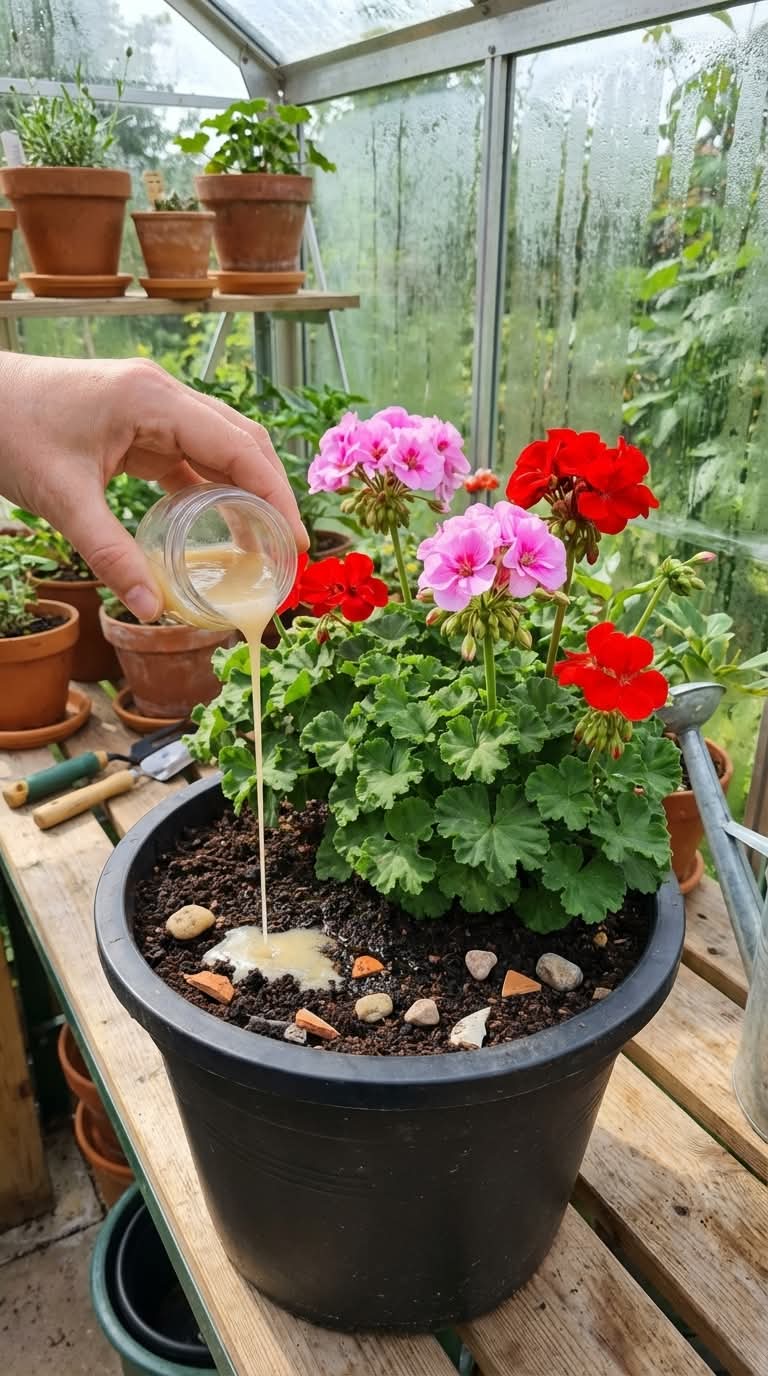
The Simple Trick That Makes Your Geraniums Bloom Bigger and Brighter – A Complete Guide
Want bigger, brighter geranium blooms? Discover the simple homemade sugar and lemon trick that boosts flowering, plus expert care tips for nonstop color all season long. Let me share the little secret that turned my average geraniums into show-stopping beauties. I’ve always loved geraniums. Their bright clusters of red, pink, white, and salmon flowers are…