

The Ultimate Savory Appetizer Your Party Needs!
There’s something undeniably magical about the combination of creamy mashed potatoes, gooey melted cheese, and richly seasoned savory ground meat. But what if you could take that beloved comfort food trio and transform it into a stunning, finger-friendly appetizer that will disappear from the platter in seconds? Enter: Cheesy Mashed Potato Nests.
These adorable and irresistible nests are more than just a recipe; they’re a culinary event. Imagine a crispy-edged, cheesy mashed potato cup, baked to golden perfection, cradling a hearty, flavorful filling of seasoned ground beef or turkey. Each bite delivers a perfect harmony of textures and flavors—creamy, crunchy, savory, and cheesy all at once. Whether you’re looking for the perfect game day appetizer, an impressive holiday party starter, or a fun twist on weeknight dinner, these nests deliver.
I first encountered a version of these at a potluck and spent the entire evening hovering near the tray. I knew I had to recreate them at home. After countless tests (a delicious burden!), I’ve perfected the method to ensure your nests are structurally sound, maximally flavorful, and shockingly easy to make. This recipe is designed for success, guiding you through every step to create appetizers that look like you spent all day in the kitchen, but are surprisingly straightforward.
Let’s dive into the secrets of making the perfect Cheesy Mashed Potato Nests.
Why This Recipe Will Become Your Go-To Appetizer
In the world of party foods, the trifecta of success is: make-ahead friendly, crowd-pleasing flavor, and visual wow factor. This recipe checks every box. The components can be prepared in advance, assembled, and then baked fresh. The ingredients are familiar and beloved by almost everyone—there are no polarizing flavors here, just pure, unadulterated deliciousness. Finally, their unique “nest” shape immediately draws the eye and invites guests to grab one. They are the ultimate high-impact, low-stress appetizer.
The Secret to Perfect, Holdable Mashed Potato Nests
The foundation of a great nest is, obviously, the mashed potato. But not just any mash will do. For structural integrity, your potatoes need to be stiff enough to hold a shape, yet still creamy and flavorful. The key is using starchy potatoes like Russets or Yukon Golds, and crucially, ensuring they are thoroughly dried after boiling. Excess moisture is the enemy of a crisp nest. We’ll also incorporate cheese and an egg yolk to bind the mixture, creating a dough that’s easy to mold and bakes up beautifully.
Ingredient Breakdown: Building Flavor Layers
Great recipes start with great ingredients. Here’s what you’ll need and why each component matters:
For the Potato Nests:
· Russet Potatoes: Their high starch content makes for a fluffy, dry mash that forms the best structure.
· Sharp Cheddar Cheese: Freshly grated is non-negotiable. Pre-shredded cheese contains anti-caking agents that can prevent smooth melting.
· Parmesan Cheese: Adds a salty, umami depth and helps with browning.
· Egg Yolk: Acts as a binder, enriching the potatoes and helping them set in the oven.
· Butter & Cream: For essential richness and creamy texture.
· Seasonings: Salt, pepper, and garlic powder build a flavor base.
For the Savory Ground Meat Filling:
· Ground Beef (80/20): The slight fat content adds incredible flavor. You can use leaner beef, turkey, chicken, or even plant-based crumbles.
· Aromatics: Onion and garlic are the soul of the filling.
· Tomato Paste: This is our flavor powerhouse, adding concentrated savoriness and color.
· Worcestershire Sauce: The ultimate umami booster for meat dishes.
· Broth: Keeps the filling juicy and helps deglaze the pan for every bit of flavor.
Equipment You’ll Need for Success
You don’t need specialty gear! A standard muffin tin is the only essential tool. For easiest molding, grease the tin well with butter or non-stick spray. A potato ricer or food mill will give you the smoothest mash, but a standard hand masher works perfectly too. You’ll also need a skillet for the meat filling and a mixing bowl.
Step-by-Step: Crafting the Ultimate Cheesy Mashed Potatoes
This isn’t your standard side-dish mash. We’re engineering it for baking.
Peel, Cube, and Boil: Cut your peeled Russets into even 1-inch cubes. Add them to a pot of cold, salted water. Bring to a boil and cook until fork-tender, about 15 minutes.
Dry Thoroughly: This is the most critical step. Drain the potatoes well, then return them to the hot, empty pot over low heat for about 1 minute. Shake the pot to evaporate any remaining surface moisture. This removes excess water that would make your nests soggy.
Mash and Enrich: Remove from heat. Mash the potatoes until smooth. Immediately add the butter, cream, salt, pepper, and garlic powder, mashing to incorporate.
Add Binders: Let the mash cool for a few minutes (so the egg doesn’t scramble), then stir in the egg yolk, grated cheddar, and Parmesan until fully combined. The mixture will be thick and moldable. Taste and adjust seasoning—remember, this is your edible “cup,” so it should be delicious on its own!
Mastering the Savory Ground Meat Filling
While the potatoes cool slightly, build your filling.
Sauté Aromatics: In a skillet over medium heat, cook the diced onion until soft and translucent. Add the minced garlic and cook for just 30 seconds until fragrant.
Brown the Meat: Add the ground meat, breaking it up with a spoon. Cook until no pink remains. If using higher-fat meat, you may want to drain some excess grease.
Develop Deep Flavor: Stir in the tomato paste and cook for 1-2 minutes. This “toasts” the paste, mellowing its acidity and boosting its sweetness.
Deglaze and Season: Pour in the Worcestershire sauce and broth, scraping up any browned bits (fond) from the pan—that’s pure flavor! Season with salt, pepper, and any other preferred spices (paprika, thyme). Simmer until the liquid is mostly absorbed. The filling should be moist but not runny. Let it cool slightly before assembling.
The Art of Forming the Perfect Nest
Now for the fun, hands-on part!
Prep the Pan: Generously grease your muffin tin cups with butter or non-stick spray.
Portion and Press: Take a generous, golf ball-sized portion of the cheesy potato mixture. Roll it into a ball, then press it into a muffin cup.
Create the Nest: Use your thumbs or a small spoon to carefully press the potato into the bottom and up the sides, creating a well in the center with an even wall. Ensure the bottom isn’t too thin, or filling may leak. The top edge can be rustic or smoothed out.
Baking for the Ideal Golden Crunch
Preheat your oven to 400°F (200°C). Before adding the filling, par-bake the empty potato nests for 15-20 minutes. This crucial step sets the structure and starts the browning process, preventing a soggy bottom. They should look dry and just beginning to turn golden at the edges.
Assembling and Final Bake
Once par-baked, spoon the cooled meat filling into each potato nest, dividing it evenly. Top with a little extra shredded cheddar for a glorious cheesy finish. Return the pan to the oven and bake for an additional 10-15 minutes, until the cheese is bubbly and the potato edges are a deep, crispy gold.
The All-Important Cooling Step
Resist the urge to immediately dig in! Let the nests cool in the muffin tin for at least 10-15 minutes. This allows them to firm up, making them much easier to remove intact with a small offset spatula or knife. They will still be perfectly warm for serving.
Pro Chef Tips for Flawless Nests Every Time
· Dry Potatoes Are Key: Don’t skip the step of drying the potatoes in the hot pot after draining.
· Cool Your Filling: Adding piping hot meat filling to the par-baked nests can create steam and make them soggy.
· Grease Generously: This ensures a beautiful release with a crispy exterior.
· Use an Ice Cream Scoop: For perfectly even potato portions, use a medium cookie or ice cream scoop.
· Make it a Meal: Serve 2-3 nests per person alongside a simple green salad for a satisfying dinner.
Creative Flavor Variations & Dietary Swaps
The basic formula is endlessly adaptable:
· Taco Style: Use taco seasoning in the meat and top with pico de gallo, jalapeños, and a drizzle of crema.
· Shepherd’s Pie Twist: Use a filling of ground lamb or beef with peas, carrots, and a splash of red wine.
· Breakfast Nests: Fill with scrambled eggs, crumbled bacon, and chives.
· Vegetarian Delight: Use a filling of sautéed mushrooms, lentils, and spinach for a hearty meat-free option.
· Gluten-Free: This recipe is naturally gluten-free—just ensure your Worcestershire sauce and broth are certified GF.
Mastering Make-Ahead & Storage Instructions
To Make Ahead: Prepare the potato mixture and meat filling separately. Store them in airtight containers in the fridge for up to 2 days. Assemble and bake just before your event. You can also fully assemble the unbaked nests, cover the muffin tin tightly with plastic wrap, and freeze for up to a month. Bake from frozen, adding 5-10 minutes to the baking time.
Storing Leftovers: Keep leftovers in an airtight container in the refrigerator for up to 3 days. Reheat in a 350°F oven or toaster oven to restore crispiness (the microwave will make them soft).
Serving Suggestions: From Party Platter to Family Dinner
Arrange these golden nests on a large platter garnished with fresh parsley or chives. They are a self-contained bite, but offering a side of garlic aioli, sour cream, or zesty ranch dressing for dipping takes them to the next level. For a dinner, plate them alongside roasted vegetables or a crisp arugula salad.
The Final Verdict: Why You Need to Make These Tonight
Cheesy Mashed Potato Nests are more than just an appetizer; they are a guaranteed way to become the hero of any gathering. They take comforting, familiar flavors and present them in a novel, engaging way that excites both the cook and the guests. With a forgiving recipe, make-ahead flexibility, and that undeniable “wow” factor, they are poised to become a staple in your entertaining repertoire.
Enjoy making these delightful bites? We’d love to see your creations! Share your photos and tell us about your favorite flavor variation in the comments below. Don’t forget to pin this recipe to your favorite board for your next party planning session!
More Recipes You Might Like
-
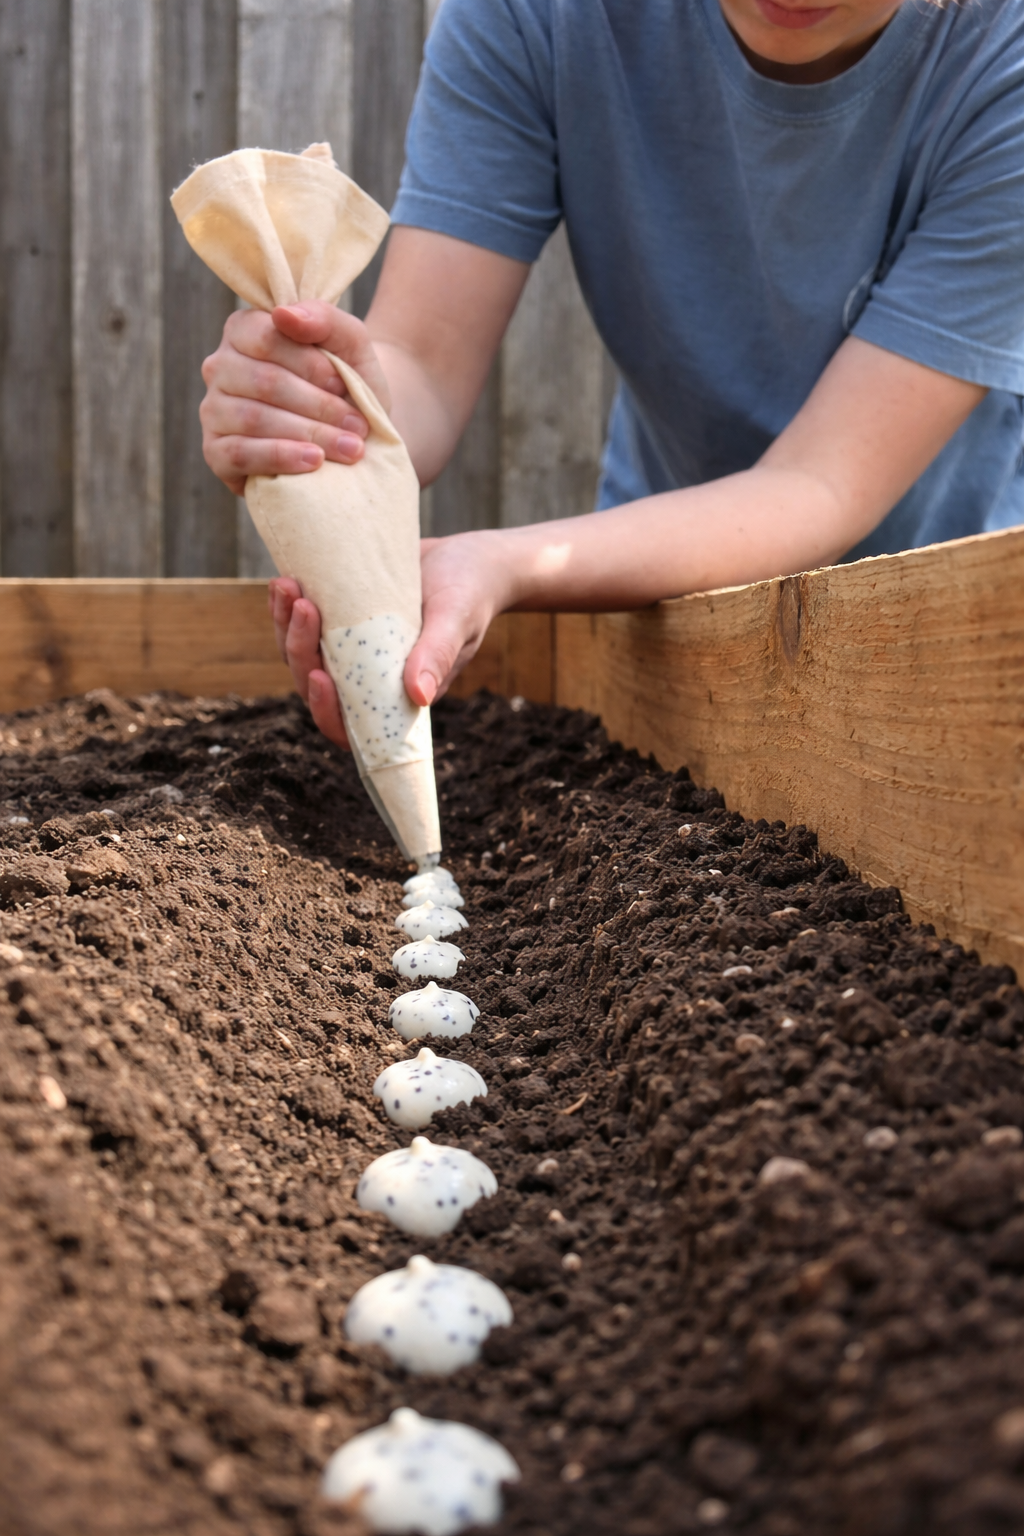
The Easy Garden Hack That Guarantees Straight, Healthy Carrots
Say goodbye to crooked, stunted carrots! Discover the simple seed paste hack that ensures perfect spacing and straight roots. This easy planting technique will transform your carrot harvest. Let me tell you about the gardening trick that turned my carrot patch from a tangle of twisted roots into a picture-perfect harvest. I love growing carrots.…
-
Grow 3X More Sweet Potatoes at Home with This Simple Soil Bag Trick
Want to grow 3 times more sweet potatoes in a small space? This clever soil bag trick is a game-changer. Learn how to plant sweet potatoes in bags for a massive harvest—perfect for small gardens and patios. Let me tell you about the gardening trick that turned my tiny patio into a sweet potato factory.…
-
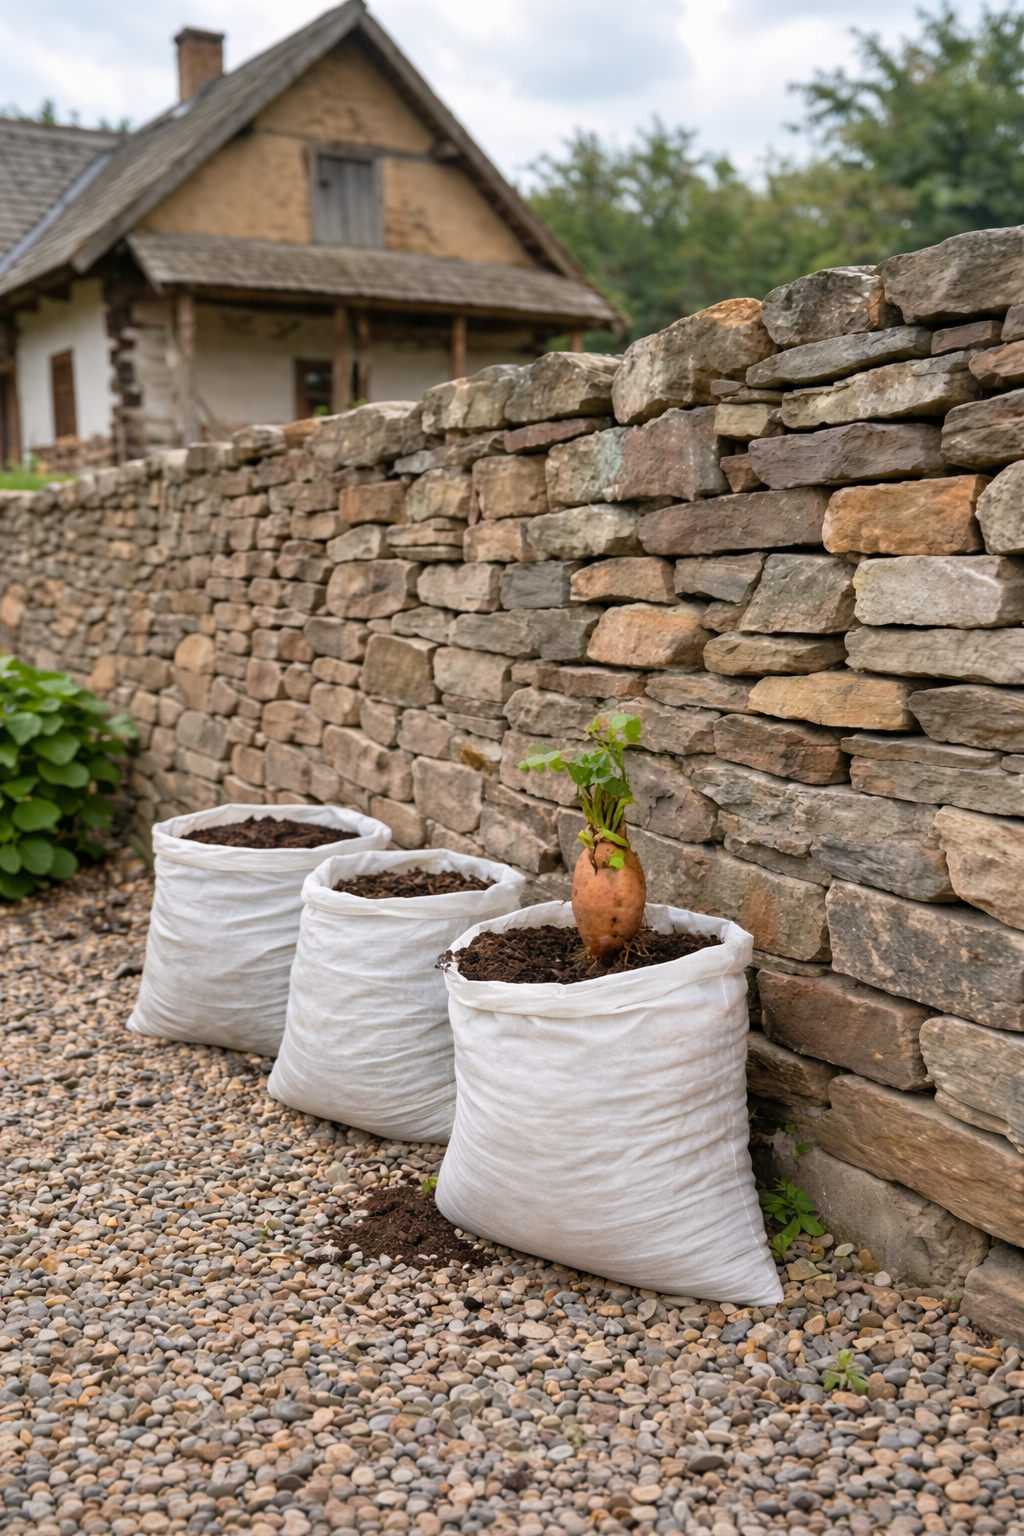
Grow 3X More Sweet Potatoes at Home with This Simple Soil Bag Trick
Want to grow 3 times more sweet potatoes in a small space? This clever soil bag trick is a game-changer. Learn how to plant sweet potatoes in bags for a massive harvest—perfect for small gardens and patios. Let me tell you about the gardening trick that turned my tiny patio into a sweet potato factory.…