

Few dishes can rival the universal appeal of crispy chicken tenders. Golden, crunchy on the outside and juicy on the inside, chicken tenders are a favorite for kids and adults alike. They’re versatile enough to serve as a weeknight dinner, a game day snack, or even party finger food. When paired with a flavorful dipping sauce, they transform from a simple dish into an irresistible experience.
This recipe for Crispy Chicken Tenders with Dipping Sauce is all about achieving that perfect balance of texture and flavor. The chicken tenders are coated in a seasoned breading that fries (or bakes!) up beautifully crisp, while the dipping sauce adds an extra punch of flavor. Whether you prefer a tangy honey mustard, spicy sriracha mayo, or a classic ranch, this dish can be customized to suit every palate.
Why This Recipe Works
Tender and Juicy Chicken – Using chicken tenders or strips ensures even cooking and natural tenderness.
Crispy Coating – A seasoned breadcrumb or flour mixture creates a crunchy shell that locks in flavor.
Simple Ingredients – Pantry staples like flour, eggs, and spices keep the recipe affordable and accessible.
Customizable Sauce Options – Choose from sweet, tangy, or spicy dips depending on your mood.
Kid and Adult Friendly – These chicken tenders please every age group, making them perfect for family dinners.
Ingredients
For the Chicken Tenders:
1 lb chicken tenders (or boneless chicken breast, cut into strips)
1 cup all-purpose flour
2 large eggs, beaten
2 cups breadcrumbs (panko or regular)
1 teaspoon garlic powder
1 teaspoon onion powder
1 teaspoon paprika
½ teaspoon salt
½ teaspoon black pepper
½ cup grated Parmesan cheese (optional, for extra flavor)
Oil for frying (vegetable, canola, or peanut oil)
For the Dipping Sauce (choose one or more):
Honey Mustard Sauce:
½ cup mayonnaise
3 tablespoons Dijon mustard
2 tablespoons honey
Garlic Ranch Dip:
½ cup sour cream
2 tablespoons mayonnaise
1 teaspoon garlic powder
1 teaspoon fresh lemon juice
1 tablespoon chopped fresh dill
Spicy Sriracha Mayo:
½ cup mayonnaise
1 tablespoon sriracha (adjust to taste)
1 teaspoon lime juice
Step-by-Step Instructions
Step 1: Prep the Chicken
Pat the chicken tenders dry with paper towels.
Season lightly with salt and pepper to lock in flavor.
Step 2: Set Up a Breading Station
In one bowl: flour, garlic powder, onion powder, paprika, salt, and pepper.
In a second bowl: beaten eggs.
In a third bowl: breadcrumbs and Parmesan cheese.
Step 3: Bread the Chicken
Coat each chicken strip in flour, shaking off excess.
Dip into the beaten egg to coat fully.
Roll in breadcrumbs until completely covered.
Place coated tenders on a tray while you finish the batch.
Step 4: Fry or Bake
To Fry: Heat 1–2 inches of oil in a skillet to 350°F (175°C). Fry tenders in batches for 3–4 minutes per side, until golden brown and cooked through.
To Bake: Preheat oven to 400°F (200°C). Place tenders on a greased baking sheet and spray lightly with cooking spray. Bake 18–20 minutes, flipping halfway.
Step 5: Make the Dipping Sauce
Mix together your chosen sauce ingredients until smooth.
Chill in the fridge until ready to serve.
Step 6: Serve and Enjoy
Arrange chicken tenders on a platter with dipping sauces on the side.
Garnish with parsley or lemon wedges if desired.
Tips for Success
Double Breading for Extra Crunch – Dip tenders twice in egg and breadcrumbs for a thicker coating.
Don’t Overcrowd the Pan – Fry in small batches to avoid soggy chicken.
Check Doneness – Internal temperature should reach 165°F (74°C).
Use Panko Breadcrumbs – They create a lighter, crispier crust compared to regular breadcrumbs.
Air Fryer Option – Cook at 375°F (190°C) for 12–15 minutes, flipping halfway for a healthier alternative.
Serving Suggestions
As a Meal: Pair with fries, coleslaw, or a side salad.
As an Appetizer: Serve on a party platter with multiple dipping sauces.
For Kids: Offer with ketchup or ranch for a familiar flavor.
For Adults: Serve with a spicy dip or alongside a cold beer.
Flavor Variations
Buffalo Style: Toss cooked tenders in buffalo sauce and serve with blue cheese dressing.
Parmesan Herb: Add Italian seasoning and extra Parmesan to the breadcrumb mix.
Cajun Spiced: Use Cajun seasoning in the flour mixture for a Southern twist.
Sweet & Spicy: Mix honey and hot sauce into the dipping sauce for balance.
Why You’ll Love This Dish
Easy to prepare with simple ingredients.
Works as both a snack and a main dish.
Customizable with different sauces and coatings.
Kid-approved and great for picky eaters.
Can be made ahead and reheated without losing texture.
Storage and Reheating
Refrigerator: Store leftovers in an airtight container for up to 3 days.
Freezer: Freeze cooked tenders on a baking sheet, then transfer to a freezer bag. Reheat in oven or air fryer.
Reheating: Bake at 375°F (190°C) until hot and crispy again—avoid microwaving for best texture.
Final Thoughts
There’s something timeless about Crispy Chicken Tenders with Dipping Sauce. They’re crunchy, juicy, and endlessly versatile—perfect for any occasion. Whether you serve them at a family dinner, a kids’ party, or as a late-night snack, they always deliver comfort and satisfaction. With this recipe, you’ll never need to buy frozen tenders again, because homemade ones taste fresher, crispier, and infinitely better.
Once you’ve mastered this base recipe, the possibilities are endless. Try new seasonings, explore creative sauces, or even turn them into sandwiches and wraps. No matter how you enjoy them, one thing is certain—your table will be a little happier with these crispy delights front and center.
More Recipes You Might Like
-
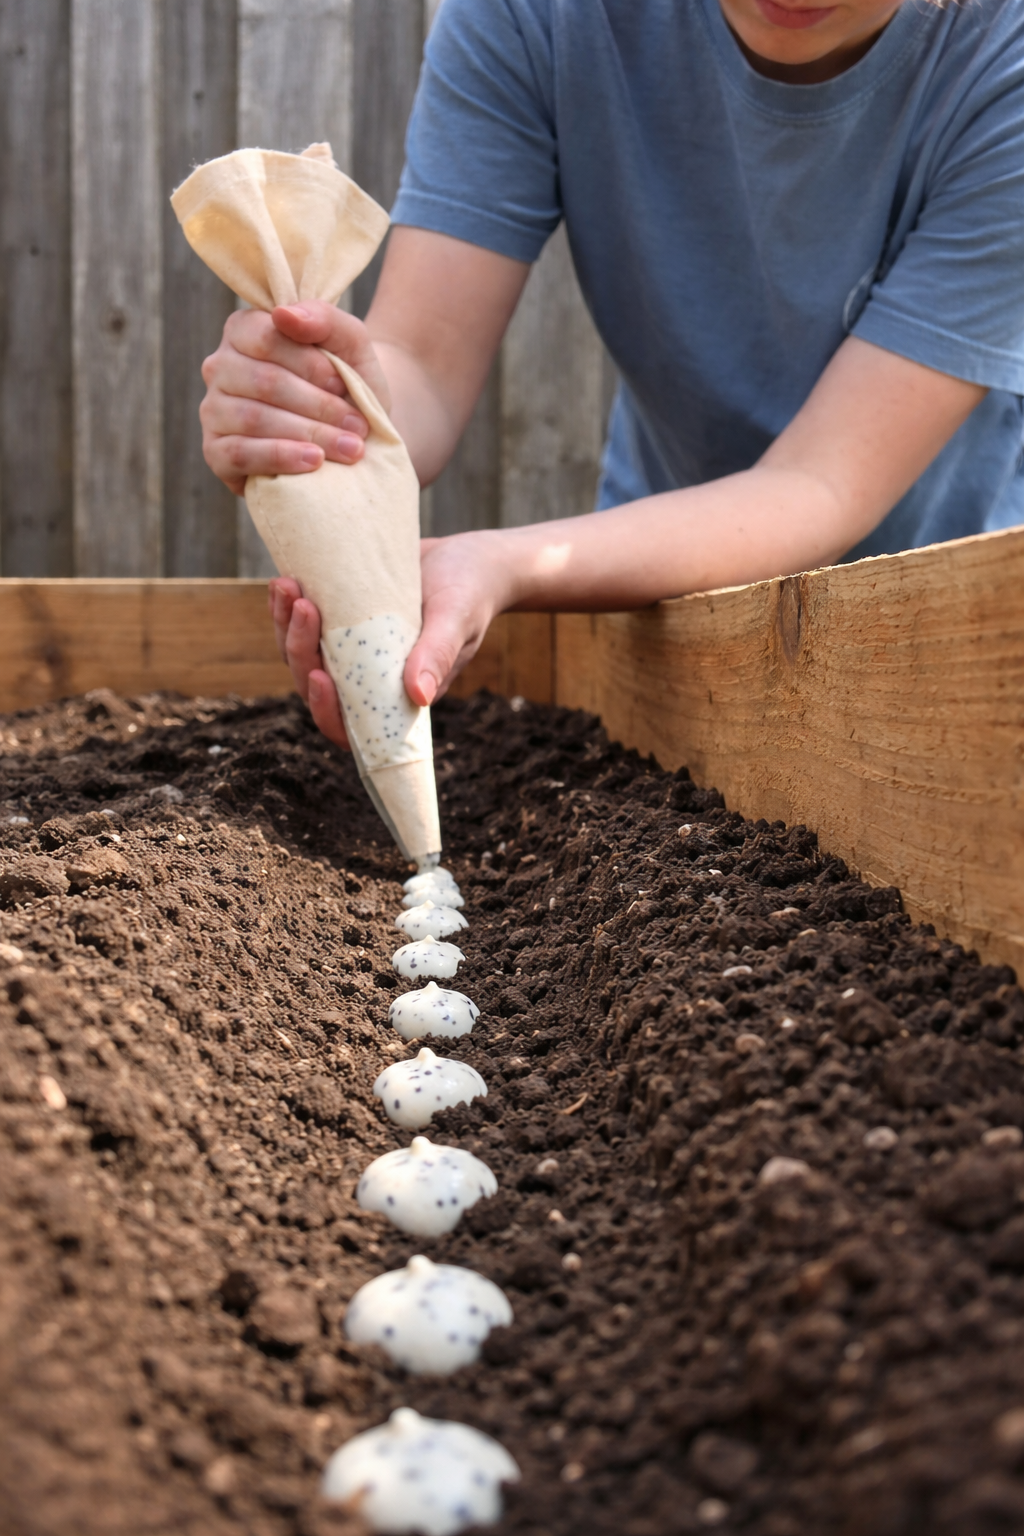
The Easy Garden Hack That Guarantees Straight, Healthy Carrots
Say goodbye to crooked, stunted carrots! Discover the simple seed paste hack that ensures perfect spacing and straight roots. This easy planting technique will transform your carrot harvest. Let me tell you about the gardening trick that turned my carrot patch from a tangle of twisted roots into a picture-perfect harvest. I love growing carrots.…
-
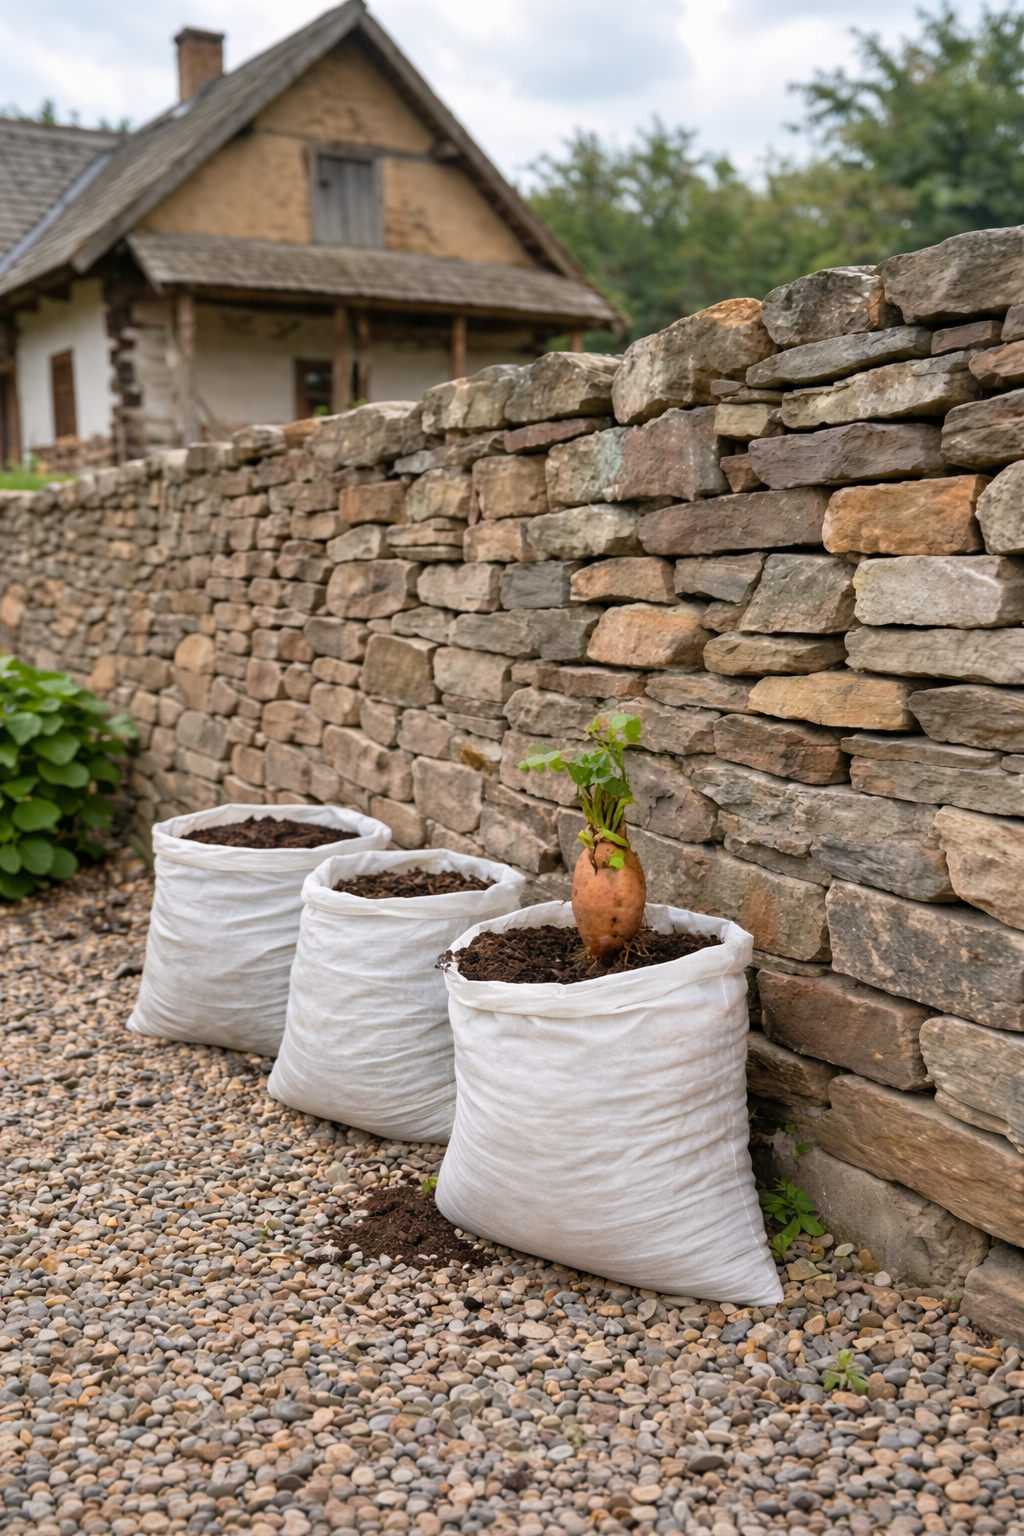
Grow 3X More Sweet Potatoes at Home with This Simple Soil Bag Trick
Want to grow 3 times more sweet potatoes in a small space? This clever soil bag trick is a game-changer. Learn how to plant sweet potatoes in bags for a massive harvest—perfect for small gardens and patios. Let me tell you about the gardening trick that turned my tiny patio into a sweet potato factory.…
-
Grow 3X More Sweet Potatoes at Home with This Simple Soil Bag Trick
Want to grow 3 times more sweet potatoes in a small space? This clever soil bag trick is a game-changer. Learn how to plant sweet potatoes in bags for a massive harvest—perfect for small gardens and patios. Let me tell you about the gardening trick that turned my tiny patio into a sweet potato factory.…