
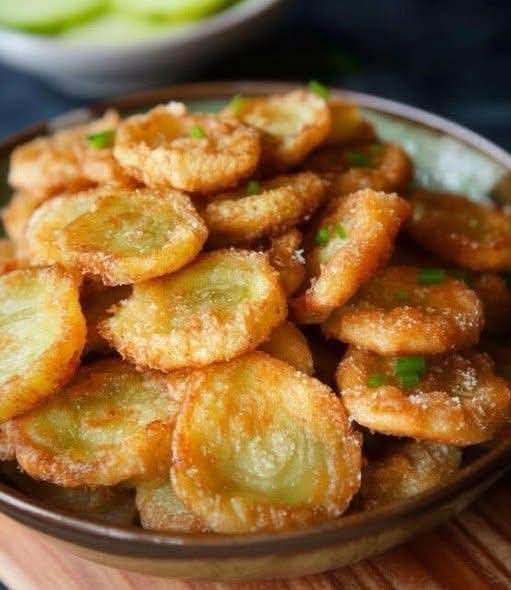
Imagine the perfect bar snack: something tangy, something crunchy, something savory, and something you absolutely cannot stop eating after just one. That’s the magic of Crispy Fried Pickle Chips. This isn’t just a side for your burger; it’s a star appetizer in its own right, a brilliant study in contrasts where a hot, shatteringly crisp, seasoned shell gives way to a juicy, briny, puckeringly tart pickle. A staple of Southern cuisine and sports bars alike, they are the ultimate shareable appetizer that’s surprisingly simple to master at home. With the right technique, you can achieve a coating that stays admirably crisp long after frying, making them perfect for game day, parties, or a indulgent treat.
This guide is your foolproof manual to pickle-frying perfection. We’ll dive deep into the essential kitchen equipment that guarantees safety and success, decode the science of creating a watertight, crispy crust, and provide a master recipe with endless variations for batter and dip. Get ready to transform a humble jar of pickles into a crave-worthy culinary event.
The Equipment Edge: Tools for Safe, Crispy, Consistent Results
Frying is a high-heat, fast-paced operation. The right tools provide control over temperature, ensure even cooking, and make the process clean and safe. This isn’t just about a pot and some oil; it’s about precision and safety.
The Dutch Oven or Heavy-Bottomed Pot: The Foundation of Steady Heat
For frying,stability is everything. A 5-7 quart Dutch oven (enameled cast iron like Le Creuset or Staub) is the gold standard. Its immense thermal mass and even heat distribution prevent dangerous temperature spikes and drops when you add food, ensuring consistent frying and perfect browning. A heavy-bottomed cast iron chicken fryer or carbon steel wok are also excellent choices. Avoid thin, lightweight pots.
The Deep-Fry Thermometer: Your Non-Negotiable Guide
This is the single most important tool for successful frying.You cannot guess oil temperature. A clip-on deep-fry/candy thermometer that reads up to 400°F (204°C) is essential. Maintaining oil between 365-375°F (185-190°C) is critical. Any lower, and the food absorbs oil and becomes greasy; any higher, and the coating burns before the pickle inside heats through. A ThermoPop or similar instant-read can also work with frequent checks.
The Wire Rack & Sheet Pan Setup: The Secret to Lasting Crisp
Never drain fried food on paper towels alone.While they absorb grease, they also trap steam against the crispy coating, causing sogginess. The professional method is to use a wire cooling rack set inside a rimmed baking sheet (a Nordic Ware half-sheet pan). This allows air to circulate on all sides of the fried pickle, letting excess oil drip away and steam evaporate, preserving that hard-won crunch.
The Spider Skimmer or Slotted Spoon: For Safe Retrieval
Awire mesh spider skimmer is the ideal tool for safely lowering batches of pickles into the hot oil and retrieving them. Its basket design lets oil drain away instantly. A large, perforated slotted spoon is a good alternative. Tongs can puncture the delicate coating.
The Baking Sheet & Parchment Paper: For the Dredging Assembly Line
Organization is key to a non-messy fry.Set up a standard breading station on a baking sheet: one plate with seasoned flour, a bowl with buttermilk/egg wash, and a second plate with seasoned breadcrumbs or cornmeal. Lining the sheet with parchment paper makes cleanup trivial.
The Essential Frying Arsenal:
- · Dutch oven or heavy-bottomed pot
- · Deep-fry thermometer
- · Wire rack & rimmed baking sheet
- · Spider skimmer or slotted spoon
- · Tongs (for dry handling)
- · Pie plates or shallow bowls for breading
- · Kitchen towels & paper towels (for drying pickles)
The Master Recipe: Ultra-Crispy Buttermilk Fried Pickle Chips
This recipe uses a double-dredge method for an extra-thick, craggy, and durable crust that stands up to dipping.
Prep Time: 20 minutes | Cook Time: 2-3 minutes per batch | Serves: 4-6 as an appetizer
Ingredients:
For the Pickles:
· 1 (16 oz) jar dill pickle chips (or “hamburger slices”), not sweet or bread & butter
· Paper towels for drying
For the Dredge & Fry:
· 1 cup all-purpose flour, divided
· 2 tsp creole or cajun seasoning (like Tony Chachere’s), divided
· 1 tsp garlic powder, divided
· ½ tsp smoked paprika, divided
· ½ cup buttermilk
· 1 large egg
· 1 cup fine cornmeal or panko breadcrumbs
· Neutral, high-heat oil for frying (peanut, canola, or vegetable), about 6 cups
· Flaky sea salt, for finishing
For Serving:
· Ranch dressing (the classic pairing)
· Comeback sauce, sriracha mayo, or chipotle aioli
Step-by-Step Instructions:
PART 1: THE CRITICAL DRY & DREDGE
Dry the Pickles: Drain the pickle chips in a colander. Spread them out in a single layer on a triple-thick bed of paper towels. Pat them aggressively dry on top with more paper towels. This step is non-negotiable; water is the enemy of adhesion. Let them air-dry for 10 minutes while you set up.
Set Up Your Station: Arrange three containers in an assembly line:
· Bowl 1 (Dry Dredge): Mix ½ cup of the flour with 1 tsp of the creole seasoning, ½ tsp garlic powder, and ¼ tsp smoked paprika.
· Bowl 2 (Wet Wash): Whisk the buttermilk and egg until smooth.
· Bowl 3 (Final Coat): Mix the cornmeal (or panko), remaining ½ cup flour, and the remaining seasonings (1 tsp creole, ½ tsp garlic powder, ¼ tsp smoked paprika).
Bread the Pickles: Working in batches, coat each dried pickle chip in the initial flour mixture (Bowl 1), shaking off excess. Dip into the buttermilk wash (Bowl 2), letting excess drip off. Finally, press firmly into the cornmeal mixture (Bowl 3), ensuring an even, clumpy coat. Place on a parchment-lined tray. Repeat until all pickles are coated.
PART 2: THE PRECISION FRY
Heat the Oil: In your Dutch oven, add oil to a depth of about 2 inches. Attach your thermometer and heat over medium-high heat to 375°F (190°C).
Fry in Batches: Once the oil is at temperature, carefully lower 6-8 breaded pickle chips into the oil using your spider skimmer. Do not overcrowd. The oil temperature will drop; adjust the heat to maintain it between 365-375°F.
Fry to Golden Perfection: Fry for 2-3 minutes, flipping once halfway, until the coating is a deep, golden brown and very crisp.
Drain Properly: Use the spider to transfer the fried pickles directly to the wire rack set over a sheet pan. Immediately sprinkle with a pinch of flaky sea salt. This seasons them while the hot oil on the surface can still absorb it.
PART 3: SERVE IMMEDIATELY
Serve the pickles hot from the fryer, alongside your chosen dipping sauces. They are best consumed within 15-20 minutes for peak crispness.
The Science of the Perfect Crust: Adhesion and Crispiness
· The Dry Start: The initial layer of seasoned flour provides a dry, starchy surface for the wet buttermilk wash to grip onto. Drying the pickles prevents the water from creating a barrier.
· The Double Dredge: The second layer of cornmeal/flour creates a craggy, textured exterior. When hit with hot oil, the moisture in the coating (and the pickle) flashes to steam, leaving behind a rigid, porous, and incredibly crisp structure. The cornmeal adds an extra layer of gritty crunch.
· Proper Oil Temperature: At 365-375°F, the surface of the food dehydrates and sets almost instantly, forming a barrier that prevents oil from soaking into the food. This is the “seal.” Lower temperatures allow oil to permeate, leading to greasiness.
Creative Variations: Batter, Breading, and Beyond
· Beer-Battered Pickles: For a lighter, puffier coating, make a batter with 1 cup flour, 1 tsp baking powder, 1 tsp seasoning, and 1 cup cold lager or ale. Dip dried pickles directly into the batter and fry.
· Everything Bagel Crust: Use everything bagel seasoning in the final breading stage with panko.
· Zesty Italian: Use Italian-seasoned breadcrumbs and add grated Parmesan to the final dredge. Serve with marinara.
· Spicy Nashville Hot: After frying, toss the hot pickles in a mixture of 2 tbsp hot oil from the fryer, 1 tbsp cayenne pepper, 1 tsp brown sugar, and ½ tsp paprika.
· Waffle Fry Alternative: Use thick pickle spears instead of chips for a different shape and texture contrast.
Troubleshooting & FAQ
· My coating fell off in the oil. The pickles were not dry enough, or you didn’t press firmly during the final breading step. Ensure thorough drying and pack on that final coat.
· My fried pickles are soggy quickly. They were drained on paper towels (which traps steam), not on a wire rack, or they were kept in a covered container. Always use a rack and serve immediately in a single layer.
· Can I use an air fryer? Yes, for a lighter version. Spray breaded pickles generously with oil and air fry at 400°F for 8-12 minutes, flipping halfway. The texture will be different—crispy but less shatteringly crisp than deep-frying.
· What’s the best oil for frying? Oils with a high smoke point and neutral flavor: peanut, canola, vegetable, or safflower oil. Do not use olive oil or butter.
· Can I make them ahead? You can bread the pickles and keep them on a tray in the fridge for up to 1 hour before frying. Do not refrigerate longer or they will get soggy. They must be fried to order.
· How do I dispose of the oil? Let it cool completely in the pot. Strain through a fine-mesh sieve lined with cheesecloth into its original container or a disposable bottle, then throw it in the trash. Do not pour down the drain.
Conclusion: The Art of the Perfectly Fried Bite
Crispy Fried Pickle Chips are a celebration of technique and contrast. They teach the fundamental principles of frying—temperature control, proper drying, and diligent breading—all while delivering a wildly addictive, tangy, and crunchy result. They prove that even the simplest ingredients can be elevated to star status with a little know-how and the right tools.
So, heat your Dutch oven, clip on your thermometer, and prepare your wire rack. Embrace the satisfying sizzle as the pickles hit the oil. In just minutes, you’ll have a platter of golden-brown perfection that’s guaranteed to disappear, securing your status as the master of the ultimate shareable snack. This isn’t just frying; it’s creating edible joy, one crispy, tangy chip at a time.
More Recipes You Might Like
-
The Easy Garden Hack That Guarantees Straight, Healthy Carrots
Say goodbye to crooked, stunted carrots! Discover the simple seed paste hack that ensures perfect spacing and straight roots. This easy planting technique will transform your carrot harvest. Let me tell you about the gardening trick that turned my carrot patch from a tangle of twisted roots into a picture-perfect harvest. I love growing carrots.…
-
Grow 3X More Sweet Potatoes at Home with This Simple Soil Bag Trick
Want to grow 3 times more sweet potatoes in a small space? This clever soil bag trick is a game-changer. Learn how to plant sweet potatoes in bags for a massive harvest—perfect for small gardens and patios. Let me tell you about the gardening trick that turned my tiny patio into a sweet potato factory.…