

The Legendary 3-Ingredient Dessert You Can Make in Minutes
In the vast universe of baking, where precision scales and stand mixers often reign supreme, there exists a legendary, almost mythical recipe that defies every modern convention. It requires no eggs, no butter, no oil, and not even a mixing bowl. It’s a recipe passed down through generations, whispered among busy parents and celebrated by novice bakers for its foolproof simplicity and surprisingly delightful result. Its name? The Cuppa Cuppa Cake.
This isn’t just a cake; it’s a baking phenomenon. The name comes from its charming, imprecise measurement system: a “cuppa” this, a “cuppa” that. With just three pantry staples and one can of fruit, it magically transforms into a warm, comforting, pudding-like cake that’s begging to be topped with a scoop of vanilla ice cream. In an era of complicated cooking shows, this cake is a beautiful testament to the power of simplicity.
If you’ve ever been intimidated by baking, if you’ve ever needed a last-minute dessert in under an hour, or if you simply love food history and vintage recipes, this is your holy grail. It’s the ultimate emergency dessert, the perfect first bake for kids, and a delicious slice of culinary nostalgia. Let’s dive into the story and science of this minimalist marvel.
The History & Lore: A Cake Born of Necessity
The Cuppa Cuppa Cake is widely believed to be a Depression-era or mid-century recipe, born from a time when scarce pantry supplies and frugality were essential. Its “cup” measurement likely referred to a standard coffee mug or tin cup, making it accessible to everyone, regardless of whether they owned proper measuring cups. It’s a sister recipe to the famous “Dump Cakes,” emphasizing ease and resourcefulness. This cake isn’t just about taste; it’s a piece of enduring food history that has survived because it simply works.
The Magical 3-Ingredient Formula Explained
The classic, most viral version is stunning in its economy:
- A Cuppa Flour: (1 cup of all-purpose flour) – The structure.
- A Cuppa Sugar: (1 cup of granulated sugar) – The sweetness and, crucially, it helps create a sweet, crackly top crust.
- A Cuppa Fruit: (1 can of fruit cocktail in heavy syrup, NOT drained) – The fruit provides moisture, flavor, and the syrup acts as the liquid component.
That’s it.The syrup from the fruit hydrates the flour and sugar, and the high heat of the oven causes them to form a cakey topping while the fruit sinks to create a saucy bottom layer. It’s pure kitchen alchemy. - Why This “No-Mixer, No-Bowl” Method Actually Works
The most shocking step? You mix it right in the baking pan. After emptying the fruit into your greased pan, you simply sprinkle the dry flour and sugar evenly over the top. Then, you stir it all together in the pan until just combined. This method minimizes dishes and, surprisingly, prevents over-mixing. A few lumps are perfectly fine. The batter will be very thick and shaggy—this is normal and key to the textural contrast.
Your Simple, Pantry-Staple Ingredient List
· 1 cup (125g) All-Purpose Flour: The foundation. No need to sift.
· 1 cup (200g) Granulated Sugar: Creates the signature sweet, craggy top.
· 1 (15-17 oz) can of Fruit Cocktail in Heavy Syrup: The star. The heavy syrup is non-negotiable for the correct texture. Do not use fruit in juice or light syrup.
· Optional but Recommended: 1 teaspoon of vanilla extract stirred into the fruit, or a pinch of salt with the dry ingredients to balance sweetness.
The Essential Equipment: One Pan, One Spoon
You need a 9-inch square or round baking dish (or a similarly sized oven-safe pan). You’ll also need a spoon or spatula for mixing. That’s genuinely all. No mixer, no bowls, no whisk. This is baking at its most elemental.
- Step-by-Step: The Famous “Mix-in-the-Pan” Method
- Prep: Preheat your oven to 350°F (175°C). Grease your baking dish lightly with butter or non-stick spray.
- Dump the Fruit: Pour the entire can of fruit cocktail (with all the syrup) into the greased dish.
- Sprinkle the Dry: Evenly sprinkle the cup of flour and then the cup of sugar over the top of the fruit. It will look like a sandy layer.
- Mix in Pan: Using your spoon, gently stir the dry ingredients into the wet fruit right there in the pan. Mix until the dry ingredients are just moistened and no big dry pockets remain.
- Bake: Place the pan in the oven and bake for 40-50 minutes. The cake is done when the top is golden brown, crusty, and a toothpick inserted into the cakey part comes out clean.
- The Perfect Bake: Identifying Doneness
Because of the saucy fruit layer at the bottom, the traditional toothpick test can be misleading. You want to test the top cake layer. The top should be a deep, golden brown with a crisp-looking sugar crust. The edges will be pulling away from the pan, and the fruit beneath will be bubbling. If the top is browning too fast, you can loosely tent it with foil for the last 10 minutes.
Serving Suggestions: The Classic Pairing is a Must
This cake is best served warm. The contrast between the hot, sweet cake and a cold topping is sublime.
· Vanilla Ice Cream: The absolute classic and highly recommended. The creaminess melts into the saucy fruit.
· Whipped Cream: A lighter, equally delicious option.
· A Dusting of Powdered Sugar: For simple elegance.
Scoop it out into bowls—it’s a rustic,spoonable dessert.
Pro Tips for the Best Possible Cuppa Cuppa Cake
· Do Not Drain the Fruit: The syrup is the liquid lifeblood of the recipe.
· Mix Gently: Over-mixing can lead to a tougher top layer. Just combine until no dry flour remains.
· Use the Right Pan: A glass or ceramic dish is ideal. A metal pan may cause the bottom to over-brown.
· Let it Rest: Allow the cake to cool for 10-15 minutes before serving. This lets the fruit layer settle and makes it the perfect eating temperature.
Endless Flavor Variations to Try
Once you master the classic, the world is your oyster. The formula is adaptable:
· Pineapple Cuppa Cake: Use a can of crushed pineapple in heavy syrup. A timeless variation.
· Cherry Delight: Use canned cherry pie filling for a decadent, cobbler-like dessert.
· Berry Bliss: Use a mix of frozen berries (do not thaw) and increase sugar by 2 tablespoons, as berries are less sweet.
· Spiced Apple: Use canned apple pie filling and add a teaspoon of cinnamon to the dry ingredients.
FAQs: Answering Your Cuppa Cake Questions
Q: Can I use fresh fruit?
A:It’s tricky. The recipe relies on the sugar content and preservatives in the canned syrup. If using fresh fruit, you’d need to macerate it in sugar to create a syrup, which changes the recipe dynamics.
Q: Why is my top layer gummy?
A:This usually means under-baking. Ensure the top is a deep golden brown and tests clean with a toothpick in the cakey part.
Q: Can I add nuts or coconut?
A:Absolutely! Sprinkle 1/2 cup of chopped walnuts, pecans, or shredded coconut over the batter before baking for added texture.
Q: How do I store leftovers?
A:Cover and store in the refrigerator for up to 3 days. Reheat individual portions in the microwave for the best texture.
The Science Behind the Simplicity
How does it work without eggs or fat? The structure comes from the gelatinization of the starch in the flour when hydrated by the syrup and heated. The sugar doesn’t just sweeten; it caramelizes on top, creating a fragile, crisp crust. The fruit sugars and acids also work with the heat to create a set, saucy bottom. It’s a perfect example of food chemistry in action.
A Recipe for Modern Times: Why It Still Resonates
In our fast-paced world, the Cuppa Cuppa Cake is more relevant than ever. It’s a digital detox in dessert form—no fancy equipment, no complicated techniques. It teaches the joy of improvisation and reduces baking anxiety to zero. It’s also a powerful recipe for teaching kids to bake, building confidence with immediate, delicious rewards.
The Final Verdict: A Charming, Imperfect, Delicious Treasure
The Cuppa Cuppa Cake won’t win a beauty contest. It won’t have the fine crumb of a French génoise. But what it offers is something arguably more valuable: unadulterated joy, unbeatable simplicity, and a direct connection to home cooks of the past. It’s humble, hearty, and profoundly satisfying.
Your Invitation to Keep the Tradition Alive
Baking this cake is an act of participation in a long, unbroken chain of home cooks. It’s a recipe meant to be shared, adapted, and passed along. So, grab a cup, a can, and a pan. Embrace the simplicity. Bake this cake, share it with someone you love, and keep the delightful, delicious legend of the Cuppa Cuppa Cake alive.
Recipe Card: Classic Cuppa Cuppa Cake
Yield: 6-8 Servings Prep Time: 5 mins Cook Time: 45 mins Total Time: 50 mins
Ingredients
· 1 cup (125g) all-purpose flour
· 1 cup (200g) granulated sugar
· 1 (15-17 oz) can fruit cocktail in heavy syrup (DO NOT DRAIN)
· 1 teaspoon vanilla extract (optional)
· Pinch of salt (optional)
· Butter or non-stick spray, for greasing
Instructions
- Preheat oven to 350°F (175°C). Grease an 8-inch or 9-inch square baking dish.
- Pour the entire can of fruit cocktail (with all the syrup) into the greased dish. Stir in vanilla if using.
- Evenly sprinkle the flour and sugar over the fruit. Add a pinch of salt if using.
- Using a spoon or spatula, stir the dry ingredients into the wet fruit directly in the baking pan until just combined and no dry pockets remain.
- Bake for 40-50 minutes, until the top is golden brown, crusty, and a toothpick inserted into the cakey top layer comes out clean.
- Let cool for 10-15 minutes. Serve warm in bowls, topped with vanilla ice cream or whipped cream.
Did you make this legendary easy cake? Share a photo of your rustic creation and tell us which fruit variation you tried in the comments below! Don’t forget to pin this piece of baking history for your next dessert emergency.
More Recipes You Might Like
-
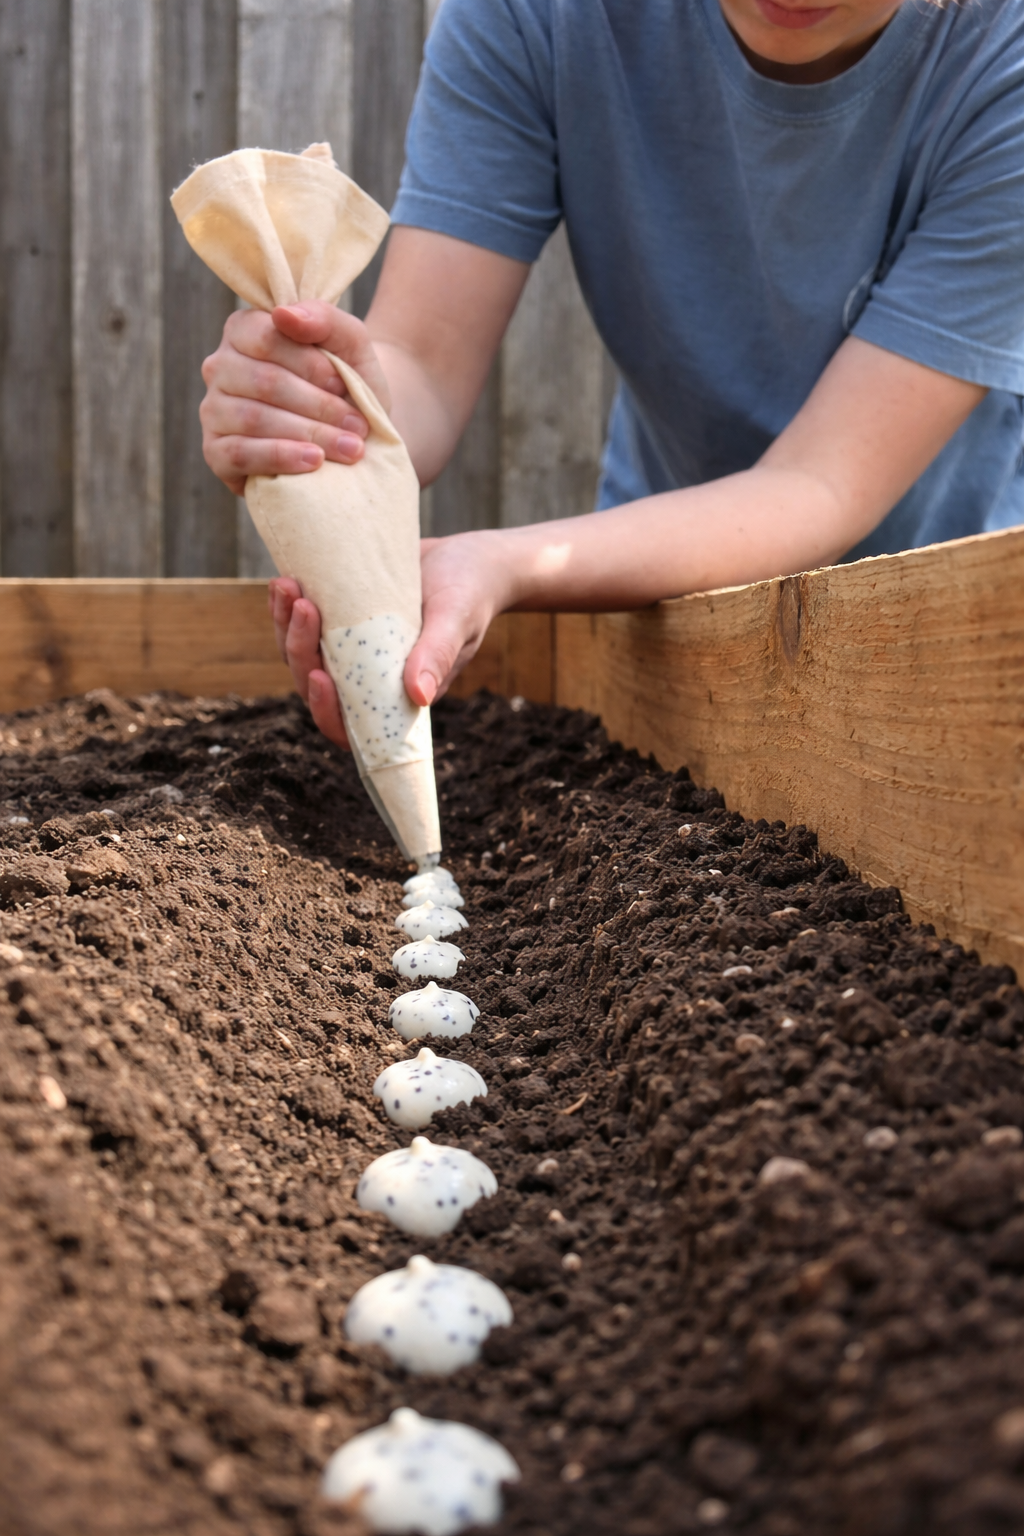
The Easy Garden Hack That Guarantees Straight, Healthy Carrots
Say goodbye to crooked, stunted carrots! Discover the simple seed paste hack that ensures perfect spacing and straight roots. This easy planting technique will transform your carrot harvest. Let me tell you about the gardening trick that turned my carrot patch from a tangle of twisted roots into a picture-perfect harvest. I love growing carrots.…
-
Grow 3X More Sweet Potatoes at Home with This Simple Soil Bag Trick
Want to grow 3 times more sweet potatoes in a small space? This clever soil bag trick is a game-changer. Learn how to plant sweet potatoes in bags for a massive harvest—perfect for small gardens and patios. Let me tell you about the gardening trick that turned my tiny patio into a sweet potato factory.…
-
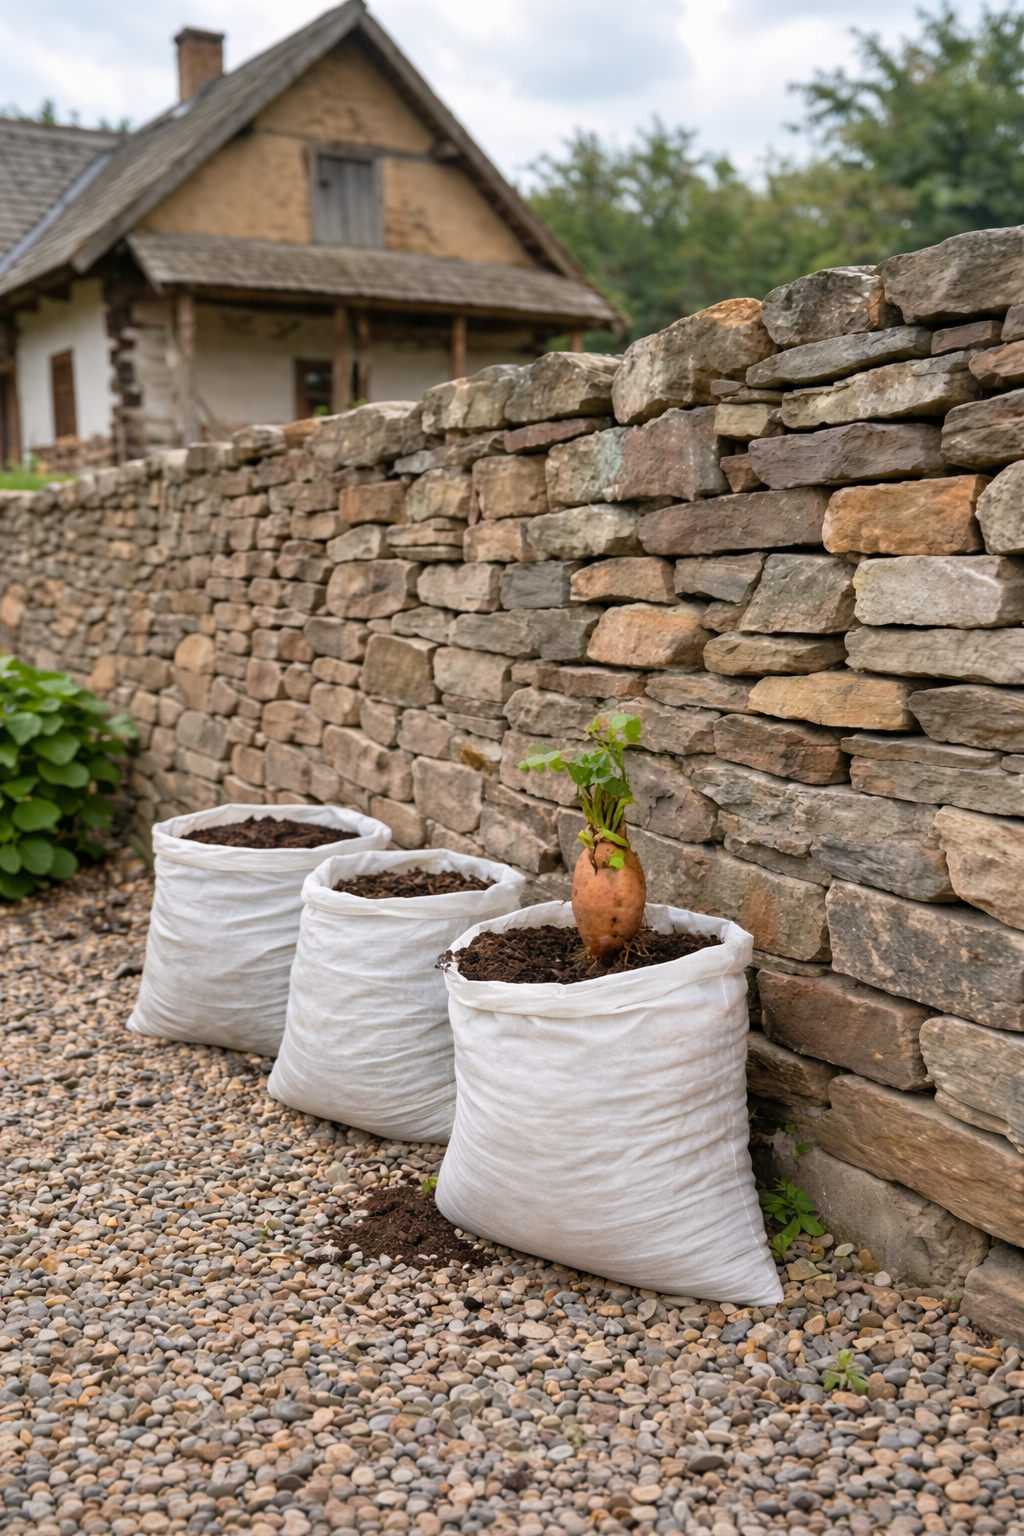
Grow 3X More Sweet Potatoes at Home with This Simple Soil Bag Trick
Want to grow 3 times more sweet potatoes in a small space? This clever soil bag trick is a game-changer. Learn how to plant sweet potatoes in bags for a massive harvest—perfect for small gardens and patios. Let me tell you about the gardening trick that turned my tiny patio into a sweet potato factory.…