

In the world of entertaining, there’s an unsung hero that bridges the gap between casual snacking and elegant hosting: the humble spread. And among them, a Garden Vegetable Spread stands out as the ultimate crowd-pleaser. Imagine the rich, tangy base of cream cheese, now studded with the sweet crunch of carrots, the refreshing bite of celery, and the sharp whisper of green onion. This isn’t just a dip; it’s a versatile vegetable spread that can transform a simple cracker into a canapé, a sandwich into a gourmet lunch, and a veggie platter into the centerpiece of your party table. Best of all, it comes together in under five minutes with minimal tools, making it the perfect last-minute appetizer you’ll rely on for every gathering.
This guide is your complete masterclass in this simple yet spectacular recipe. We’ll go beyond the basic mix to explore how to maximize flavor and texture, detail the essential kitchen equipment that makes the process effortless, and unlock a world of creative variations to match any season or dietary need. Get ready to make a spread so delicious and adaptable, it will become a permanent fixture in your refrigerator.
The Minimalist’s Toolkit: Equipment for Effortless, Perfect Texture
The beauty of this recipe is its simplicity, which is amplified by using the right tools. While a knife and cutting board will work, the right equipment ensures a perfect, uniform texture and integrates the flavors seamlessly without overworking the cream cheese.
The Food Processor: The Ultimate Texture Control Center
A7-cup or larger food processor (like a Cuisinart Custom 14) is the undisputed MVP for this recipe. It allows you to pulse the vegetables to your ideal consistency—from a fine confetti to a hearty, rustic chop—in literally seconds. More importantly, it can then incorporate the soft cream cheese with just 2-3 pulses, creating a homogenous spread without warming or over-beating it, which would make it gummy. A mini food processor is also perfectly suited for this job.
The Box Grater or Microplane: For Flavor Infusion (The Optional Upgrade)
Want to add a punch of umami or a burst of citrus without changing the texture?A Microplane grater is your secret weapon. Use it to finely grate a clove of garlic directly into the mix instead of using powder, or to add a shower of Parmigiano-Reggiano or lemon zest for a sophisticated twist. It incorporates these intense flavors evenly throughout the spread.
Flexible Spatulas and Mixing Bowls: For Scraping and Serving
A set ofsilicone spatulas is essential for two reasons: first, to scrape down the sides of the food processor to ensure even mixing, and second, to transfer every last bit of the finished spread from the bowl to your serving vessel without waste. A glass mixing bowl is also handy if you prefer to mix by hand, allowing you to see when all ingredients are fully combined.
Quality Storage Containers: For Flavor Development
The chilling time is not just for firming up;it’s when the flavors meld. An airtight glass container (like a Weck jar or a Pyrex storage dish) is ideal. Glass won’t absorb odors or flavors, and it allows you to see the colorful spread inside. For gifting, a small Mason jar tied with twine makes a charming, personal present.
Chef’s Knife & Cutting Board: The Foundation (If Not Using a Processor)
If you’re going the manual route,a sharp 8-inch chef’s knife and a sturdy cutting board are your primary tools. The key is a fine brunoise—dicing the carrots, celery, and green onions into perfectly uniform, tiny cubes. This ensures a consistent texture and even distribution in every bite.
The Essential Spread-Making Kit:
- · Food processor (highly recommended) (Buy it From here)
- · Microplane grater (for fresh garlic/zest) (Buy it From here)
- · Silicone spatulas (Buy it From here)
- · Airtight glass storage container (Buy it From here)
- · Chef’s knife & cutting board (if hand-chopping) (Buy it From here)
- · Measuring spoons (Buy it From here)
The Master Recipe: Classic Garden Vegetable Spread
This recipe is optimized for maximum flavor and the perfect, spreadable texture. The key is starting with truly room-temperature cream cheese.
Prep Time: 10 minutes | Chill Time: 1-2 hours | Yields: About 2.5 cups
Ingredients & Their Roles:
· 2 (8 oz) packages full-fat cream cheese, room temperature: The non-negotiable, lush foundation. Full-fat ensures the best texture and flavor. It must be soft to blend smoothly without lumps.
· ¼ cup finely chopped carrots: Provides a sweet crunch and vibrant color.
· ½ cup finely chopped celery: Offers a refreshing, aqueous crunch and herbaceous note.
· 2 green onions, chopped (white and green parts): Delivers a mild, allium sharpness and pop of green.
· ½ teaspoon fine sea salt: Enhances all the natural flavors.
· ½ teaspoon garlic powder: Adds a savory, rounded garlic note without the raw bite of fresh (though fresh is a great alternative!).
· ¼ teaspoon onion powder: Deepens the savory, umami profile.
Step-by-Step Instructions:
PART 1: PREPARE THE VEGETABLES
Pulse in Processor (Recommended): Fit your food processor with the standard “S” blade. Add the roughly chopped carrots, celery, and green onions. Pulse 5-7 times in 1-second bursts, until the vegetables are reduced to small, uniform bits. Stop before they become a wet pulp. Transfer to a small bowl.
Hand-Chop Method: Using your chef’s knife, dice the vegetables into the smallest, most uniform cubes you can manage. This is called a brunoise and ensures a professional texture.
PART 2: COMBINE & SEASON
Mix the Base: In the bowl of the food processor (no need to wash it), add the softened cream cheese, salt, garlic powder, and onion powder. Process for 10-15 seconds until completely smooth and creamy, scraping down the sides with a spatula if needed.
Incorporate Vegetables: Add the processed (or hand-chopped) vegetables back into the food processor. Pulse just 2-3 times until the veggies are evenly distributed throughout the cream cheese. Do not over-process; you want to see the distinct bits of vegetable.
PART 3: CHILL & SERVE
Chill to Meld Flavors: Transfer the spread to an airtight container. Press a piece of plastic wrap directly onto the surface to prevent a skin from forming, then seal with the lid. Refrigerate for at least 1-2 hours, ideally overnight. This chilling time is crucial for the flavors to deepen and marry, and for the spread to firm up to the perfect spreading consistency.
Serve: Let the spread sit at room temperature for 15-20 minutes before serving to soften slightly. Serve with crackers, bread, or vegetable crudités.
The Science of Success: Why This Method Works
· Room-Temperature Cream Cheese: Cold cream cheese has a rigid structure that breaks into lumps when mixed. At room temperature, the fat softens, allowing it to blend into a perfectly smooth, silky base that can hold the vegetable pieces in suspension.
· Pulsing, Not Puréeing: The quick pulses in the food processor chop the vegetables while preserving their cellular structure. This retains their satisfying crunchy texture and prevents them from releasing too much water, which would thin out and weaken the spread.
· The Flavor Meld (Chilling): As the spread chills, the salt has time to gently draw moisture and flavor compounds out of the vegetables, which then infuse the cream cheese. This results in a more complex, unified flavor than if served immediately.
Creative Variations: Endless Customization
This recipe is a flawless canvas. Add up to ½ cup of any of the following with the vegetables:
· Herb Garden: 2 tbsp each of fresh dill, chives, and parsley.
· Everything Bagel: 2 tbsp of everything bagel seasoning + extra for topping.
· Smoked Salmon & Dill: Fold in 4 oz of finely chopped smoked salmon and 2 tbsp fresh dill.
· Jalapeño Popper: Add 2-3 finely diced jalapeños (seeds removed for mild, kept for heat) and ½ cup shredded sharp cheddar.
· Sun-Dried Tomato & Basil: Use ½ cup oil-packed sun-dried tomatoes (drained and chopped) and ¼ cup fresh basil.
· French Onion: Sauté ½ cup finely diced yellow onions until caramelized, let cool, then mix in. Add a pinch of thyme.
Serving Vessels & Presentation Ideas
· The Classic Bowl: Serve in a shallow bowl, smoothed top, drizzled with a little olive oil and sprinkled with extra chopped herbs or cracked pepper.
· The Vegetable “Cup”: Hollow out a small, round loaf of bread (like pumpernickel or sourdough) to create a bread bowl. Fill with spread and serve with the torn bread pieces for dipping.
· The Elegant Platter: Shape the spread into a log or disk on a serving board. Roll it in finely chopped nuts (pecans, almonds) or herbs for a stunning exterior. Surround with an array of dippers.
· The Canapé Starter: Use it as a base for cucumber rounds, endive leaves, or halved cherry tomatoes for instant, elegant finger food.
Troubleshooting & FAQ
· My spread is lumpy. The cream cheese was too cold. To fix, let it warm up slightly and beat it with a hand mixer until smooth before folding in the vegetables.
· My spread is too runny. The vegetables may have been too wet, or the cream cheese was over-beaten and warmed. For next time, pat chopped vegetables dry. For now, stir in a tablespoon or two of finely grated Parmesan cheese to help absorb moisture and stiffen it.
· Can I make this healthier/lighter? You can substitute one of the cream cheese blocks with Neufchâtel cheese or use a full-fat Greek yogurt blend. Avoid fat-free cream cheese, as it has additives that can create a gummy texture.
· How long does it really keep? Stored properly in an airtight container, it will keep for 7-10 days. The flavors often peak around day 2.
· Can I freeze it? It’s not recommended. The cream cheese can become grainy and the vegetables will release water upon thawing, creating a separated, undesirable texture.
· What are the best dippers?
· Crackers: Water crackers, wheat thins, pretzel crisps.
· Bread: Baguette slices, pita chips, rye bread.
· Vegetables: Bell pepper strips, cucumber rounds, snap peas, carrot chips.
· Protein: Grilled chicken strips, cooked shrimp.
Conclusion: The Spread That Earns a Permanent Spot in Your Fridge
The Garden Vegetable Spread is more than a recipe; it’s a culinary essential. It embodies the principle that the most satisfying foods are often the simplest, made with fresh ingredients and a little technique. It rewards minimal effort with maximum flavor and versatility, proving itself equally at home at a fancy soiree or a casual Tuesday night snack session.
So, keep your cream cheese on the counter, your food processor at the ready, and your vegetable drawer stocked. This spread is your secret weapon for effortless hospitality, a guaranteed way to bring a touch of fresh, homemade goodness to any moment. It’s not just an appetizer; it’s a delicious, reliable habit waiting to be formed.
More Recipes You Might Like
-
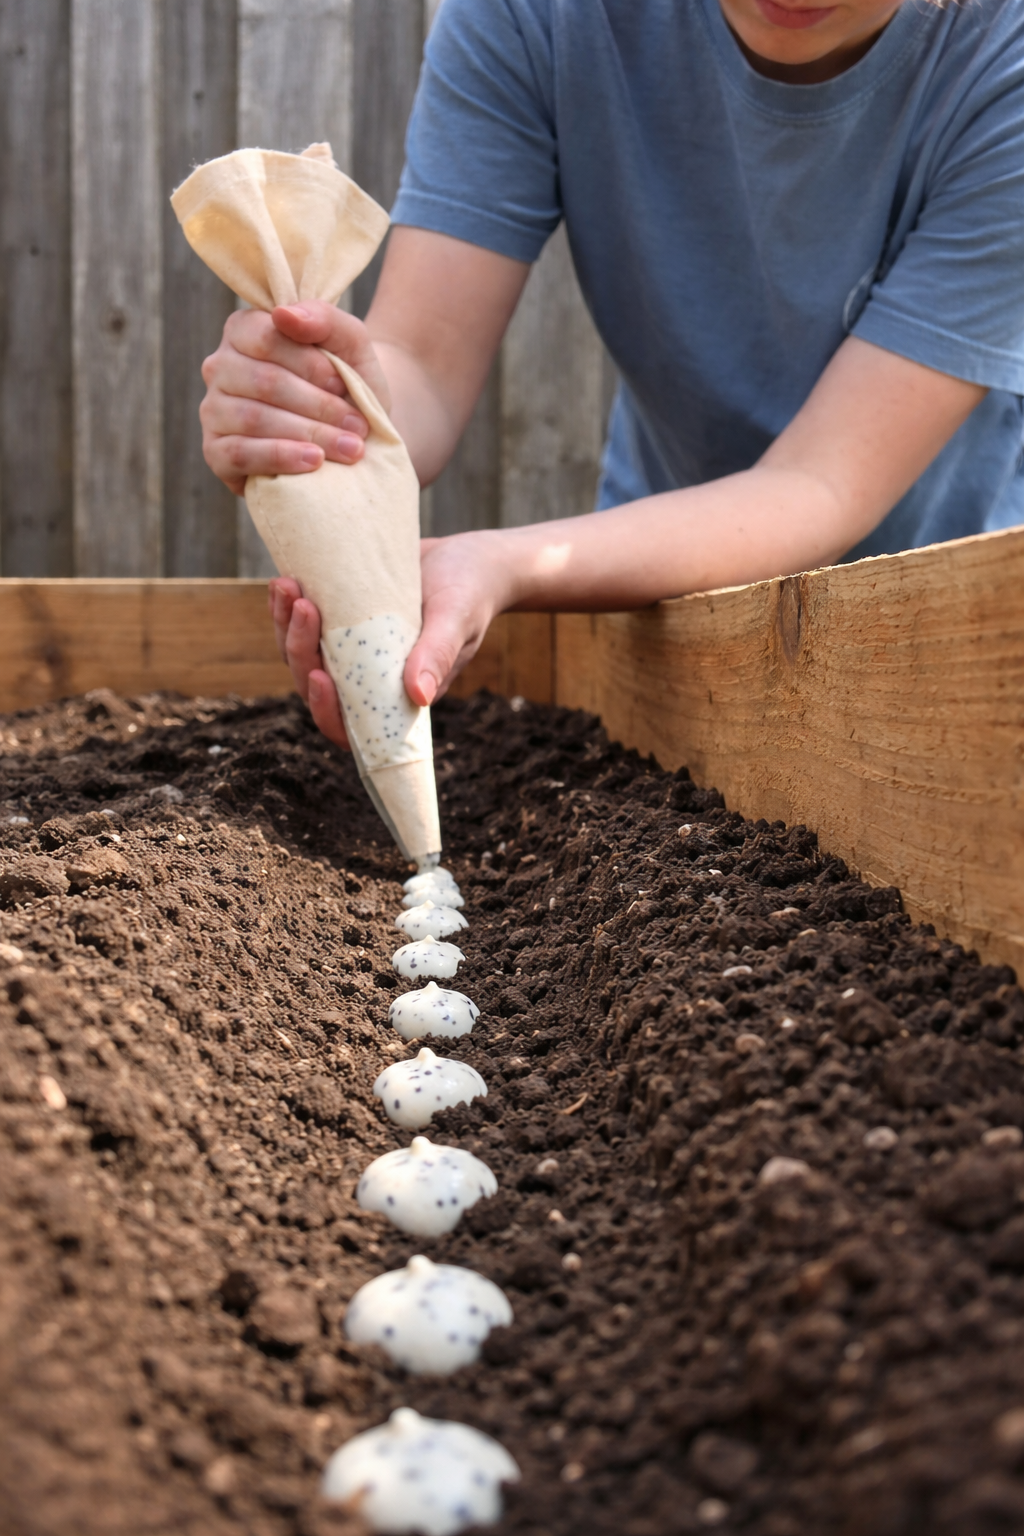
The Easy Garden Hack That Guarantees Straight, Healthy Carrots
Say goodbye to crooked, stunted carrots! Discover the simple seed paste hack that ensures perfect spacing and straight roots. This easy planting technique will transform your carrot harvest. Let me tell you about the gardening trick that turned my carrot patch from a tangle of twisted roots into a picture-perfect harvest. I love growing carrots.…
-

Grow 3X More Sweet Potatoes at Home with This Simple Soil Bag Trick
Want to grow 3 times more sweet potatoes in a small space? This clever soil bag trick is a game-changer. Learn how to plant sweet potatoes in bags for a massive harvest—perfect for small gardens and patios. Let me tell you about the gardening trick that turned my tiny patio into a sweet potato factory.…
-
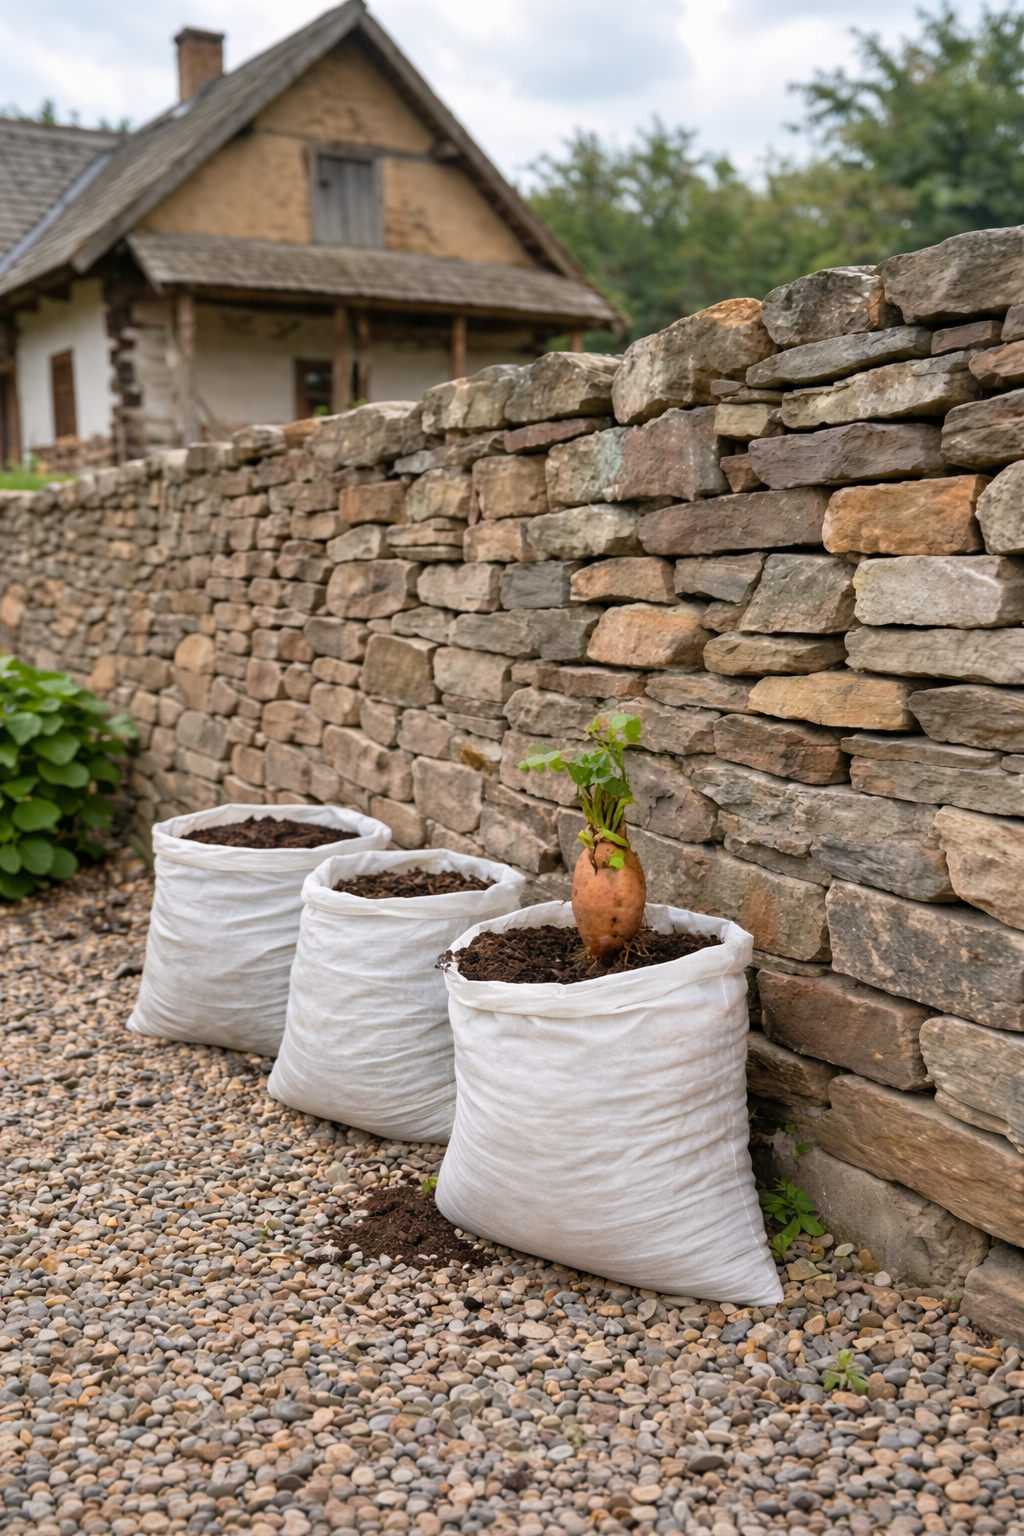
Grow 3X More Sweet Potatoes at Home with This Simple Soil Bag Trick
Want to grow 3 times more sweet potatoes in a small space? This clever soil bag trick is a game-changer. Learn how to plant sweet potatoes in bags for a massive harvest—perfect for small gardens and patios. Let me tell you about the gardening trick that turned my tiny patio into a sweet potato factory.…