Homemade plant tonics are everywhere, and one of the most talked‑about combinations is ginger and garlic. It sounds powerful, natural, and easy to make at home. But if you want real results, the most important thing is using it the right way.
Ginger and garlic have been used in traditional gardening for generations. Some gardeners swear by them as a natural way to support plant health, deter pests, and give a gentle boost to leafy growth. But are they truly a “fertilizer”? And how do you make a batch that actually helps your plants without causing harm?
In this guide, you will learn exactly how to make a safe, effective liquid organic tonic from ginger and garlic, when to use it, which plants benefit most, and — most importantly — how to avoid common mistakes that can sour your soil or stress your plants.
The Truth About Ginger and Garlic as Plant Tonics
Here is the honest truth: ginger and garlic are not a complete fertilizer like a balanced plant food. They do not provide significant amounts of nitrogen, phosphorus, or potassium. Instead, they work better as a mild homemade plant tonic that may help support root‑zone health and overall vigor when used lightly and diluted well.
What Ginger and Garlic May Do for Plants
Used gently, this homemade liquid may help as a light supportive treatment because:
· Garlic is often used in home gardening for its strong natural compounds, which include allicin and other sulfur‑containing substances. Some gardeners believe these compounds can help create an environment that is less inviting to certain soil pests and fungi.
· Ginger is valued in homemade plant care for its stimulating, fresh organic profile. It contains gingerol and other bioactive compounds that, in very diluted forms, may support microbial activity in healthy soil.
What This Mix Does NOT Do
It is equally important to understand what this mix does not do. It does not:
· Replace a balanced fertilizer (it lacks essential macronutrients).
· Fix root rot (if roots are already mushy and black, this will not help).
· Force instant blooms (blooming requires light, temperature, and proper nutrition).
· Repair poor drainage (no liquid can fix a pot without holes).
· Make weak plants recover overnight (recovery takes weeks of consistent care).
The best results happen when this tonic is used alongside good light, proper watering, healthy soil or bark, and good drainage. Think of it as a supporting actor, not the star of the show.
Best Plants for This Tonic (And Which to Avoid)
Not every plant responds well to homemade garlic‑ginger solutions. Some love it; others can be stressed by it.
Ideal Candidates
This kind of diluted homemade liquid is best used on:
· Outdoor ornamentals – Flowering shrubs, annuals, and perennials in garden beds.
· Leafy potted plants – Pothos, philodendrons, peace lilies, and spider plants (use cautiously).
· Garden vegetables – Tomatoes, peppers, and leafy greens during active growth.
· Herbs – Basil, mint, rosemary (dilute very well).
Plants That Need Extra Caution
Be more cautious with:
· Orchids – Their sensitive roots and bark medium do not handle organic residues well.
· Succulents and cacti – They prefer dry, lean conditions; added liquids can cause rot.
· Snake plants – While tough, they dislike wet soil additives.
· Plants already stressed or rotting – Fix the underlying issue first.
· Seedlings – Their tender roots can be easily burned.
For sensitive plants, use a much weaker dilution (1 part tonic to 15–20 parts water) or skip it entirely.
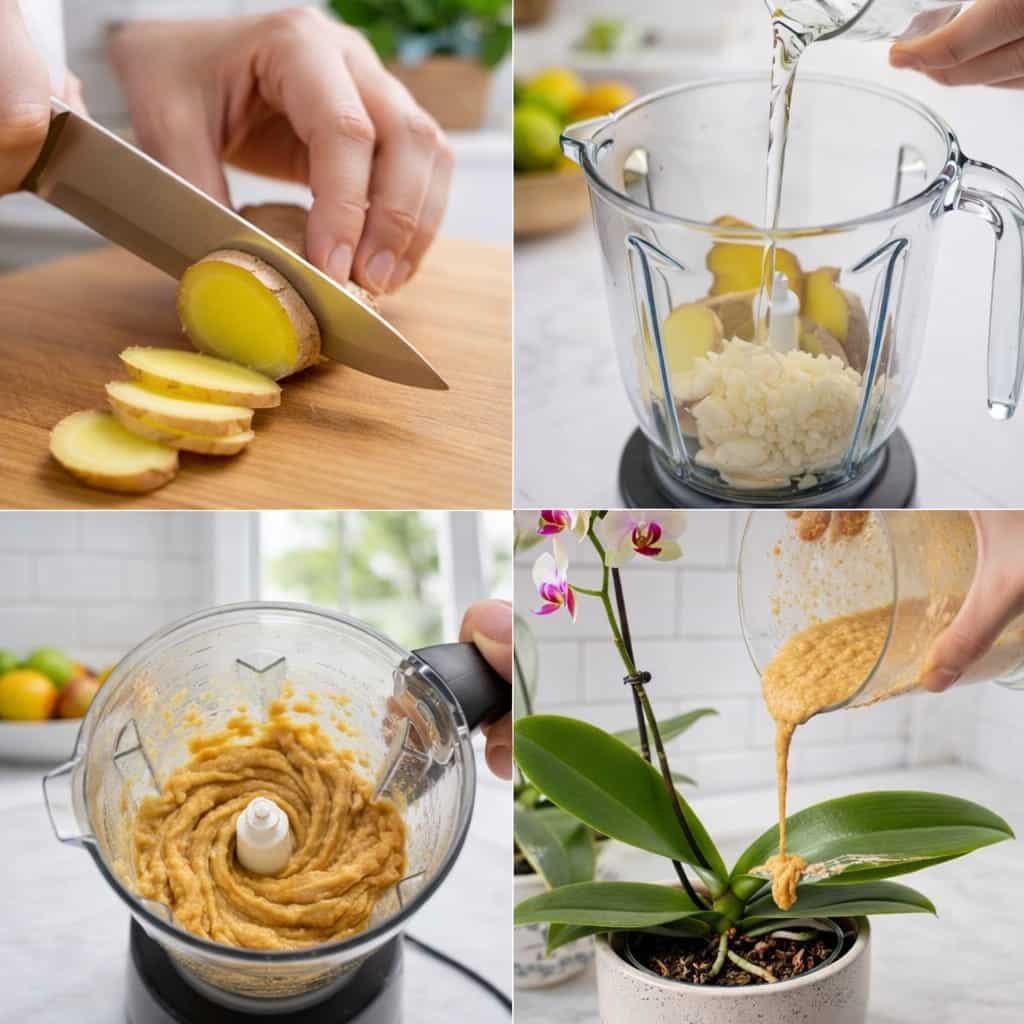
The Complete Recipe: Ginger‑Garlic Liquid Tonic
This recipe makes about 2–3 cups of concentrated liquid, which you will then dilute before using.
Ingredients
· 1 small piece fresh ginger (about 1–2 inches), sliced
· 3 to 4 garlic cloves (fresh, not dried)
· 2 to 3 cups water (for blending)
· Extra water for dilution (non‑chlorinated is best)
Equipment
· Blender
· Fine mesh strainer or cheesecloth
· Glass jar or bottle for storage
· Measuring cup
Step‑by‑Step Instructions
Step 1 – Prep the Ingredients
Peel the ginger if you prefer (the skin is fine to leave on if thoroughly washed). Slice it into small pieces so it blends easily. Peel the garlic cloves. Rinse both well.
Step 2 – Blend
Add the ginger, garlic, and 2–3 cups of water to a blender. Blend on high until the mixture becomes smooth and frothy. You should not see large chunks. This usually takes 30–60 seconds.
Step 3 – Strain Thoroughly (This Is Critical)
This is one of the most important steps. Use a fine mesh strainer or a piece of cheesecloth to remove all pulp and solids. Press the solids with the back of a spoon to extract as much liquid as possible. You want only the liquid — no chunks, no pulp.
Do not pour thick paste or chunks into plant pots. That can:
· Attract pests (fruit flies, fungus gnats)
· Smell bad as it decomposes
· Encourage mold on the soil surface
· Sit on top of the soil and rot
If you are concerned about waste, you can compost the solids. Do not put them directly into indoor pots.
Step 4 – Dilute
Before using, dilute the strained liquid with more water. A safe starting point is:
· 1 part ginger‑garlic liquid to 5 to 10 parts water
For sensitive houseplants, go even weaker (1:15 or 1:20). For outdoor ornamentals in active growth, 1:5 is generally safe. When in doubt, use a weaker dilution. You can always add a little more, but you cannot take it back.
Step 5 – Store or Use Immediately
Fresh tonic is best used within 24–48 hours. You can store it in a sealed glass jar in the refrigerator for up to one week, but the smell will intensify, and the beneficial compounds may degrade. If it develops a sour, rotten, or fermented odor, discard it.
How to Use It for Maximum Results
Application method matters as much as the recipe.
Apply to Soil Only
Pour the diluted liquid directly onto the soil around the base of the plant. Do not spray it on leaves or pour it into the crown (center) of the plant, especially for plants like orchids, succulents, or bromeliads. Wet crowns can rot.
When to Apply
· Use it lightly – A few tablespoons for a small pot, up to 1 cup for a large outdoor plant.
· Occasionally – Once every 2–4 weeks during the active growing season (spring and summer).
· Only when the soil is in a healthy condition – Do not apply to soggy, waterlogged, or sour‑smelling soil.
· Time of day – Apply in the morning so the soil has time to absorb before evening.
Do Not Use It Every Watering
Once every few weeks is more than enough for a homemade tonic. Overuse can lead to salt buildup, unpleasant odors, and root stress.
How to Get the Best Results (Combine with Good Care)
If you want maximum results from your ginger‑garlic tonic, combine it with the basics that actually matter most. The tonic is a helper, not a cure.
- Use It on a Healthy Root System
A plant with soggy, rotting roots will not benefit much from homemade tonic. First, ensure your plant has firm, white or tan roots. If you see black, mushy roots, trim the rot, repot in fresh soil, and let the plant recover before using any additives.
- Apply During Active Growth
Spring and summer are the best times for light feeding support. Plants are actively growing and can use the trace compounds. In fall and winter, most plants slow down; skip the tonic.
- Make Sure the Plant Has Good Drainage
If the pot stays wet too long, adding organic liquids can make things worse. Always use pots with drainage holes and a well‑draining potting mix (cactus mix for succulents, orchid bark for orchids).
- Keep the Dosage Low
Stronger is not better here. Over‑concentrated garlic‑ginger liquid can burn roots, especially on tender houseplants. When in doubt, dilute more.
- Observe Your Plant
After applying, watch for signs of improvement or stress. Good signs: slightly fresher growth, stronger leaf color, no negative changes. Bad signs: yellowing leaves, wilting, foul soil smell, or white crust on soil. If you see bad signs, flush the soil with plain water and stop using the tonic.
Continue to Page 2
Continue to page 2 for more details about this article and the key points many readers miss on the first page.