
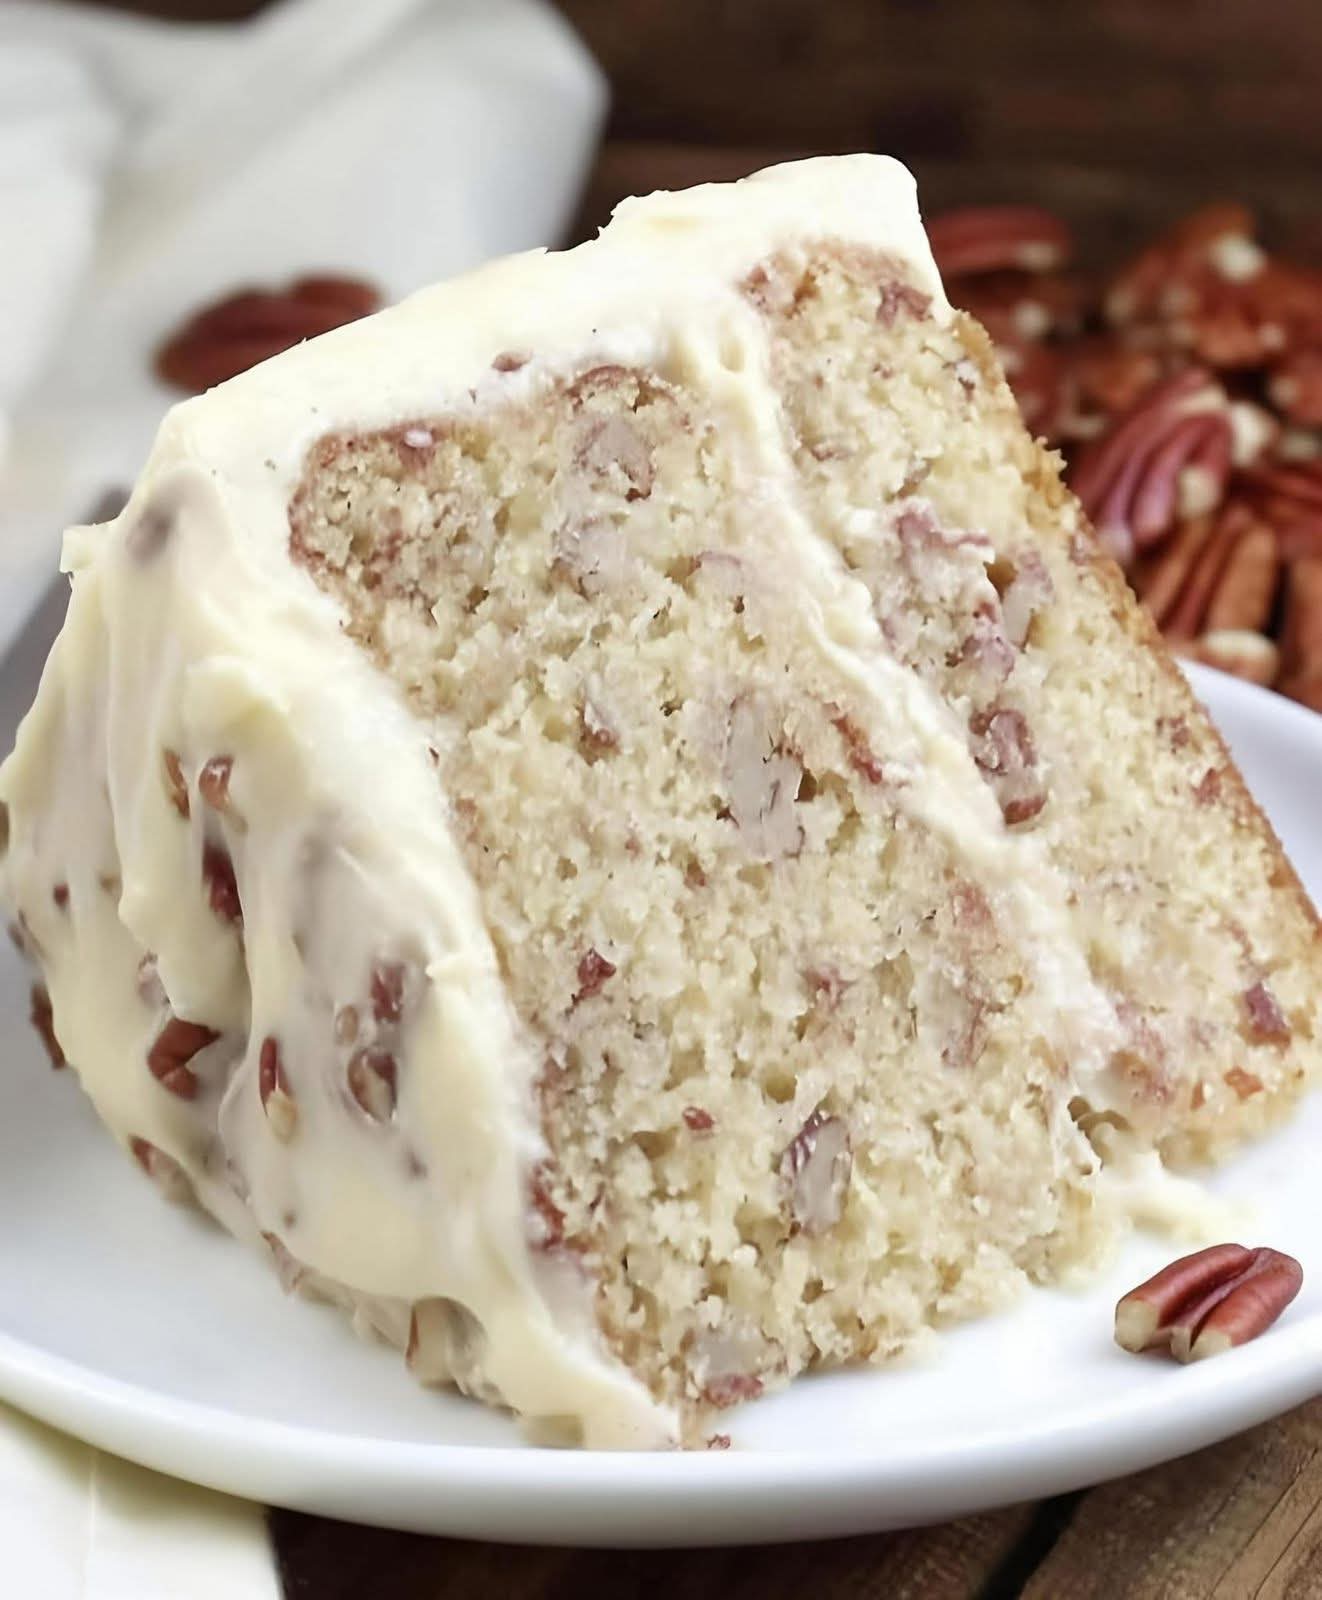
Close your eyes and imagine the most tender, moist cake you’ve ever tasted. Now, envelop it in a cloud of rich, tangy cream cheese frosting, and stud it with the delicate crunch of toasted pecans and the sweet chew of coconut. What you’re dreaming of is Italian Cream Cake—a legendary Southern dessert that, despite its name, is a pure American classic. This cake is a masterpiece of texture and balance, where each component plays a crucial role in creating a symphony of flavor that is far greater than the sum of its parts.
Why is it called “Italian” when its roots are firmly in the American South? The mystery only adds to its charm. Perhaps it’s the use of buttermilk or the luxurious texture that feels celebratory and old-world. Whatever its origin story, this cake is the one you make when mere “dessert” won’t suffice. It’s for birthdays, anniversaries, Christmas, and any occasion that demands a show-stopping, unforgettable finale. This isn’t just a cake; it’s an experience. Let’s bake a cake that will earn you standing ovations and recipe requests for years to come.
Why This Italian Cream Cake Recipe is a Cut Above the Rest
· The Perfect Textural Trio: Enjoy the contrast of the supremely moist crumb, the creamy frosting, and the crunchy nuts and coconut in every single bite.
· A Study in Balanced Flavors: The tangy buttermilk and cream cheese frosting perfectly cut the sweetness, while the toasted pecans add a sophisticated, nutty depth.
· Impressive Yet Approachable: It looks like it came from a professional bakery, but the steps are straightforward and foolproof with the right guidance.
· A Make-Ahead Dream: The cake layers can be baked, wrapped, and frozen days in advance, making assembly on the day of your event stress-free.
The Science of Moisture: Why This Cake is So Tender
The legendary tenderness of a perfect Italian Cream Cake is no accident. It’s a result of strategic ingredient chemistry. Buttermilk is the first hero; its acidity tenderizes the gluten in the flour, resulting in a softer crumb. The oil (often used alongside or in place of some butter) coats the flour proteins more thoroughly than solid fat, ensuring a moist cake that stays moist for days. Finally, the egg whites, beaten to soft peaks and folded in, act as a natural leavener, giving the cake a delicate, airy structure that simply melts in your mouth.
Essential Equipment for a Flawless Layer Cake
Baking a layer cake of this caliber requires precision. The right tools ensure even baking, easy assembly, and a stunning final look. Here is your essential baking arsenal:
· Three 9-Inch Round Cake Pans: This is the standard for a classic three-layer cake. For best results, use light-colored aluminum pans. Dark pans can cause over-browning. Prepare them impeccably: grease, line with parchment rounds, grease again, and flour. This guarantees clean release.
· Stand Mixer or Hand Mixer: A KitchenAid or similar stand mixer is invaluable for this recipe. You’ll use it to cream butter and sugar, whip egg whites, and make the frosting. A powerful hand mixer can also get the job done.
· Paddle & Whisk Attachments: You’ll need the flat beater/paddle for the cake batter and frosting, and the wire whisk attachment for beating the egg whites to perfect peaks.
· Fine-Mesh Sieve or Sifter: Crucial for sifting the cake flour, baking soda, and salt together. This aerates the dry ingredients, preventing lumps and ensuring a uniform, delicate crumb.
· Kitchen Scale: The most accurate way to measure flour and sugar. For consistent results every time, weigh your ingredients. (1 cup of cake flour = ~115g).
· Cooling Racks: You must have at least two wire cooling racks. Cooling the cakes in the pans for only 10-15 minutes before turning them out onto the racks prevents steaming and sogginess.
· Cake Turntable (Highly Recommended): This is a game-changer for frosting. A simple rotating cake turntable allows for smooth, professional-looking frosting application and clean sides.
· Offset Spatulas: A large and a small offset spatula are the secret tools of pro bakers. They provide unparalleled control for spreading batter evenly in pans and for applying and smoothing frosting.
· Cake Leveler or Serrated Knife: To create perfectly flat, even layers for stacking, a wire cake leveler is foolproof. A long, sharp serrated bread knife works with a steady hand.
· Bench Scraper: For achieving those beautifully smooth, sharp sides on your frosted cake, a metal bench scraper is essential when used with the turntable.
Ingredient Deep Dive: Building Flavor & Texture
For the Cake Layers:
· Cake Flour: The low-protein content of cake flour is non-negotiable for a tender, fine crumb. Do not substitute all-purpose flour without adjustments (for 1 cup cake flour, use 1 cup AP flour minus 2 tbsp, replaced with 2 tbsp cornstarch).
· Butter & Oil: Using both gives you the rich flavor of butter and the guaranteed moisture of a neutral oil like canola or vegetable.
· Buttermilk: The acidic tang tenderizes. No buttermilk? Make a soured milk: 1 cup milk + 1 tbsp white vinegar or lemon juice, rested for 5 minutes.
· Eggs, Separated: The yolks enrich the batter. The whites, beaten to soft peaks, are folded in at the end for lift and lightness.
· Sweetened Flaked Coconut & Toasted Pecans: Folded into the batter, they provide pockets of flavor and texture. Toasting the pecans is mandatory—it unlocks their deep, nutty essence.
For the Cream Cheese Frosting:
· Full-Fat Cream Cheese & Butter: Use brick-style cream cheese, not spreadable tubs. Bring both to true room temperature for a smooth, lump-free frosting.
· Powdered Sugar: Sift it to avoid lumps. The ratio here balances tang and sweetness perfectly.
· Vanilla Extract & Pinch of Salt: Enhances all the flavors and cuts the sweetness.
Step-by-Step Instructions for Cake Perfection
Part 1: Prep & Preheat
Prepare Pans & Toast Nuts: Preheat oven to 350°F (175°C). Grease, parchment-line, grease, and flour three 9-inch pans. Spread pecans on a baking sheet and toast for 7-10 minutes until fragrant. Cool and chop.
Separate Eggs & Prep Ingredients: Separate egg whites and yolks, placing whites in the clean, grease-free bowl of your stand mixer. Bring buttermilk, butter, and cream cheese to room temperature. Sift cake flour, baking soda, and salt together.
Part 2: Make the Cake Batter
Beat Egg Whites: Using the whisk attachment, beat egg whites on medium-high until soft peaks form. Gradually add 1/4 cup of the sugar until medium peaks form. Transfer to another bowl.
Cream Butter & Sugar: In the same mixer bowl (no need to wash), switch to the paddle. Cream softened butter, oil, and remaining sugar on medium-high for 3-4 minutes until light and fluffy.
Add Yolks & Vanilla: Beat in egg yolks one at a time, then vanilla.
Combine Dry & Wet: Add the sifted dry ingredients in three parts, alternating with the buttermilk in two parts, beginning and ending with flour. Mix on low until just combined after each addition.
Fold in Whites, Coconut, Nuts: By hand, using a large spatula, gently fold in 1/3 of the egg whites to lighten the batter. Then fold in the remaining whites, followed by 1 cup of the toasted pecans and all of the flaked coconut until no white streaks remain.
Bake: Divide batter evenly among prepared pans (a scale helps!). Bake for 22-28 minutes, until a toothpick comes out clean. Do not overbake.
Part 3: The Critical Cool & Level
Cool in Pans: Let cakes cool in pans on a wire rack for 15 minutes.
Turn Out: Run a knife around the edges and invert onto racks. Peel off parchment and let cool completely (2-3 hours). Wrap tightly in plastic wrap and freeze for 30 minutes for easier frosting.
Part 4: Make Frosting & Assemble
Make Frosting: With a clean paddle attachment, beat room-temperature butter and cream cheese until completely smooth. On low speed, gradually add sifted powdered sugar. Increase speed, add vanilla and salt, and beat until fluffy (2-3 mins).
Level & Fill: If needed, level cake tops with a serrated knife. Place a dollop of frosting on your cake plate or board. Place first layer top-side down. Spread with a generous 3/4 cup of frosting. Repeat with second layer.
Crumb Coat: Add final layer, top-side down. Apply a thin “crumb coat” of frosting over the entire cake. Chill for 20 minutes.
Final Frost & Decorate: Apply the final, thick layer of frosting. Use a bench scraper on a turntable for smooth sides. Press remaining toasted pecans onto the sides and garnish the top with coconut and pecan halves.
Serving, Storing, and Gifting Your Masterpiece
· Serve at Room Temperature: Bring the cake out of the fridge 1-2 hours before serving for the softest texture and most pronounced flavors.
· Storage: Store covered in the refrigerator for up to 5 days due to the cream cheese frosting. Let slices come to room temp before eating.
· Gifting: Transport on a cardboard cake round secured in a box. It’s a spectacular gift for any celebration.
FAQs: Your Italian Cream Cake Questions Answered
Q: Can I make this cake in advance?
A:Absolutely. Bake, cool, and wrap layers tightly in plastic wrap, then foil. Freeze for up to 2 months. Thaw in the fridge overnight before frosting. The frosted cake holds beautifully in the fridge for 2 days.
Q: My cream cheese frosting is runny. How do I fix it?
A:This happens if ingredients are too warm or over-beaten. Immediately chill the bowl in the fridge for 20 minutes, then re-whip. Using full-fat, brick-style cream cheese is crucial.
Q: Can I use all butter instead of oil?
A:You can, but the cake will be denser and may dry out faster. The oil is key for the signature moistness that lasts for days.
Q: Is there a substitute for coconut?
A:The coconut is traditional, but if you must omit it, increase the pecans by 1/2 cup. The texture will be different but still delicious.
The Final Slice: A Cake to Remember
This Italian Cream Cake is more than a dessert; it’s a culmination of careful technique and glorious ingredients. It represents the joy of baking something breathtakingly beautiful and deeply satisfying to share. It’s a cake that creates its own occasion, turning an ordinary day into a celebration.
So, gather your ingredients, prepare your pans with care, and embark on the rewarding process of creating this Southern icon. Don’t forget to PIN the image below to your ‘Special Occasion Cakes’ and ‘Southern Recipes’ boards so you always have this guide at your fingertips.
Now, preheat your oven. It’s time to bake a masterpiece that will be remembered long after the last crumb is gone.
More Recipes You Might Like
-
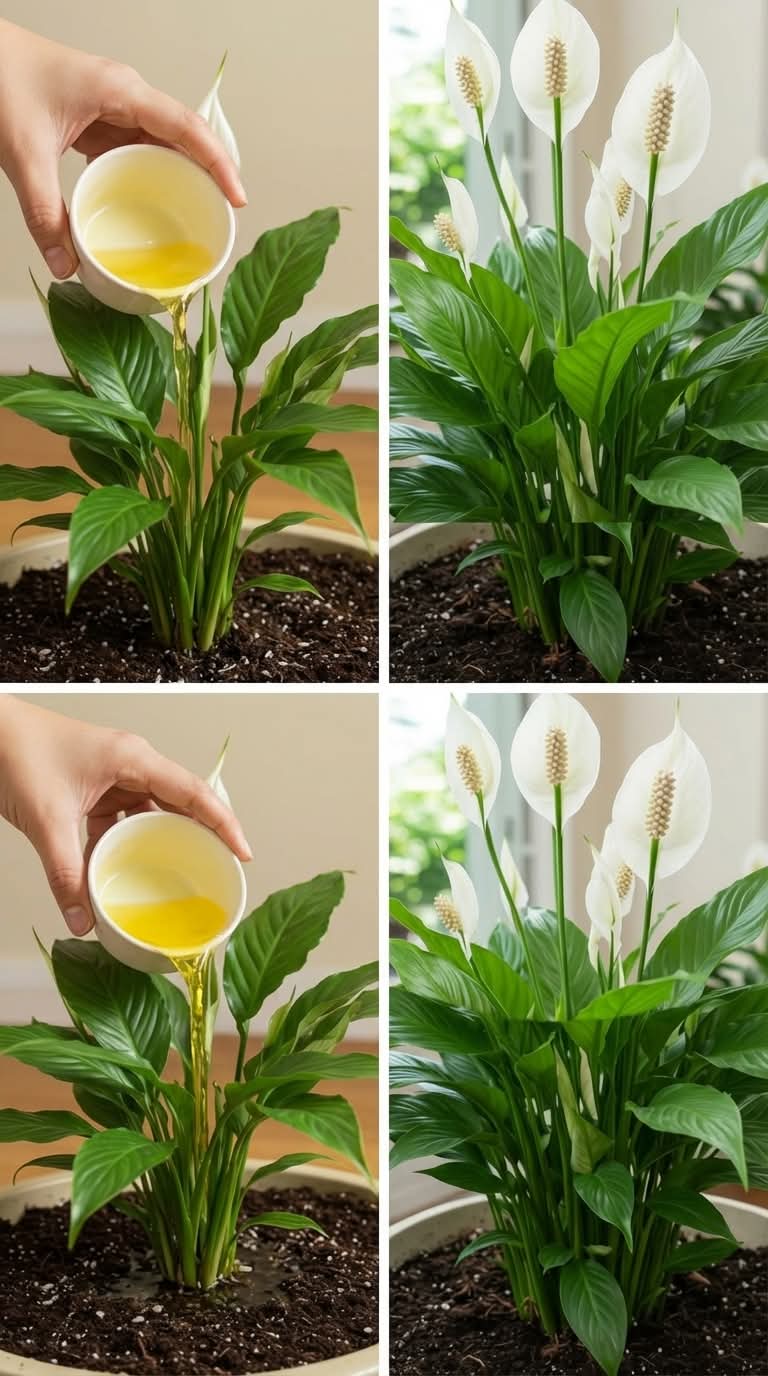
Just One Cup of This Kitchen Liquid… And Your Peace Lily Explodes With Flowers!
If you’ve ever struggled to get your peace lily to bloom, you’re not alone. Many plant lovers find that their lush green plant looks healthy—but those beautiful white flowers just don’t appear as often as expected. The good news? There’s a simple, natural plant fertilizer you can make right from your kitchen that may help…
-
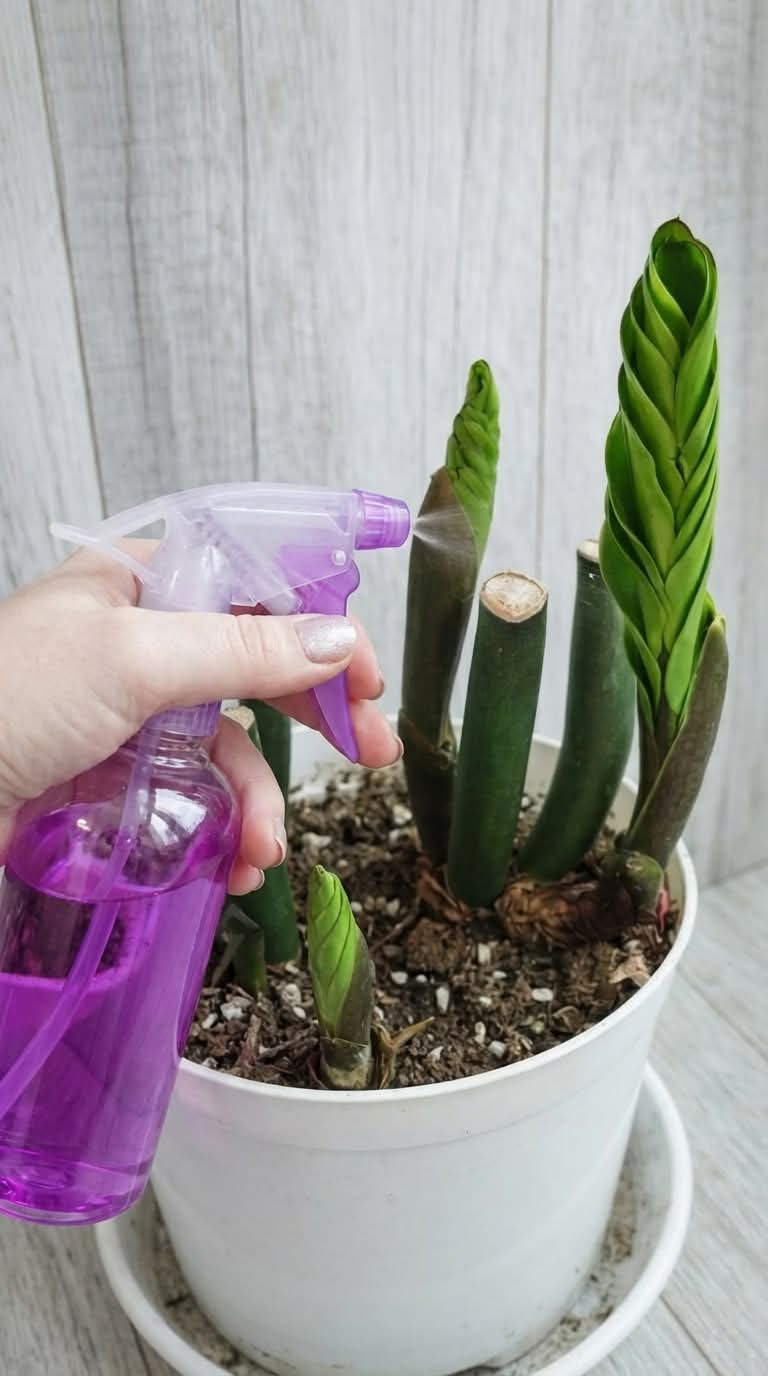
Just a Few Sprays of This Simple Mix… And Your ZZ Plant Wakes Up!
Is your ZZ plant looking stuck or slow to grow? This simple homemade leaf spray cleans dust, adds shine, and supports healthier growth. Easy recipe with neem oil for pest protection. Let me share the simple spray that brought my once‑dormant ZZ plant back to life. ZZ plants (Zamioculcas zamiifolia) are famous for being nearly…
-
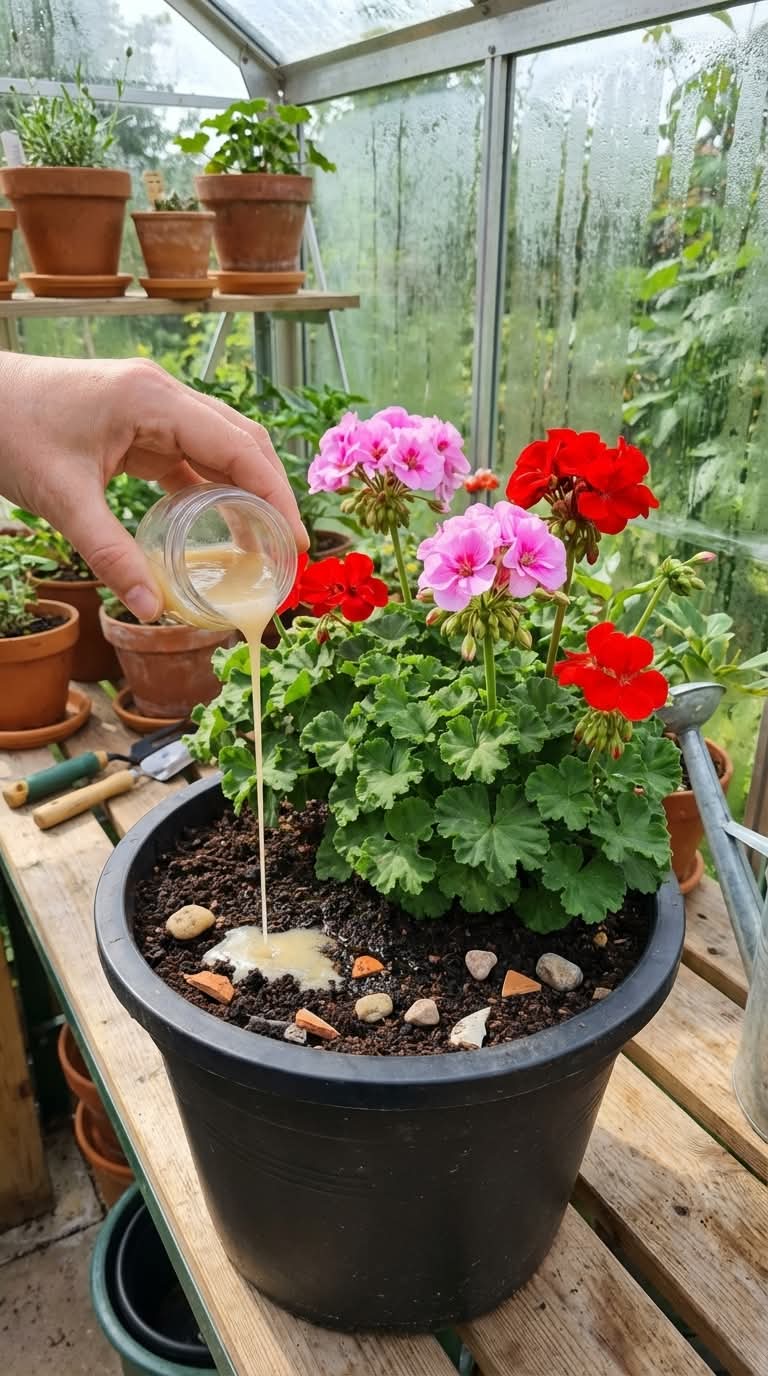
The Simple Trick That Makes Your Geraniums Bloom Bigger and Brighter – A Complete Guide
Want bigger, brighter geranium blooms? Discover the simple homemade sugar and lemon trick that boosts flowering, plus expert care tips for nonstop color all season long. Let me share the little secret that turned my average geraniums into show-stopping beauties. I’ve always loved geraniums. Their bright clusters of red, pink, white, and salmon flowers are…