
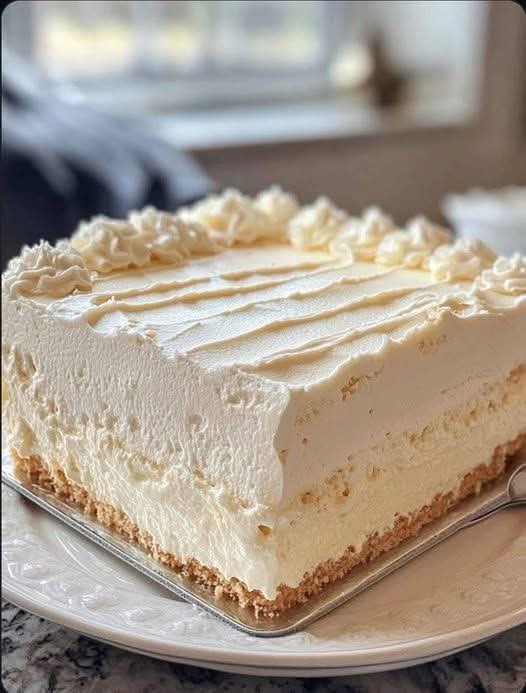
Imagine a dessert so ethereally light, so luxuriously creamy, and so perfectly sweet that it feels like tasting a cloud. That’s the magic of a No-Bake Vanilla Dream Cheesecake. This isn’t just any cheesecake; it’s a foolproof, easy dessert that requires zero oven time, eliminates the fear of cracks, and delivers a silky-smooth, intensely vanilla filling on a buttery biscuit crust. It’s the ultimate make-ahead dessert for busy hosts, a show-stopping summer treat that won’t heat up your kitchen, and a kid-friendly cooking project that promises incredible results with minimal effort.
The “dream” in the name isn’t just marketing—it describes the texture. Without the need for eggs or baking, this cheesecake achieves a mousse-like consistency that’s rich yet refreshing, substantial yet melt-in-your-mouth light. By using quality ingredients and a few simple techniques, you can create a gourmet-tasting dessert that rivals any bakery version. This comprehensive guide will walk you through every step to ensure a perfect set, a flavor that sings of pure vanilla, and a presentation that wows every time.
Why This No-Bake Cheesecake Recipe is Unbeatable
In the world of no-bake desserts, this recipe stands out for its perfect balance of simplicity and sophistication.
· No Oven, No Stress: Perfect for warm weather, tiny kitchens, or anyone intimidated by traditional water-bath baking. It’s the ultimate easy summer dessert.
· Crack-Free Guarantee: Since it never sees the heat of an oven, you’ll never deal with unsightly cracks. The surface stays flawlessly smooth.
· Make-Ahead Perfection: It must chill for hours, making it the ideal stress-free party dessert. Make it a day or two before your event.
· Pure, Customizable Flavor: The vanilla base is a classic canvas. Once mastered, you can infuse it with citrus zest, swirl in fruit purees, or top it with endless possibilities.
· Crowd-Pleasing Texture: The combination of cream cheese, whipped cream, and a touch of gelatin (for stability) creates a texture that is both lush and light—a true “dream” to eat.
Ingredient Spotlight: Building the Dream
The quality of your ingredients is paramount here, as each flavor shines through clearly.
For the Graham Cracker Crust:
· Graham Cracker Crumbs: The classic base. You can pulse whole crackers in a food processor or buy pre-crushed.
· Granulated Sugar: Just a bit to sweeten the crust.
· Unsalted Butter, Melted: The binding agent that toasts up beautifully when set. Salted butter can be used; just omit the added salt.
For the Vanilla Dream Filling:
· Full-Fat Cream Cheese (2 blocks, 16 oz total): This is non-negotiable. Use brick-style, full-fat cream cheese at true room temperature for a lump-free filling. Low-fat or spreadable tubs will not set properly.
· Powdered Sugar: Sweetens the filling without grittiness and helps stabilize it.
· Pure Vanilla Extract & Vanilla Bean Paste (The Dream Team): Vanilla bean paste is the secret weapon. It provides the beautiful speckled appearance and a deeper, more complex flavor than extract alone. Using both creates a truly extraordinary vanilla flavor.
· Heavy Cream (or Heavy Whipping Cream): Whipped to medium-stiff peaks, it’s folded in to give the cheesecake its airy, mousse-like texture.
· Unflavored Gelatin: The gentle stabilizer that ensures your dream cheesecake slices beautifully without being rubbery. It’s what makes this a no-bake cheesecake that holds its shape.
Step-by-Step Recipe: Creating Perfection
Follow these detailed steps for a flawless, silky-smooth cheesecake every time.
Ingredients:
For the Crust:
· 1 ½ cups (150g) graham cracker crumbs (about 10-12 full sheets)
· 2 tablespoons granulated sugar
· ¼ teaspoon fine sea salt
· 6 tablespoons (85g) unsalted butter, melted
For the Filling:
· 2 (8 oz) blocks full-fat cream cheese, softened to room temperature
· 1 cup (120g) powdered sugar, sifted
· 1 tablespoon pure vanilla extract
· 1 tablespoon vanilla bean paste (or the seeds from 1 vanilla bean)
· ¼ teaspoon fine sea salt
· 2 ¼ teaspoons (1 packet) unflavored powdered gelatin
· 3 tablespoons cold water
· 1 ¼ cups (300ml) cold heavy cream
For Serving (Optional):
· Fresh berries, whipped cream, lemon curd, or a berry compote.
Instructions:
Prepare the Pan & Make the Crust:
Lightly grease the bottom and sides of an 8-inch or 9-inch springform pan.For extra security against leaks, you can wrap the outside bottom in plastic wrap.
In a medium bowl,mix the graham cracker crumbs, sugar, and salt. Pour in the melted butter and stir until the mixture resembles wet sand.
Press the crumbs firmly and evenly into the bottom of the prepared pan,going slightly up the sides if desired. Use the bottom of a flat glass or measuring cup to compact it. Freeze for 15 minutes while you make the filling.
Bloom the Gelatin:
In a small,microwave-safe bowl, sprinkle the gelatin over the 3 tablespoons of cold water. Let it sit for 5-10 minutes until it becomes a solid, spongy mass. This is called “blooming” and ensures it dissolves smoothly.
Make the Cream Cheese Base:
In a large bowl using a hand mixer or stand mixer with the paddle attachment,beat the room-temperature cream cheese on medium speed until completely smooth and lump-free, about 2 minutes. Scrape down the bowl.
Add the sifted powdered sugar,vanilla extract, vanilla bean paste, and salt. Beat on low until combined, then on medium until smooth and creamy. Scrape down the bowl again.
Activate & Add the Gelatin:
Melt the bloomed gelatin in the microwave for 5-10 seconds,or until it becomes a clear liquid. Do not let it boil.
With the mixer running on low,slowly drizzle the liquid gelatin into the cream cheese mixture. Beat until fully incorporated. Set aside.
Whip the Cream:
In a separate,clean, cold bowl, whip the heavy cream using a hand mixer or whisk attachment until it reaches medium-stiff peaks (the peaks hold their shape but are still soft and creamy, not grainy).
Fold & Combine:
Using a large rubber spatula,gently fold about one-third of the whipped cream into the cream cheese mixture to lighten it. Then, carefully fold in the remaining whipped cream until no white streaks remain. Be gentle to maintain the airy volume.
Assemble & Chill:
Pour the dreamy filling onto the prepared crust.Smooth the top with an offset spatula.
Cover the pan loosely with plastic wrap.Refrigerate for a minimum of 6 hours, but ideally overnight (12 hours) for the perfect, firm set.
Serve the Dream:
Run a thin knife under hot water,wipe dry, and gently run it around the inner edge of the springform pan before releasing the clamp.
Slice with a clean,hot knife for beautiful pieces. Serve with fresh berries, a dollop of whipped cream, or a drizzle of salted caramel.
Pro Tips for a Flawless Cheesecake
· Room Temperature is KEY: Cold cream cheese will create lumps no matter how long you mix. Let it sit out for 1-2 hours.
· Don’t Over-whip the Cream: Whipped cream that’s gone too far (becomes grainy or buttery) won’t fold in smoothly and can deflate your filling.
· The Gelatin Guard: The small amount of gelatin is essential for clean slices but doesn’t make the cheesecake jiggly. Don’t omit it. For a vegetarian option, agar-agar can be used (follow package instructions for substitution ratios).
· Smooth Top Secret: After smoothing, you can gently tap the pan on the counter to release any air bubbles.
· Storage: Keep covered in the refrigerator for up to 5 days. It can be frozen for up to 2 months; thaw overnight in the fridge.
Dreamy Variations & Toppings
· Lemon Dream: Add 2 tbsp of fresh lemon zest and 2 tbsp lemon juice to the filling. Top with blueberry compote.
· Berry Swirl: Before chilling, dollop ½ cup of seedless raspberry or strawberry puree on top and swirl with a knife.
· Chocolate Chip: Fold in ¾ cup of mini chocolate chips after combining the filling.
· Salted Caramel: Drizzle salted caramel sauce over the set cheesecake and sprinkle with flaky sea salt.
· Tropical: Fold in ½ cup of finely chopped dried pineapple and toasted coconut. Top with a mango puree.
Frequently Asked Questions (FAQ)
Q: Can I make this without gelatin?
A:For a slightly softer set, you can use 4 oz of softened, full-fat mascarpone cheese in place of 4 oz of the cream cheese. However, for guaranteed clean slices, gelatin is recommended.
Q: Why is my filling lumpy?
A:The cream cheese was too cold. Ensure it is truly softened. If lumps persist, you can press the finished filling through a fine-mesh sieve before pouring it into the crust—a pro trick for absolute silkiness.
Q: Can I use a different crust?
A:Absolutely! Digestive biscuits, vanilla wafers, or even crushed pretzels (for a sweet/salty twist) work beautifully with the same butter ratio.
Q: My cheesecake is too soft. What happened?
A:Possible causes: not chilling long enough, the heavy cream was under-whipped, or the gelatin wasn’t fully incorporated. It will still taste delicious but may need to be served with a spoon.
Q: Is this recipe gluten-free?
A:Yes, if you use certified gluten-free graham crackers or another GF cookie for the crust.
Conclusion: The Dessert That Lives Up to Its Name
The No-Bake Vanilla Dream Cheesecake is more than a recipe; it’s a promise of effortless elegance. It proves that you don’t need complex techniques or hours of baking to create a dessert that feels special, looks professional, and tastes sublime. It’s a testament to the power of pure vanilla and the joy of a dessert that’s both luxurious and surprisingly simple to achieve.
It’s the perfect ending to a summer dinner party, a cherished addition to a holiday table, or a beautiful treat just because. So, let your cream cheese soften, break out the vanilla bean paste, and prepare to make a dessert that will have everyone asking, “How did you make this?” The answer is simple: with a little patience and a whole lot of dreamy vanilla flavor.
Now, we’d love to hear from you! What’s your favorite way to top a classic vanilla cheesecake? Share your ideas and creations in the comments below!
More Recipes You Might Like
-
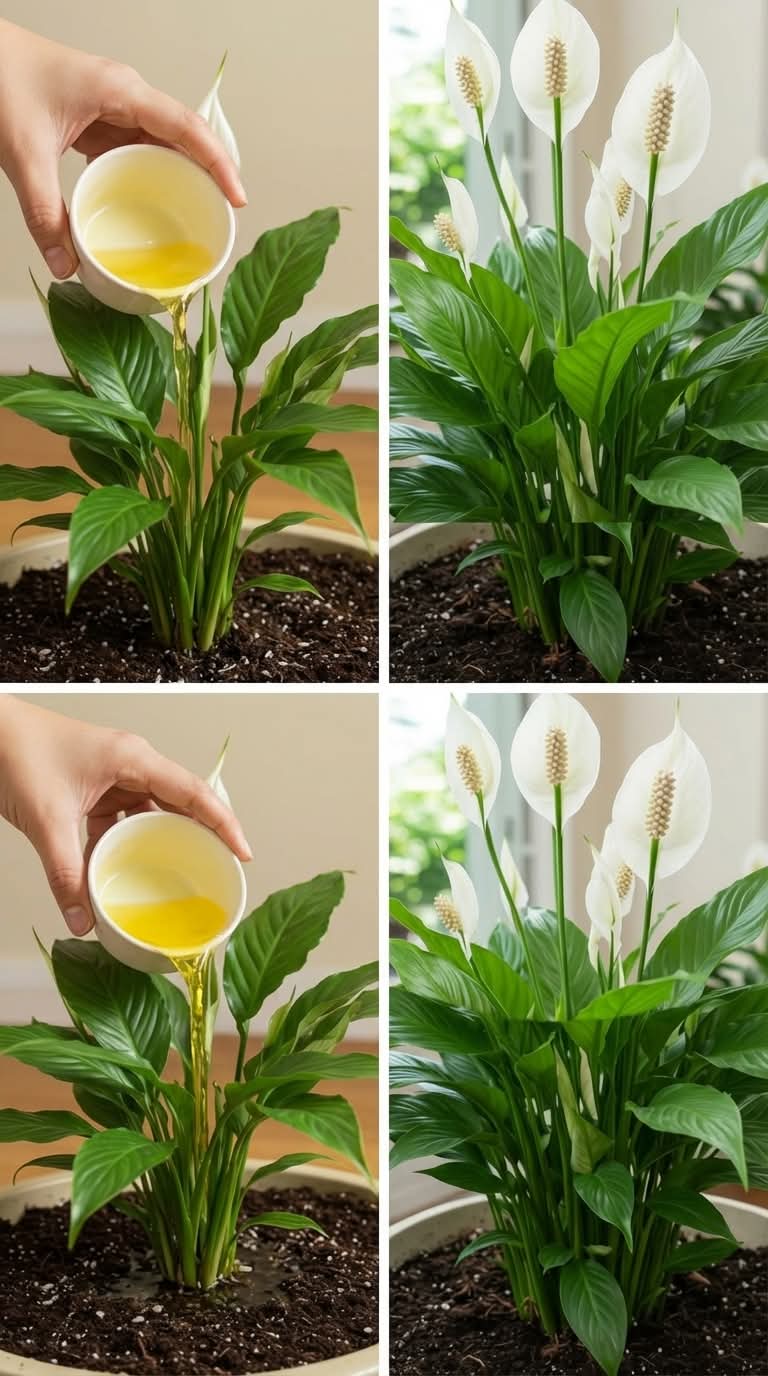
Just One Cup of This Kitchen Liquid… And Your Peace Lily Explodes With Flowers!
If you’ve ever struggled to get your peace lily to bloom, you’re not alone. Many plant lovers find that their lush green plant looks healthy—but those beautiful white flowers just don’t appear as often as expected. The good news? There’s a simple, natural plant fertilizer you can make right from your kitchen that may help…
-
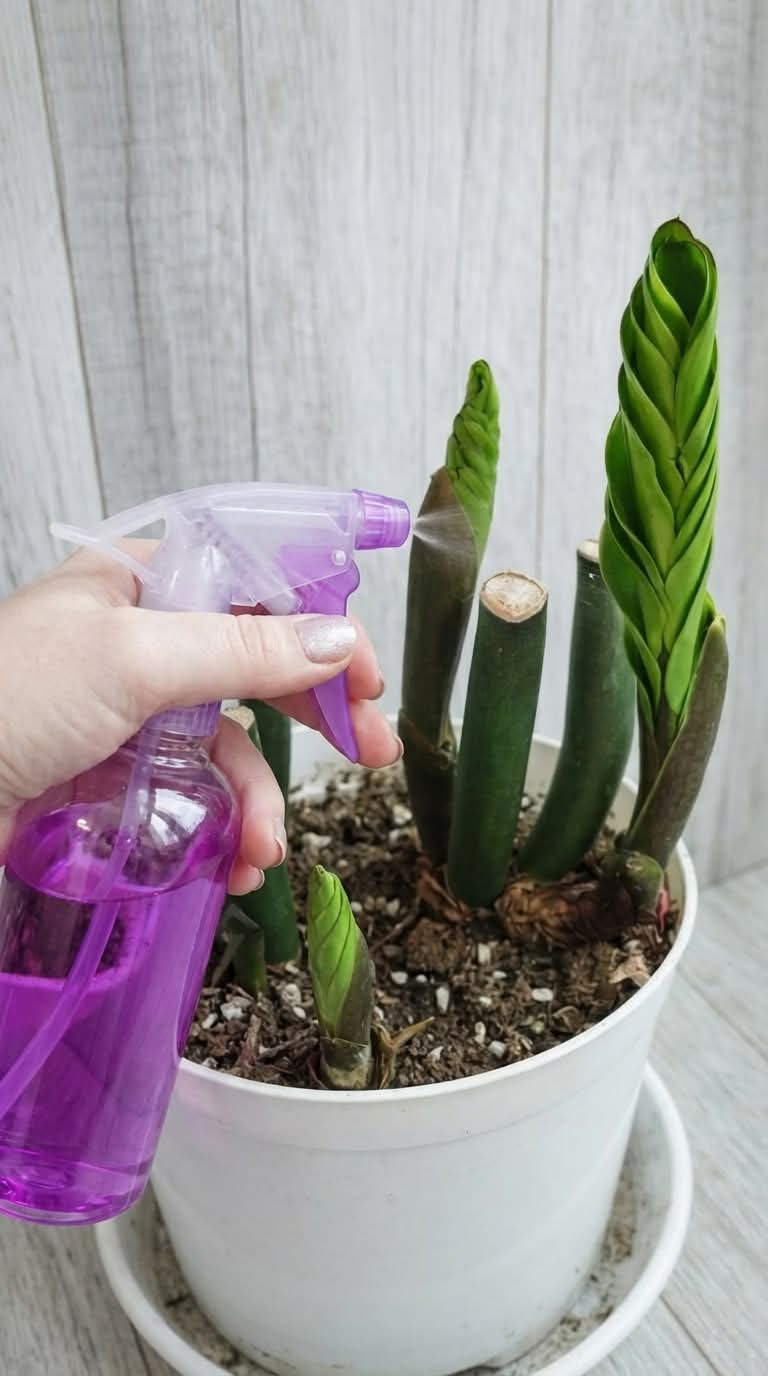
Just a Few Sprays of This Simple Mix… And Your ZZ Plant Wakes Up!
Is your ZZ plant looking stuck or slow to grow? This simple homemade leaf spray cleans dust, adds shine, and supports healthier growth. Easy recipe with neem oil for pest protection. Let me share the simple spray that brought my once‑dormant ZZ plant back to life. ZZ plants (Zamioculcas zamiifolia) are famous for being nearly…
-
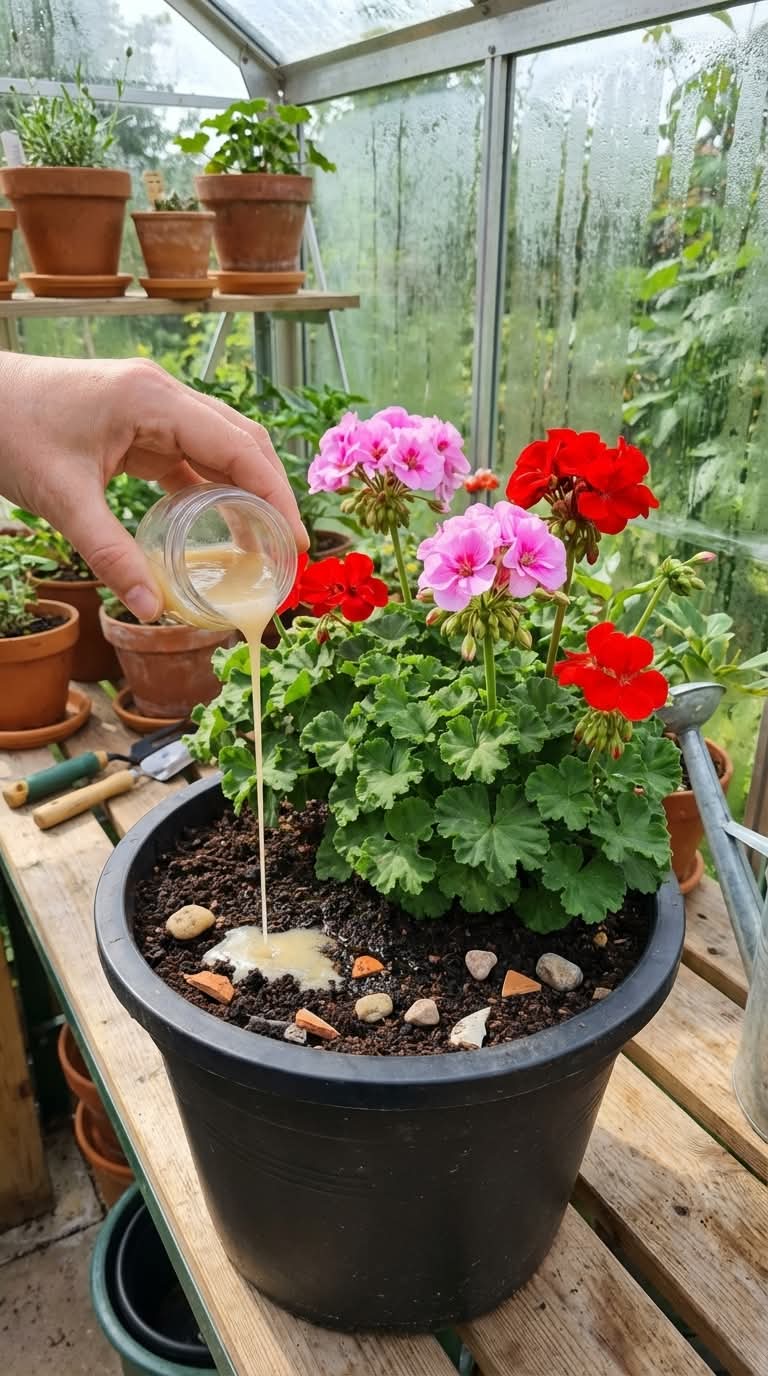
The Simple Trick That Makes Your Geraniums Bloom Bigger and Brighter – A Complete Guide
Want bigger, brighter geranium blooms? Discover the simple homemade sugar and lemon trick that boosts flowering, plus expert care tips for nonstop color all season long. Let me share the little secret that turned my average geraniums into show-stopping beauties. I’ve always loved geraniums. Their bright clusters of red, pink, white, and salmon flowers are…