
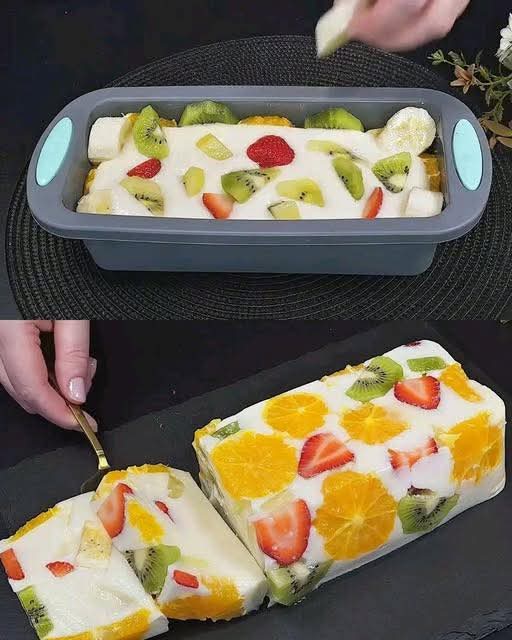
There is a singular, pure joy that comes from a dessert that wobbles. It’s playful, it’s elegant, and it promises a texture that is both soothing and exciting. Now, imagine that delight doubled: a sunlit layer of vibrant, berry-studded jelly topped by a cloud of creamy, vanilla-kissed milk jelly. This Refreshing Fruit and Milk Jelly Delight is not just a dessert; it’s a visual masterpiece, a textural wonder, and the ultimate answer to “what should I make for the party?” when the forecast calls for sunshine.
This recipe transcends generations. It evokes nostalgic memories of childhood treats while feeling sophisticated enough for a dinner party. It’s naturally beautiful, requiring no fancy piping skills—just the patience for layers to set. The best part? It’s almost entirely make-ahead, gluten-free, and you can control the sweetness to your liking. Whether you call it a jelly, a gelatin dessert, or a panna cotta-inspired creation, this delight is about to become your go-to for potlucks, BBQ side dishes, and beating the heat with something sweet. Let’s create a dessert that’s as fun to make as it is to eat.
Why This Jelly Delight Recipe is a Must-Make
· Stunning Visual Impact: The clear, colorful fruit layer against the opaque, creamy layer is naturally gorgeous. It’s a dessert that looks like you spent hours, with minimal effort.
· Cooling & Light: It’s the definitive warm-weather dessert. Light on the palate, refreshing, and not overly rich.
· Dietary Friendly & Adaptable: Naturally gluten-free. Easily adapted with plant-based milks and agar-agar for a vegetarian version. Sugar levels are fully in your control.
· Crowd-Pleasing for All Ages: Kids adore the jiggly sweetness, and adults appreciate the refined flavor and presentation. It’s a true crowd-pleaser.
The Science of the Perfect Wobble: Gelatin vs. Texture
Understanding the agent that makes your jelly set is key to success. We typically use gelatin, a protein derived from animals that creates a smooth, melt-in-your-mouth set. For the fruit layer, we often use fruit juice, which is acidic. A small amount of acid is fine, but highly acidic juices (like straight pineapple, kiwi, mango, or papaya) contain enzymes that break down gelatin, preventing it from setting. We’ll use a simple trick to navigate this. The milk layer uses sweetened, flavored milk. Dairy sets beautifully with gelatin, yielding a creamy, delicate texture that’s firmer than a mousse but softer than a cheese.
Essential Equipment for Flawless Layers
Precision and the right tools are crucial for creating those clean, distinct layers and ensuring a perfect unmolding. Here’s your dedicated equipment list:
· 9×9-inch Square Pan or 9-inch Round Deep Pie Dish/Springform Pan: Your mold is key. A square baking pan gives classic, easy-to-cut squares. For a more elegant presentation, a 9-inch springform pan allows for flawless removal and a cake-like presentation. A glass or ceramic dish works if you plan to serve directly from it.
· Fine-Mesh Strainer: This is non-negotiable for achieving crystal-clear fruit jelly. Straining the fruit puree or juice mixture removes all pulp and foam, ensuring a professional, translucent layer.
· Small and Medium Saucepans: You’ll need at least two. A small saucepan for blooming and melting gelatin. A medium saucepan for gently warming the fruit juice and milk mixtures.
· Heatproof Bowls & Measuring Cups: Glass measuring cups (like Pyrex) are ideal for microwaving gelatin mixtures and for easily pouring layers. A set of mixing bowls for prepping ingredients.
· Whisk and Spatula: A balloon whisk is perfect for incorporating gelatin smoothly without creating lumps. A flexible silicone spatula helps scrape every bit of mixture into your mold.
· Blender or Food Processor: Essential if you’re making your fruit layer from fresh or frozen fruit instead of pre-made juice. A high-speed blender will create the smoothest puree.
· Kitchen Timer or App: Setting layers is all about timing. Use a reliable timer to track the 20-25 minute setting intervals for perfect layer adhesion.
· Knife for Unmolding: To release the jelly from a non-springform pan, you’ll need a thin paring knife to gently loosen the edges.
· Ladle (Optional but Helpful): For transferring mixtures from the measuring cup to the mold without splashing and disrupting a set layer, a ladle provides superb control.
Ingredient Deep Dive & Customization Guide
The Fruit Jelly Layer:
· Fruit Juice or Puree: This defines the color and flavor. Store-bought 100% juice (like grape, apple, berry blends) is easy and reliable. For a brighter, fresher flavor, blend fresh or frozen berries (strawberries, raspberries, mango) with a little water and strain. Remember: Avoid fresh pineapple, kiwi, papaya, or ginger unless using the agar-agar method.
· Unflavored Gelatin: The setting agent. Powdered gelatin is standard. One packet is typically 2 1/4 teaspoons. For a vegetarian version, substitute with agar-agar powder, but note the setting temperature and strength are different (use about 1 tsp agar powder per 2 cups liquid and bring to a full boil).
· Sweetener: Granulated sugar, honey, agave, or a sugar substitute. Sweeten to taste, remembering the milk layer will be less sweet.
The Milk Jelly Layer:
· Whole Milk or Cream: For the richest, creamiest texture, use whole milk or a combination of milk and heavy cream (e.g., 1 1/2 cups milk, 1/2 cup cream). For a dairy-free version, full-fat coconut milk or almond milk works, but the set may be slightly softer.
· Sweetened Condensed Milk: This is the secret weapon for an irresistibly creamy, sweet, and stable milk layer. It provides body and a nostalgic flavor. For a less sweet version, use more plain milk and sugar to taste.
· Vanilla Extract or Bean Paste: Use pure vanilla for the best flavor. Scraping a real vanilla bean into the milk makes it extraordinarily fragrant.
The Garnish:
· Fresh Fruit: Use the same fruit as in your jelly layer for a cohesive look.
· Mint Leaves: Adds a pop of color and fresh aroma.
· Whipped Cream or Coconut Cream: A dollop on top adds decadence.
Step-by-Step Instructions for Perfect Stratification
Part 1: Preparing the Mold & First Gelatin Base
Lightly Grease Your Pan: Use a neutral-tasting oil (like canola) or a non-stick spray on a paper towel to very lightly grease your chosen pan. This aids unmolding. Skip if using a springform.
Bloom the Gelatin for the Fruit Layer: Pour 1/2 cup of your cold fruit juice into a small bowl. Sprinkle one packet of gelatin evenly over the surface. Do not stir. Let it sit for 5-10 minutes until it becomes a wrinkly, solid sponge-like mass. This “blooming” step ensures it dissolves smoothly.
Part 2: Creating the Vibrant Fruit Layer
Heat the Remaining Juice: In a medium saucepan, heat the remaining fruit juice (about 1 1/2 cups) over medium heat until it is steaming hot but not boiling.
Dissolve the Gelatin: Add the hot juice to the bowl with the bloomed gelatin. Whisk immediately and constantly until the gelatin is completely dissolved and the mixture is clear, about 1-2 minutes.
Strain for Clarity: Pour the mixture through your fine-mesh strainer into a clean glass measuring cup. This removes any undissolved granules or bubbles. Stir in your chosen sweetener until dissolved. Taste and adjust.
Pour First Layer & Chill: Carefully pour the strained fruit juice mixture into your prepared mold. Tilt the mold to ensure an even layer. Place it on a level shelf in the refrigerator. Chill for 20-25 minutes, or until the surface is set to a sticky touch (like glue) but not fully firm. This is the perfect stage for the next layer to bond.
Part 3: Crafting the Creamy Milk Layer
Bloom Gelatin for Milk Layer: Repeat the blooming process with the second packet of gelatin and 1/2 cup of cold milk in a clean bowl.
Heat the Dairy Mixture: In the same cleaned saucepan, combine the remaining milk, sweetened condensed milk, and vanilla. Warm over medium heat, stirring, until steaming.
Dissolve & Combine: Pour the hot milk mixture over the bloomed milk gelatin. Whisk thoroughly until fully dissolved and smooth.
Cool Slightly: Let the milk mixture sit at room temperature for about 10 minutes, stirring occasionally. It should still be liquid but no longer hot to the touch. This prevents it from melting the set fruit layer.
Part 4: The Crucial Layering & Final Set
Add the Second Layer: Once the fruit layer is tacky-set, gently pour or ladle the slightly cooled milk mixture over the back of a spoon held just above the surface. This disperses the weight and prevents creating a crater in the first layer.
Return to Fridge: Very carefully transfer the mold back to the refrigerator. Chill for at least 4 hours, preferably overnight, for a complete, firm set.
Part 5: Unmolding & Serving
Unmold with Confidence:
· For Springform: Simply run a thin knife under hot water, dry it, and run it around the very edge before unclamping the ring.
· For a Baking Pan: Fill a sink or large tray with 1-2 inches of hot water. Dip the bottom of the pan in the hot water for 10-15 seconds. Run the warmed knife around the edges. Place your serving plate upside-down on top of the pan, then quickly and confidently flip it over. It should release with a satisfying plop.
Garnish & Slice: Garnish with fresh fruit and mint. For clean cuts, dip a sharp, thin knife in hot water and wipe it clean between each slice.
Serving Suggestions & Presentation Ideas
· Elegant Cubes: Cut into perfect cubes and serve in pretty glass bowls or martini glasses.
· Party Platter: Unmold onto a slate or white platter, garnish, and let guests cut their own slices.
· Parfait Style: If a layer breaks, simply scoop both layers into a glass for a delicious deconstructed parfait.
· Pairings: Serve with a crisp sparkling wine, a cup of herbal tea, or a shot of espresso for contrast.
FAQs: Your Jelly Delight Questions Answered
Q: Can I use agar-agar instead of gelatin?
A:Yes, for a vegetarian version. Use about 1 teaspoon of agar-agar powder for every 2 cups of liquid. Crucially, you must bring the liquid to a full boil and simmer for 1-2 minutes for agar to activate. It sets at room temperature and is firmer and more brittle than gelatin.
Q: Why is my fruit layer cloudy?
A:Cloudiness comes from air bubbles (whisking too vigorously) or fruit pulp. Straining meticulously and avoiding whisking after adding hot liquid are key. Pouring from a height can also create bubbles.
Q: My layers separated! What went wrong?
A:This happens if the first layer is completely set and hard before adding the second. The second layer can’t bond with it. The “sticky-touch” stage is critical. If this happens, you can “glue” them with a very thin layer of plain, newly made jelly brushed on the set layer before adding the next.
Q: How far in advance can I make this?
A:Perfectly up to 2 days in advance. Keep it covered in the refrigerator. The flavors often improve overnight.
The Final Scoop: A Dessert of Simple Elegance
This Refreshing Fruit and Milk Jelly Delight is a testament to the beauty of simple techniques and quality ingredients. It’s a dessert that teaches patience and rewards it with a creation that dazzles the eyes and comforts the soul. It’s a blank canvas for seasonal fruits, a cool respite on a hot day, and a reminder that some of the best desserts are the ones that wobble joyfully.
So, choose your favorite fruit, clear a space in the fridge, and prepare to make something truly delightful. Don’t forget to PIN the image below to your ‘Summer Desserts’ and ‘Make-Ahead Party Recipes’ boards to keep this recipe handy for your next gathering.
Now, go create some wobbly, wonderful magic. Your new signature dessert is waiting.
More Recipes You Might Like
-
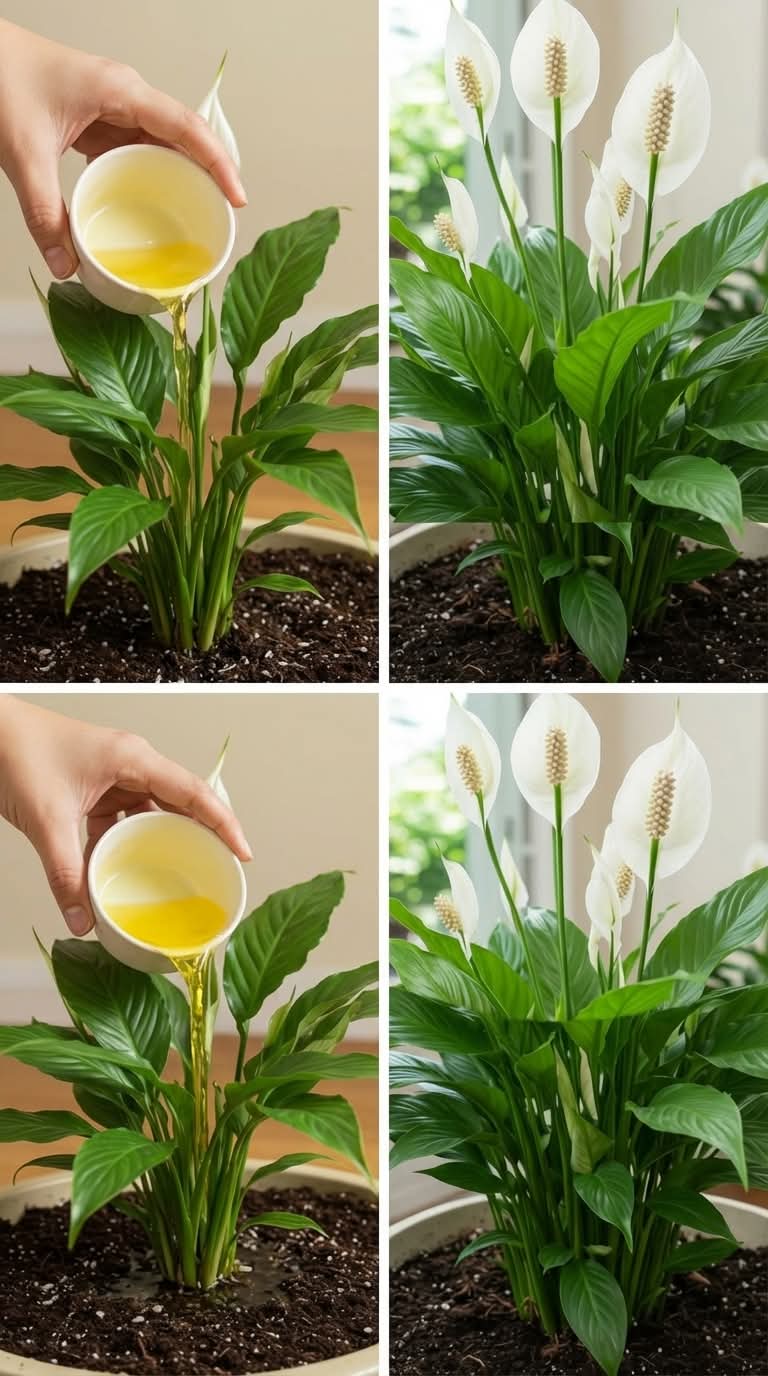
Just One Cup of This Kitchen Liquid… And Your Peace Lily Explodes With Flowers!
If you’ve ever struggled to get your peace lily to bloom, you’re not alone. Many plant lovers find that their lush green plant looks healthy—but those beautiful white flowers just don’t appear as often as expected. The good news? There’s a simple, natural plant fertilizer you can make right from your kitchen that may help…
-
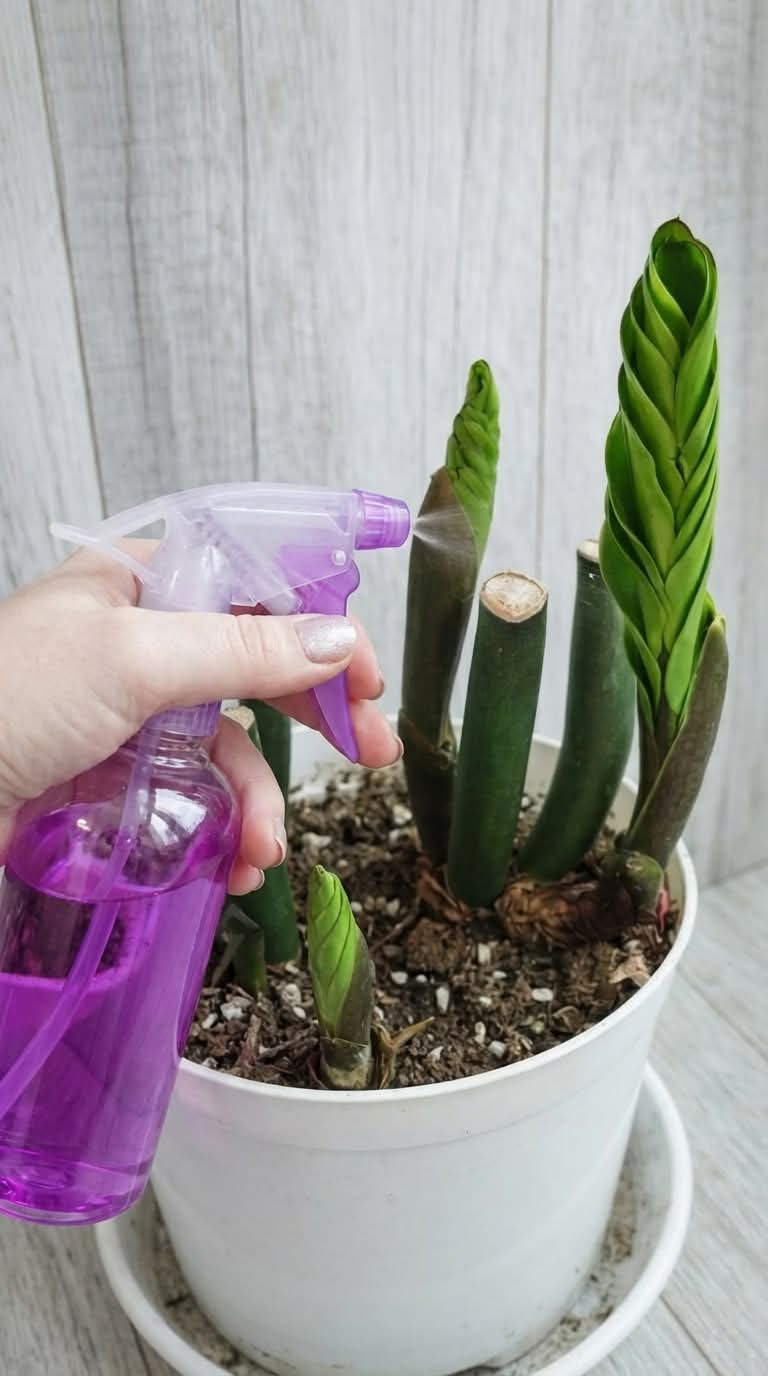
Just a Few Sprays of This Simple Mix… And Your ZZ Plant Wakes Up!
Is your ZZ plant looking stuck or slow to grow? This simple homemade leaf spray cleans dust, adds shine, and supports healthier growth. Easy recipe with neem oil for pest protection. Let me share the simple spray that brought my once‑dormant ZZ plant back to life. ZZ plants (Zamioculcas zamiifolia) are famous for being nearly…
-
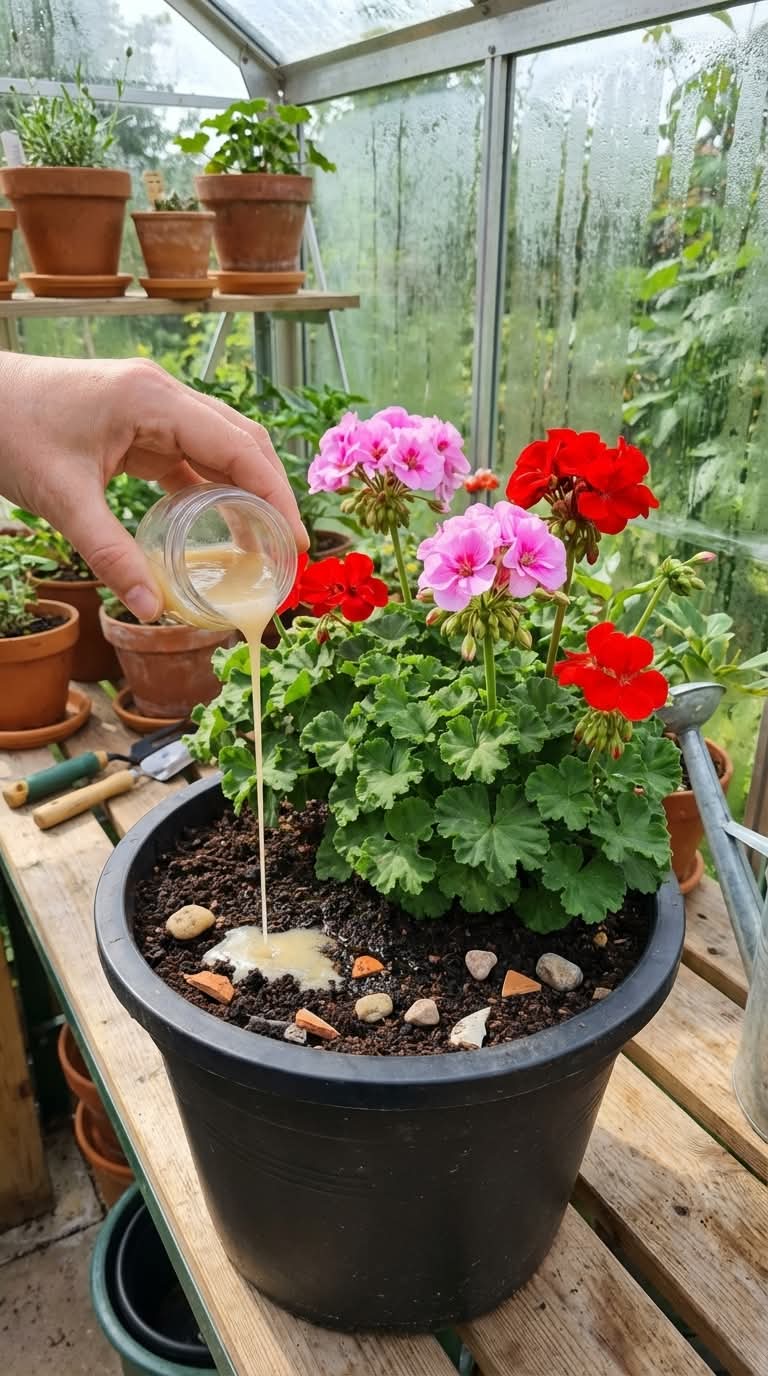
The Simple Trick That Makes Your Geraniums Bloom Bigger and Brighter – A Complete Guide
Want bigger, brighter geranium blooms? Discover the simple homemade sugar and lemon trick that boosts flowering, plus expert care tips for nonstop color all season long. Let me share the little secret that turned my average geraniums into show-stopping beauties. I’ve always loved geraniums. Their bright clusters of red, pink, white, and salmon flowers are…