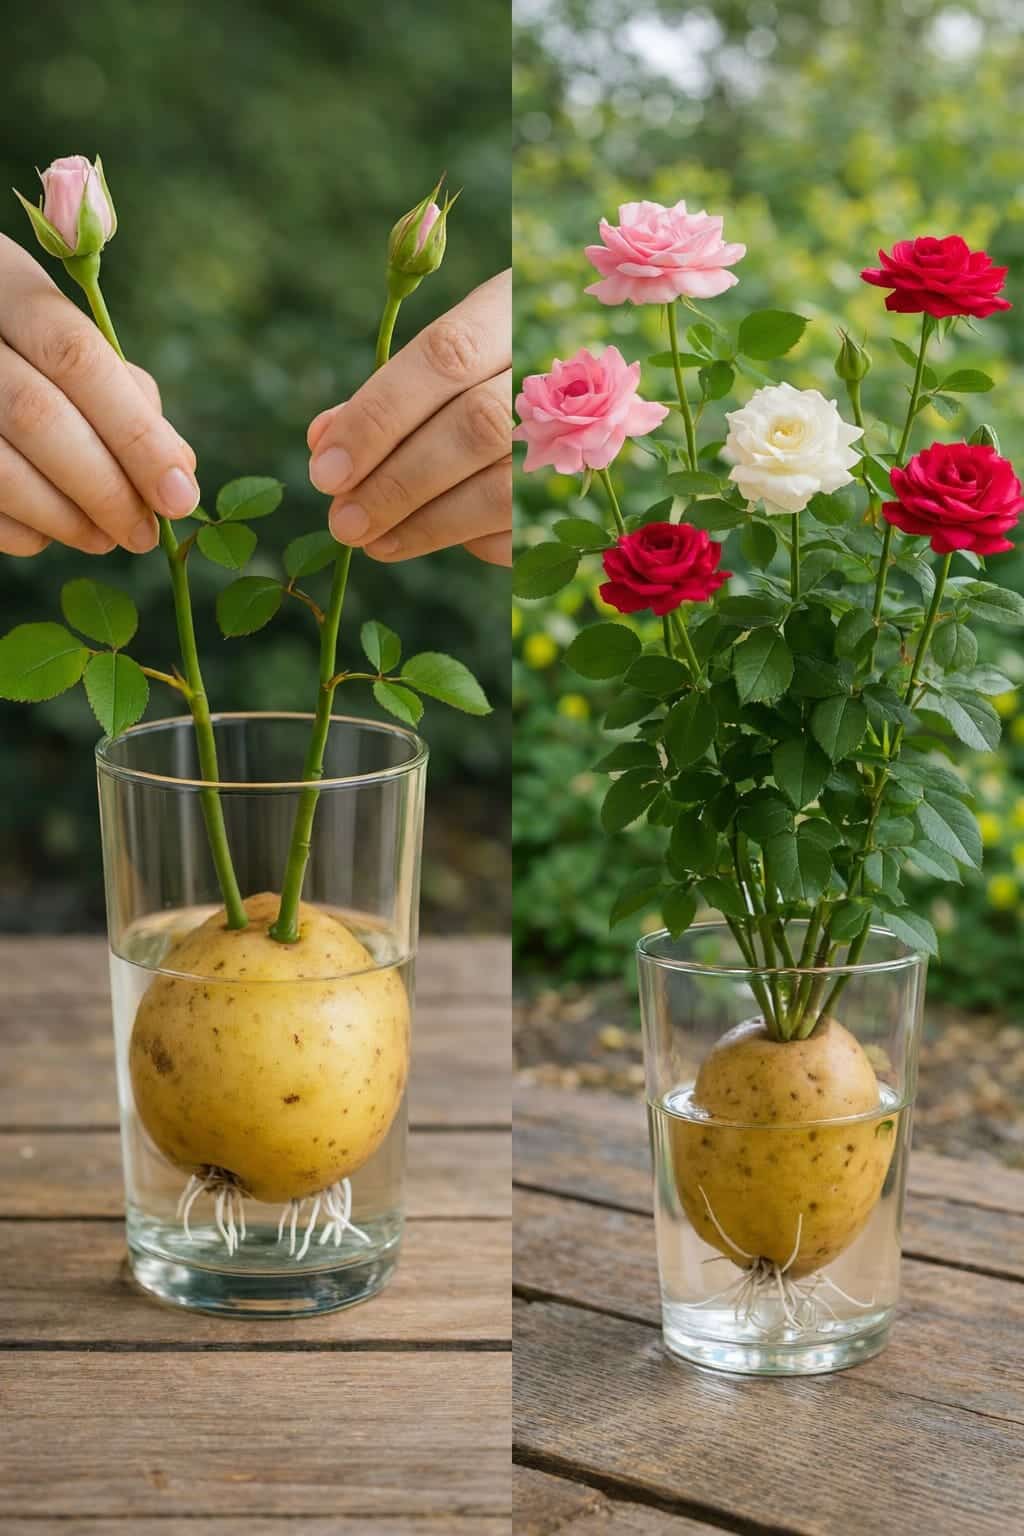
The idea sounds almost too clever to be true: take a rose cutting, place it into a potato, and let that potato help it root into a brand‑new plant. It is one of those gardening tricks that keeps spreading because it feels simple, inexpensive, and full of promise. A kitchen potato, a healthy rose stem, a little patience — and suddenly you have the possibility of growing beautiful new roses at home.
But does it actually work? And if so, how?
In this guide, we will explore the truth behind the potato propagation method, explain what the potato really does for your rose cutting, walk you through the step‑by‑step process, and share professional tips to maximize your success. Whether you are a beginner gardener or a seasoned rose enthusiast, you will learn exactly how to turn a single stem into a strong, new rose plant.
Why People Use Potatoes for Rose Cuttings
Rose cuttings need a few things to root well: steady moisture, clean conditions, a healthy stem, warmth, and time. In a typical propagation setup, you would plant the cutting directly into a moist potting mix or perlite and keep it under high humidity. But some gardeners have discovered that a humble potato can act as a natural moisture reservoir.
The reason potatoes became popular in propagation is that they can help hold moisture around the lower part of the cutting. Potatoes are about 80% water, and as they slowly release that moisture, they keep the stem from drying out too quickly while roots begin forming. That is why many people like the method. It feels like a natural little rooting chamber that requires no special equipment.
Additionally, potatoes contain small amounts of natural sugars and starches. Some gardeners believe these can provide a gentle energy source for the developing cutting. While this theory is not scientifically proven, the moisture‑retention benefit is real.
What the Potato Really Does (And What It Doesn’t)
A potato does not magically turn a weak cutting into a perfect rose bush. It is not a rooting hormone, and it will not compensate for poor technique or an unhealthy stem.
What the Potato May Do:
· Hold moisture around the stem base – The potato acts like a slow‑release water source, preventing the cutting from dehydrating before roots form.
· Keep the cutting more stable – When planted in soil, the potato anchors the cutting and prevents it from shifting.
· Reduce drying while you wait for roots – Especially helpful in dry indoor environments or if you forget to mist.
What the Potato Does NOT Do:
· Provide rooting hormones – Unlike commercial rooting powders, potatoes do not contain auxins that stimulate root growth.
· Prevent rot – In fact, if conditions are too wet, the potato itself can rot and kill the cutting.
· Speed up rooting – The speed of rooting depends on the rose variety, temperature, humidity, and cutting health — not the potato.
· Work with every cutting – Some rose varieties root easily; others are notoriously difficult. The potato will not change that.
The real success still depends on using a fresh, healthy cutting, avoiding rot, giving the cutting enough humidity, keeping the setup clean, and not letting it stay waterlogged.
Best Type of Rose Cutting to Use
For the best chance of success, choose a healthy stem that is:
· Not too soft and new – Green, flexible “softwood” cuttings can wilt quickly. Semi‑hardwood (slightly firm, with leaves that are mature) is better.
· Not too old and woody – Hardwood cuttings take much longer to root and have lower success rates.
· About pencil‑thickness or slightly thinner – Very thin stems lack energy reserves; very thick stems are harder to root.
· Free of disease or damage – No black spots, mildew, or insect damage.
A good cutting is usually around 6 to 8 inches long and taken from a healthy rose plant that has recently flowered or is in active growth (spring to early summer). The best time to take cuttings is in the morning when the plant is fully hydrated.
How to Prepare the Cutting (Before the Potato)
Proper preparation is the most important step. Do not skip this.
Step‑by‑Step Cutting Prep:
- Select a healthy stem. Look for a stem that has just finished blooming. Remove the spent flower.
- Make a clean cut. Using sharp, sterilized pruners, cut just below a leaf node (the bump where leaves attach). The cutting should be 6–8 inches long.
- Remove lower leaves. Strip off all leaves from the lower half to two‑thirds of the stem. These leaves would otherwise sit in moisture and rot.
- Leave a few top leaves. Keep 2–3 small leaves at the top for photosynthesis. If the leaves are large, cut them in half to reduce water loss.
- Remove any flowers or buds. The cutting needs to focus energy on root development, not blooming. Snip off any buds or open flowers.
- Make a fresh bottom cut. Just before inserting into the potato, make a new 45‑degree cut at the very bottom. This increases surface area for water uptake.
- Optional: Dip in rooting hormone. While not required, dipping the cut end in rooting hormone powder (containing IBA or NAA) can significantly increase rooting success. This is especially helpful for harder‑to‑root rose varieties.
Now your cutting is ready for the potato.
How to Use the Potato Method (Step‑by‑Step)
What You Will Need:
· Fresh, healthy rose cutting (prepared as above)
· 1 medium firm potato (organic is best, but any firm, non‑sprouting potato works)
· Clean tool to make a hole (a screwdriver, drill bit, or thick nail)
· Small pot with drainage holes
· Light, well‑draining propagation mix (e.g., 50% perlite + 50% peat moss or cactus mix)
· Clear plastic bag or propagation dome (optional but helpful)
Step 1 – Choose a Firm Potato
Pick a potato that is healthy, not mushy, and not already sprouting heavily. Avoid potatoes with green skin (they contain solanine, which may inhibit rooting). The potato should be large enough to hold the cutting without splitting — about the size of a small egg or larger.
Step 2 – Make a Hole in the Potato
Use a clean screwdriver, drill bit, or thick nail to make a hole in the potato. The hole should be slightly smaller than the diameter of the cutting stem, so the cutting fits snugly. Make the hole about 1–1.5 inches deep. Do not drill all the way through the potato.
Tip: Sterilize your tool with rubbing alcohol before making the hole to prevent introducing rot‑causing bacteria.
Step 3 – Insert the Cutting
Gently slide the prepared cutting into the hole. The fit should be snug but not forced. Do not push so hard that the stem cracks. The bottom of the cutting should be fully inside the potato, with the node (where roots will form) buried in the potato flesh.
Step 4 – Plant the Potato and Cutting Together
Fill your small pot with propagation mix. Make a hole in the center of the soil large enough to accommodate the potato. Place the potato into the hole and cover it completely with soil. The cutting should stand upright above the soil line. The potato acts as a moisture reservoir below ground.
Step 5 – Water Lightly
Water the soil just enough to moisten it. Do not soak. Because the potato already holds moisture, too much water can lead to rot. The soil should feel like a wrung‑out sponge — damp but not dripping.
Step 6 – Cover for Humidity (Optional but Recommended)
Rose cuttings root best in high humidity (80–100%). To create a mini greenhouse:
· Place a clear plastic bag over the pot and secure it with a rubber band around the pot rim.
· Or use a clear plastic cup or propagation dome.
· Ensure the plastic does not touch the leaves (use sticks or chopsticks as supports).
· Leave a small opening for air exchange, or open the bag once daily to prevent mold.
Step 7 – Place in Bright Indirect Light
Do not put the cutting in direct sunlight — it will cook inside the plastic. Instead, place it in a bright location with indirect light, such as near an east or north window, or under a grow light on a low setting. Ideal temperature is 65–75°F (18–24°C).
Continue to Page 2
Continue to page 2 for more details about this article and the key points many readers miss on the first page.