

There is a moment in every home baker’s journey that changes everything. It’s not when you pull a perfect cake from the oven, or when your cookies win a bake-off. It’s the moment you pull a loaf of your own homemade bread from the oven. The sound—a symphony of crackles as the crust contracts. The smell—an aroma of warmth, yeast, and comfort that fills your entire home. The taste—a soft, tender crumb with a slight chew and a flavor so profoundly different from any plastic-wrapped loaf, you’ll wonder what you’ve been eating all your life.
This recipe is your gateway to that moment. With just five simple pantry ingredients and a few hours mostly spent waiting, you can create a loaf that is honest, satisfying, and deeply connected to a timeless tradition. The claim, “you will no longer buy bread,” isn’t about deprivation; it’s about discovery. It’s about realizing that the best bread isn’t found in an aisle; it’s made in your own kitchen, with your own hands.
This isn’t a fussy artisan project requiring a starter or a steam-injected oven. This is accessible, forgiving, and foolproof bread-making. It’s the kind of recipe that builds confidence, saves money, and turns a simple meal into an event. Let’s dust off the counter, warm up the water, and bake the loaf that will make you a bread believer for life.
Why This Homemade Bread Beats Store-Bought Every Time
Commercial bread is engineered for shelf life, not soul. It often contains preservatives, dough conditioners, and added sugar. Your homemade loaf contains just flour, water, yeast, salt, and oil. The result? Superior flavor, better texture, and total ingredient control. You also get the unbeatable pride of creation and a kitchen that smells like a bakery. The cost per loaf is a fraction of a premium artisanal bakery bread.
The 5-Ingredient Magic: Understanding Your Components
Every ingredient has a purpose:
· Plain Flour (All-Purpose): The backbone. It provides the structure (gluten) that traps gas from the yeast, allowing the bread to rise.
· Warm Water: Activates the yeast and hydrates the flour. The temperature is crucial—too hot kills yeast, too cold slows it down. Aim for “baby bottle warm” (about 105-110°F / 40-43°C).
· Dry Yeast: The living organism that makes bread rise. It feeds on the flour’s sugars, producing carbon dioxide gas.
· Salt: The flavor enhancer. It strengthens gluten and regulates yeast activity, preventing over-proofing.
· Olive Oil: The tenderizer. It enriches the dough, yielding a softer crumb and a more pliable, easier-to-work-with dough. It also adds a subtle, lovely flavor.
The Crucial First Step: Activating the Yeast (The “Bloom”)
In your large mixing bowl, combine the warm water, a pinch of the sugar from the recipe (if you like, though not listed, a teaspoon helps feed the yeast), and the dry yeast. Let it sit for 5-10 minutes. You should see a creamy, frothy foam develop on the surface. This “bloom” confirms your yeast is alive and active—the single most important step for success. If it doesn’t foam, your yeast may be old or the water was too hot/cold. Start over.
Mixing & Kneading: Building the Gluten Network
Once your yeast is frothy, add the olive oil and salt. Gradually stir in the flour with a wooden spoon until a shaggy dough forms. Turn it out onto a lightly floured surface.
· Knead for 8-10 minutes. Use the heel of your hand to push the dough away, fold it over, and rotate. You’re developing gluten, the protein that gives bread its structure and chew.
· How to know it’s ready? The dough will transform from sticky and shaggy to smooth, elastic, and slightly springy. Perform the “windowpane test”: stretch a small piece. If you can stretch it thin enough to see light through without tearing, the gluten is perfect.
The First Rise: Letting Time Do the Work
Place the smooth dough in a lightly oiled bowl, turning to coat. Cover with a damp kitchen towel or plastic wrap. Let it rise in a warm, draft-free spot for 1-2 hours, or until doubled in size. This fermentation is where flavor develops. Don’t rush it.
Shaping Your Loaf: Creating Tension for a Good Rise
Once doubled, gently punch down the dough to release air. Turn it out onto a surface and shape it.
· For a free-form round (boule): Tuck the edges under, rotating to create a smooth, taut surface on top.
· For a loaf pan: Shape into a log and place seam-side down in a greased 9×5 inch loaf pan.
Place the shaped dough on a parchment-lined baking sheet or in the pan,cover, and let rise again for 45-60 minutes, until puffy.
Scoring & Baking: The Final Transformation
Preheat your oven to 375°F (190°C). Place an empty metal pan on the bottom rack.
· Score the loaf: Just before baking, use a sharp knife or razor blade to make a few shallow slashes (about ¼ inch deep) on top. This controls where the bread expands, preventing random tearing.
· Create steam (optional but recommended): Carefully pour 1 cup of hot water into the empty preheated pan right when you load the bread. Immediately close the oven door. The steam creates a crisp, professional-quality crust.
· Bake for 30-40 minutes until the loaf is deeply golden brown and sounds hollow when tapped on the bottom. An internal thermometer should read 190-200°F (88-93°C).
The Most Important Step: Cooling Completely
Resist every urge to slice into the warm loaf! Let it cool on a wire rack for at least 1 hour. Slicing too soon releases steam, turning the soft, set crumb into a gummy mess. The wait is agony but essential for perfect texture.
Pro Baker Tips for Your Best Loaf Ever
· Measure by Weight: For absolute accuracy, use a kitchen scale. 570g of flour is more precise than 4 3/4 cups.
· Autolyse (Rest): For a more open crumb, mix just the flour and water and let it rest for 30 minutes before adding yeast, salt, and oil. This allows the flour to fully hydrate and gluten to start forming naturally.
· Oven Spring: That final, dramatic rise in the oven’s first few minutes. A hot oven and proper scoring ensure a great “spring.”
· Storage: Keep bread in a paper bag at room temp for 2-3 days. For longer storage, slice and freeze in a bag. Reheat slices in a toaster.
Flavor & Flour Variations
· Whole Wheat: Substitute up to half the all-purpose flour with whole wheat flour. You may need a touch more water.
· Herb & Garlic: Knead in 2 tbsp of chopped fresh herbs and 2 minced garlic cloves with the flour.
· Seeded Bread: Coat the shaped loaf with an egg wash and roll it in a mix of sesame, poppy, and sunflower seeds before the final rise.
· No-Knead Variation: Use only 1 1/2 cups (360ml) water, mix until just combined, cover, and let rise for 12-18 hours in the fridge. Shape, do a second shorter rise, and bake. A wetter, slower dough develops incredible flavor.
FAQs: Your Bread-Making Questions Answered
Q: My bread is dense. What went wrong?
A:Common causes: yeast wasn’t active (didn’t bloom), water was too hot, dough didn’t rise long enough, or it was kneaded insufficiently (or too much, if using a machine).
Q: Can I use instant yeast instead of active dry?
A:Yes! You can mix it directly with the dry flour. Use the same amount. No need to bloom it first.
Q: My dough didn’t double in size.
A:Your kitchen might be too cold. Place the bowl in a turned-off oven with the light on, or near a warm appliance. Give it more time.
Q: Why is my crust pale and soft?
A:The oven may not be hot enough, or steam wasn’t used. Ensure proper preheating and try the steam pan trick.
The Simple Joy: Why Baking Bread is Good for the Soul
Beyond the delicious result, the process of bread-making is a form of mindfulness. It connects you to the rhythm of your kitchen, the feel of the dough, and the patient passage of time. In a fast world, it’s a slow, rewarding practice.
Your First Loaf: Embrace the Imperfection
Your first loaf may not be bakery-perfect. It might be lopsided or have a wild crack. It doesn’t matter. It will be your loaf, made by you, and it will taste better than any “perfect” loaf you could buy because of the story and care baked into it.
The Verdict: Will You Really Never Buy Bread Again?
Maybe not never. Life gets busy. But once you know how simple, economical, and profoundly better homemade bread is, the store-bought loaf will become a convenience, not a necessity. You’ll find yourself reaching for the flour more often than your wallet.
Begin Your Bread Journey Today
This recipe is an invitation. An invitation to simplicity, to self-sufficiency, and to the ancient, universal comfort of breaking bread you made yourself. So, gather your five ingredients. Take a deep breath. And start.
Recipe Card: The Simple Homemade Bread
Yield: 1 large loaf Prep Time: 20 mins Rise Time: 2-3 hours Bake Time: 35 mins Total Time: 3.5 hours
Ingredients
· 1 1/3 cups (320 ml) warm water (105-110°F / 40-43°C)
· 1 tablespoon (10 g) active dry yeast
· 1 teaspoon granulated sugar (optional, to feed yeast)
· 4 tablespoons (60 ml) olive oil
· 1 teaspoon fine sea salt
· 4 3/4 cups (570 g) all-purpose flour, plus more for dusting
Instructions
- Bloom Yeast: In a large bowl, combine warm water, yeast, and optional sugar. Stir and let sit 5-10 mins until frothy.
- Make Dough: To the yeast mixture, add olive oil and salt. Stir. Add flour, one cup at a time, stirring with a wooden spoon until a shaggy dough forms.
- Knead: Turn dough onto a floured surface. Knead for 8-10 minutes until smooth and elastic.
- First Rise: Place dough in a lightly oiled bowl, cover, and let rise in a warm place for 1-2 hours, until doubled.
- Shape: Punch down dough. Shape into a round or loaf. Place on parchment-lined sheet or in greased loaf pan.
- Second Rise: Cover and let rise 45-60 mins until puffy. Preheat oven to 375°F (190°C). Place empty pan on bottom rack.
- Bake: Score loaf top. Pour 1 cup hot water into the empty pan in oven. Quickly place bread in oven. Bake 30-40 mins until deep golden and hollow-sounding.
- Cool: Transfer to a wire rack. Cool completely (at least 1 hour) before slicing.
Did you bake your first triumphant loaf? Share a photo of your beautiful bread and tell us about your experience in the comments below! Welcome to the wonderful world of homemade bread.
More Recipes You Might Like
-
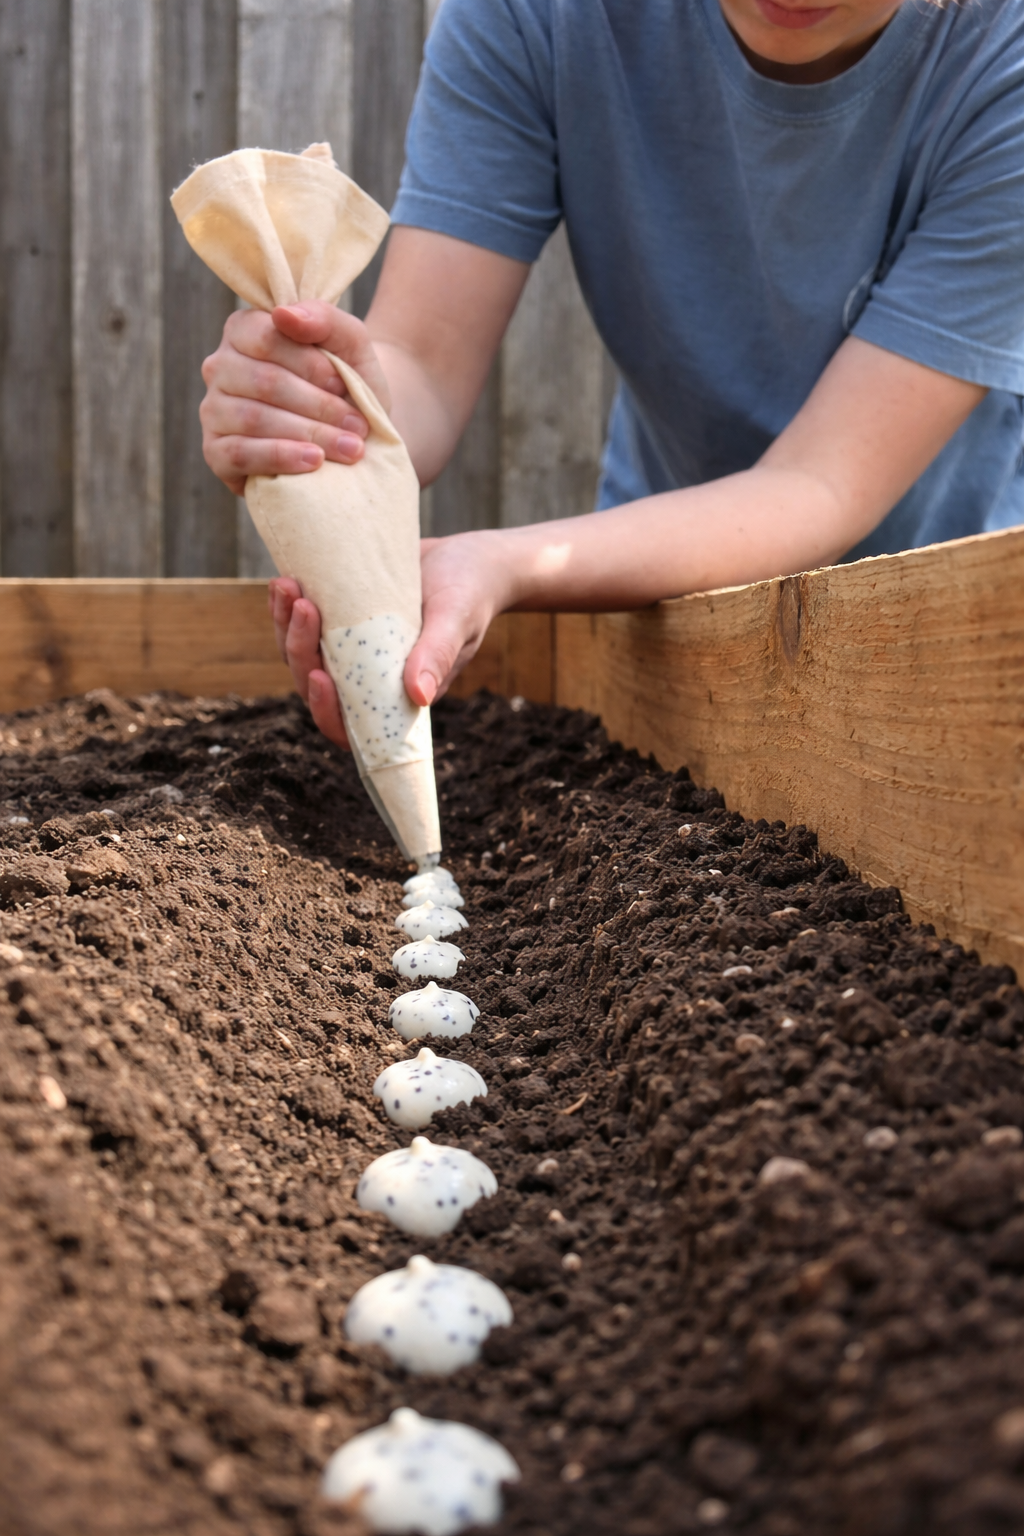
The Easy Garden Hack That Guarantees Straight, Healthy Carrots
Say goodbye to crooked, stunted carrots! Discover the simple seed paste hack that ensures perfect spacing and straight roots. This easy planting technique will transform your carrot harvest. Let me tell you about the gardening trick that turned my carrot patch from a tangle of twisted roots into a picture-perfect harvest. I love growing carrots.…
-
Grow 3X More Sweet Potatoes at Home with This Simple Soil Bag Trick
Want to grow 3 times more sweet potatoes in a small space? This clever soil bag trick is a game-changer. Learn how to plant sweet potatoes in bags for a massive harvest—perfect for small gardens and patios. Let me tell you about the gardening trick that turned my tiny patio into a sweet potato factory.…
-
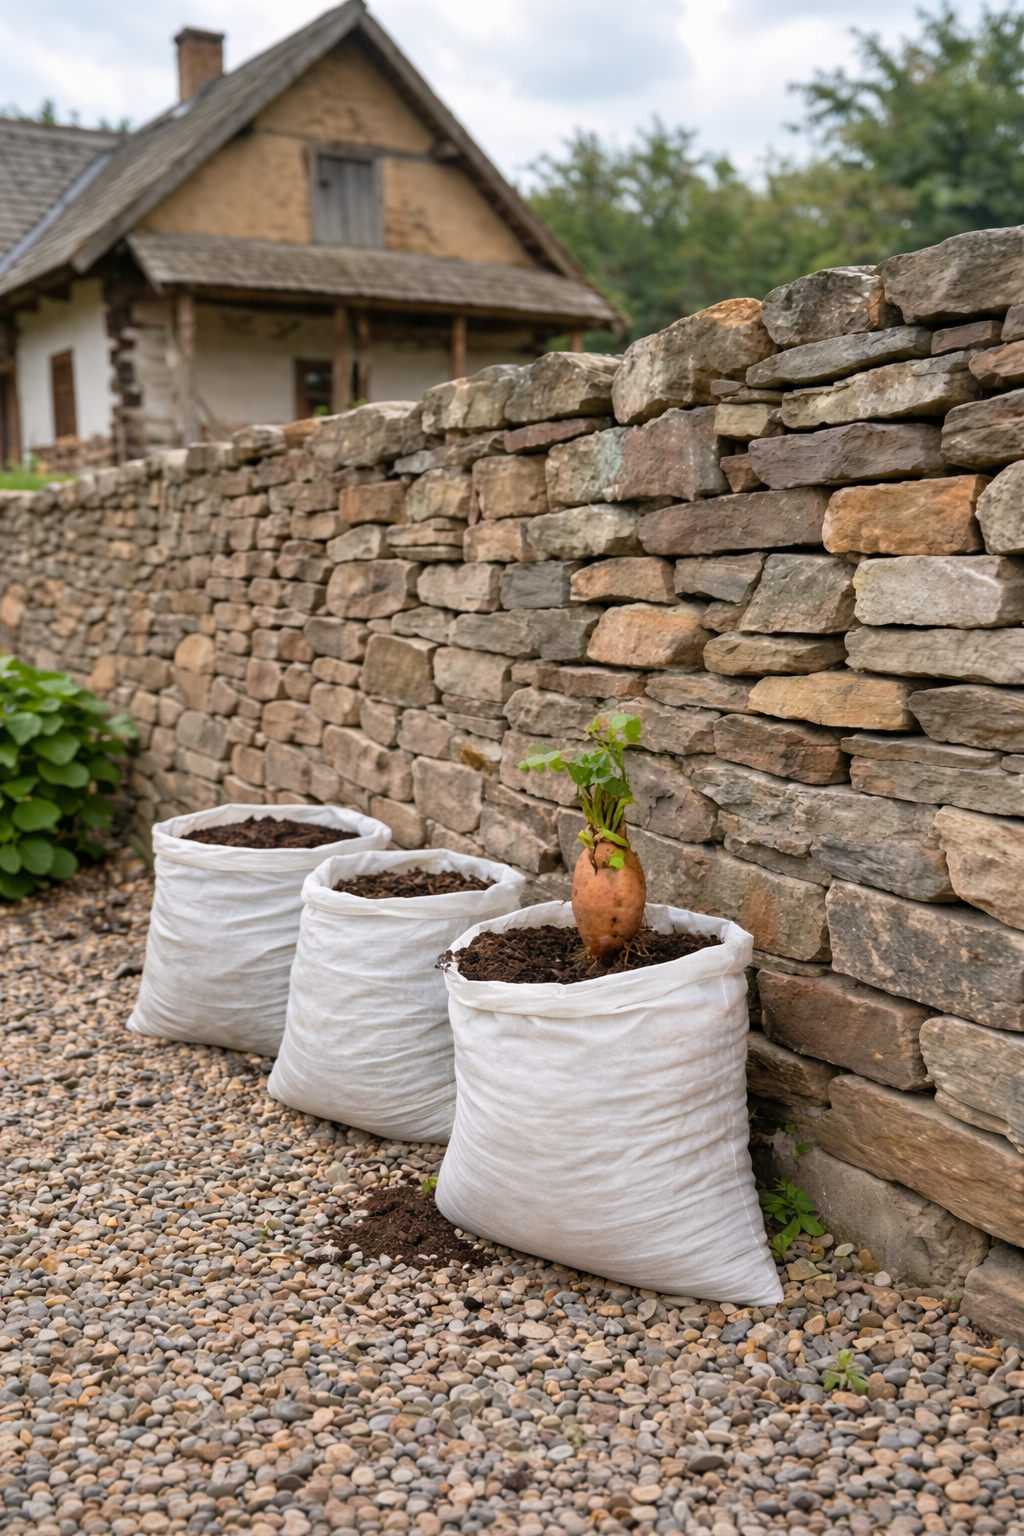
Grow 3X More Sweet Potatoes at Home with This Simple Soil Bag Trick
Want to grow 3 times more sweet potatoes in a small space? This clever soil bag trick is a game-changer. Learn how to plant sweet potatoes in bags for a massive harvest—perfect for small gardens and patios. Let me tell you about the gardening trick that turned my tiny patio into a sweet potato factory.…