If your orchid looks weak — with wrinkled leaves, no new growth, or flowers that faded too fast — your first instinct might be to search for a quick fix. And online, that often means watching someone sprinkle a white powder over the roots and claiming instant miracles.
But here is the truth that experienced growers know: the most effective orchid root treatment is not a mystery powder. It is a simple, proven process that focuses on root health, fresh medium, and gentle aftercare.
No gimmicks. No guesswork. Just a few straightforward steps that actually help your orchid recover, grow stronger, and eventually bloom again.
In this guide, you will learn a simple, safe, step‑by‑step root treatment that works for Phalaenopsis and most other epiphytic orchids. You will also learn what that white powder in videos really is, when it might help, and when to skip it entirely.
Why Orchid Root Health Is Everything
Orchids are not like most houseplants. In nature, many orchids grow attached to trees, with their roots exposed to air and rain. Those roots are designed to absorb moisture and nutrients quickly, then dry out. That is why orchids are usually potted in bark or moss, not soil.
When the roots are healthy, the plant thrives. When the roots rot, dry out completely, or become damaged, the whole plant suffers.
Signs of Unhealthy Orchid Roots
· Mushy, brown, or black roots – Classic root rot from overwatering or old, broken‑down bark.
· Hollow or stringy roots – The outer sheath slides off, leaving a thin thread. These are dead.
· Flat, papery roots – Severe dehydration or old age.
· No active root tips – Healthy roots have bright green or silvery tips that grow over time.
Signs of Healthy Orchid Roots
· Firm and plump – Not squishy or hollow.
· Green when wet – After watering, healthy roots turn bright green.
· Silvery when dry – When the bark dries, roots return to a silvery white color.
· Active green tips – New root growth is a sign of a recovering or thriving orchid.
If your orchid has more bad roots than good, do not panic. Many orchids can be saved with this simple root treatment.
The Simple Orchid Root Treatment: Step by Step
This treatment works best for Phalaenopsis (moth orchids), the most common orchids found in homes and garden centers. It can also be adapted for Dendrobiums, Cattleyas, and other epiphytic orchids.
Step 1 – Take the Orchid Out of the Pot
Gently remove the orchid from its pot. If it is stuck, squeeze the sides of a plastic pot to loosen the bark. For ceramic pots, carefully run a knife around the inside edge.
Shake off the old bark or moss. Do not worry if some pieces cling to the roots — you will remove them in the next steps.
Step 2 – Inspect the Roots
Lay the orchid on a clean surface. Sort through the roots one by one.
Healthy roots are:
· Firm to the touch
· Green when wet (or silvery when dry)
· Plump, not flat
Bad roots are:
· Mushy, soft, or slimy (rot)
· Hollow or stringy (dead)
· Black or dark brown (rot or old age)
· Papery and dry (dehydrated or dead)
If you are unsure, gently squeeze the root. If it feels firm, keep it. If it collapses or feels hollow, cut it.
Step 3 – Trim Damaged Roots
Use clean, sharp scissors or pruning shears. Sterilize them with rubbing alcohol or a flame to prevent spreading disease.
Cut away every rotten, dead, or hollow root. Cut back to healthy tissue. If the root is brown at the tip but firm near the base, you can cut off only the damaged part.
Do not be afraid to remove a lot of dead roots. A orchid with few healthy roots will recover faster than one with rot spreading to the stem.
Step 4 – Let Cuts Dry a Little
After trimming, leave the orchid out of the pot for a few hours (or overnight) on a paper towel. This allows the cut surfaces to callus over. A dry cut is much less likely to rot when you repot.
Do not put the orchid in direct sun while it dries. A shaded, airy spot is perfect.
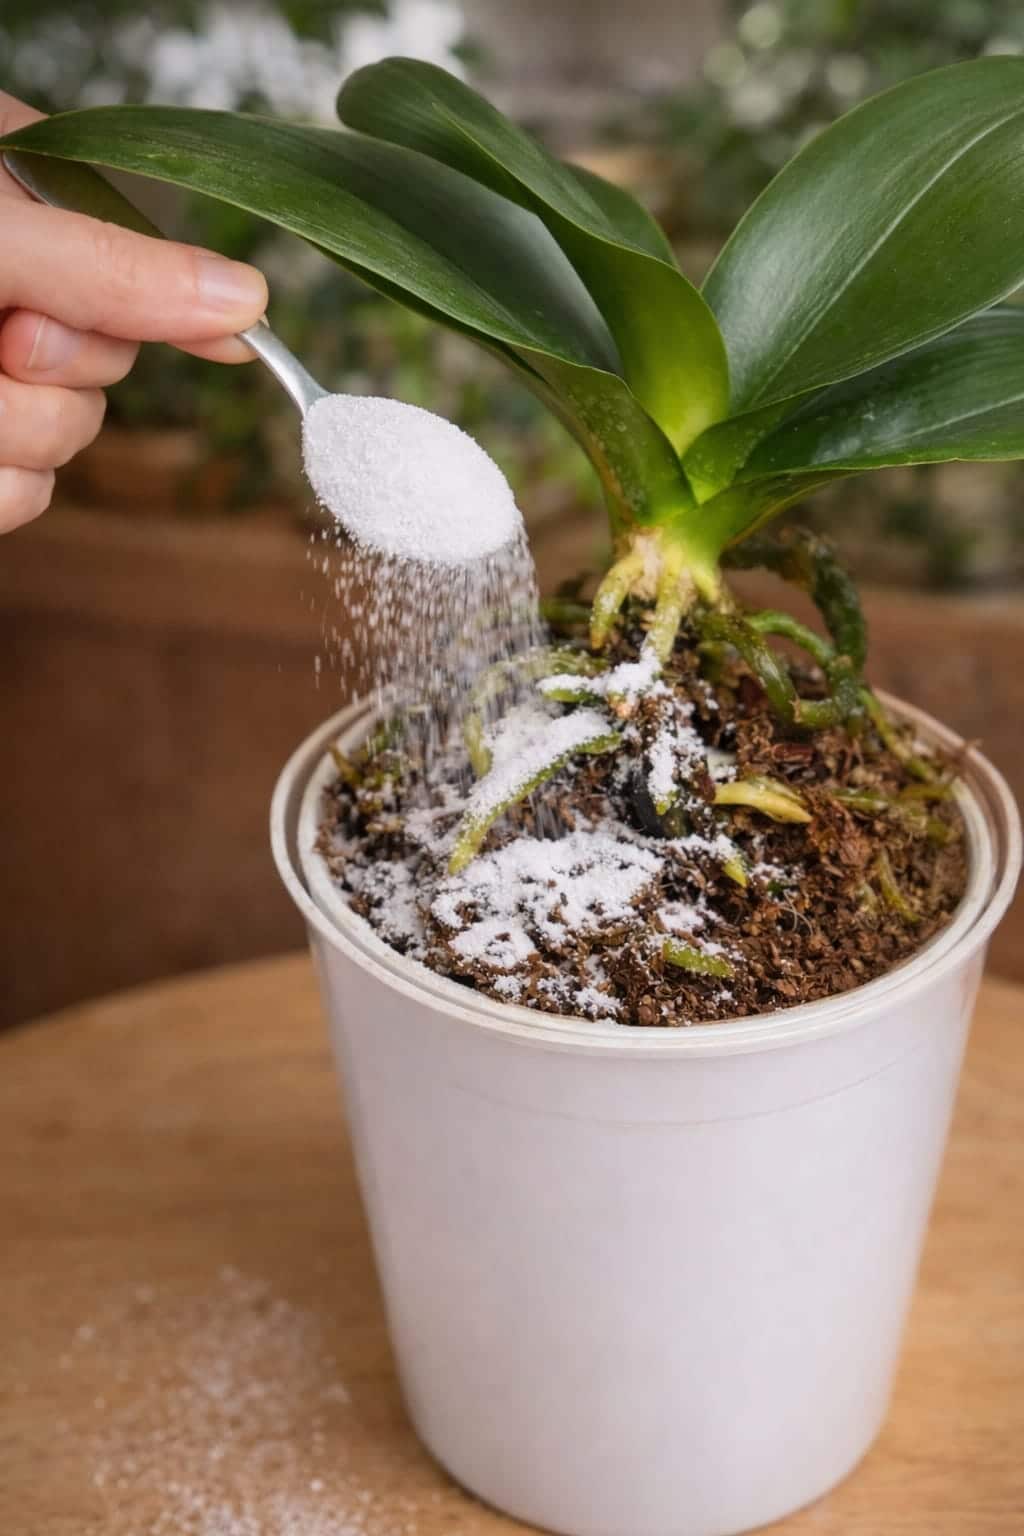
Step 5 – Optional Dry Support (Cinnamon, Used Correctly)
If you want a simple home treatment for the cut areas, use a tiny dusting of cinnamon — but only on the cut ends of roots, not all over healthy roots and never in the crown.
Cinnamon is a natural antifungal. A light dusting on trimmed root ends can help prevent rot. But too much cinnamon can dry out healthy tissue. Use a cotton swab or a small brush to apply a thin layer only where cuts were made.
Do not sprinkle cinnamon over the entire root system. Do not pour it into the crown (the center where leaves meet). And do not use cinnamon as a substitute for good care.
Step 6 – Repot in Fresh Orchid Bark
This step is non‑negotiable. Old bark breaks down over time, becoming compact, acidic, and waterlogged. Even if your orchid looks fine, old bark can hide root rot.
What to use:
· Fresh orchid bark (fir or pine) – medium to coarse grade.
· Or a quality orchid mix that includes bark, perlite, and charcoal.
· Never use regular potting soil. It will suffocate orchid roots.
How to repot:
· Choose a pot with plenty of drainage holes. Clear plastic orchid pots are ideal because you can see the roots.
· The pot should be just large enough to hold the root ball — not oversized.
· Place a layer of bark at the bottom.
· Hold the orchid in the pot, spreading the roots gently.
· Fill in with bark around the roots, tapping the pot to settle it.
· Do not pack the bark tightly. Orchid roots need air pockets.
Step 7 – Water Lightly After Repotting
If you trimmed many roots, wait 3–5 days before watering. This gives cut surfaces time to heal. If you only removed a few dead roots, you can water lightly after repotting.
The right way to water:
· Water thoroughly until water runs from the drainage holes.
· Let all excess water drain away completely.
· Never let the orchid sit in standing water (empty the saucer).
· After that, water only when the bark is nearly dry.
Continue to Page 2
Continue to page 2 for more details about this article and the key points many readers miss on the first page.