

Let’s be honest: is there any aroma more universally comforting than garlic bread baking in the oven? That fragrant, herbal, buttery scent is a promise of pure culinary joy. Now, imagine elevating that classic comfort food into something truly extraordinary—a rustic, artisan loaf with a crackling crust, a soft, holey interior, and a deep, tangy flavor that only natural fermentation can provide.
Welcome to the world of Sourdough No-Knead Garlic Bread.
This isn’t just garlic butter slathered on a baguette. This is garlic and herbs baked into the very fabric of the bread. We’re infusing the dough itself with the essence of roasted garlic and fresh herbs, then creating a crust that shatters beautifully with every bite. And the best part? It’s a no-knead sourdough recipe, which means it requires minimal hands-on effort. The magic of time and your active sourdough starter do all the heavy lifting.
If you’ve been looking for a simple sourdough recipe that yields professional results, or a show-stopping side dish for your next pasta night or dinner party, you’ve found your holy grail. This loaf is a testament to the fact that the most delicious foods are often the simplest. Let’s roll up our sleeves and create a garlic bread that will forever change your standards.
Why This Recipe is a Game-Changer for Home Bakers
Before we dive into the ingredients, let’s talk about what makes this specific recipe so special and foolproof.
· Truly No-Knead & Beginner-Friendly: This method relies on a long, slow fermentation (the autolyse and bulk fermentation) to develop the gluten naturally. There’s no strenuous kneading required, making it the perfect easy sourdough bread for beginners.
· Next-Level Flavor Development: The slow rise allowed by the sourdough starter creates a complex, tangy flavor that commercial yeast simply can’t match. Infusing the dough with garlic and herbs from the start means the flavor is in every single bite, not just on the surface.
· An Incredible, Artisan Texture: The high hydration and no-knead technique encourage the development of an open, airy crumb (the inside of the bread) and a thick, shatteringly crispy crust. This is what defines a great rustic artisan bread.
· Uses Your Sourdough Discard or Active Starter: This recipe is flexible! You can use your peak, active starter for the best rise, or your discard for a more dense, focaccia-like crumb that’s packed with flavor. It’s a fantastic sourdough discard recipe to reduce waste.
· The Ultimate Make-Ahead Bread: The dough is mixed one day and baked the next, fitting perfectly into a busy schedule. The flavor actually improves with the long, slow fermentation in the fridge.
The Science of Simplicity: Why No-Knead Works So Well
You might be wondering, how can you make bread without kneading it? The secret lies in time.
Kneading mechanically develops the gluten network in flour, which gives bread its structure and chew. The no-knead method uses time and water to achieve the same result. When flour and water are left to rest (a process called autolyse), enzymes naturally begin to break down the starches and proteins, making the gluten strands align and form a network on their own. The long, cool fermentation period further strengthens this network while the wild yeast and bacteria in your starter work their magic, creating incredible flavor and gas that gets trapped in the resilient gluten web.
This results in a dough that is strong, elastic, and full of potential—all without a single minute of kneading.
Gathering Your Ingredients: The Foundation of Flavor
The beauty of this recipe is in its simplicity. You only need a handful of quality ingredients.
For the Main Dough:
· 500g Bread Flour: The high protein content (12-13%) is essential for building a strong gluten structure that can support those beautiful air pockets. All-purpose flour can work but will yield a slightly denser crumb.
· 350g Warm Water (70°F/21°C): This creates a hydration level of around 70%, which is ideal for an open crumb. Adjust slightly based on your flour.
· 100g Active Sourdough Starter (or discard): Your starter should be bubbly, active, and at its peak for the best rise. If using discard, expect a denser, but still delicious, result.
· 10g Fine Sea Salt: Crucial for flavor and for regulating yeast activity.
· 1-2 Heads of Roasted Garlic: This is our secret weapon. Roasting garlic transforms its sharp, pungent flavor into something sweet, mellow, and deeply aromatic.
For the Herb Infusion:
· 3-4 tbsp High-Quality Olive Oil
· 2-3 tbsp Fresh Herbs, finely chopped (Rosemary & Thyme are classic): You can use 1 tbsp of dried Italian seasoning if fresh isn’t available.
· 1 tsp Flaky Sea Salt (for topping)
Equipment You’ll Need:
· A digital kitchen scale (non-negotiable for accuracy in baking)
· A large mixing bowl
· A Dutch oven (highly recommended for the perfect crust)
· A bench scraper
· Parchment paper
Step-by-Step Instructions: The Path to Garlicky Perfection
Follow these steps for a flawless loaf. Remember, sourdough is not about speed; it’s about patience.
Step 1: Roast Your Garlic (Do This First)
Preheat your oven to 400°F (200°C). Slice the top off a head of garlic to expose the cloves. Drizzle with olive oil, wrap in foil, and roast for 30-40 minutes until the cloves are soft, golden, and caramelized. Let it cool, then squeeze the soft cloves out of their skins.
Step 2: Autolyse (The Secret to a Great Crumb)
In your large mixing bowl, whisk together the 500g of bread flour and 350g of warm water until no dry bits remain. The dough will be shaggy. Cover the bowl and let it rest for 30-60 minutes. This autolyse period allows the flour to fully hydrate and the gluten chains to begin forming naturally.
Step 3: Mix the Final Dough
After the autolyse, add the 100g of active sourdough starter, the mashed roasted garlic cloves, and 10g of salt to the bowl. Use wet hands to pinch and fold the ingredients into the dough until everything is fully incorporated. It will be sticky and messy—that’s normal!
Step 4: Bulk Fermentation & The Coil Folds
This is the main rising period. Cover the bowl and let the dough rest in a warm spot (75-78°F / 24-26°C is ideal) for 3-5 hours.
· During this time, you will perform 4-6 “coil folds.” Every 30 minutes for the first 2-3 hours, wet your hand, reach under one side of the dough, gently stretch it up, and fold it over the center. Repeat this on all four “sides” of the dough. This gently builds strength without kneading.
· You’ll know bulk fermentation is complete when the dough has increased by about 30-50%, is full of air pockets, and has a smooth, jiggly surface.
Step 5: Shape and Cold Proof
· Lightly flour your work surface and turn the dough out. Gently shape it into a round (boule) or an oval (batard) by folding the edges into the center.
· Place the shaped dough seam-side up into a floured banneton or a bowl lined with a floured tea towel.
· Cover it and place it in the refrigerator for a long cold proof for 12-16 hours (or up to 48 hours). This slow fermentation is where the signature sourdough tang develops.
Step 6: Bake to Perfection
- Preheat: Place your Dutch oven with the lid on into your oven and preheat to 475°F (245°C) for at least 45 minutes.
- Score: Carefully remove the hot Dutch oven. Turn your cold proofed dough out onto a piece of parchment paper. Score the top with a sharp lame or razor blade in a single, confident slash. This allows the steam to escape and the bread to expand beautifully.
- Bake Covered: Lower the dough (using the parchment as a sling) into the hot Dutch oven, put the lid back on, and bake for 25 minutes. The trapped steam creates an incredible oven spring and that crispy crust.
- Bake Uncovered: Remove the lid, reduce the oven temperature to 450°F (230°C), and bake for another 20-25 minutes until the crust is a deep, golden brown.
- The Herb Infusion: While the bread is still hot, brush the top generously with the olive oil and fresh herb mixture. Sprinkle with flaky sea salt.
Step 7: The Crucial Cool Down
Resist every urge to cut into the bread immediately! Transfer it to a wire rack and let it cool completely for at least 2-3 hours. Slicing it warm will result in a gummy, sticky crumb as the internal structure is still setting.
Expert Tips & Troubleshooting for the Perfect Loaf
· The Windowpane Test: To check if your gluten is developed enough after bulk fermentation, take a small piece of dough and gently stretch it. If you can stretch it thin enough to see light through it without it tearing (a “windowpane”), it’s ready.
· My Dough Didn’t Rise Much:
· Starter Issue: Your starter might not be active enough. Ensure it doubles in size 4-8 hours after a feeding.
· Temperature: Your kitchen might be too cold. Bulk fermentation can take much longer. Look for the 30-50% increase in volume, not just the clock.
· My Bread is Too Dense:
· You may have over-proofed or under-proofed the dough.
· You didn’t develop enough gluten through the coil folds.
· You used sourdough discard, which lacks the leavening power of a peak starter.
· Maximizing Flavor: The longer the cold proof (up to 48 hours), the more pronounced the sour, tangy flavor will be.
· Creating a Custom Blend: Feel free to add ½ cup of grated parmesan cheese to the dough along with the salt for a cheesy twist.
Serving Suggestions: Beyond the Pasta Bowl
While this bread is a natural companion to a big plate of spaghetti, its uses are endless.
· The Ultimate Soup Bowl: Serve a thick slice alongside a hearty soup like tomato basil or a creamy mushroom.
· Gourmet Appetizer: Slice and serve with a board of high-quality olive oil and balsamic vinegar for dipping.
· Sandwich Bread: Once cool, it makes incredible, flavorful sandwiches. Try it with roasted vegetables, mozzarella, and pesto.
· Breakfast Toast: The roasted garlic and herbs make for a sublime base for avocado toast or a fried egg.
Storage & Reheating Guide
· Storage: Store the completely cooled loaf in a paper bag at room temperature for 2-3 days. Do not store it in a plastic bag, as it will make the crust soft and chewy.
· Freezing: For longer storage, slice the cooled loaf, wrap it tightly in plastic wrap and foil, and freeze for up to 3 months.
· Reheating: To restore the crust’s crispness, reheat slices directly on the oven rack at 350°F (175°C) for 5-10 minutes. For a frozen slice, you can pop it straight into the toaster.
Frequently Asked Questions (FAQ)
Q: Can I make this without a Dutch oven?
A:Yes, but the results won’t be identical. Place a pan of water on the bottom rack of your oven to create steam and bake the loaf on a preheated pizza stone or baking sheet. The Dutch oven is the best tool for a home baker to replicate a professional steam-injected oven.
Q: My dough is too sticky to handle. What do I do?
A:This is a high-hydration dough, and stickiness is normal. The key is to use wet hands or a wet bench scraper when handling it. A little more flour on your work surface during shaping is okay, but don’t incorporate too much, or you’ll change the dough’s consistency.
Q: Can I use garlic powder instead of roasted garlic?
A:While roasted garlic is highly recommended for its mellow, sweet flavor, you can use 1-2 teaspoons of garlic powder mixed into the flour during the autolyse. The flavor will be more sharp and direct.
Q: How do I know when my bread is fully baked?
A:The deep golden color is a good indicator. For the most accurate test, use an instant-read thermometer. The internal temperature should read between 205-210°F (96-99°C).
Q: Is this a good recipe for a sourdough beginner?
A:Absolutely! It teaches the fundamental processes of sourdough baking—autolyse, bulk fermentation, shaping, and cold proofing—in a very forgiving, no-knead format. It’s one of the best beginner sourdough recipes to build confidence.
There you have it—the complete guide to transforming simple ingredients into a breathtaking Sourdough No-Knead Garlic Bread. This loaf is more than just food; it’s a experience, a testament to your patience, and a gift of incredible flavor to share with those you love. So, feed your starter, preheat your oven, and get ready to bake the most memorable garlic bread of your life.
We are thrilled to see your results! What herb variations did you try? Did you add cheese? Share your baking triumphs and photos in the comments below!
More Recipes You Might Like
-
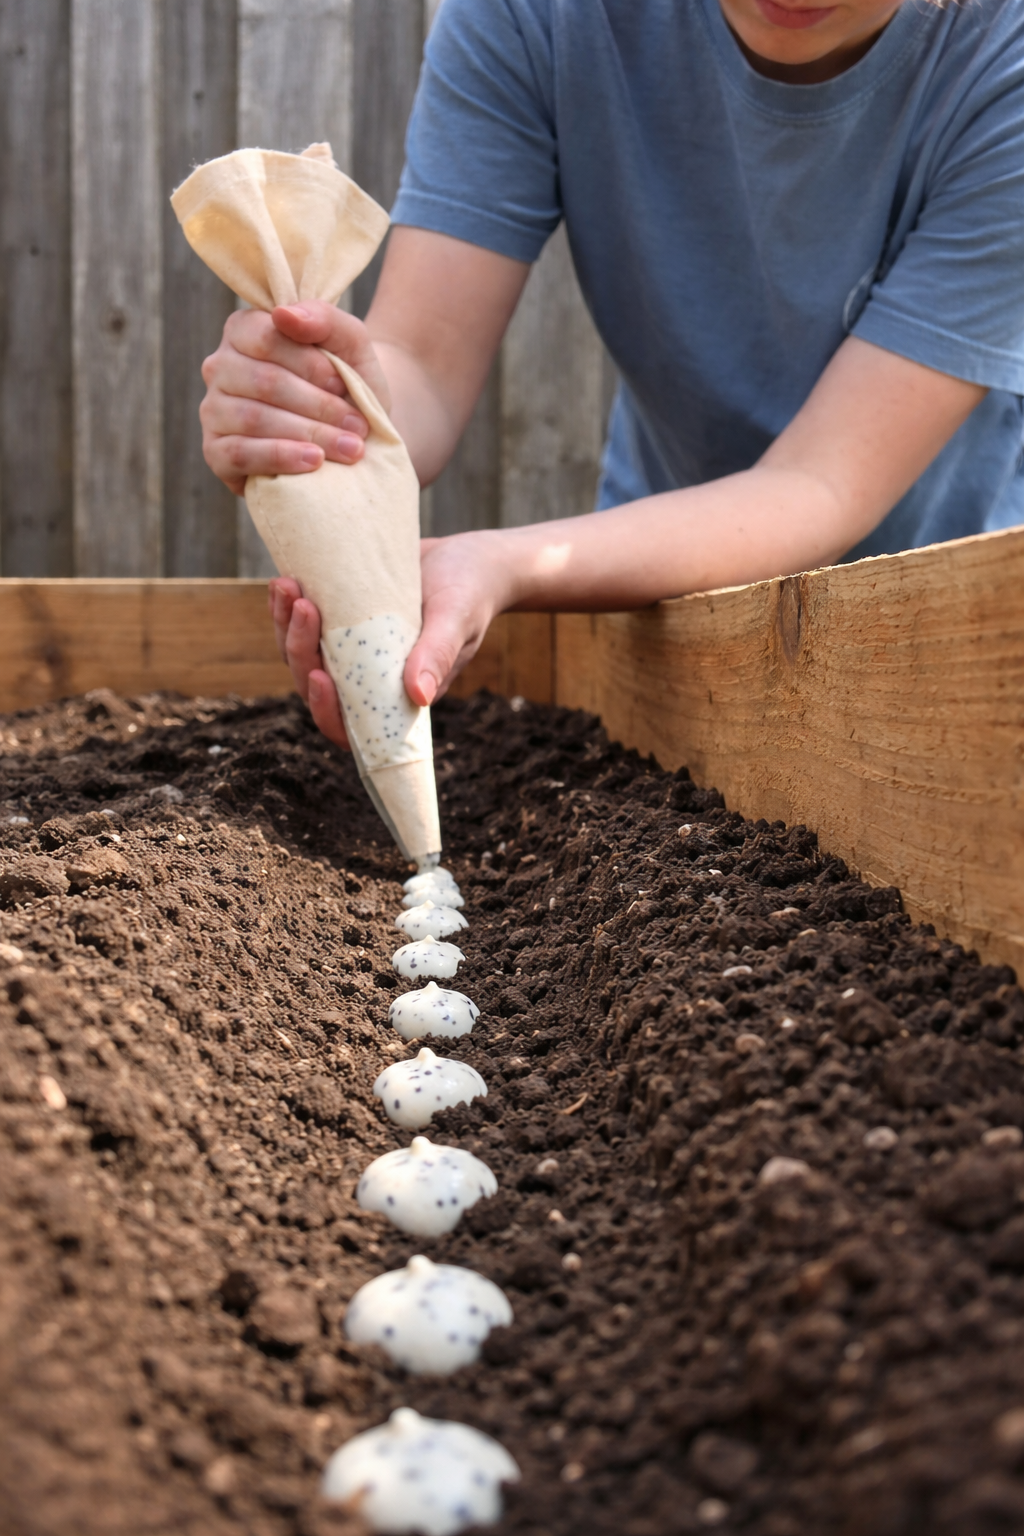
The Easy Garden Hack That Guarantees Straight, Healthy Carrots
Say goodbye to crooked, stunted carrots! Discover the simple seed paste hack that ensures perfect spacing and straight roots. This easy planting technique will transform your carrot harvest. Let me tell you about the gardening trick that turned my carrot patch from a tangle of twisted roots into a picture-perfect harvest. I love growing carrots.…
-
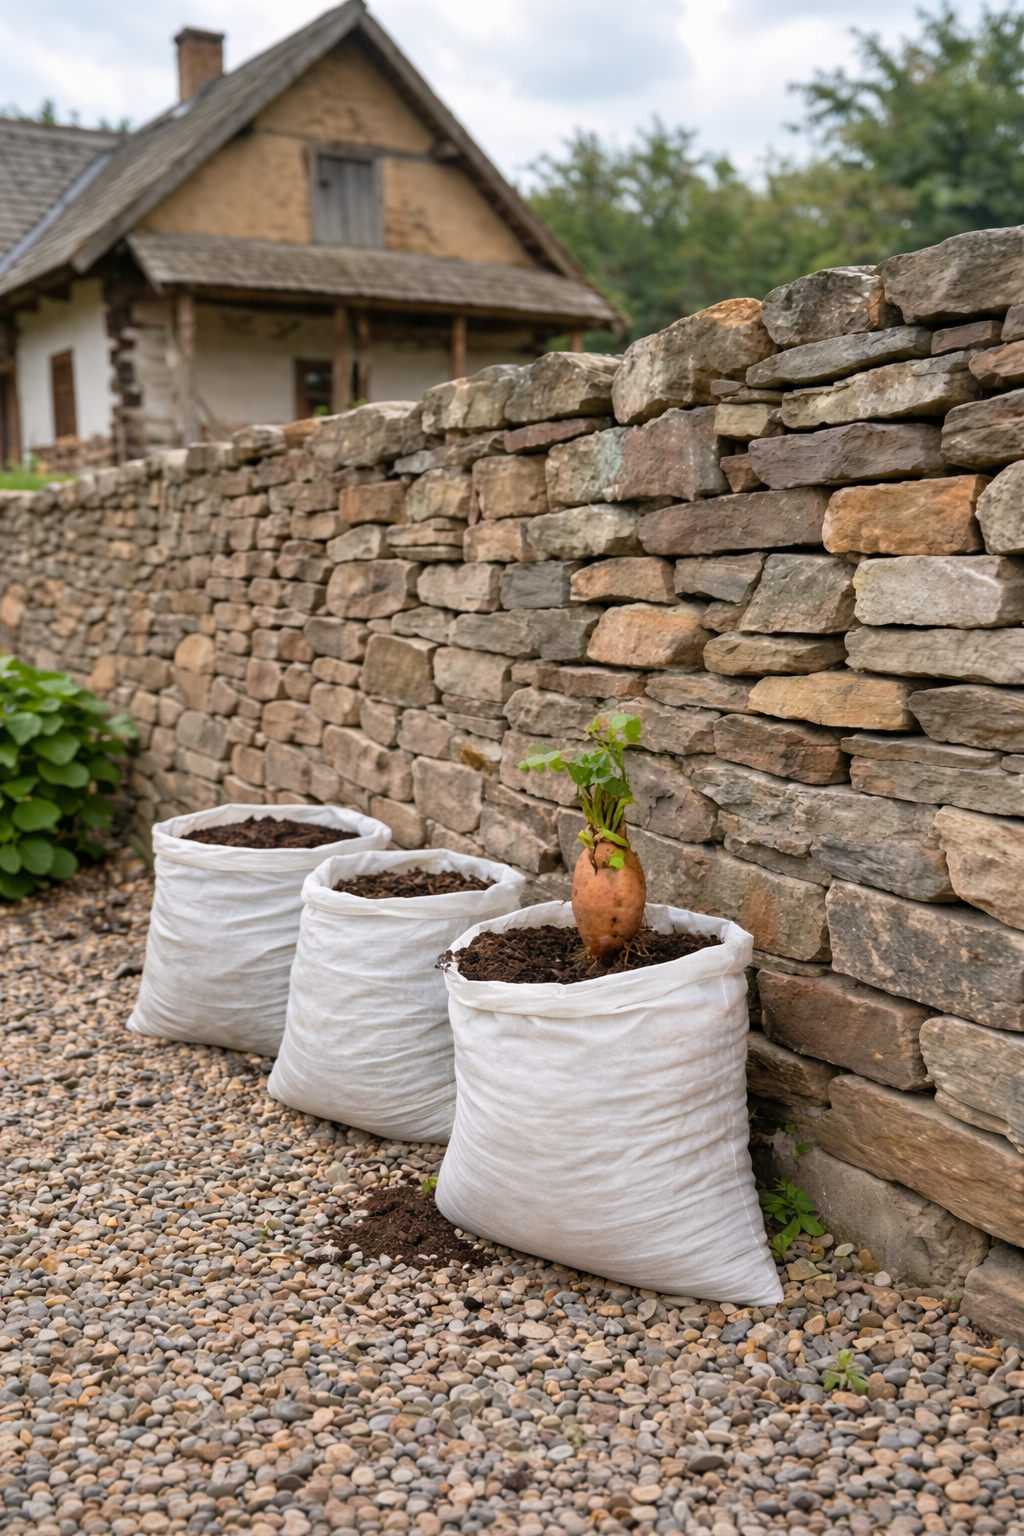
Grow 3X More Sweet Potatoes at Home with This Simple Soil Bag Trick
Want to grow 3 times more sweet potatoes in a small space? This clever soil bag trick is a game-changer. Learn how to plant sweet potatoes in bags for a massive harvest—perfect for small gardens and patios. Let me tell you about the gardening trick that turned my tiny patio into a sweet potato factory.…
-
Grow 3X More Sweet Potatoes at Home with This Simple Soil Bag Trick
Want to grow 3 times more sweet potatoes in a small space? This clever soil bag trick is a game-changer. Learn how to plant sweet potatoes in bags for a massive harvest—perfect for small gardens and patios. Let me tell you about the gardening trick that turned my tiny patio into a sweet potato factory.…