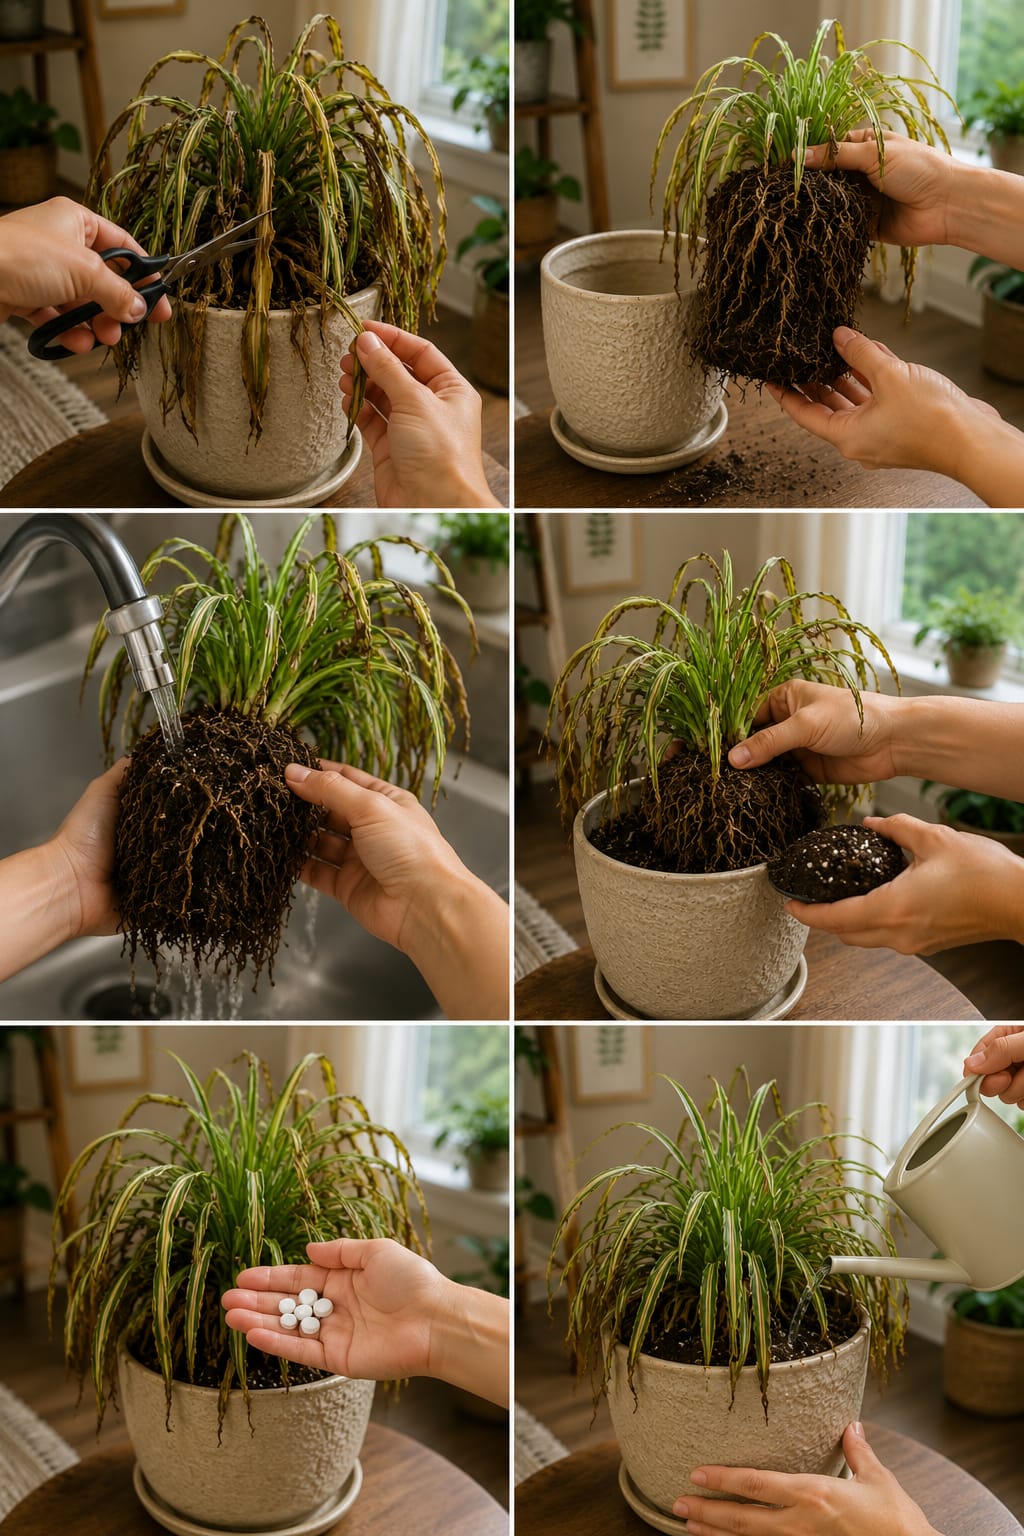
Spider plants are usually known as easy, forgiving, and fast-growing houseplants, but even this strong plant can begin to look tired when its roots, soil, water, and light are out of balance. The image shows a struggling spider plant with drooping leaves, brown tips, dry edges, and weak growth being rescued step by step. The plant is trimmed, removed from its pot, rinsed at the roots, placed back into fresh soil, supported with gentle care, and watered again. This is a common situation for spider plants that have been overwatered, underwatered, left in old compact soil, exposed to too much sun, or kept in a pot where the roots can no longer breathe properly.
A spider plant can look dramatic when it is stressed. The long striped leaves may bend downward, turn brown at the tips, become yellow along the edges, or dry into crispy ribbons. Some leaves may collapse while the center still looks alive. This can make the plant look almost dead, but many spider plants can recover if the crown and roots are still healthy. The key is to avoid panic. Pouring random liquids, adding strong fertilizer, or watering every day usually makes things worse. A tired spider plant needs careful cleaning, root inspection, fresh airy soil, correct watering, and a bright but gentle location.
The rescue process in the image is useful because it focuses on the foundation of the plant: the roots. When spider plants decline, the problem is often below the soil. Old potting mix can become compact and stay wet too long. Roots can circle tightly around the pot and stop absorbing water evenly. Minerals and fertilizer salts can build up. Water may run around the root ball instead of soaking it. In other cases, the soil may remain soggy and oxygen-starved, causing root rot. A spider plant may also suffer when it is kept too dry for too long, especially if it is near a sunny window or heater.
Understanding Why Spider Plants Decline
Spider plants, also called Chlorophytum comosum, grow from a central crown and produce long narrow leaves that arch outward. Their roots are thick, fleshy, and able to store moisture. This root system makes the plant tolerant of short dry periods, but it also means the roots need air. If the soil stays wet and heavy, the roots can suffocate. If the soil becomes too dry and hard, the roots may shrink and stop taking up water properly. Both extremes can lead to drooping leaves and brown tips.
A struggling spider plant can have several causes at the same time. It may be root-bound, overwatered, underfed, exposed to hard tap water, or growing in soil that has broken down. A plant near a window may receive too much direct sun, while a plant far from light may become weak and pale. Brown tips can also come from fluoride or mineral buildup in water, which spider plants are known to dislike. This is why a rescue routine should not focus on only one symptom. It should look at the whole plant.
The first visual sign is often brown leaf tips. Many spider plant owners ignore the first brown tips because the plant still looks alive. Later, the tips spread, leaves bend, the plant becomes dull, and the center may stop producing strong fresh growth. At this stage, the plant needs more than cosmetic trimming. It needs a full care reset.
Trimming Damaged Leaves
The first panel in the image shows damaged leaves being cut away with scissors. This is a good first step when a spider plant has many dead, brown, or crispy leaves. Dead leaves cannot turn green again. Keeping them on the plant does not help recovery. Removing them improves airflow, makes the plant easier to inspect, and lets the remaining healthy growth receive more light.
Use clean, sharp scissors. Cut fully dead leaves near the base without damaging the crown. If only the tip is brown, you can trim the tip following the natural shape of the leaf. This makes the plant look neater, but remember that trimming only improves appearance. It does not solve the cause of browning. If the plant continues to receive poor water, poor light, or bad soil, new tips will brown again.
Do not remove every leaf unless it is truly dead. A stressed spider plant still needs green leaves to make energy. Keep leaves that have green tissue, even if the tips are damaged. The green parts can still help the plant recover. A careful trim is better than a harsh haircut.
Removing the Plant From the Pot
The second panel shows the spider plant being lifted from the pot with its root ball exposed. This step is important when the plant looks severely stressed. The roots tell the truth about what is happening. A plant can look thirsty above the soil while the roots are actually rotting in wet soil. It can also look overwatered while the root ball is so dry and compact that water never reaches the center.
When removing the plant, support the base gently and slide the root ball out. If the plant is stuck, squeeze the pot slightly if it is plastic, or loosen the edges with a tool if the pot is firm. Avoid pulling hard on the leaves because this can tear the crown. Once the plant is out, look closely at the roots and soil.
Healthy spider plant roots are usually light-colored, firm, and thick. They may be white, cream, tan, or pale brown. They often look like small storage tubers. Rotten roots are dark, soft, mushy, hollow, or smelly. Dry damaged roots may be brittle and shriveled. If the root ball is packed tightly and circling the pot, the plant may be root-bound and struggling to absorb water evenly.
Rinsing and Checking the Roots
The third panel shows the root ball being rinsed under water. This can help remove old compact soil and reveal the condition of the roots. Rinsing is useful when the soil is sour, salty, or old. It is also helpful when you need to separate healthy roots from damaged ones.
Use lukewarm water, not hot or icy water. Rinse gently. Do not blast the roots with strong pressure. The goal is to loosen old soil, not tear the root system apart. If some soil remains attached, that is fine. You do not need to make the roots perfectly clean unless the old soil is rotten or contaminated.
After rinsing, trim any rotten roots with clean scissors. Remove roots that are black, slimy, hollow, or foul-smelling. Keep firm roots. If many roots are damaged, the plant may need extra recovery time. Do not feed it immediately after root trimming. Fresh soil and careful watering are enough at first.
Choosing Fresh Soil
The fourth panel shows fresh potting mix being added around the root ball. Fresh soil is one of the best ways to restart a struggling spider plant. The new mix should be light, airy, and able to drain well while still holding some moisture. Spider plants do not want cactus-dry soil, but they also do not want heavy mud.
A good spider plant mix can be made with quality indoor potting soil improved with perlite. Perlite helps air move through the soil and prevents the mix from staying too wet. A little orchid bark can also improve structure. The mix should feel loose in your hand. It should not clump into a heavy wet mass.
Do not use dense garden soil in an indoor pot. Garden soil can compact, hold too much water, and bring pests indoors. Do not use a potting mix that smells sour or moldy. Fresh soil should smell earthy and clean. If you are repotting because of root rot, it is better not to reuse the old soil.
Repotting the Spider Plant
When placing the spider plant back into the pot, keep the crown at the same level it was growing before. Do not bury the center of the plant too deeply. The crown is where the leaves emerge, and if it stays wet under soil, it can rot. The roots should be covered, but the crown should remain slightly above the soil surface.
Fill soil around the root ball and press gently. The goal is to stabilize the plant, not compact the potting mix. If you press too hard, you remove air pockets that roots need. A spider plant should sit firmly but still have loose soil around the roots.
The pot should have drainage holes. This is essential. A decorative pot without drainage may look beautiful, but it can trap water and cause root problems. If you want to use a decorative outer pot, keep the spider plant in a draining inner pot and remove it for watering. Let it drain before placing it back.
About the White Tablets in the Image
The image shows a hand holding small white tablets near the plant. These could represent fertilizer tablets, slow-release plant food, water treatment tablets, or a visual “plant booster.” This part should be treated with caution. Spider plants do not need unknown tablets to recover. In fact, adding strong fertilizer or mystery tablets to a weak plant can burn damaged roots and slow recovery.
If the tablets are slow-release fertilizer, they should only be used according to the product instructions and only when the plant is healthy enough to use nutrients. A freshly rescued spider plant with trimmed roots should not be pushed with strong feeding. It needs time to settle in fresh soil. Fertilizer is useful for active growth, not for emergency root repair.
If you do not know exactly what the tablets are, do not add them. Plain water, fresh soil, and bright indirect light are safer. After the plant begins producing healthy new leaves, you can use a diluted balanced houseplant fertilizer during the growing season. Gentle feeding is better than a strong rescue dose.
Watering After Repotting
The final panel shows the plant being watered. After repotting, watering should be careful. If the roots were healthy and the soil was dry, water lightly to settle the soil. If many roots were trimmed or the plant had rot, wait a short time before watering or water very sparingly. Damaged roots need oxygen and time to heal.
When watering a spider plant, pour water evenly over the soil until it begins to drain from the bottom. Then empty the saucer. Never let the pot sit in standing water. After that, wait until the top part of the soil begins to dry before watering again. Spider plants like more moisture than succulents, but they still need air around their roots.
In recovery, it is better to keep the soil slightly moist rather than soaked. A plant with fewer healthy roots cannot absorb as much water as a strong plant. Too much water after repotting is one of the easiest ways to cause a second decline.
Finding the Right Light
After rescue, place the spider plant in bright indirect light. Light is important because the plant needs energy to grow new roots and leaves. A dark corner will slow recovery. Harsh direct sun can stress the damaged leaves and dry the plant too quickly. The best location is bright but gentle.
An east-facing window is often ideal because it gives soft morning light. A bright north-facing window can also work. If the plant sits near a south or west-facing window, keep it back from direct afternoon sun or use a sheer curtain. If the leaves look bleached, scorched, or crispy, the light may be too strong. If new growth is pale and stretched, the plant may need more brightness.
Do not move the plant repeatedly during recovery. Choose a good location and let it adjust. Plants recover better when conditions stay stable.
Brown Tips and Crispy Leaves
Brown tips are very common on spider plants. They can come from hard water, fluoride sensitivity, fertilizer buildup, dry air, underwatering, inconsistent watering, or old leaf age. After a rescue, old brown tips will not heal. The important thing is whether new leaves grow cleaner.
If your tap water is very mineral-heavy, consider using filtered water, rainwater, or water left out overnight. This may reduce tip burn. Avoid overfertilizing, because fertilizer salts also cause brown tips. If you see white crust on the soil or pot, mineral buildup may be present. Fresh soil and gentle watering can help reset the plant.
Trim brown tips only for appearance. Do not cut into healthy green tissue more than necessary. The plant still needs its leaves.
Continue to Page 2
Continue to page 2 for more details about this article and the key points many readers miss on the first page.