Spider plants are some of the easiest and most rewarding houseplants to grow. They are cheerful, forgiving, fast-growing, and generous. A healthy spider plant does not just sit quietly in a pot. It sends out long arching stems, produces baby plants, fills hanging baskets, and gives you endless chances to grow more plants for free.
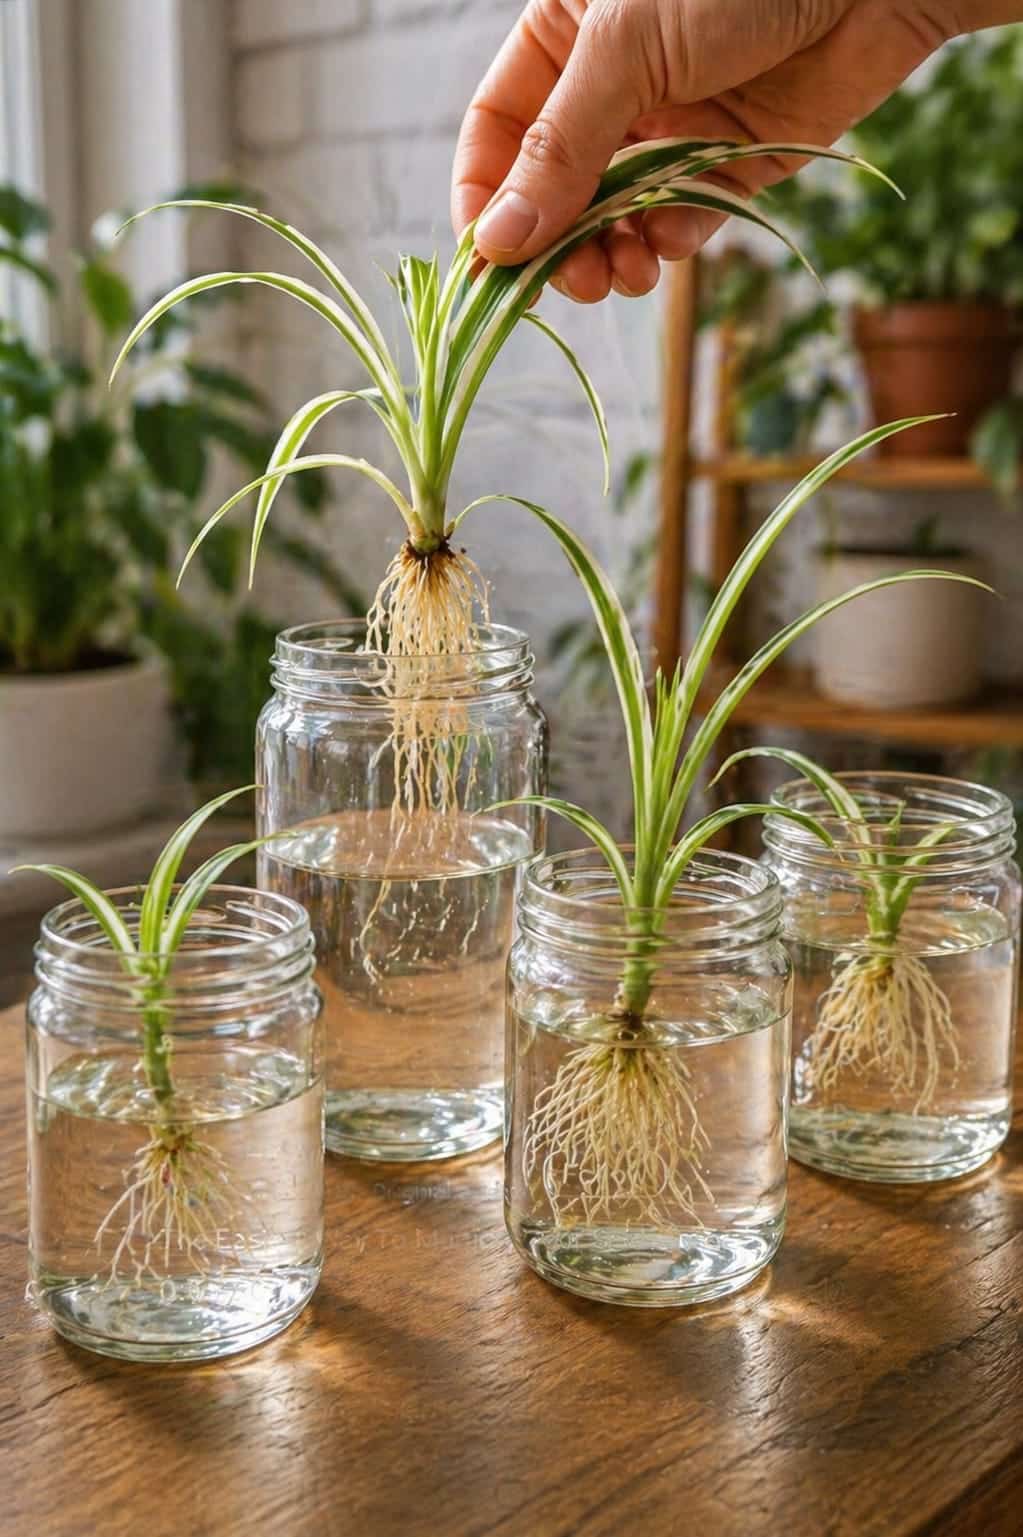
If you have ever looked at a mature spider plant covered in little plantlets and wondered what to do with them, this water propagation trick is the answer. In the image, several spider plant babies are sitting in clear glass jars filled with water. Their white roots are growing down into the jars, while their green striped leaves reach upward. It is simple, beautiful, and surprisingly satisfying to watch.
This is one of the easiest ways to multiply spider plants. You do not need expensive tools. You do not need special fertilizer. You do not need a greenhouse. You only need healthy spider plant babies, clean jars, fresh water, and a bright spot with indirect light.
Spider plant water propagation works because the baby plants, also called spiderettes or plantlets, are already designed to grow into new plants. They form naturally on long runners from the mother plant. Once they are large enough, they can root in water or soil and become independent plants. That means every mature spider plant can become a little plant nursery.
In this complete guide, you will learn exactly how to multiply spider plants in water, when to cut the babies, which plantlets root fastest, what kind of water to use, how often to change the water, when to move them into soil, and how to avoid common mistakes. By the end, you will be able to turn one spider plant into many healthy new plants with very little effort.
What Is Spider Plant Water Propagation?
Spider plant water propagation is the process of growing roots on spider plant babies by placing them in water. Instead of planting the baby directly into soil, you place the base of the baby plant in a jar of clean water and wait for roots to grow. Once the roots are long and strong enough, you move the baby plant into soil.
This method is popular because it is easy and visual. You can see the roots developing through the clear glass. Every few days, the roots become longer, thicker, and more tangled. It feels exciting because you can watch the plant growing in real time.
Spider plants are especially good for this method because their babies often begin forming tiny root bumps before they are even removed from the mother plant. These little bumps quickly turn into roots once they touch water.
Water propagation is also a great method for beginners. If you are nervous about cutting plant babies or planting them too soon, water gives you a simple middle step. You can wait until the roots are clearly visible before moving the plant into soil.
The best part is that spider plants usually root quickly. In good conditions, you may see root growth within a few days to two weeks. Some plantlets already have small roots and will take off almost immediately.
Why Spider Plants Are So Easy to Multiply
Spider plants are naturally built to reproduce. A mature spider plant sends out long, thin stems called runners or stolons. Along these runners, small white flowers may appear. After flowering, baby spider plants begin to form. These babies look like miniature versions of the mother plant, with tiny striped leaves arranged in a small rosette.
In nature, these babies would eventually touch the ground and root where they land. Indoors, they hang in the air until you decide what to do with them. You can leave them attached for a fuller hanging look, or you can remove them and grow new plants.
This is why multiplying spider plants is easier than propagating many other houseplants. You do not have to cut a stem section and hope it grows. You are working with a baby plant that already has the structure it needs to survive.
A single mature spider plant can produce many babies at once. If the plant is happy, you may get enough plantlets to fill jars, small pots, shelves, and even gift bags for friends. This makes spider plants one of the best houseplants for people who enjoy sharing plants.
The more you propagate them, the more you realize that spider plants are almost impossible not to multiply.
When Is the Best Time to Propagate Spider Plants?
The best time to propagate spider plants is during spring and summer, when the plant is actively growing. Warm temperatures, longer days, and stronger light help the babies root faster. However, spider plants are tough enough that you can often propagate them indoors at almost any time of year if your home is warm and bright.
If you propagate in winter, the process may be slower. The babies may still root, but they may take longer to grow strong enough for soil. Low light and cool temperatures can slow root development.
The ideal time to remove a spider plant baby is when it has a few small leaves and a visible base. Some babies may already show tiny white or beige root bumps. These are perfect for water propagation.
A baby that is too tiny may struggle. A baby that is larger and more developed will root faster. If you are not sure whether a plantlet is ready, wait until it looks like a mini spider plant with several leaves.
You can also root spider plant babies while they are still attached to the mother plant. This method gives the baby extra support while it forms roots. But the water jar method usually involves cutting the baby first and placing it in water.
What You Need for the Water Jar Method
You do not need many supplies to propagate spider plants in water. This is part of what makes the method so appealing.
- Healthy spider plant babies
- Clean scissors or pruning shears
- Small glass jars, cups, or bottles
- Room-temperature water
- A bright spot with indirect light
- Small pots for planting later
- Light, well-draining potting mix
Clear glass jars are especially nice because they let you watch the roots grow. Mason jars, jam jars, small drinking glasses, spice jars, and recycled glass containers can all work. The jar does not need to be fancy. It only needs to hold enough water to cover the base of the baby plant without submerging all the leaves.
Clean tools are important. A clean cut reduces the chance of disease or rotting. Wipe scissors with rubbing alcohol or wash them with hot soapy water before cutting.
Use room-temperature water. Very cold water can shock the plant, while hot water can damage the tissue. Plain tap water often works, but if your tap water is heavily treated or very hard, filtered water or rainwater may be better.
How to Choose the Best Spider Plant Babies
Not every baby plant is equally ready for propagation. The best spider plant babies are medium-sized, healthy, and firm. They should have several leaves and a small central base where roots can grow.
Look for plantlets with bright green and white striped leaves. Avoid babies that are brown, mushy, dried out, or damaged. A weak baby may still root, but it will take longer and may fail more easily.
If you see tiny root bumps at the base of the baby, choose that one first. These bumps are a sign that the plantlet is ready to root. Once placed in water, those bumps can quickly turn into long white roots.
Do not choose babies that are too young. Very tiny plantlets may not have enough stored energy to root well after cutting. Let them grow on the runner a little longer.
Also avoid taking all babies from a stressed mother plant. If the mother plant is yellowing, drooping, or struggling, improve its care first. Healthy mother plants produce healthier babies.
Step-by-Step: How to Propagate Spider Plants in Water
The water method is simple. Follow these steps carefully, and you can have rooted spider plant babies in a few weeks.
Step 1: Pick a Healthy Baby Plant
Choose a spider plant baby with several leaves and a visible base. If it already has tiny root bumps, even better.
Step 2: Cut the Baby From the Runner
Use clean scissors to cut the plantlet from the long stem. Cut close to the baby, but avoid damaging the central base. You can remove extra runner stem if it is still attached.
Step 3: Prepare a Clean Jar
Wash the jar with warm soapy water and rinse it well. A clean jar helps prevent bacteria and algae from building up too quickly.
Step 4: Add Water
Fill the jar with enough room-temperature water to cover the root base of the plantlet. The leaves should stay above the water. Only the bottom part of the plant should touch the water.
Step 5: Place the Baby in the Jar
Set the plantlet into the jar so the base is submerged. If the plant falls too deep, use the jar rim to support the leaves. You can also use a small piece of paper, plastic wrap with a hole, or a narrow-neck bottle to hold the plant in place.
Step 6: Put the Jar in Bright Indirect Light
Place the jar near a bright window, but keep it out of harsh direct sun. Too much direct sun can heat the water and stress the baby plant.
Step 7: Change the Water Regularly
Change the water every few days or at least once a week. Fresh water keeps the roots oxygenated and prevents unpleasant smells.
Step 8: Wait for Roots
Watch the roots grow. Once the roots are about 1 to 2 inches long, the baby is ready to move into soil.
How Long Does It Take Spider Plant Babies to Root in Water?
Spider plant babies can root quickly in water. Some show visible roots within a few days. Others take one to two weeks. In cooler conditions or lower light, it may take three weeks or more.
The speed depends on the size of the plantlet, the temperature, the light, and whether it already had root bumps. A mature baby with visible root points will usually root faster than a tiny fresh plantlet.
Do not worry if nothing happens immediately. As long as the leaves stay green and the base does not turn mushy, the plant is likely still working on roots.
Roots that grow in water are usually white or cream-colored. They may look delicate at first. Over time, they become longer and more branched. The jar may begin to fill with fine roots, just like in the image.
Once roots are long enough, do not wait too long before planting. A spider plant can live in water for a while, but it grows better long-term in soil.
How Much Water Should Be in the Jar?
The water should cover the base of the spider plant baby but not drown the leaves. The crown, where the leaves emerge, should not sit too deeply underwater for long periods because it may rot.
A good rule is to keep the lowest root area submerged while keeping most of the plant above the water. If the jar is too deep and the baby sinks, choose a smaller jar or support the plant with the rim.
As roots grow, they will reach down into the water. Keep the water level high enough that the roots do not dry out. At the same time, do not submerge the entire plant.
If the water evaporates quickly, top it up between water changes. In warm sunny rooms, jars can lose water faster than expected.
Clear jars make it easy to see whether the roots are still covered. This is one reason they are so useful for propagation.
What Kind of Water Is Best?
Room-temperature water is best. Spider plants are generally tolerant, so ordinary tap water often works. However, some spider plants are sensitive to chemicals or minerals in tap water. If you notice brown tips on the mother plant, your tap water may be part of the issue.
Filtered water, rainwater, or water that has been left sitting out overnight can be gentler. If your area has very hard water, filtered water may reduce mineral buildup.
Do not use hot water. Do not use salty water. Do not use water mixed with sugar, soda, juice, milk, or fertilizer for new cuttings. Plain clean water is best for rooting.
After roots form and the plant is moved to soil, you can begin normal spider plant care. Young plants do not need strong fertilizer immediately.
How Often Should You Change the Water?
Change the water every three to five days if possible. At minimum, change it once a week. Fresh water helps prevent bacteria, algae, and bad smells. It also brings oxygen to the developing roots.
If the water becomes cloudy, change it right away. Cloudy water may mean bacteria or organic debris is building up. Rinse the jar before refilling it.
If the roots feel slimy, gently rinse them with room-temperature water and clean the jar. Healthy roots should look light and fresh, not brown and mushy.
Do not add fertilizer to the water while the roots are forming. Fertilizer can encourage algae and may be too strong for tender roots. The baby plant has enough energy to begin rooting on its own.
Where Should You Place the Jars?
Place the jars in bright indirect light. A bright windowsill with filtered light is ideal. An east-facing window is often excellent because it gives gentle morning light. A north-facing window can work if it is bright enough. A south- or west-facing window may be too intense unless the jars are set back or filtered with a curtain.
Do not place water jars in direct hot sun. The water can heat up quickly and damage the roots. Direct sun can also encourage algae growth in clear jars.
A warm room helps rooting. Spider plants root best in comfortable household temperatures. Avoid cold drafts, air conditioners, and chilly windowsills in winter.
If your home is dark, a grow light can help. Keep it gentle and not too close to the plantlets.
When Should You Move Spider Plant Babies From Water to Soil?
Move the baby plants into soil when the roots are about 1 to 2 inches long. Some people wait until the roots are longer and more branched, but waiting too long can make the transition harder because water roots are delicate.
Roots grown in water are different from roots grown in soil. They are used to constant moisture. When you move them into soil, they need time to adjust. If the roots are extremely long and tangled, they may be more easily damaged during planting.
A good stage for transplanting is when there are several healthy white roots and the plantlet still looks fresh. The baby should be able to stand in soil with a little support.
Do not leave spider plant babies in water forever if your goal is a strong potted plant. They can survive in water for a while, but soil gives better long-term support and nutrients.
How to Plant Rooted Spider Plant Babies in Soil
Once the roots are ready, prepare a small pot with drainage holes. Use a light, well-draining potting mix. A regular indoor potting mix with added perlite works well.
Planting Steps
- Choose a small pot with drainage holes.
- Fill it with lightly moist potting mix.
- Make a small hole in the center.
- Place the rooted baby into the hole.
- Spread the roots gently downward.
- Cover the roots with soil while keeping the crown above the soil line.
- Press the soil lightly to support the plant.
- Water gently.
- Place the pot in bright indirect light.
Do not bury the crown too deeply. The crown is the central base where leaves emerge. If buried too deep, it can rot. The roots should be covered, but the leafy center should remain above the soil.
After planting, keep the soil lightly moist for the first couple of weeks while the water roots adjust to soil. After the plant is established, allow the top layer of soil to dry between waterings.
What Soil Is Best for New Spider Plants?
Spider plants like soil that holds some moisture but drains well. They do not want heavy, soggy soil. A good mix should feel light and fluffy.
A simple spider plant mix can include:
- 2 parts indoor potting mix
- 1 part perlite
- A small amount of coco coir or compost if desired
Perlite helps keep the soil airy and prevents it from becoming compacted. This is helpful for young roots that are adjusting from water to soil.
Do not use garden soil from outside. It can be too heavy for pots and may contain pests. Do not plant tiny spider plant babies into huge pots. Too much soil holds too much moisture, which can lead to root problems.
A small pot is best at first. Once the plant grows larger, you can move it into a bigger container.
Continue to Page 2
Continue to page 2 for more details about this article and the key points many readers miss on the first page.