Some home décor projects are pretty. Some are clever. And then there are the ones that instantly make people stop, smile, and say, “Wait… that is actually amazing.”
That is exactly the kind of reaction this spider plant mannequin planter creates.
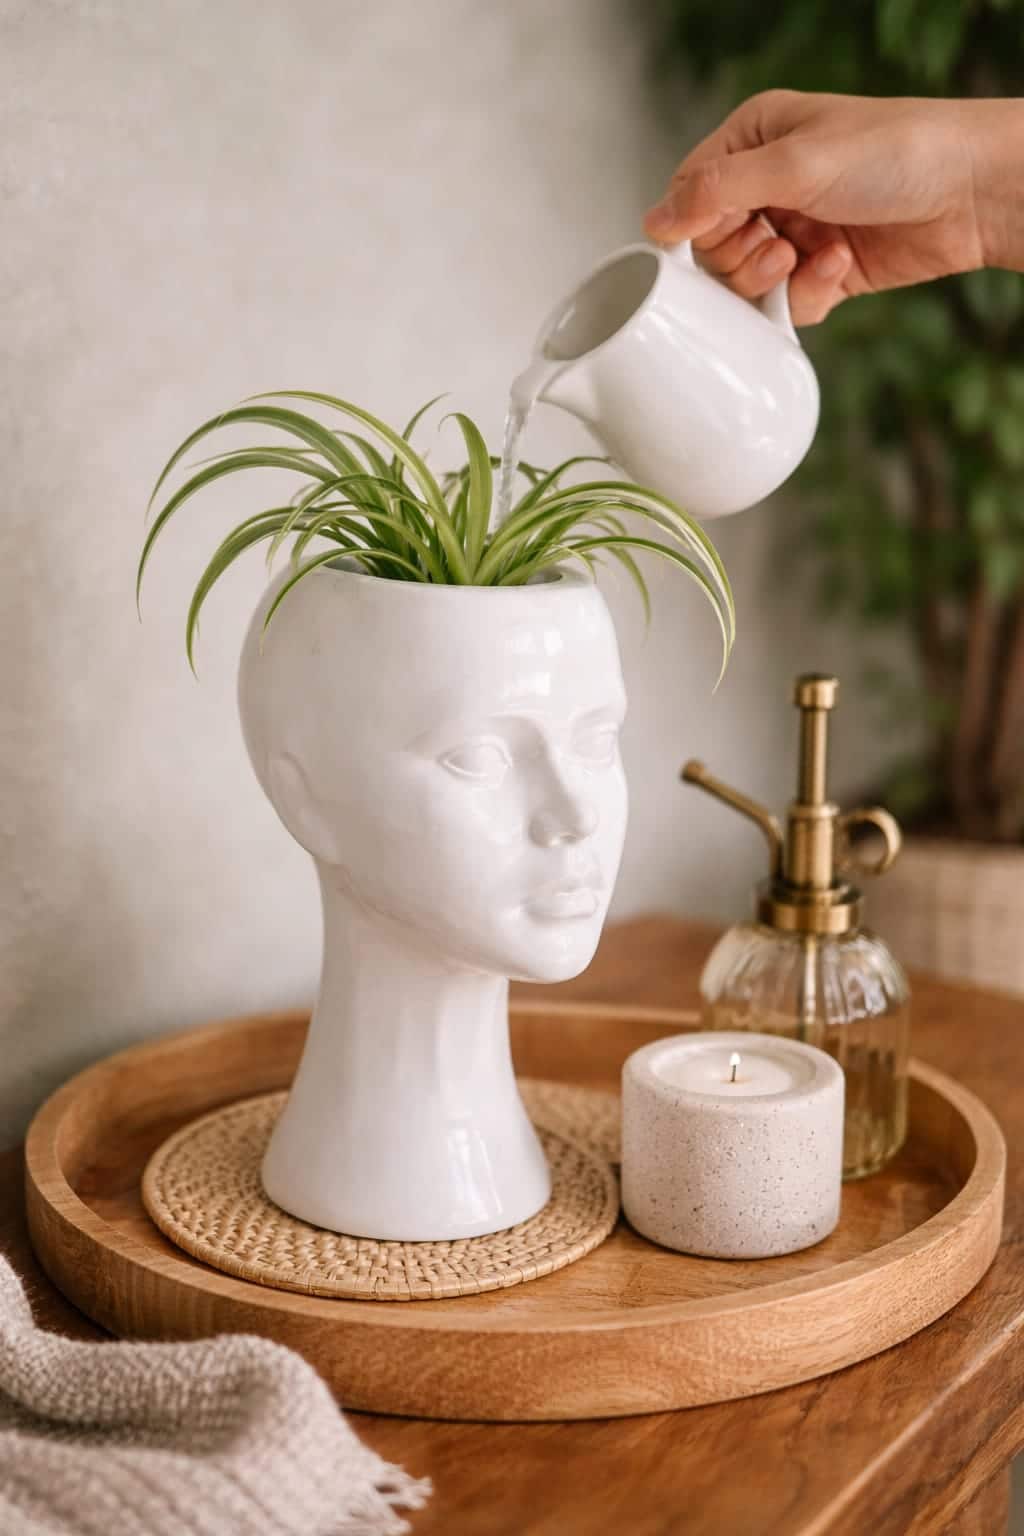
At first glance, it is simple: an old mannequin head turned into a planter. But once you add a spider plant on top, the whole thing comes to life. The long arching leaves look like wild, stylish hair, and suddenly an ordinary plant becomes a sculptural statement piece.
It is creative, unexpected, and surprisingly elegant.
Best of all, it is the kind of DIY project that looks high‑end and artistic without being complicated. Whether you are a seasoned plant parent or just looking for a unique way to display your greenery, this idea is one you will want to try immediately.
In this guide, I will show you exactly why this project works so well, how to make your own mannequin planter, which spider plants to choose, and how to care for the plant so it continues to look like fabulous hair for years to come.
Why This Planter Idea Works So Well
Spider plants are already one of the best houseplants for decorative projects. Their leaves naturally spill outward in soft, curved lines, which makes them perfect for anything that plays with shape or silhouette. Unlike stiff, upright plants, spider plants have a flowing, organic movement that mimics hair almost perfectly.
That is why they work so beautifully in a head‑shaped planter.
The plant does not just sit in the container. It becomes part of the design. The leaves create the “hair,” the planter becomes the face, and the finished result feels like a piece of art rather than just another pot on a table.
It is the kind of décor that adds personality instantly. Place it on a console table, and guests will do a double take. Set it on a shelf, and it becomes the focal point of the room. Unlike a standard terracotta pot, this project has character, humor, and elegance all at once.
Why Spider Plants Are Perfect for This Project
Not every plant would work in a mannequin planter like this, but spider plants (Chlorophytum comosum) are ideal for several reasons.
They Are:
· Easy to care for – Spider plants forgive occasional missed waterings and adapt well to indoor conditions.
· Lightweight compared with many larger plants – The mannequin head does not need to support heavy, dense foliage.
· Naturally arching and full – The leaves curve outward and downward, creating a soft, flowing “hair” effect.
· Fast‑growing – Within months, your spider plant will fill out and become even more dramatic.
· Great for creating that soft “hair” effect – The green and white striped varieties add visual texture.
As the plant grows, the look actually gets better. A fuller spider plant gives the mannequin more volume, more movement, and more character. And if it starts producing baby plantlets (the little “spiderettes” that hang from long stems), the whole piece becomes even more whimsical — like hair with tiny decorative clips.
Best Spider Plant Varieties for This Project
· Chlorophytum comosum ‘Vittatum’ – Green leaves with a white center stripe. Classic and elegant.
· Chlorophytum comosum ‘Variegatum’ – Green leaves with white edges. Very full and lush.
· Solid green spider plant – Less common but equally beautiful for a minimalist look.
Any healthy spider plant will work, but variegated varieties add extra visual interest against a white or neutral mannequin.
Turning an Old Mannequin Head into Décor
One of the best parts of this idea is that it gives new life to something old or overlooked. You do not need to buy an expensive planter. A vintage mannequin head, a display bust from a craft store, or even a sculptural head‑shaped vase can become a totally unique home accent with just a few simple modifications.
Where to Find a Mannequin Head
· Thrift stores – Old salon mannequins are often very inexpensive.
· Craft stores – Foam or plastic display heads for wigs or jewelry.
· Online marketplaces – Search for “mannequin head” or “display bust.”
· Home decor stores – Some sell ceramic or concrete head planters already.
The Look Can Be:
· Modern – Glossy white or black finish.
· Artsy – Painted in bold colors or with patterns.
· Playful – Bright neon or pastel shades.
· Minimalist – Unpainted plaster or concrete.
· Boho – Wrapped in macrame or with natural textures.
· Gallery‑inspired – Classic white bust on a pedestal.
A glossy white mannequin, like the one in the image, gives the whole project a clean, modern, high‑contrast look. It feels artistic without being too heavy or too busy. The white reflects light and makes the green leaves pop.
How to Make a Spider Plant Mannequin Planter (Step‑by‑Step)
This project is easier than it looks, but there are a few important things to get right — especially when it comes to drainage and plant health.
Step 1 – Choose the Right Mannequin Head or Bust
The container should be sturdy enough to hold soil and a small plant. If it is made of foam or hollow plastic, you may need to reinforce it. If it is ceramic or concrete, it will be heavier but more stable.
Important: If your mannequin head is decorative only and has no drainage hole, do not plant directly into it. Use it as a cover pot instead (see Step 3).
Step 2 – Prepare the Planting Area
If your mannequin head has a flat top or a small opening, you may need to create a larger hole to fit a pot. Use a drill or a craft knife carefully. If you are not comfortable modifying the mannequin, simply place a small pot on top and secure it with glue or wire.
Step 3 – Consider Drainage (Very Important)
Spider plants do not want soggy roots. They prefer evenly moist soil that drains well. If the planter does not have a drainage hole, the safest option is:
· Keep the spider plant in a smaller nursery pot (with drainage holes).
· Place that pot inside the mannequin planter.
· Remove the inner pot for watering.
· Let it drain fully before putting it back.
This protects both the plant and the décor piece. No water damage, no root rot.
If you want to plant directly into the mannequin head, drill a drainage hole in the bottom and use a saucer underneath. But for most DIYers, the inner pot method is much easier and safer.
Step 4 – Pick a Healthy Spider Plant
Choose one that is:
· Compact – Not too tall, with leaves that will spill outward.
· Healthy – No yellow leaves, pests, or brown tips.
· Bright green – Vibrant color indicates good health.
· Slightly full already – The fuller the plant, the more dramatic the “hair” effect.
If your spider plant is young and small, give it a few months to grow before placing it in the mannequin. You can always start with a more mature plant from a nursery.
Step 5 – Use the Right Soil
Spider plants like a loose, well‑draining potting mix. Nothing too heavy or waterlogged.
Best soil mix:
· 2 parts all‑purpose potting soil
· 1 part perlite (for drainage)
· Optional: 1 part orchid bark or coarse sand
Do not use garden soil or moisture‑control mixes that stay wet too long.
Step 6 – Plant and Style
· Place a small amount of soil in the bottom of the inner pot (or directly in the mannequin if using drainage).
· Set the spider plant in the pot, centering it.
· Fill around the roots with soil, pressing gently.
· Water lightly to settle the soil.
· If using an inner pot, place it into the mannequin head.
Position the leaves so they cascade naturally. You can gently arrange them to fall evenly around the head.
Step 7 – Style It in the Right Spot
This project looks best somewhere visible and intentional, like:
· An entryway console table
· A dining room sideboard
· A shelf with open space around it
· A bedroom dresser
· A hallway table
· A home office desk
It works especially well where people can appreciate the silhouette. Avoid cluttered backgrounds — let the planter be the star.
Continue to Page 2
Continue to page 2 for more details about this article and the key points many readers miss on the first page.