Peanuts are a unique and versatile crop, beloved around the world for their taste and nutritional benefits. Many people don’t realize that you can grow peanuts at home, even starting from raw, store-bought nuts. Growing peanuts can be an exciting and rewarding experience, offering not only the chance to enjoy a fresh harvest but also the opportunity to learn about the fascinating process of cultivating these underground legumes. In this guide, we will walk you through the steps of how to grow peanuts in soil using raw peanuts bought from a store.
Understanding Peanuts: A Brief Overview
Before we dive into the process, it’s important to understand what peanuts are and how they grow. Unlike most nuts, peanuts are not actually nuts; they are legumes, related to beans and lentils. The peanut plant (Arachis hypogaea) is native to South America and thrives in warm climates. What makes peanuts unique is the way they grow their pods: after the plant flowers, the fertilized flower forms a structure called a “peg,” which burrows into the soil, where the peanut pods then develop underground.
Peanuts are typically grown in tropical or subtropical climates, but with the right techniques, you can successfully grow them in many other regions, even starting from raw peanuts you can buy in most stores. Here’s how you can do it.
Step 1: Choose and Prepare the Peanuts
First, you’ll need to purchase raw, unroasted peanuts. This is crucial because roasted peanuts won’t germinate. Raw peanuts with their shells still intact are ideal. Make sure that the peanuts haven’t been treated with chemicals, which can prevent them from sprouting.
Once you have your peanuts, it’s time to prepare them for planting:
- Soaking the Peanuts: To encourage germination, soak the peanuts (in their shells) in water for 8 to 12 hours. This softens the outer shell and speeds up the sprouting process. After soaking, carefully remove the peanuts from their shells, making sure not to damage the seed inside.
Step 2: Prepare the Soil
Peanuts need well-draining, loose soil to thrive. The ideal soil type for peanuts is sandy or loamy, as this allows for proper drainage and gives the pegs enough space to penetrate the soil and form the peanut pods.
- Drainage: Whether planting in a garden bed or pots, ensure that the soil drains well. If planting in pots, make sure the pots have drainage holes to prevent waterlogging.
- Soil pH: Peanuts prefer slightly acidic soil with a pH between 6.0 and 6.5. You can test your soil’s pH using a home testing kit, available at garden centers, and adjust accordingly with lime (to raise pH) or sulfur (to lower pH).
- Location: Choose a sunny spot for planting, as peanuts require full sunlight to grow properly. Ideally, they should get at least 6 to 8 hours of sunlight daily.
Step 3: Planting the Peanuts
Once your peanuts have soaked and you’ve prepared the soil, it’s time to plant. Here’s what to do:
- Planting Depth and Spacing: Plant the peanuts about 1 to 2 inches deep in the soil, with the seeds spaced 6 to 8 inches apart. If planting in rows, make sure the rows are spaced about 18 to 24 inches apart to allow enough room for the plants to grow and for air circulation.
- Covering the Seeds: After placing the peanuts in the soil, gently cover them with soil and lightly press down to ensure good contact between the seeds and the soil. Be careful not to compact the soil too much, as the pegs need to penetrate easily.
Step 4: Watering and Fertilizing
Peanuts need consistent moisture, especially during their early growth stages. However, they don’t like waterlogged conditions, so finding a balance is key.
- Watering: Keep the soil consistently moist but not soggy. Water regularly, particularly during dry periods, but make sure the soil has time to dry out slightly between waterings. Overwatering can lead to root rot or fungal diseases.
- Fertilizing: Although peanuts are nitrogen-fixing plants (meaning they can produce their own nitrogen with the help of bacteria in their roots), they still benefit from balanced fertilization. Use a balanced fertilizer, such as 10-10-10, sparingly throughout the growing season. Avoid over-fertilizing, as this can lead to excessive foliage growth at the expense of peanut production.
Step 5: Care and Maintenance
Peanut plants are relatively low-maintenance, but there are a few key tasks to keep in mind to ensure a healthy crop.
- Weeding: Keep the area around your peanut plants free of weeds, especially in the early stages of growth. Weeds can compete with peanuts for nutrients and water, reducing your yield.
- Mulching: Applying a layer of organic mulch around the plants can help retain moisture, regulate soil temperature, and suppress weeds. Straw, grass clippings, or shredded leaves are excellent mulching options.
Step 6: The Flowering and Pegging Process
One of the most interesting parts of growing peanuts is watching the flowering and pegging process. Here’s what to expect:
- Flowering: After about 30 to 40 days of growth, your peanut plants will start producing small, yellow flowers. These flowers are self-pollinating, so you don’t need to worry about manually pollinating them.
- Pegging: Once the flowers have been pollinated, the fertilized ovary at the base of the flower will form a peg, a long, slender structure that bends toward the soil. The peg will grow into the soil, where the peanut pods will develop underground. This process is unique to peanuts and makes them different from most other crops.
Step 7: Harvesting the Peanuts
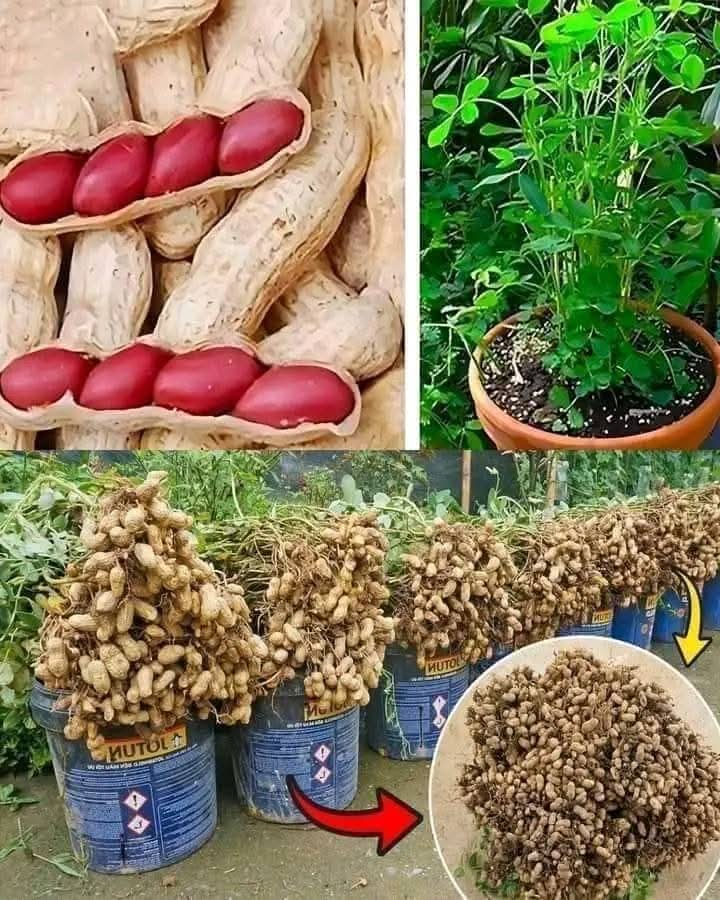
Peanuts are usually ready to harvest 4 to 5 months after planting. You’ll know it’s time to harvest when the plants’ leaves start turning yellow, signaling that the peanut pods have fully developed.
- Harvesting Method: To harvest, carefully dig up the entire plant using a garden fork or shovel. Be gentle to avoid damaging the peanut pods growing underground. Once you’ve dug up the plant, shake off the excess soil, but don’t remove the pods just yet.
- Drying the Peanuts: After harvesting, hang the plants upside down in a warm, dry, and well-ventilated area for 1 to 2 weeks. This allows the peanuts to dry and cure, which improves their flavor and makes them easier to store.
- Final Preparation: Once the peanuts are fully dried, you can remove them from their pods. Store your harvested peanuts in a cool, dry place, and they’ll be ready to enjoy.
Step 8: Storing and Using Your Peanuts
Freshly harvested peanuts can be used in a variety of ways. You can eat them raw, roast them, or use them in cooking and baking. If you want to store your peanuts for future use, make sure to keep them in an airtight container in a cool, dry place to prevent mold or spoilage.
Benefits of Growing Peanuts at Home
Growing your own peanuts offers several benefits:
- Self-Sufficiency: Growing peanuts allows you to produce your own food, reducing your reliance on store-bought products and giving you control over the quality of the peanuts you consume.
- Health Benefits: Peanuts are packed with nutrients, including protein, healthy fats, fiber, and essential vitamins and minerals like vitamin E, magnesium, and potassium. They’re a great addition to a balanced diet.
- Sustainability: Peanuts are nitrogen-fixing plants, meaning they help improve the soil by adding nitrogen to it. This can benefit future crops and reduce the need for synthetic fertilizers.
Conclusion
Growing peanuts from store-bought raw nuts is a rewarding and educational experience that can result in a bountiful harvest of delicious, homegrown peanuts. With a little care and attention, you can enjoy the unique process of watching these fascinating plants develop, from flowering to pegging to harvesting. Plus, you’ll get to enjoy the fresh taste of peanuts straight from your own garden. Happy planting!