Discover the secret bottle method that turns ordinary snake plants into stunning spiral sculptures. Learn how to shape your Sansevieria with patience and a simple household item.
Let me share a gardening secret that’s quietly making the rounds among plant lovers: you can shape your snake plant into a beautiful spiral using nothing more than a plastic bottle and a little patience.
Snake plants (Dracaena trifasciata, formerly Sansevieria) are already beloved for their architectural, upright leaves and legendary resilience. They’re the plant that survives low light, forgetful watering, and general neglect. But what if you could transform this humble houseplant into a living sculpture—a spiral of green that becomes the centerpiece of any room?
I first saw a spiraled snake plant on a gardening forum and assumed it was some expensive designer plant. Then I discovered the technique behind it: a simple bottle placed in the pot, around which the young leaves are gently guided over time. It’s a low‑cost, creative way to elevate your plant game, and anyone can do it.
In this guide, I’ll walk you through exactly how to shape a snake plant using the bottle method, from choosing the right plant to maintaining its new form. You’ll learn why this technique works, how to avoid common mistakes, and how to keep your plant healthy while it transforms.
Why Snake Plants Are Perfect for Shaping
Snake plants are ideal candidates for shaping because of their natural growth habits.
Trait Why It Helps
Strong, upright leaves Provide a sturdy structure that holds shape once trained.
Flexible young growth New leaves are pliable and can be guided without breaking.
Slow, controlled development Gives you time to adjust and refine the shape over weeks or months.
Resilience Can handle gentle manipulation without significant stress when done correctly.
Unlike many trailing plants that grow too fast or too floppy, snake plants grow at a pace that allows you to influence their form gradually. This makes them perfect for creative shaping.
What Is the Bottle Method?
The bottle method is a simple shaping technique where a cylindrical object—typically a plastic bottle—is placed in the center of the snake plant’s pot. The leaves are then gently wrapped around the bottle over time, encouraging them to grow in a spiral or circular shape.
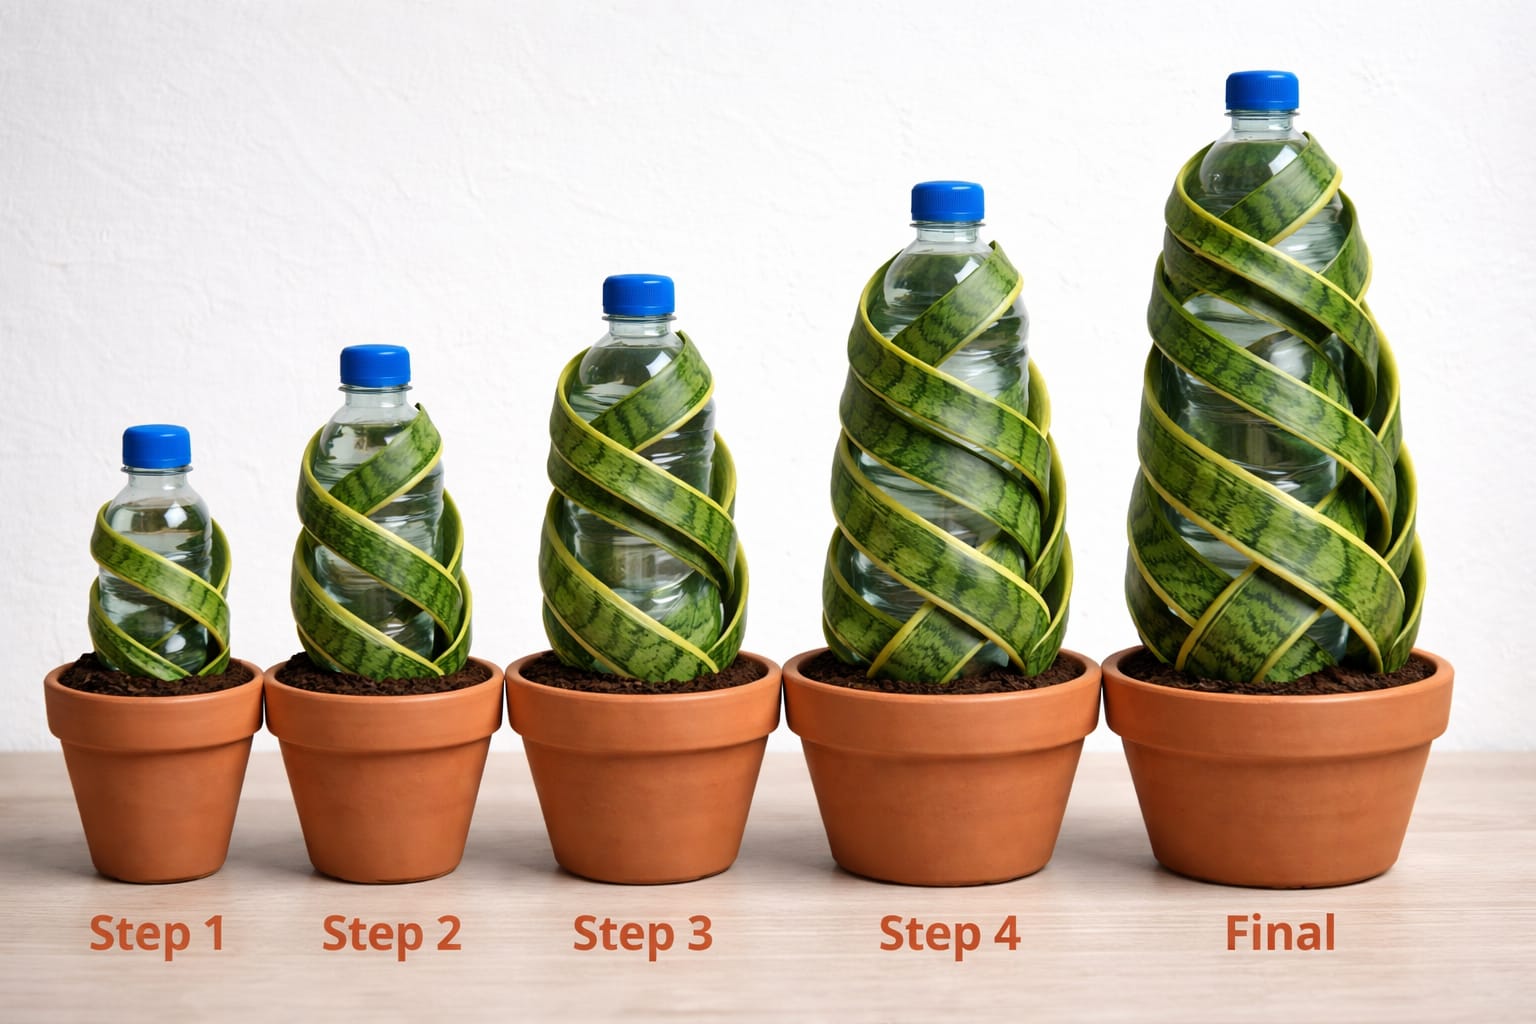
In the image you see, the progression is clear:
· Start: A young snake plant with straight leaves.
· Process: A bottle is inserted into the soil; leaves are gradually guided around it.
· Result: After weeks of gentle training, the plant forms a beautiful, sculptural spiral.
The bottle serves as a temporary support and guide. Once the leaves have hardened into the new shape, the bottle can be removed, leaving a plant that looks like it was grown that way by nature.
Why This Method Works
Plants naturally grow toward light—a phenomenon called phototropism. They also adapt to physical contact and obstacles, slowly shifting their growth direction to avoid pressure or follow a support.
When you gently guide snake plant leaves around a bottle:
· You influence the direction of new growth – The plant responds to the curved surface, sending new leaves along the same path.
· The plant “remembers” the shape – Over time, the cells on the inside of the curve compress, while those on the outside expand, locking the shape in place.
· Slow growth works to your advantage – Because snake plants grow slowly, the shape hardens gradually and holds well once formed.
It’s not magic—it’s biology and patience working together.
How to Shape a Snake Plant Using the Bottle Method
Step 1: Choose the Right Plant
· Select a young snake plant. Leaves should be soft and flexible. Mature leaves are stiff and can snap.
· Look for a plant with healthy growth. A stressed or struggling plant won’t take well to shaping.
· Cylindrical varieties (like Sansevieria cylindrica) are easiest because their round leaves bend naturally. Flat‑leaf varieties like ‘Laurentii’ can also work, but require more care.
Step 2: Gather Your Supplies
· A clean, sturdy bottle. A plastic water or soda bottle works well. Choose one that fits inside your pot without crowding the roots.
· Soft plant ties or garden twine (optional) for securing leaves in place while they adjust.
· A pot with drainage holes and well‑draining cactus or succulent soil.
Step 3: Insert the Bottle
- Gently press the bottle into the soil near the center of the plant, being careful not to damage the roots. If the pot is too small, repot into a slightly larger container first.
- Ensure the bottle stands upright and is stable. You can add a little soil around its base if needed.
Step 4: Start Guiding the Leaves
· Select the longest, most flexible leaves to begin.
· Gently curve each leaf around the bottle in the direction you want the spiral to go. Work slowly—if a leaf resists, wait a few days and try again.
· Wrap the leaf around the bottle once or twice, depending on your desired tightness.
Step 5: Secure Lightly (Optional)
· Use soft ties or Velcro plant tape to loosely hold the leaves against the bottle. Don’t tie tightly—the plant needs room to grow.
· If you don’t use ties, you can simply let the leaves rest against the bottle, checking and repositioning every few days.
Step 6: Be Patient
· This is not an overnight transformation. You’ll see subtle changes over weeks.
· Check the plant every few days. Adjust ties if needed, and gently guide new leaves as they emerge.
· New growth will naturally follow the curve of the leaves around it, reinforcing the spiral.
Step 7: Remove the Bottle (Optional)
· After several months, the leaves will have hardened into the new shape. Test by removing the bottle gently; if the spiral holds, you can keep it out.
· If the leaves spring back, replace the bottle and wait longer. Some gardeners choose to leave the bottle in permanently as part of the design.
Pro Tips for Success
- Work with New Growth
Focus on training new leaves as they emerge. They’re more pliable and will adapt to the shape more easily than older leaves.
- Rotate the Pot
To encourage even growth, rotate the pot a quarter turn every week. This prevents the plant from leaning toward the light and keeps the spiral symmetrical.
- Maintain Plant Health
A healthy plant shapes best. Keep it in bright, indirect light, water only when the soil is dry, and fertilize lightly in spring and summer.
- Use Soft Ties
Avoid wire or string that can cut into leaves. Velcro plant tape, foam‑coated wire, or strips of old pantyhose work well.
- Don’t Force It
If a leaf feels resistant, stop. Forcing it can cause cracks or permanent damage. Give it time, and try again in a few days.
Best Conditions for a Healthy Shaped Plant
Even while training, your snake plant needs proper care.
Factor Ideal Condition
Light Bright, indirect light. An east‑ or north‑facing window is ideal.
Water Allow soil to dry completely between waterings. Overwatering is the #1 killer.
Temperature 65–85°F (18–29°C). Protect from cold drafts.
Soil Well‑draining cactus or succulent mix.
Fertilizer Use a balanced liquid fertilizer diluted to half strength once in spring and once in summer. Stop in fall and winter.
Common Mistakes to Avoid
Mistake Why It’s a Problem Solution
Bending too quickly Leaves can snap Work in small increments over days
Using a weak bottle Can tip over, damaging leaves Choose a sturdy, stable bottle
Ignoring plant needs Stressed plants won’t shape well Maintain proper light and water
Overcrowding leaves Leaves can trap moisture, cause rot Give them space to breathe
Removing support too early Shape may not hold Wait several months before testing
Continue to Page 2
Continue to page 2 for more details about this article and the key points many readers miss on the first page.