An orchid can look breathtaking while it is in bloom. For weeks, the flowers may stay open, bright, and elegant, turning a simple windowsill or balcony into a beautiful display. But eventually, every orchid flower fades. The flower spike dries, the blooms fall, and the plant can suddenly look tired or weak. Many people see this stage and think the orchid is dying, but in most cases, the plant is simply entering its recovery phase.
After flowering, an orchid needs time to rebuild strength. It has spent energy producing and holding blooms, and now it must return its focus to roots and leaves. This is the best moment to inspect the plant, remove damaged material, refresh the potting medium, and help the orchid prepare for the next growing cycle. If the crown is still firm, the leaves are not completely collapsed, and some roots are still alive, there is still hope.
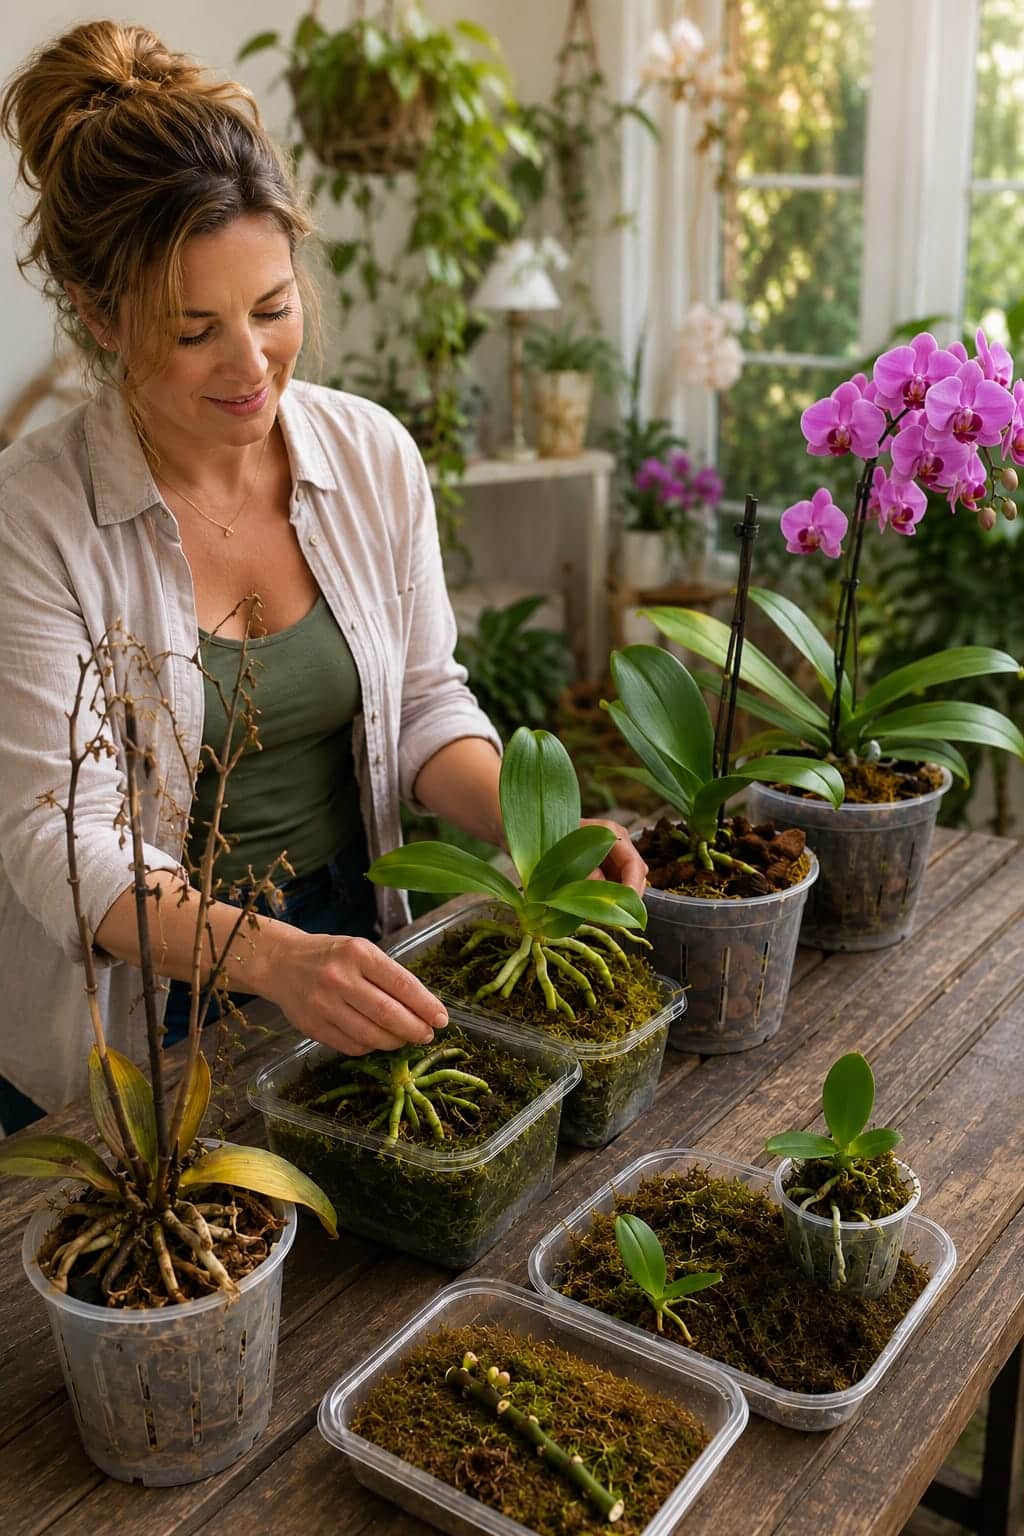
The image shows several orchids at different stages: one plant with old, dry flower spikes and yellowing leaves, several recovering orchids with exposed roots, small propagation trays, fresh moss, clear pots, orchid bark, and a healthy blooming orchid in the background. This is a perfect visual example of orchid recovery. Some orchids look finished when they are not. With clean tools, fresh medium, gentle moisture, and patience, many stressed orchids can grow new roots and eventually bloom again.
This guide explains how to revive an orchid after flowering in a careful and realistic way. It also discusses the popular garlic-water method and orchid spike propagation, but with important safety notes. Garlic water is not a miracle solution, and flower spike propagation is not guaranteed. The real foundation of recovery is healthy tissue, clean pruning, fresh airy bark, correct watering, bright indirect light, and time.
Why Orchids Look Weak After Flowering
When an orchid finishes blooming, it may look less attractive than before. The flowers fade, the spike may turn brown, and the plant may appear smaller or less impressive. This does not mean the orchid is dead. Flowering is only one part of the orchid’s life cycle. After blooming, the plant often shifts into a root and leaf growth phase.
A healthy Phalaenopsis orchid can live for many years and bloom many times. But it must have a strong root system to do that. If the roots are damaged, the plant will struggle to hydrate its leaves and store enough energy for future flowers. This is why post-bloom care is so important.
The mistake many people make is trying to force another bloom immediately. They add strong fertilizers, homemade liquids, or random kitchen ingredients before checking the roots. This can stress the plant. A recently bloomed or weakened orchid should not be pushed into flowering. It should first be helped to grow stronger roots and healthy leaves.
Think of the post-bloom stage as a reset. The orchid is not useless after flowers fade. This is the golden moment to clean it, inspect it, and prepare it for the next season.
Step 1: Decide Whether the Orchid Can Be Saved
Before trimming or treating anything, inspect the orchid carefully. The most important part is the crown. The crown is the central area where the leaves join together. If the crown is firm and green, the orchid may recover. If the crown is black, mushy, hollow, or foul-smelling, recovery becomes much harder.
Next, inspect the leaves. A few yellow lower leaves can be normal, especially after stress or age. But if all leaves are soft, collapsed, and detaching from the crown, the plant may be severely damaged. Firm green leaves are a good sign, even if they are slightly wrinkled.
Then inspect the roots. Healthy orchid roots are firm. They may be green when wet and silver-gray when dry. Some roots may look pale or dry but still be alive if they are firm. Dead roots are usually mushy, hollow, black, brown, or papery.
If the orchid still has a firm crown and at least a few living roots, it has a real chance. If it has no roots but the crown is still alive, recovery is possible but slower. If the crown is dead, no treatment can bring it back.
Step 2: Remove the Old Flower Spike
After the flowers fade, look at the flower spike. If the spike is brown, dry, and brittle, it is no longer useful. Cut it near the base with clean scissors or pruning shears. This helps the plant stop wasting energy on dead tissue.
If the spike is still green, you have two options. Some growers cut above a node to encourage a secondary spike. This can sometimes produce more flowers, but it also uses the plant’s energy. If your orchid is weak, has poor roots, or has yellowing leaves, it is usually better to cut the spike completely so the plant can focus on recovery.
For a stressed orchid, root growth is more important than another quick bloom. A plant that is forced to flower while weak may decline further. Cutting the spike can feel disappointing, but it is often the healthier choice.
Use clean tools every time. Dirty scissors can spread bacteria or disease between plants. Wipe the blades with rubbing alcohol before cutting.
Step 3: Remove the Orchid From the Old Potting Medium
Once the flower spike is removed, gently take the orchid out of its pot. Be patient. Orchid roots can cling to bark, moss, or the pot itself. If the roots are stuck, loosen the medium slowly instead of pulling hard.
Old potting medium is one of the biggest reasons orchids decline. Bark breaks down over time and becomes soft, compacted, and moisture-retentive. When bark breaks down, it holds too much water and reduces airflow around the roots. This can lead to root rot.
Remove old bark, moss, and dead material from around the roots. If some pieces are stuck to healthy roots, do not rip them away aggressively. Damaging living roots can slow recovery. Remove what comes away easily and leave stubborn pieces if necessary.
This step allows you to see the real condition of the root system. Sometimes the top of the plant looks fine, but the roots inside the pot are rotten. Other times, the plant looks tired but still has strong roots underneath.
Step 4: Trim Rotten and Dead Roots
Use sterilized scissors to remove only the roots that are clearly dead. Rotten roots are mushy, slimy, brown, black, or hollow. Hollow roots often leave behind a thin string-like core when the outer layer slides off. These roots cannot absorb water properly and should be removed.
Do not cut roots just because they are silver or pale. Silver-gray roots are often healthy dry orchid roots. If they feel firm, keep them.
Trim carefully and slowly. It is better to leave a questionable firm root than to remove too much. A recovering orchid needs as many functioning roots as possible.
After trimming, you may dust fresh cut ends with a very small amount of cinnamon if desired. Cinnamon is sometimes used by orchid growers to help dry cut surfaces. However, it should be used only on cut wounds, not all over healthy roots. Too much cinnamon can dry out living roots and slow new growth.
Step 5: Remove Diseased or Dead Leaves Carefully
Old leaves and dry leaf sheaths can trap moisture and debris. They can also hide pests or rot. If a leaf is completely yellow, soft, or detached, it can be removed. If a dry old leaf sheath is loose, gently peel it away.
Do not pull hard on green leaves. If a leaf is still firmly attached and partly green, let the plant absorb what it can from it. Orchids often recycle nutrients from old leaves before dropping them naturally.
If a leaf has a localized rotten section, cut away the damaged part with clean scissors. Avoid cutting into healthy crown tissue. If disease is spreading toward the crown, the plant needs close monitoring.
After any cut, keep the plant dry for a short period and avoid water sitting on the wound.
Step 6: Rinse the Orchid Gently
After removing old medium and dead roots, you can rinse the orchid roots under room-temperature running water. This helps remove old bark dust, dirt, and debris. Do not use hot or cold water. Extreme temperatures can shock the plant.
Rinse gently. Do not scrub healthy roots. The outer layer of orchid roots is delicate and important for absorbing moisture. Rough handling can damage it.
After rinsing, let the orchid drain completely. Place it on a clean towel or paper towel for a short time. The roots should not remain dripping wet for hours in a cold room.
This is also a good moment to inspect again. Clean roots are easier to judge. You may notice additional dead roots that need trimming.
⚠️ Important: Never leave the orchid crown wet for long periods. Water trapped in the center of the plant is one of the fastest ways to cause crown rot.
Step 7: Should You Use Garlic Water? (Safe, Gentle Method)
Garlic water is a popular natural orchid treatment. Many gardeners use it because garlic contains strong sulfur compounds and has a reputation for supporting plant hygiene. Some people use it to wipe leaves, rinse roots, or discourage pests.
However, garlic water should be used carefully. It is not a guaranteed root-growth booster, and it is not a cure for severe orchid disease. A strong garlic solution can irritate roots, leave odor, or create residue. It should never be used as a substitute for fresh bark, correct watering, and good light.
If you choose to use garlic water, keep it mild. A safer version is made with one small garlic clove in plenty of water, then strained and diluted again. Strong garlic mixtures are not necessary for orchids.
Never leave garlic pieces in the orchid pot. Solid garlic can rot, smell bad, attract insects, and disturb the potting medium. Only a clear, strained, diluted liquid should be used, and only occasionally.
A Gentle Garlic Water Recipe for Orchids
For a mild garlic rinse, take one small garlic clove and slice it. Add it to about two cups of water and let it sit for one hour. Strain the liquid very well. Then dilute the strained liquid with more water before use. A good beginner dilution is one part garlic infusion to three or four parts plain water.
The final mixture should smell mild, not overpowering. If the smell is very strong, dilute it more. Orchids do not need a harsh treatment.
Use the mixture fresh. Do not store it for many days. Homemade organic liquids can ferment, especially in warm rooms. If the mixture smells sour or rotten, discard it.
This garlic water can be used as a light wipe for leaves or a short root rinse, but it should not be used repeatedly. Once every several weeks is more than enough, and many orchids do not need it at all.
How to Wipe Orchid Leaves With Garlic Water
If you want to clean the leaves, dip a soft cloth or cotton pad into the diluted garlic water and wipe the leaf surface gently. This can remove dust and residue. Clean leaves help the orchid receive light more efficiently.
Do not soak the crown. Keep liquid out of the center of the orchid where the leaves meet. Water trapped in the crown can cause crown rot, especially indoors with poor airflow.
After wiping, let the leaves dry naturally in a bright, airy place away from direct harsh sun. If the garlic smell is too strong, the mixture was probably too concentrated.
Plain water is often enough for routine leaf cleaning. Garlic water should be occasional, not a daily habit.
Can You Soak Orchid Roots in Garlic Water?
A short soak in very diluted garlic water may be used by some growers, but it should be done cautiously. If the roots are badly damaged, strong treatments may cause more stress.
If you choose to soak, use a weak, strained solution and limit the soak to about 10 to 15 minutes. A 20-minute soak may be acceptable for a sturdy plant, but weaker orchids should be treated more gently.
After soaking, let the roots drain completely. Do not repot them while they are dripping wet into a soggy setup. Good airflow after treatment is important.
If roots are severely rotten, do not rely on garlic water. Rotten roots must be removed, and the orchid must be placed in fresh airy medium.
Step 8: Let the Orchid Dry Before Repotting
After rinsing and any optional treatment, let the orchid dry briefly. This helps cut areas settle and reduces excess moisture before repotting. You do not need to dry the plant for days, but a short rest period is helpful.
Place the orchid on a clean towel in bright indirect light. Avoid direct sun, which can dry exposed roots too quickly. Avoid cold drafts.
While the orchid rests, prepare the pot and medium. Clean everything. A recovering orchid should not be placed back into dirty containers or old decaying bark.
Step 9: Choose the Right Pot
A clear plastic orchid pot with drainage and side ventilation is often ideal for Phalaenopsis orchids. Clear pots allow you to monitor root color and moisture. This makes watering much easier.
The pot should not be too large. Orchids generally prefer a snug pot. A pot that is too big holds extra moisture and can increase the risk of root rot. Choose a pot that fits the roots comfortably without leaving a large amount of empty wet medium around them.
If the old pot is still usable, wash it thoroughly before reusing. If it smells bad or has old residue, use a new clean pot.
Drainage is essential. Never repot a recovering orchid into a container with no drainage holes.
Step 10: Use Fresh Orchid Bark
Use fresh orchid bark or a suitable orchid mix. Pine bark is commonly used because it provides structure, drainage, and airflow. Some mixes also contain charcoal, perlite, or sphagnum moss.
Do not use regular potting soil for Phalaenopsis orchids. Regular soil is too dense and holds too much moisture around the roots. Orchid roots need air.
If your home is very dry, a little sphagnum moss may help hold moisture. If you tend to overwater, use mostly chunky bark and avoid too much moss. The best mix depends on your environment and watering habits.
The goal is simple: moisture plus airflow. Roots should become hydrated during watering, then gradually dry.
Continue to Page 2
Continue to page 2 for more details about this article and the key points many readers miss on the first page.