ZZ plants have a reputation for being almost impossible to kill. They tolerate low light, missed waterings, and dry indoor air better than most houseplants. But even a “tough” plant can suddenly start looking tired.
Leaves lose shine. Stems weaken. Growth slows down. And before long, people start searching for one secret trick to bring it back.
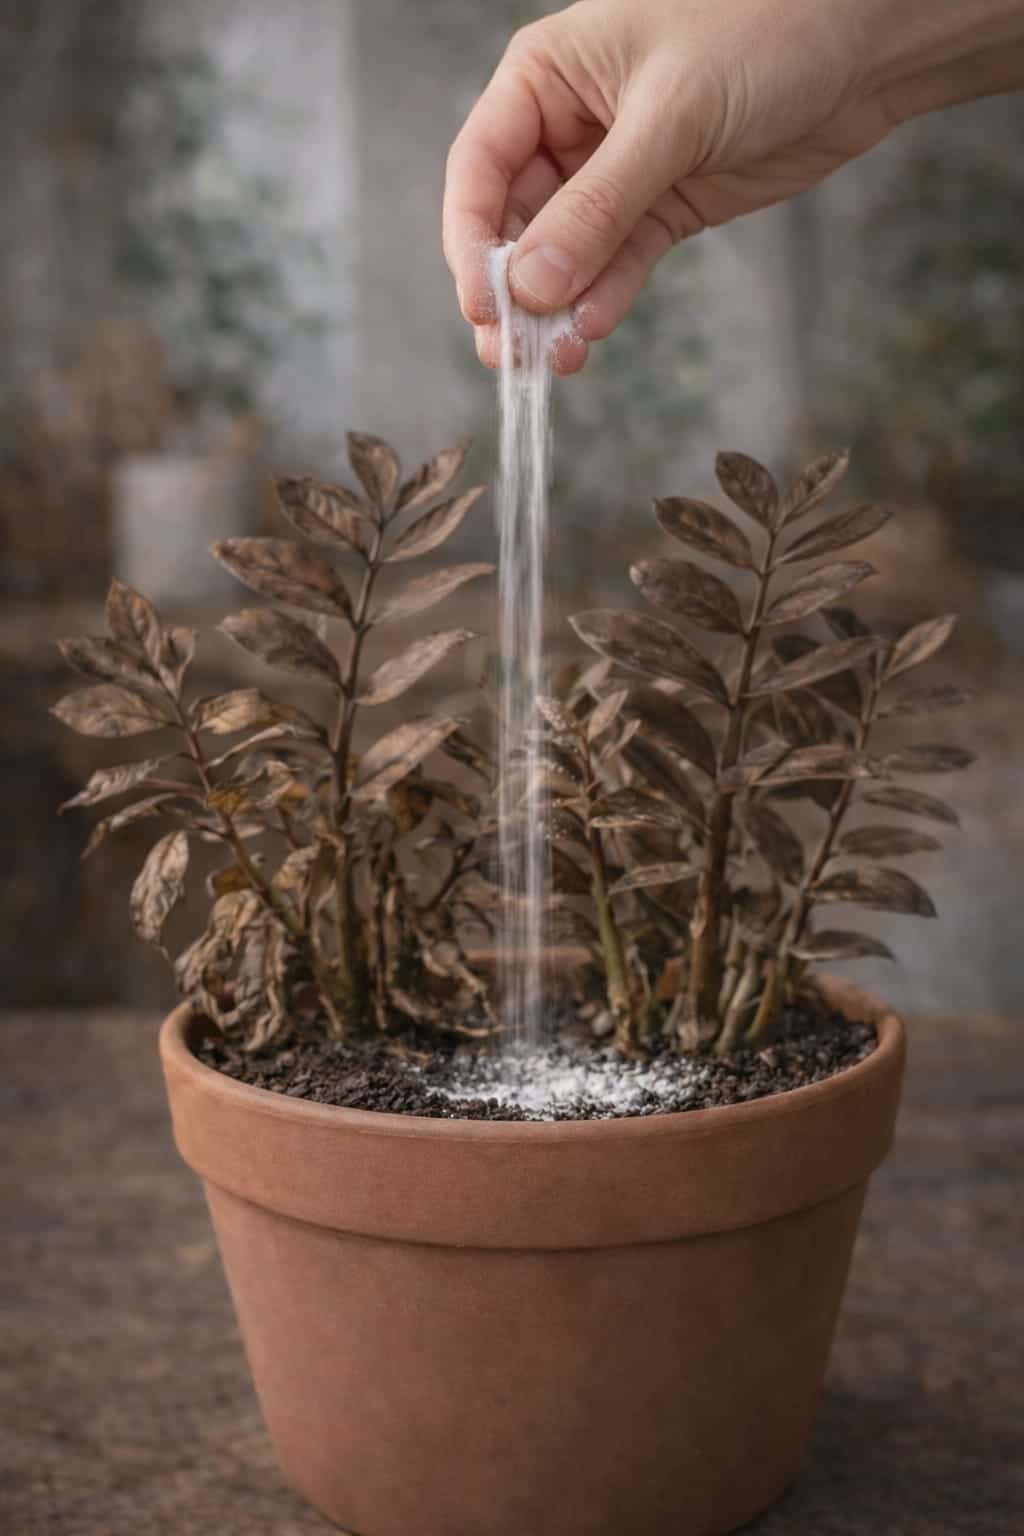
That is why so many plant videos now show a dying ZZ plant with a little white powder sprinkled onto the soil, followed by a dramatic recovery. It looks simple, cheap, and almost magical.
But the real story is more useful than that.
The low-key ZZ plant method people are noticing is not really about one mystery powder. It is about restoring the plant’s roots, reducing stress, and creating the conditions that let the rhizomes recover.
In this guide, you will learn exactly why ZZ plants decline, what that white powder likely is, the proven low-key method that actually works, and how to bring your ZZ plant back to full, glossy health without gimmicks.
Why ZZ Plants Suddenly Decline
ZZ plants (Zamioculcas zamiifolia) are often called “unkillable,” but that does not mean they are invincible. They usually struggle for very specific reasons. The most common ones are:
· Overwatering – The #1 killer. ZZ plants store water in their thick rhizomes and roots. Soggy soil leads to rot.
· Heavy soil that stays wet too long – Regular potting soil is often too dense. ZZ plants need a fast‑draining mix.
· Low light for too long – They survive low light, but over time, energy reserves deplete. Growth slows, leaves lose shine.
· Root or rhizome stress – Rotting rhizomes cannot support healthy stems.
· Poor drainage – A pot without holes or a saucer full of water suffocates roots.
· Exhausted potting mix – Old soil becomes compacted, acidic, and nutrient‑poor.
A ZZ plant can survive bad conditions for a while, which is why decline often seems sudden. In reality, the problem usually starts below the soil long before the leaves show it.
Early Warning Signs of a Struggling ZZ Plant
· Yellowing lower leaves (not just old age)
· Soft, mushy stems at the base
· Wrinkled or shriveled stems (dehydration from root loss)
· No new growth for over a year
· Leaves that stay curled or droopy even after watering
· A musty or sour smell from the soil
If you see these signs, do not reach for a powder. Reach for a pot and fresh soil.
What the “White Powder” Usually Is
In videos like this, the powder is often one of these:
· A powdered houseplant fertilizer – Slow‑release or water‑soluble granules.
· Epsom salt – Magnesium sulfate, sometimes overused as a “miracle” treatment.
· Cinnamon – Antifungal, used on cut wounds, not as a soil feed.
· A fungicide or root treatment – Commercial products for disease prevention.
· Sometimes just a misleading visual trick for engagement – The powder does nothing; the plant was already recovering.
That is why blindly copying the video is risky. The powder may not even be the real reason the plant improved. Even if it is a genuine product, using it without fixing the underlying issue — like soggy soil — will not help.
The Real Low-Key Method (No Magic Powder Required)
What actually helps a struggling ZZ plant is a simple, proven process. More plant lovers are noticing that this method works consistently, without gimmicks.
Step 1 – Check the Rhizomes and Roots
ZZ plants store energy in thick, potato‑like underground rhizomes. If those are mushy, rotting, or sitting in constantly wet soil, the plant cannot recover well.
How to check:
· Gently remove the ZZ plant from its pot.
· Shake off loose soil.
· Examine the rhizomes. Healthy ones are firm, plump, and light tan to white inside. Unhealthy ones are soft, brown, or black.
· Healthy roots are firm and white or tan. Rotten roots are brown, mushy, or hollow.
If more than half the rhizomes are rotten, you may need to propagate healthy cuttings (see FAQ). If only a few are rotten, cut them away with clean, sharp scissors.
Step 2 – Move It into Better Soil
A ZZ plant needs an airy, fast‑draining mix. Heavy, wet soil is one of the fastest ways to ruin it.
Best soil mix for ZZ plants:
· Commercial cactus or succulent potting mix.
· DIY: 2 parts all‑purpose potting soil + 1 part perlite + 1 part coarse sand.
· Avoid: Regular potting soil alone, garden soil, or moisture‑control mixes.
Repot into a clean pot with drainage holes. Choose a pot only 1–2 inches larger than the root ball. A pot that is too large will hold excess moisture.
Step 3 – Water Less Often (This Is Usually the Biggest Fix)
ZZ plants want the soil to dry completely between waterings. They are drought‑tolerant and much more likely to rot than to dry out.
Watering rules for ZZ plants:
· Stick your finger into the soil. If it feels dry at least 2 inches down, water.
· In most homes: water every 2–3 weeks in spring/summer, every 4–6 weeks in fall/winter.
· When you water, do it thoroughly until water runs from the drainage holes. Then empty the saucer.
· Never let the pot sit in water.
If you have been watering on a schedule, stop. Let the plant tell you when it is thirsty.
Step 4 – Give Brighter Indirect Light
ZZ plants survive low light, but they recover and grow better with brighter filtered light.
· Ideal spot: Within 3–5 feet of an east or north window. A south or west window with a sheer curtain also works.
· How much: 10–12 hours of bright indirect light daily.
· Signs of too little light: Very slow growth, small new leaves, long bare stems reaching toward light.
Moving a struggling ZZ plant to a brighter spot can trigger new growth within weeks.
Step 5 – Feed Lightly, Not Aggressively
If the plant is recovering, a mild fertilizer during active growth (spring and summer) can help. Too much can make things worse.
· Use a balanced liquid fertilizer (10‑10‑10 or 20‑20‑20) diluted to half strength.
· Feed once every 6–8 weeks during spring and summer.
· Do not fertilize a stressed or newly repotted plant. Wait 4–6 weeks.
· Never fertilize dry soil – water first.
That is the real method more plant lovers are starting to understand. No mystery powder. Just good, consistent care.
Continue to Page 2
Continue to page 2 for more details about this article and the key points many readers miss on the first page.