Peace lilies are some of the most elegant indoor plants you can grow at home. Their deep green leaves, soft white flowers, and calm tropical look make them perfect for living rooms, bedrooms, offices, kitchens, bathrooms, plant shelves, and bright windowsills. A healthy peace lily can make any room feel cleaner, fresher, and more peaceful.
One creative way to grow a peace lily is by using a recycled plastic bottle as a planter. This method is simple, affordable, and useful for people who love indoor plants but do not want to spend money on expensive pots. A plastic bottle can be cut, layered with pebbles, filled with fresh potting mix, and used as a temporary container for a small peace lily. The clear sides help you see the layers, moisture level, and root movement. It is also a fun DIY project for plant lovers.
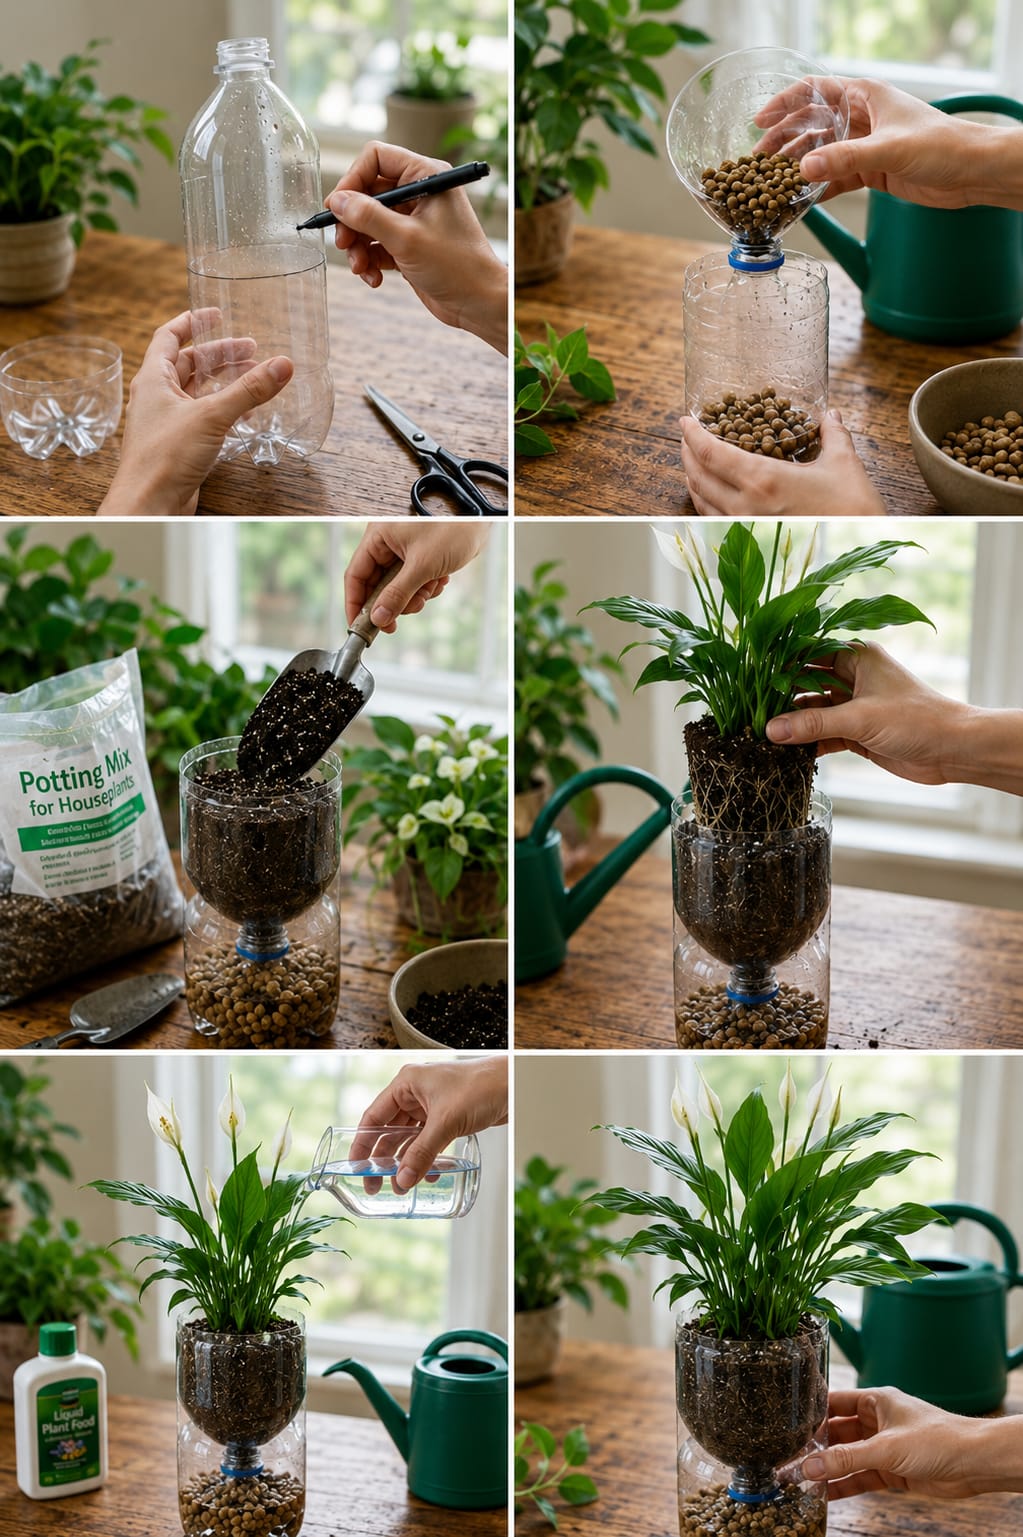
The image shows a simple six-step process. A plastic bottle is marked and cut. Pebbles are added to the bottom. Potting mix is placed above the pebble layer. A peace lily is inserted into the soil. The plant is watered gently. Finally, the peace lily stands fresh, green, and blooming in its recycled bottle planter.
This guide explains how to grow peace lily in a plastic bottle safely, how to prepare the bottle, how to add drainage layers, how to choose the right soil, how to water correctly, how to prevent root rot, how to encourage white blooms, and how to move the plant into a permanent pot later. The goal is simple: help your peace lily grow strong roots, glossy leaves, and beautiful white flowers without drowning the plant.
Why Grow Peace Lily in a Plastic Bottle?
Growing a peace lily in a plastic bottle is a creative way to reuse materials and create a simple indoor planter. It is especially useful for small plants, starter plants, plant divisions, and propagation projects. The bottle is light, easy to cut, easy to move, and easy to decorate.
A clear plastic bottle also lets you see what is happening inside. You can see the pebble layer, the soil moisture, and sometimes the roots as they grow. This makes it easier to learn how much water the plant needs.
However, a plastic bottle must be prepared correctly. Peace lilies like moisture, but they do not like soggy soil. If the bottle has no drainage holes, water can collect at the bottom and cause root rot. The safest method is to make drainage holes and place the bottle on a saucer.
Important Drainage Warning
A plastic bottle can look like a perfect planter, but it can become dangerous for plants if there is no drainage. Peace lily roots need oxygen. When roots sit in water for too long, they can become soft, black, and rotten. Once root rot begins, the plant may droop, yellow, and collapse.
Always make drainage holes in the bottom of the bottle if you want the plant to grow there for more than a short display. Pebbles at the bottom help create a base layer, but pebbles alone do not remove extra water. Water still needs a way to escape.
What You Need
- Clean plastic bottle
- Scissors or craft knife
- Marker pen
- Small pebbles or clay pebbles
- Fresh indoor potting mix
- Perlite or orchid bark, optional
- Small peace lily plant
- Clean water
- Small trowel or spoon
- Watering bottle or watering can
- Saucer or tray
- Bright indirect light
Choosing the Right Plastic Bottle
A medium or large plastic bottle works best. A small bottle may not give the roots enough room. A wider bottle is more stable and safer than a narrow one. If the plant is already medium-sized, use a larger plastic container or a proper pot instead.
Wash the bottle well before using it. Remove any sticky labels. Rinse away soap residue. A clean bottle helps prevent mold, odor, and bacteria.
Step 1: Mark and Cut the Bottle
Use a marker to draw a cutting line around the bottle. Cut carefully with scissors or a craft knife. The lower part will become the planter. The upper part can be reused as a humidity cover or funnel if needed.
Make the opening wide enough so you can add soil and place the peace lily easily. Be careful with sharp plastic edges. You can trim the rim neatly or cover the edge with tape if needed.
Step 2: Make Drainage Holes
Before adding anything inside, make several small holes in the bottom of the bottle. You can use scissors, a heated nail, or a small drill. The holes should allow water to drain freely.
Place the bottle on a saucer or tray after planting. This catches extra water and keeps your table clean. Always empty the saucer after watering.
Step 3: Add Pebbles to the Bottom
Add a layer of pebbles or clay balls to the bottom of the bottle. This adds weight and helps stabilize the planter. It also creates a separation layer between the soil and the bottom of the bottle.
Use clean pebbles. Rinse them first to remove dust. Do not add dirty outdoor stones unless they are washed well.
Step 4: Add Fresh Potting Mix
Add fresh indoor potting mix above the pebbles. Peace lilies need soil that holds moisture but still drains well. Regular potting mix can work, but it is better when improved with perlite or orchid bark.
Simple Peace Lily Soil Mix
- 2 parts indoor potting mix
- 1 part perlite
- 1 part coco coir or peat moss
- A small handful of orchid bark, optional
This mix keeps the soil light and airy. It holds enough moisture for peace lily roots but does not stay heavy and muddy.
Step 5: Place the Peace Lily in the Bottle
Remove the peace lily gently from its old pot. Hold the plant near the base and support the root ball. Do not pull hard on the leaves. Shake away a little old soil if it is compacted, but do not damage the roots unnecessarily.
Place the root ball into the bottle planter. The crown of the plant, where the stems meet the roots, should sit slightly above the soil line. Do not bury the crown deeply because trapped moisture can cause rot.
Step 6: Fill Around the Roots
Add more soil around the root ball. Press gently with your fingers to hold the plant in place. Do not pack the soil tightly. Roots need air, and compacted soil can stay wet too long.
The peace lily should stand upright. Leave a little space at the top of the bottle so water does not overflow.
Step 7: Water Gently
Water slowly until the soil is evenly moist. Let extra water drain from the holes. Empty the saucer after watering. Do not leave the bottle sitting in water.
If the soil was already moist before planting, water only lightly. Peace lilies like moisture, but newly repotted plants should not be flooded.
Step 8: Place in Bright Indirect Light
Place the peace lily near a bright window with indirect light. Avoid hot direct sun because it can burn the leaves. A bright room with filtered light is ideal.
Peace lilies can tolerate low light, but they bloom better in brighter indirect light. If you want more white flowers, light is one of the most important factors.
Best Light for Peace Lily
Peace lilies grow best in bright indirect light. They can live in lower light, but flowering may slow down. If your peace lily has healthy green leaves but no blooms, it probably needs more light.
An east-facing window is excellent. A north-facing window can also work if it is bright. A south or west window may need a sheer curtain to soften the sunlight.
How Often to Water Peace Lily in a Plastic Bottle
Water when the top inch of soil feels slightly dry. In a plastic bottle, soil may dry more slowly than in terracotta. Always check before watering.
Peace lilies like steady moisture, but they do not like standing water. The soil should feel lightly moist, not wet and heavy.
Signs Your Peace Lily Needs Water
- Leaves droop slightly.
- Top inch of soil feels dry.
- The bottle feels lighter.
- Leaves look less firm.
- Soil pulls slightly from the sides.
Signs of Overwatering
- Yellow leaves
- Soft stems
- Sour soil smell
- Wet soil for many days
- Fungus gnats
- Mold on the soil surface
- Drooping even when soil is wet
If the plant droops while the soil is wet, do not add more water. Check the roots and drainage.
How to Prevent Root Rot
- Make drainage holes in the bottle.
- Use loose soil with perlite.
- Water only when the top soil begins to dry.
- Empty the saucer after watering.
- Do not keep the bottle in dark corners.
- Do not overfill the bottom with standing water.
- Keep the crown above the soil line.
- Repot into a proper pot when roots outgrow the bottle.
Root rot is the biggest risk in bottle planters. Good drainage and careful watering keep the plant safe.
Can Peace Lily Grow Long-Term in a Plastic Bottle?
A peace lily can grow in a plastic bottle for a while if the bottle is large enough and has drainage holes. However, it is usually better as a temporary planter or starter container. As the plant grows, the roots will need more space and better airflow.
Move the plant into a proper pot when roots fill the bottle, when the plant becomes top-heavy, or when watering becomes difficult.
When to Move Peace Lily to a Bigger Pot
- Roots are pressed against the bottle sides.
- Roots come out of drainage holes.
- The plant dries too quickly.
- The bottle becomes unstable.
- The peace lily stops growing.
- The soil becomes compacted.
- The plant has many new shoots.
Choose a pot only slightly larger than the root ball. A huge pot can hold too much wet soil.
Best Pot After the Bottle Stage
A peace lily grows well in ceramic, plastic, or terracotta pots, as long as the pot has drainage holes. Ceramic looks elegant indoors. Terracotta dries faster and helps prevent overwatering. Plastic holds moisture longer and is lightweight.
The best pot is one that drains well and matches your watering habits.
How to Encourage More White Blooms
Peace lilies bloom best when the plant is healthy and receives enough bright indirect light. If the plant sits in a dark room, it may grow leaves but few flowers.
Bloom Tips
- Place near bright indirect light.
- Keep soil lightly moist.
- Avoid overwatering.
- Feed lightly during active growth.
- Use a pot with drainage.
- Remove old flowers.
- Keep leaves clean.
- Avoid cold drafts.
Do not expect instant flowers after repotting. The plant may need time to settle before blooming again.
How to Feed Peace Lily
Peace lilies do not need heavy feeding. Use a balanced houseplant fertilizer diluted to half strength once every 6 to 8 weeks during spring and summer.
Do not fertilize right after repotting. Wait at least 4 to 6 weeks. Fresh soil and root disturbance are enough for the plant at first.
Natural Feeding Options
Some plant lovers use natural ingredients such as diluted rice water, banana peel water, eggshell powder, or diluted milk water. These must be used carefully. Too much organic liquid can smell bad, attract fungus gnats, or create mold in indoor pots.
For a bottle planter, it is safer to use plain water most of the time and a diluted balanced fertilizer only occasionally.
Ingredients to Avoid
- Undiluted milk
- Strong coffee
- Table salt
- Sugar water
- Cleaning powders
- Heavy baking soda
- Rotting kitchen scraps
- Strong fertilizer on dry roots
Peace lily roots are sensitive. Keep the soil clean and fresh.
How to Clean Peace Lily Leaves
Peace lily leaves collect dust easily. Dust blocks light and makes the plant look dull. Wipe the leaves with a soft damp cloth every few weeks. Support each leaf gently while wiping.
Clean leaves look glossy and help the plant absorb more light. This can support better growth and flowering.
Should You Mist Peace Lily?
Misting can briefly increase moisture around the leaves, but it does not replace proper humidity. If your home is very dry, a humidifier or pebble tray works better.
If you mist, do it lightly in the morning so leaves can dry. Avoid misting late at night because wet leaves in still air can encourage fungal spots.
Humidity for Peace Lily
Peace lilies like moderate humidity. Dry air can cause brown tips and curled edges. If the leaves look crispy, humidity may be too low.
Easy Humidity Tips
- Group plants together.
- Use a pebble tray under the plant.
- Place in a bright bathroom.
- Use a small humidifier.
- Keep away from heaters.
- Avoid cold drafts.
Common Peace Lily Problems
Yellow Leaves
Yellow leaves can come from overwatering, poor drainage, low light, old leaves, or root stress. If many leaves yellow at once, check the roots.
Brown Tips
Brown tips may come from dry air, inconsistent watering, fertilizer buildup, harsh tap water, or too much direct sun.
Drooping Leaves
Drooping can mean underwatering or overwatering. Always check the soil before adding water.
No Flowers
No flowers usually means not enough bright indirect light or the plant is not mature enough.
Mold on Soil
Mold usually means too much moisture and poor airflow. Remove the top layer, improve airflow, and water less often.
How to Rescue an Overwatered Peace Lily
- Stop watering.
- Remove the plant from the bottle or pot.
- Check the roots.
- Trim black or mushy roots.
- Remove sour wet soil.
- Repot in fresh airy soil.
- Use a container with drainage.
- Place in bright indirect light.
- Water only when the top soil starts to dry.
If root rot is present, do not fertilize until the plant recovers.
How to Divide Peace Lily
If your peace lily grows many clumps, you can divide it. Division is best done during repotting.
- Remove the plant from its pot.
- Separate natural clumps gently.
- Make sure each section has roots.
- Plant each division in fresh soil.
- Water lightly.
- Keep in bright indirect light.
Do not divide a very weak plant. Let it recover first.
Indoor Styling Ideas
A peace lily in a recycled bottle can look simple and creative. You can keep it clear for a modern DIY look or decorate the outside.
- Wrap the bottle with jute rope for rustic style.
- Place it inside a basket cover.
- Use a white saucer for a clean look.
- Put it near a bright window.
- Group with pothos and snake plants.
- Use it as a kitchen windowsill plant.
- Place on a wooden table for natural warmth.
- Move to a ceramic pot when mature.
Continue to Page 2
Continue to page 2 for more details about this article and the key points many readers miss on the first page.