
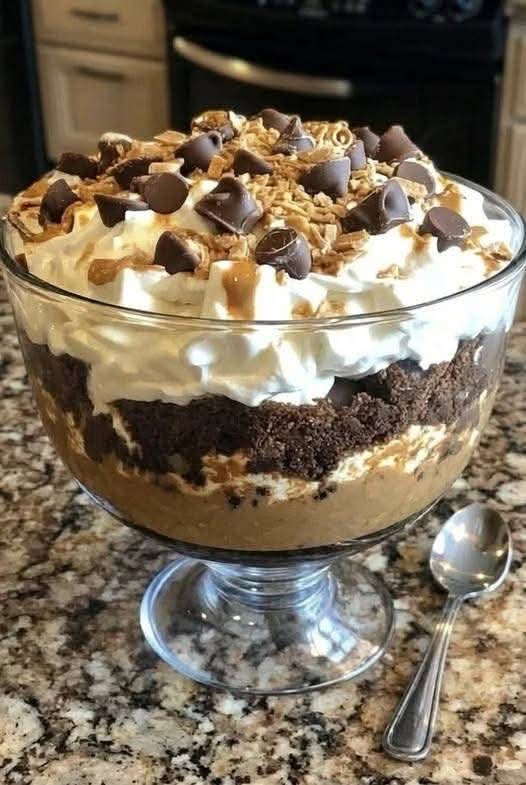
This chocolate peanut butter delight trifle has rich brownie, creamy peanut butter pudding, and fluffy whipped cream. No‑bake, easy to assemble, and perfect for potlucks, holidays, and birthdays.
Let’s be honest: some desserts are just meant to be shared. The kind you bring to a party and watch disappear before the main course is even served. The kind that makes people ask, “Who made this?” and “Can I have the recipe?”
This chocolate peanut butter delight trifle is that dessert.
It’s a towering, gorgeous, layered masterpiece that looks like you spent hours in the kitchen – but secretly comes together in about 30 minutes with no baking required (if you use store‑bought brownies or cake). Rich, fudgy chocolate. Creamy, dreamy peanut butter pudding. Fluffy, cloud‑like whipped cream. Crunchy bits of peanut butter cups in every single bite. It’s the ultimate combination of salty and sweet, smooth and crunchy, indulgent and somehow still light.
Whether you’re hosting a holiday dinner, bringing a dish to a potluck, celebrating a birthday, or just treating your family on a random Tuesday, this trifle delivers. It’s make‑ahead friendly (actually, it’s better the next day), endlessly customizable, and guaranteed to get rave reviews.
In this guide, I’ll walk you through everything: the complete recipe from scratch (including shortcuts), pro tips for perfect layers, delicious variations, storage instructions, and answers to all your trifle questions.
Let’s build a dessert that’s as beautiful as it is delicious.
Why This Chocolate Peanut Butter Trifle Is a Crowd‑Pleaser
- No Baking Required (If You Choose)
Use store‑bought brownies, cake, or even crushed chocolate sandwich cookies. This is a truly no‑bake dessert when you need it to be.
- Visually Stunning
A clear glass trifle dish or large bowl shows off every gorgeous layer. It’s a centerpiece dessert that needs no decoration.
- Make‑Ahead Magic
Trifles actually taste better after chilling for several hours or overnight. The flavors meld, and the layers set perfectly.
- Crowd‑Pleasing Flavor Combo
Chocolate + peanut butter is arguably the most beloved dessert pairing in America. Kids and adults alike can’t resist it.
- Endlessly Customizable
Gluten‑free? Use gluten‑free brownies. Dairy‑free? Use coconut whipped cream and dairy‑free pudding. Want extra crunch? Add crushed pretzels or peanuts.
- Feeds a Crowd
A standard trifle dish serves 12–16 people easily. Perfect for holidays, birthdays, and potlucks.
Ingredient Breakdown – The Layers of Bliss
A great trifle is all about contrast: rich vs. light, creamy vs. crunchy, sweet vs. salty. Here’s what makes each layer shine.
Layer 1: The Chocolate Base
Option A: Brownie Bites (Recommended)
· 1 box brownie mix (or homemade) – Fudgy, not cake‑style, works best.
· Ingredients called for on the box (eggs, oil, water) – Prepare as directed.
Option B: Chocolate Cake
· 1 box chocolate cake mix – Or homemade. Bake in a 9×13 pan.
Option C: No‑Bake Shortcut
· 1 package chocolate sandwich cookies (like Oreos), crushed – Mix with ¼ cup melted butter to create a crust‑like crumb layer.
Why brownies work best: Their dense, fudgy texture holds up better in a trifle than airy cake, which can get soggy. Brownies stay moist but structured.
Layer 2: Creamy Peanut Butter Pudding
· 1 box (5.1 oz) instant vanilla pudding mix – Use the “cook and serve” won’t work here.
· 2 cups cold milk – Whole milk yields the creamiest result; 2% works too.
· ½ cup creamy peanut butter – Smooth, not natural (natural separates).
· 4 oz cream cheese, softened (optional but recommended) – Adds tangy richness and stability.
· ½ cup powdered sugar (if using cream cheese) – Sweetens the cream cheese layer.
Pro tip: For an even richer peanut butter flavor, use peanut butter pudding mix (if you can find it) or add 2 tablespoons of peanut butter powder (PB2) to the vanilla mix.
Layer 3: Fluffy Whipped Cream
· 2 cups heavy whipping cream – Cold, straight from the fridge.
· ¼ cup powdered sugar – Sweetens and stabilizes.
· 1 tsp vanilla extract – Adds warmth.
Alternative: Use 1 tub (8 oz) frozen whipped topping (Cool Whip), thawed – Faster, but homemade is creamier and less sweet.
Layer 4: Crunchy Peanut Butter Cup Crumbles
· 1 cup (about 8–10) mini peanut butter cups, chopped – Reese’s are classic.
· ¼ cup chopped salted peanuts (optional) – Extra crunch and salt.
Layer 5: Chocolate Ganache Drizzle (Optional but Glorious)
· ½ cup semi‑sweet chocolate chips
· ¼ cup heavy cream
The Recipe – Chocolate Peanut Butter Delight Trifle
Prep time: 30 minutes
Chill time: 4 hours (minimum, preferably overnight)
Total time: 4.5 hours (mostly inactive)
Yield: 12–16 servings
Ingredients
Chocolate Layer Amount Notes
Brownie mix (or homemade) 1 box (9×13 pan) Prepare as directed; cool completely
Or chocolate cake mix 1 box Bake and cool
Peanut Butter Pudding Layer Amount Notes
Instant vanilla pudding mix 1 box (5.1 oz) Not cook‑and‑serve
Cold milk 2 cups Whole milk preferred
Creamy peanut butter ½ cup Smooth, not natural
Cream cheese (optional) 4 oz Softened
Powdered sugar (if using cream cheese) ½ cup
Whipped Cream Layer Amount Notes
Heavy whipping cream 2 cups Very cold
Powdered sugar ¼ cup
Vanilla extract 1 tsp
Toppings Amount Notes
Mini peanut butter cups 1 cup Chopped
Salted peanuts (optional) ¼ cup Chopped
Chocolate ganache (optional) ½ cup chips + ¼ cup cream
Equipment
· Trifle dish (4–5 quart capacity) or large glass bowl
· Electric mixer (hand or stand)
· Large mixing bowls
· Spatula
· Piping bag (optional, for neat layers)
Step‑by‑Step Instructions
Step 1: Prepare the Chocolate Base
Bake the brownies (or cake) according to package directions. Cool completely. Do not skip cooling – warm brownies will melt the pudding and whipped cream.
Once cooled, cut the brownies into 1‑inch cubes. You want bite‑sized pieces that fit neatly into the trifle dish.
Shortcut: Use store‑bought brownie bites or even brownie brittle.
Step 2: Make the Peanut Butter Pudding
In a large bowl, beat the cream cheese (if using) and peanut butter together until smooth. Add the powdered sugar and mix until combined.
In a separate bowl, whisk the instant pudding mix with cold milk for 2 minutes until thickened. (It will be soft‑set.)
Fold the pudding into the peanut butter mixture until smooth and uniform. Set aside.
No cream cheese version: Simply whisk the pudding mix with milk, then whisk in the peanut butter until smooth.
Step 3: Make the Whipped Cream
Pour the cold heavy cream into a chilled bowl. Beat on medium‑high speed until soft peaks form. Add the powdered sugar and vanilla, then beat until stiff peaks form (the cream holds its shape and doesn’t droop). Do not overbeat, or it will turn into butter.
Tip: Chill your bowl and beaters in the freezer for 10 minutes before starting – it makes a difference.
Step 4: Make the Ganache (Optional)
Place the chocolate chips in a small bowl. Heat the heavy cream until just simmering (microwave for 30–45 seconds). Pour over the chocolate chips, let sit for 2 minutes, then stir until smooth. Let cool slightly – it should be pourable but not hot.
Step 5: Assemble the Trifle
Now for the fun part. Grab your trifle dish and start layering. There’s no single “right” order, but this sequence works beautifully:
Layer 1 (Bottom): ⅓ of the brownie cubes. Spread them evenly.
Layer 2: ½ of the peanut butter pudding. Spread gently to the edges – you want every spoonful to get some pudding.
Layer 3: ⅓ of the whipped cream. Spread evenly.
Layer 4: ½ of the chopped peanut butter cups and peanuts.
Repeat:
· Layer 5: Another ⅓ of brownie cubes
· Layer 6: Remaining peanut butter pudding
· Layer 7: Another ⅓ of whipped cream
· Layer 8: Remaining peanut butter cups and peanuts
Top layer: The final ⅓ of whipped cream. Swirl it decoratively. Drizzle with chocolate ganache if using. Sprinkle with a few reserved peanut butter cup pieces.
Step 6: Chill (This Is Crucial)
Cover the trifle with plastic wrap and refrigerate for at least 4 hours, preferably overnight. Chilling allows the layers to set and the flavors to meld. A trifle served immediately is good; a trifle that has rested is spectacular.
Step 7: Serve
Scoop deep to get all the layers in every serving. Use a large spoon or a trifle server. Garnish with an extra drizzle of peanut butter or chocolate sauce if desired.
Pro Tips for a Show‑Stopping Trifle
- Use a Clear Glass Dish
The beauty of a trifle is seeing the layers. A glass bowl or dedicated trifle dish (with a pedestal) is worth the investment.
- Build Layers Neatly
Spread each layer all the way to the edges of the dish so every scoop has everything. Use a spatula or the back of a spoon.
- Don’t Skimp on Chill Time
A rushed trifle can be soupy. The pudding and whipped cream need time to set. Overnight is ideal.
- Reserve Some Toppings for the Top
The top layer is what everyone sees. Save a handful of peanut butter cup chunks and peanuts for the final garnish.
- Make It a Day Ahead
Trifles are the ultimate make‑ahead dessert. Prepare it the day before your event, keep it refrigerated, and pull it out 15 minutes before serving.
- Use a Piping Bag for Neat Layers
If you want pristine, Instagram‑worthy layers, transfer the pudding and whipped cream to piping bags. Pipe in concentric circles for perfect coverage.
Delicious Variations
Gluten‑Free Chocolate Peanut Butter Trifle
Use gluten‑free brownie mix (King Arthur, Betty Crocker). Ensure your pudding mix and peanut butter cups are gluten‑free (most are). Everything else is naturally gluten‑free.
Dairy‑Free / Vegan
· Brownies: Use a vegan brownie mix (or applesauce instead of eggs, plant milk instead of dairy).
· Pudding: Use instant pudding mix with unsweetened almond milk or oat milk – note that plant milks may produce a softer set. Add 2 tbsp cornstarch to help.
· Whipped cream: Use coconut whipped cream (chill a can of full‑fat coconut milk overnight, scoop the solid cream, beat with powdered sugar).
· Peanut butter cups: Use vegan peanut butter cups (Justin’s, Unreal, or homemade).
Peanut Butter Lover’s Trifle
Add an extra layer: warm ½ cup peanut butter with 2 tbsp coconut oil until pourable, then drizzle between layers. Or swirl peanut butter directly into the whipped cream.
Salted Caramel Peanut Butter Trifle
Drizzle store‑bought or homemade salted caramel sauce between layers. The salty‑sweet combination is incredible.
Banana Split Trifle
Add a layer of sliced fresh bananas (tossed with a little lemon juice to prevent browning) between the brownie and pudding layers. Top with chocolate syrup and maraschino cherries.
S’mores Peanut Butter Trifle
Replace brownies with crushed graham crackers (mixed with melted butter). Add a layer of mini marshmallows and toast them with a kitchen torch before serving.
Lower Sugar Version
Use sugar‑free brownie mix (Duncan Hines makes one), sugar‑free instant pudding mix, natural peanut butter (no added sugar), and sugar‑free whipped cream (homemade with a sugar substitute like allulose or monk fruit).
Storage & Make‑Ahead Instructions
Refrigerator
Store the assembled trifle, covered, in the refrigerator for up to 3 days. The brownies will soften slightly (which many people love). If you want to maintain crunch, add the peanut butter cup topping fresh just before serving.
Freezer
Not recommended. The pudding and whipped cream will separate upon thawing, becoming watery and grainy. Make and refrigerate – never freeze.
Make Ahead Timeline
· Up to 2 days ahead: Bake and cube the brownies. Store in an airtight container at room temperature.
· Up to 1 day ahead: Make the peanut butter pudding and whipped cream. Store separately in the fridge.
· Day of serving: Assemble the trifle (takes 15 minutes) and chill for at least 4 hours. Or assemble completely the night before – it’s even better.
Nutrition Facts (Per Serving – 1/12 of recipe)
Nutrient Amount
Calories 585
Protein 11g
Fat 34g
Saturated Fat 16g
Carbohydrates 62g
Fiber 3g
Sugar 42g
Sodium 380mg
Calcium 8% DV
Iron 12% DV
Nutritional information is an estimate using standard brownie mix, whole milk, and full‑fat whipped cream. Reduce by using lighter ingredients.
Frequently Asked Questions (FAQs)
Q: Can I use a different type of chocolate base?
Absolutely. Chocolate cake, chocolate chip cookies, Oreos, or even chocolate graham crackers all work. If using cookies or crackers, crush them and mix with a little melted butter to help them hold together.
Q: Can I make this without peanut butter cups?
Yes. Substitute with chopped salted peanuts, chocolate chips, toffee bits, or crushed pretzels. You can also simply omit them – the pudding already has plenty of peanut butter flavor.
Q: Why did my whipped cream deflate?
Several reasons: the cream wasn’t cold enough, you overbeat it (it becomes grainy, then butter), or the bowl/beaters weren’t clean (any trace of fat or yolk can prevent whipping). Always use cold heavy cream (not light cream or half‑and‑half) and a clean, chilled bowl.
Q: Can I use homemade brownies instead of a mix?
Yes. Use your favorite fudgy brownie recipe. Cool completely before cubing.
Q: How do I get clean, neat layers?
Use a piping bag or a zip‑top bag with the corner snipped off to pipe the pudding and whipped cream. This gives you perfect control. Spread the brownie cubes with your hands or a spatula.
Q: Can I serve this in individual cups instead of one big dish?
Yes! This makes a gorgeous individual dessert. Use 8–10 ounce glasses or mason jars. Layer as directed. Chill for 2 hours minimum. Perfect for dinner parties or buffets.
Q: Is this dessert safe for kids and pregnant women?
Yes – as long as you use pasteurized ingredients (all standard grocery store products are). The eggs in the brownie mix are cooked during baking. No raw eggs in the pudding or whipped cream.
Q: Can I reduce the sugar?
Yes. Use sugar‑free brownie mix, sugar‑free pudding mix, and a sugar substitute in the whipped cream (powdered allulose or monk fruit). The peanut butter cups are the hardest to replace – use sugar‑free chocolate and make your own peanut butter cups, or omit them and add salted peanuts instead.
Troubleshooting – What Went Wrong?
Problem Likely Cause Fix Next Time
Trifle is soupy / runny Pudding didn’t set, or whipped cream overbeat and separated Use instant pudding (not cook‑and‑serve); chill cream and bowl; don’t overbeat
Layers look messy Rushed assembly or didn’t spread to edges Use piping bag; spread each layer to the glass edge
Brownies are hard / dry Overbaked or stale Use fudgy brownie mix; bake just until set; don’t overbake
Whipped cream weeps (watery layer at bottom) Overbeat or used cream with too low fat Use heavy cream (36%+ fat); beat only to stiff peaks
Peanut butter pudding is grainy Peanut butter not fully incorporated, or cream cheese not softened Bring cream cheese to room temp; beat thoroughly
Trifle collapsed while chilling Too much liquid or layers too heavy Ensure brownies are completely cool; don’t overload with wet ingredients
The History of the Trifle – A Dessert Born from Thrift
The trifle has been delighting diners for over 400 years. Originating in England in the late 16th century, it was a way to use up leftover cake or bread. Cooks would soak stale cake in alcohol (usually sherry), layer it with custard and fruit, and top with whipped cream. The name comes from the Old French trufle, meaning something whimsical or of little consequence – ironic, given how beloved it became.
By the Victorian era, trifles were elaborate centerpieces, often made in cut‑glass bowls to show off the layers. The dessert crossed the Atlantic and evolved into countless American versions, replacing sherry with fruit juice (or skipping alcohol entirely) and incorporating distinctly American flavors like chocolate, peanut butter, and Oreos.
This chocolate peanut butter delight trifle is a modern twist on a centuries‑old tradition. It honors the original’s layered beauty and make‑ahead practicality while embracing flavors that feel distinctly contemporary. When you serve this, you’re not just making dessert – you’re participating in a culinary legacy.
Final Thoughts – The Dessert That Disappears First
This chocolate peanut butter delight trifle is everything a dessert should be: beautiful, delicious, forgiving, and endlessly adaptable. It’s the dish you bring to a potluck knowing you’ll leave with an empty bowl. It’s the dessert you make for a birthday when you want to impress without stress. It’s the sweet ending to a holiday meal that has everyone asking for seconds.
And because it’s make‑ahead and no‑bake (if you choose), it fits into even the busiest schedules. The layers of fudgy brownie, creamy peanut butter pudding, fluffy whipped cream, and crunchy peanut butter cups create a symphony of textures and flavors that’s impossible to resist.
So grab a glass bowl. Bake those brownies (or buy them). Whisk that pudding. Whip that cream. And build something beautiful – one layer at a time.
Now it’s your turn! Have you made a trifle before? What’s your favorite layer combination – chocolate and peanut butter, or something else? Drop a comment below – I’d love to hear your creations.
And if you found this guide helpful, share it with a friend who needs an easy, show‑stopping dessert for their next gathering. Pin it for later, and subscribe to our newsletter for more no‑bake, crowd‑pleasing recipes.
Stay layered, stay creamy, and always save room for dessert. 🍫🥜🍰✨
Loved this trifle? Try our other no‑bake favorites: Oreo Delight, Strawberry Shortcake Trifle, and Tiramisu Layer Dessert.
More Recipes You Might Like
-
Chocolate Peanut Butter Delight Trifle – The No‑Bake Layered Dessert That Steals the Show
This chocolate peanut butter delight trifle has rich brownie, creamy peanut butter pudding, and fluffy whipped cream. No‑bake, easy to assemble, and perfect for potlucks, holidays, and birthdays. Let’s be honest: some desserts are just meant to be shared. The kind you bring to a party and watch disappear before the main course is even…
-
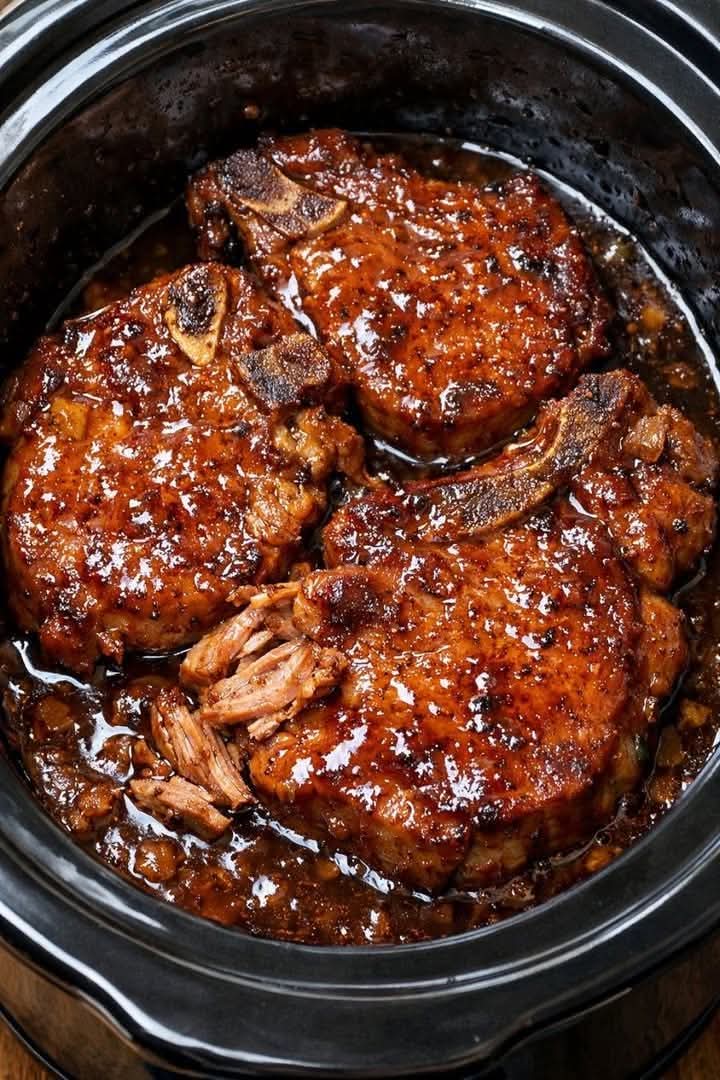
My Dad Passed Down This Cheap 4‑Ingredient Dinner Trick… The Most Melt‑in‑Your‑Mouth Meal You’ll Ever Make
This 4‑ingredient pork chop dinner is my dad’s secret recipe. Slow‑cooked with onion soup mix and barbecue sauce, it’s tender, budget‑friendly, and unforgettable. Perfect for busy families. Let’s be honest: the best recipes don’t come from celebrity chefs or glossy cookbooks. They come from family. From a parent who knew how to stretch a dollar…
-
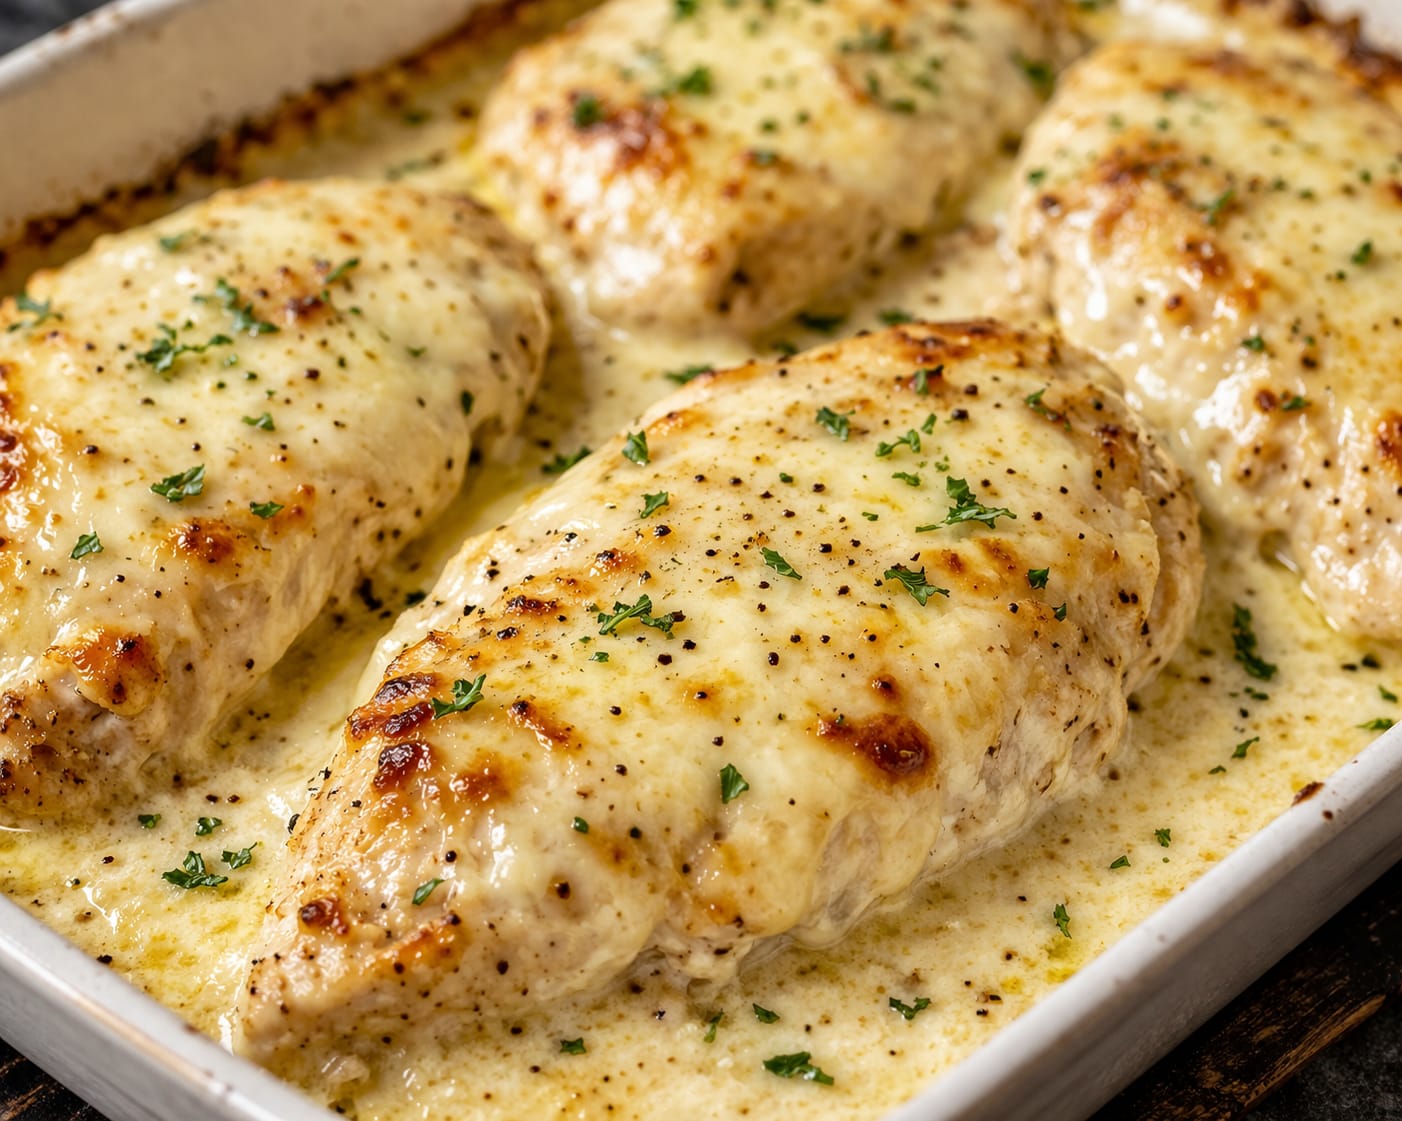
Smothered Cheesy Sour Cream Chicken – The Creamiest One‑Pan Dinner You’ll Ever Make
This smothered cheesy sour cream chicken is rich, creamy, and packed with flavor. Ready in 30 minutes with simple ingredients. Low‑carb, keto‑friendly, and loved by kids and adults alike. Let’s be honest: chicken breasts can be boring. Dry, bland, and forgettable – they’re the default “healthy” dinner that no one actually looks forward to. But…