Anthuriums are famous for their glossy, heart‑shaped leaves and bold, waxy blooms in shades of red, pink, white, and even purple. They bring a tropical, elegant feel to any room. Most people grow them in soil or a chunky aroid mix, but there is another method that more plant lovers are starting to discover: water rooting and water propagation.
It looks almost too simple. A healthy cutting. A clean jar of water. A bright spot indoors. And after a little patience, new roots begin to appear. That is why this method gets so much attention online. It is neat, easy to watch, and surprisingly effective when done the right way.
But as with most viral plant tricks, the real success comes from understanding the process, not just copying what you see in a short video. In this guide, you will learn exactly how to propagate anthuriums in water, what works, what does not, and how to turn one plant into many — all while enjoying the satisfying sight of roots growing before your eyes.
Why the Water Method Is So Appealing
Anthurium propagation in water has become popular for several good reasons. It offers benefits that traditional soil propagation cannot match.
Here is why plant lovers love it:
· See root growth clearly – No guessing what is happening below the surface. You can watch every tiny root develop.
· Monitor plant health more easily – Spot rot, algae, or stagnation immediately.
· Start cuttings without messy soil – Perfect for small apartments or clean indoor setups.
· Enjoy a simple, decorative propagation setup – A glass jar with a cutting can look like living art.
· Lower risk of overwatering – In soil, it is easy to drown cuttings. In water, you control the environment directly.
For many plant owners, the biggest advantage is visibility. Instead of wondering whether roots are forming, you can actually see them day by day. That alone makes the method feel exciting and rewarding.
Can Anthuriums Really Root in Water?
Yes, healthy anthurium cuttings can root in water, especially if they already have a node and are taken from a strong parent plant. Water propagation can be a good temporary step before moving the plant into an airy potting mix.
However, it is important to understand that water rooting is usually best used for:
· Propagation – Creating new plants from stem cuttings.
· Short‑term recovery monitoring – Reviving a cutting that has lost roots.
· Rooting cuttings before potting up – A transitional phase before soil.
Water is not always the best permanent setup for every anthurium long term. Most anthuriums prefer a chunky, well‑draining mix once they are established. But for starting new plants, water is a fantastic tool.
What Part of the Plant You Need (The #1 Secret)
For this method to work, the cutting needs more than just a leaf. Many beginners make the mistake of placing a single leaf in water and wondering why nothing happens.
A good cutting usually includes:
· A node – The small bump or joint on the stem where roots and leaves emerge. This is non‑negotiable.
· Part of the stem – At least 1–2 inches of stem below the node.
· At least one healthy leaf – To photosynthesize and provide energy.
· Ideally a visible aerial root or root nub – Speeds up rooting dramatically.
Without a node, the cutting is much less likely to produce real new growth. That is one of the biggest reasons people fail with water propagation. The cutting may look pretty, but if it does not include the right growth point, it may sit in water for weeks without doing much.
The Basic Water Propagation Method (Step‑by‑Step)
Follow these steps for the highest chance of success.
Step 1 – Take a Healthy Cutting
Use clean, sharp scissors or pruning shears. Sterilize them with rubbing alcohol to prevent introducing bacteria. Cut below a node, leaving at least 1–2 inches of stem below the node. Choose a piece that looks firm, green, and free from rot or pests.
Step 2 – Use a Clean Jar
Select a small, clean jar or glass. Clear containers are popular because they let you see root development. However, clear glass can also promote algae growth if exposed to too much light. You can use an opaque jar or wrap the glass in paper to reduce algae. Rinse the jar thoroughly before use.
Step 3 – Keep Only the Node in Water
Place the cutting in the jar so that the node and any root nubs are submerged. The leaves should stay completely above the water. If leaves sit in water, they will rot quickly. If the cutting is top‑heavy, you can use a narrow‑necked jar or support the leaves with a rubber band or mesh.
Step 4 – Place in Bright Indirect Light
Anthuriums love bright, filtered light. An east window or a south/west window with a sheer curtain is ideal. Too much direct sun can overheat the jar, cook the roots, and encourage algae. Too little light means no photosynthesis and slow rooting.
Step 5 – Refresh the Water Regularly
Change the water every 3–5 days, or whenever it begins to look cloudy. Use room‑temperature, filtered or distilled water if possible. Tap water with chlorine or fluoride can inhibit root growth. Clean water is one of the biggest keys to success.
Step 6 – Wait and Watch
Roots typically appear in 2–6 weeks, depending on the health of the cutting and environmental conditions. Be patient. Do not tug on the cutting to check for roots. Let it do its work.
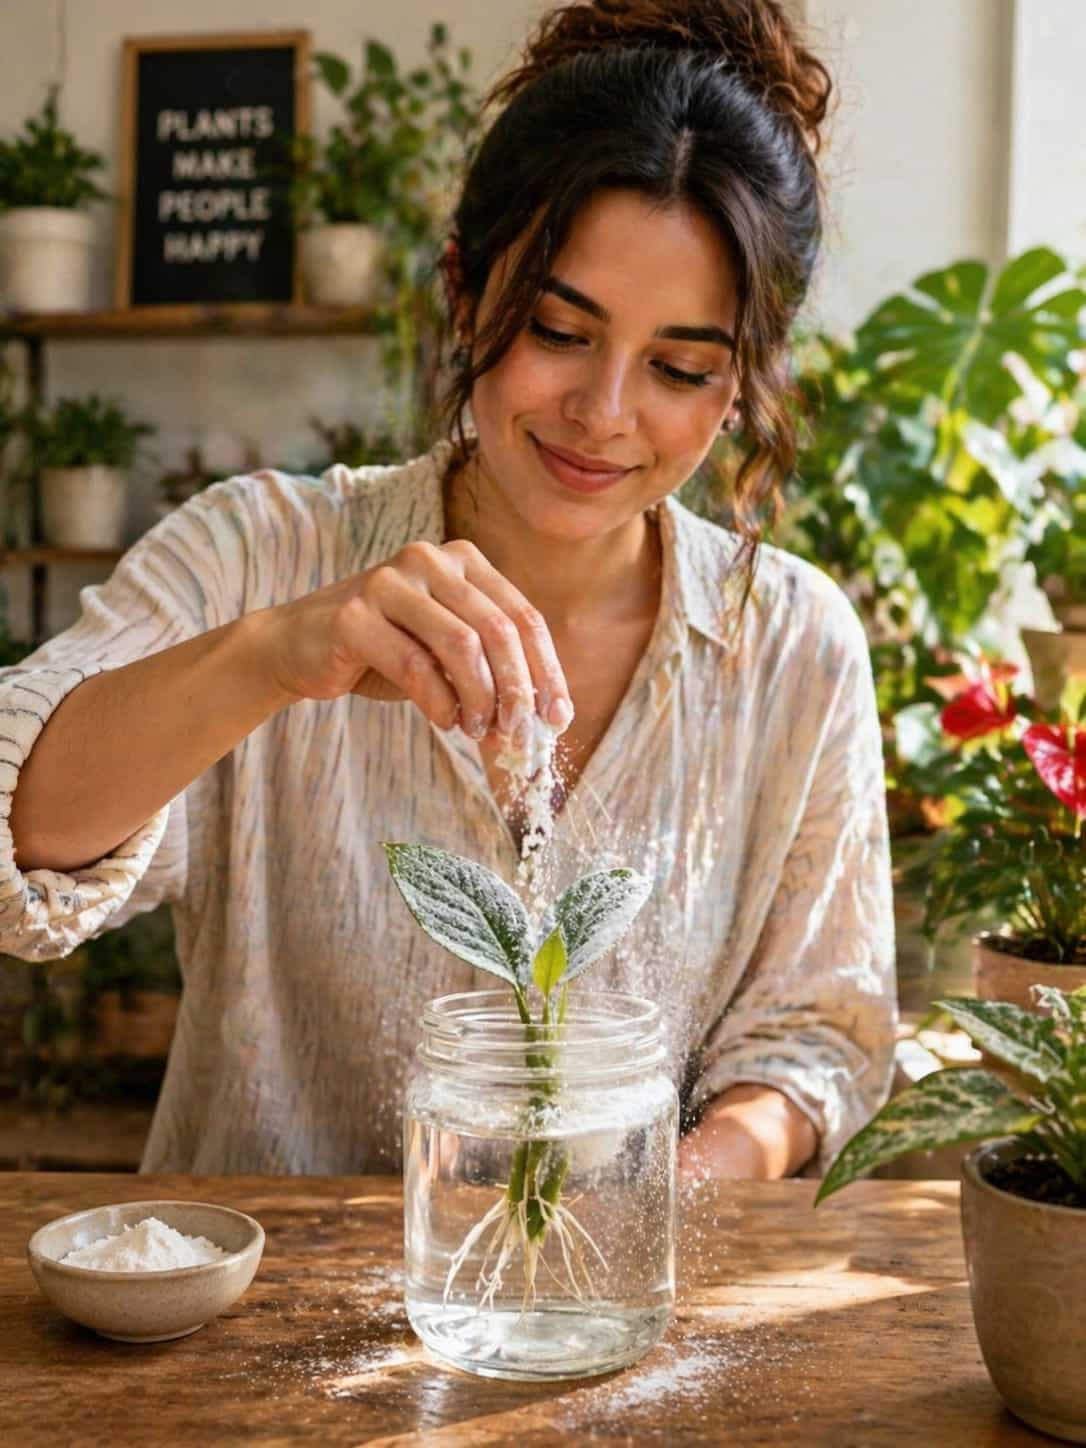
What About the White Powder in Videos?
In many viral plant videos, you will see a white powder sprinkled over the cutting or into the jar. Sometimes it is:
· Rooting hormone – Contains auxins that stimulate root growth.
· Cinnamon – Natural antifungal, often used on cut wounds.
· Crushed tablet powder – Aspirin, vitamin, or other household tablets (not recommended).
· Fertilizer – Water‑soluble plant food.
· Something unclear used for attention – No real benefit.
This is where caution matters. A healthy anthurium cutting does not need random powder dumped on it to root in water. In fact, adding unknown powders can sometimes:
· Cloud the water and reduce oxygen.
· Encourage rot instead of preventing it.
· Leave residue on the stem, blocking pores.
· Make the whole setup less clean.
If you want to use a proper rooting hormone, dip the cut end into the powder before placing it in water. Use it sparingly. But the truth is that many strong cuttings will root just fine in clean water, good light, and warm conditions — no powder required.
How Long Does Rooting Take?
That depends on the cutting, the anthurium variety, and the environment. However, most people start seeing signs of progress within a few weeks.
Early signs include:
· Firmer cutting – The stem feels more rigid.
· Swelling at the node – Tiny white bumps appear where roots will emerge.
· Small white root tips – These are the first visible roots.
· Steady leaf health – Leaves remain green and perky.
Larger root systems take longer. Some anthuriums may take 2–3 months to develop a strong network. Patience matters here. Do not give up too soon.
Continue to Page 2
Continue to page 2 for more details about this article and the key points many readers miss on the first page.