
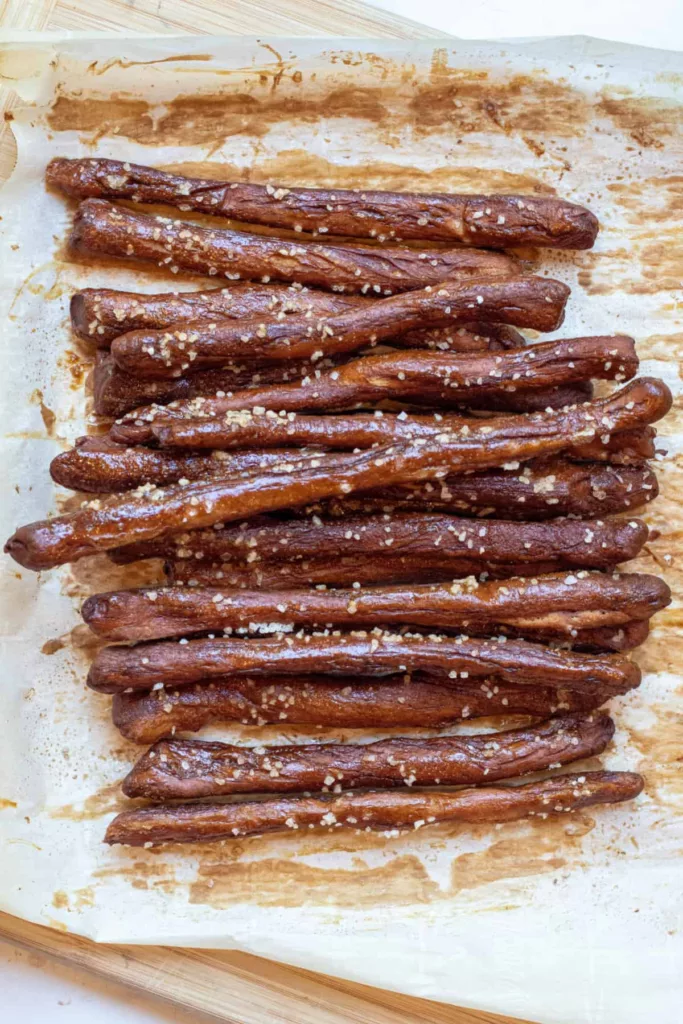
This traditional snack will help you take your handmade pretzels to the next level! Our handmade Hard Pretzel Rods are prepared (easier than you would think) at home and have all the flavor and crunch you expect from a handmade hard pretzel!
Ingredients Needed
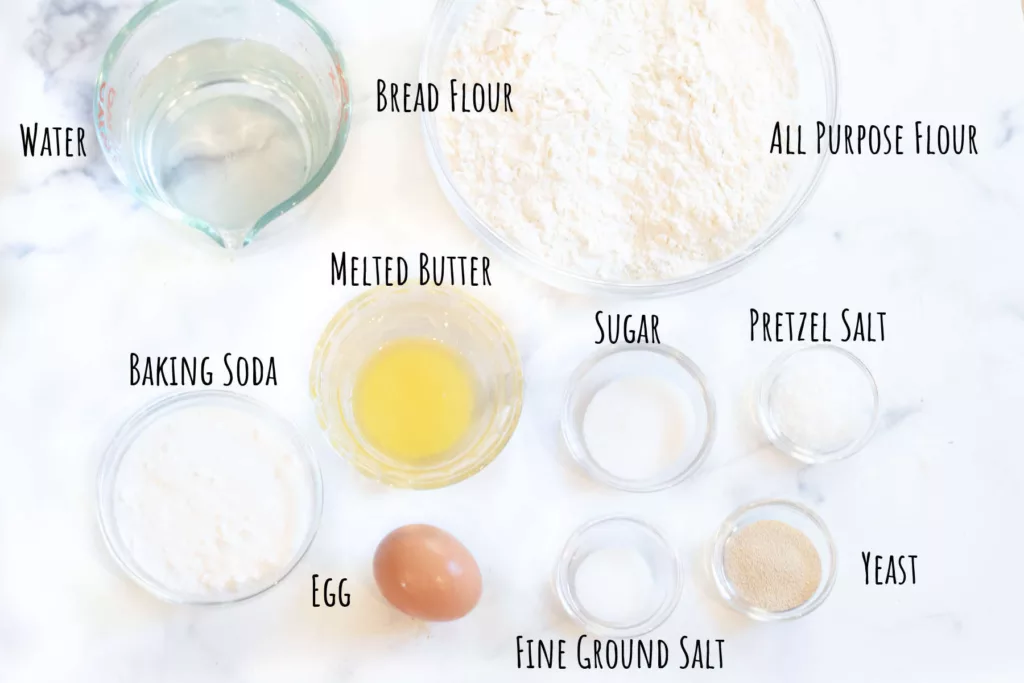
- We really enjoy using both bread flour and all-purpose flour together, but you could certainly make them with just one of them.
- The initial stage of the dough is made with instant yeast, sugar, and warm water.
- Melt butter and sugar: The dough just needs a small amount of fat and sugar.
- Baking soda is essential for giving the dough a baking soda bath before to baking in order to get the ideal texture and taste.
- To complete the pretzels, add Pretzel Salt and Egg Wash. Of course, you could finish the pretzels with coarse kosher salt, but we really adore this bagel/pretzel salt!
Easy to Make
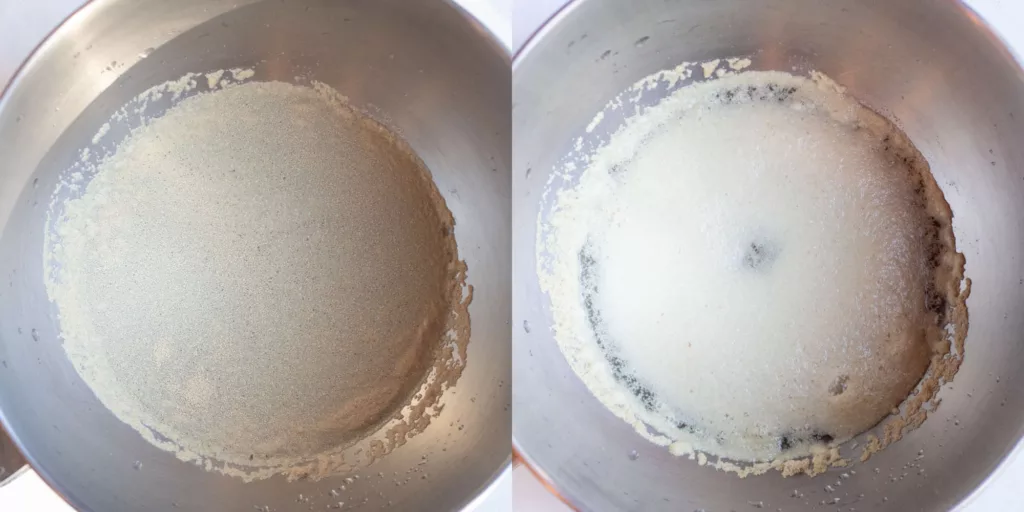
Get the Yeast Going
In the bowl of your stand mixer, combine the sugar and warm water, and whisk thoroughly. After that, stir in the yeast and allow it get to a frothy state.
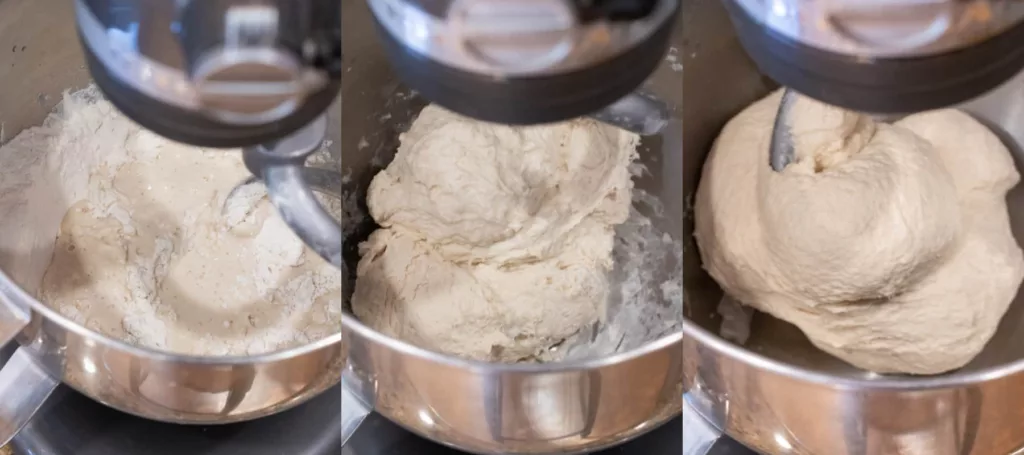
Make Dough
To make a lovely, smooth dough, all you need to do is add the remaining ingredients when you have your activated yeast.
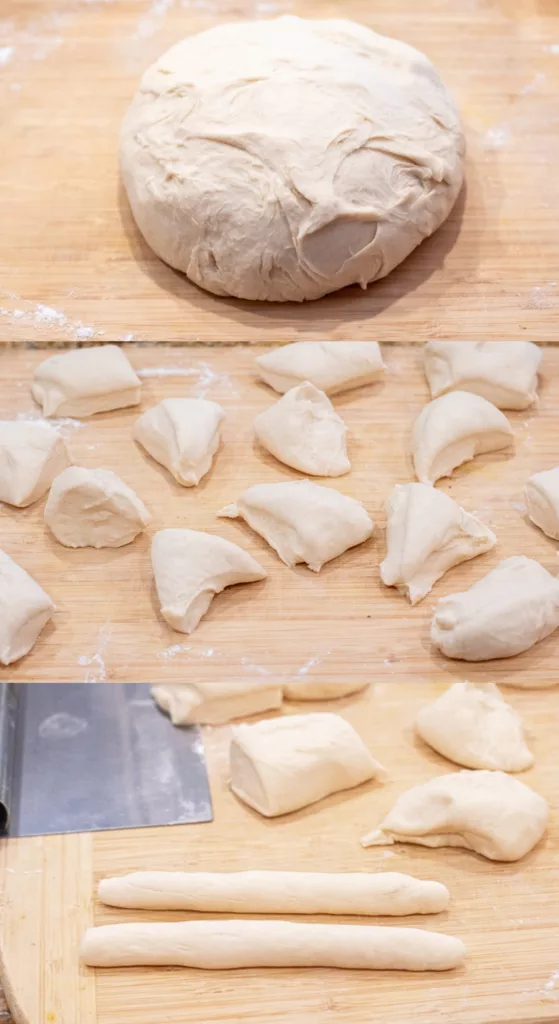
Sliced Dough
After giving the dough a few kneads, divide it into pieces using your reliable dough cutter so that it may be rolled out.
Homemade Hard Pretzel Rods
Consolidate into Rods
The most labor-intensive step in making these handmade hard pretzels is rolling out the dough into pretzel rods, but it’s also one of the most enjoyable—especially for little ones!
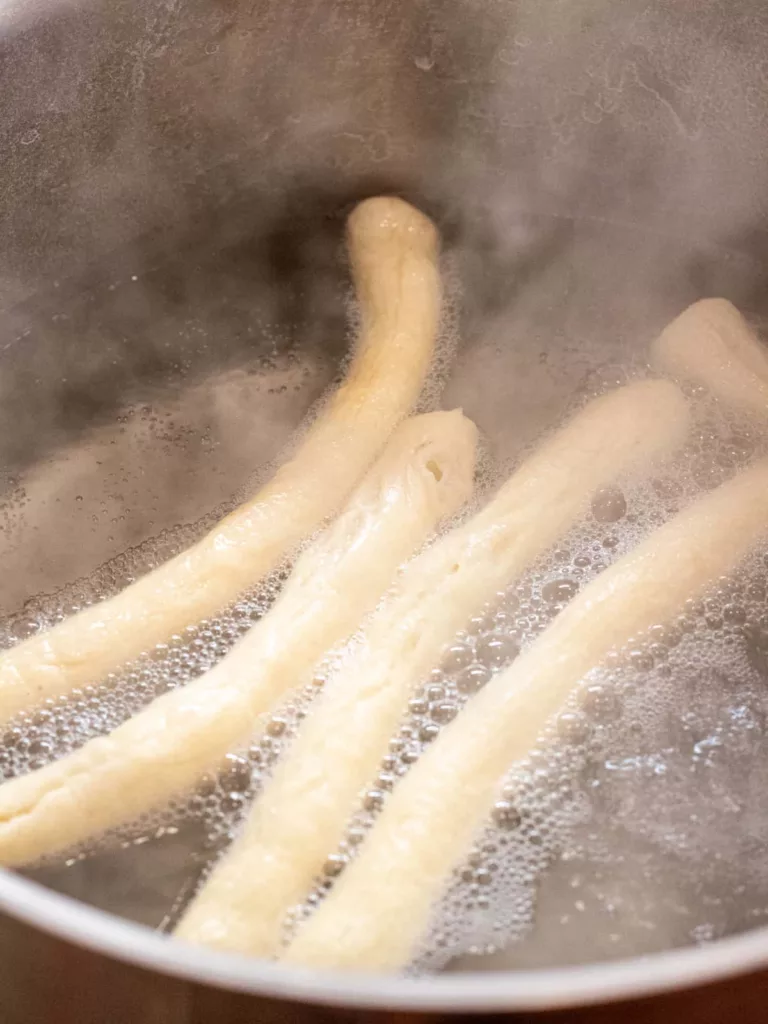
Baking Bath with Soda
The baking soda bath, which is essentially simply bringing the rods to a rapid boil in some baking soda water, is now a crucial step in achieving the ideal pretzel flavor.

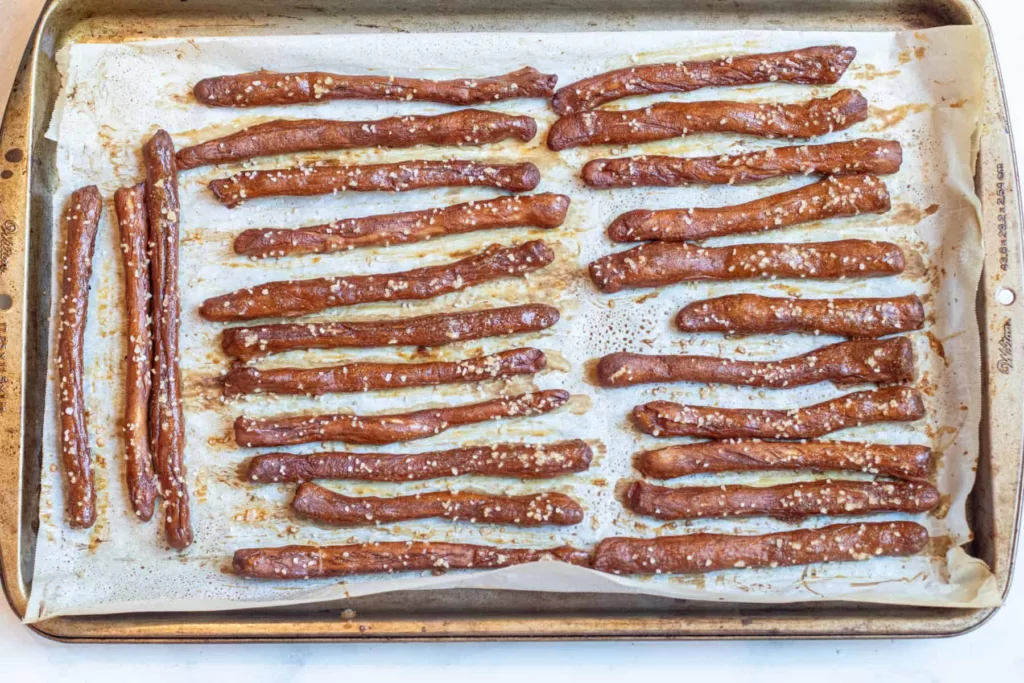
Wash, Salt, and Bake the Eggs
Finally, bake those rods until they are nice and crispy and crunchy by lightly brushing them with an egg wash and then generously sprinkling them with that pretzel salt!
Hard Pretzel Rods Made at Home! They’re not as good as the ones you get at the store, but then, they aren’t made by hand either! Furthermore, the handcrafted and loving appearance of these homemade pretzels is enhanced.

Pretzel Making Tips
Set aside ample room and bake trays.
It requires some time and room to prepare this dish. Prior to giving the rods a baking soda bath, make sure you have enough spotless surfaces on which to spread out the dough and a place to store it.
narrow roll rods
Remember that the pretzel rods will get somewhat thicker while they boil, so roll them a little thinner than you would like. We prefer to make 12-inch long rods and then cut them into 6-inch pieces. When rolling, this will assist save time.
Make use of a large enough pot.
Make sure your pot is large enough to accommodate the length of your pretzel rods. We manufacture 6-inch rods, thus a pot large enough to allow the rods to boil through is required.
Make sure you take the baking soda bath!
This is a crucial action! Even though commercial pretzels are frequently prepared in a food-grade lye bath, you must add baking soda to your prebake poach water in order to obtain a flavor that is similar.
When poaching, don’t bother about the form.
The rods will not stay absolutely straight; they will bend somewhat when you add them to the hot water. That’s okay; you may reshape them into a more angular shape when you take them out of the water.

More Recipes You Might Like
- Homemade Irish Soda Bread
- Prize Winning Key Lime Pie Recipe
- Cranberry Soda Bread
- Easy Apple Fritters
Homemade Hard Pretzel Rods

This traditional snack will help you take your handmade pretzels to the next level! Our handmade Hard Pretzel Rods are prepared (easier than you would think) at home and have all the flavor and crunch you expect from a handmade hard pretzel!
- 2 cups all-purpose flour 163 g
- 2 cups bread flour 272 g
- 2 1/4 teaspoons instant yeast 10 g
- 1 tablespoon white sugar 14 g
- 1 1/4 teaspoon table salt 8 g
- 1 1/2 cup warm/hot water about 90-110 degrees F
- 1 tablespoon salted butter melted
Baking Soda Bath
- 10 cups water
- 2/3 cup baking soda 152 g
Topping
- 1 egg whisked
- 1 tablespoon pretzel salt 16 g
- Prepare the Baking Soda Bath by adding baking soda and water to a large saucepan and mixing to dissolve the soda. Put on the cooktop, but don’t turn the heat on just yet.
- Prepare Baking Trays: Set aside a baking tray by the saucepan. Put parchment paper between the other two and set them aside.
- Make Dough: Fill the bowl of a stand mixer with water and sugar, whisk to dissolve the sugar, and then add the yeast. This activates the yeast. After the yeast becomes bubbly, give it ten minutes to settle.
- Add the salt and melted butter, then quickly stir with the hook attachment.
- Add the flour to the bowl gradually and mix on medium-low speed until a dough forms. When the dough is no longer sticky and starts to pull away from the bowl, gradually add the remaining flour until it bounces back beautifully when you poke it.
- Knead Dough: Place the dough on a surface dusted with flour and knead it for two to three minutes, or until a smooth dough forms.
- Warm Up the Baking Soda Bath: Give the water and baking soda one more stir, then turn the heat up to high and begin to boil the water.
- Preheat the oven to 350 degrees Fahrenheit.
- Make Room: Make sure your workplace is large enough, whether it’s on a spotless table or counter. Space is required for both rolling out the dough and arranging it on trays or cutting boards. This recipe yields enough dough to line two large baking pans or cutting boards.
- Cut Dough: Cut the dough in half, then in half again, using a dough cutter, until you have sixteen pieces. Slice it in half, working with one piece at a time, and then roll it out into a long, thin log that is approximately 12 inches long and between 1/4 and 1/2 inch thick. Place the log on a clean surface or a big cutting board that has been gently floured. Continue until 15 12-inch rods are filled into your big cutting board or surface, or until half of the dough has been rolled out. Then, to make 6-inch rods, cut each one in half with the dough cutter.
- Proceed with the remaining dough.
- Baking Soda Bath: Add four to five pretzel rods at a time to the heating water. After poaching for 15 to 20 seconds, carefully remove the rods with a slotted spatula, brushing off any leftover liquid, and set them on the baking pan without parchment paper.
- Reshape and put to Baking pan: Some of the rods may bend slightly, so shake off any extra water while they’re still warm. Then, put them to the pan lined with parchment paper, and gently reshape straight if necessary.
- Wash the rods with salt and egg by whisking the egg in a small basin. Add a dash of pretzel salt.
- Bake: Carefully place aluminum foil over the tray, making sure there is room between it and the pretzels. Bake, covered, for an additional 25 to 35 minutes after 40 minutes, or until the pretzel rods are well browned.
- If you’re baking both trays at once, bake on the two oven racks in the center and switch after the first 20 minutes. After the first 15 minutes of baking, switch racks once again for the remaining 25–35 uncovered bakes.
- Have fun!
Storage Counter: If kept in an airtight container, these pretzels can last up to a week.
Before using the pretzel dough, you can make it and freeze it for up to two or three months.
Replacements
Flour: You can use all-purpose flour or bread flour, but we like the combination.
Halve the Recipe
You can easily cut this recipe in half to create a smaller batch; it yields around 60–70 pretzels. Alternately, prepare the entire dough, cut it in half, and freeze the other half to use at a later date.
Roll Narrow
Because the pretzels will thicken after the baking soda bath, you want to make sure you roll them thinner than you want them to finish up. Moreover, they will take longer in the oven to cook through and dry out the thicker they are. The middle of the rod will be a little softer and you won’t get the same crunch through. If they are too thick.
Prepare a space, boards, and trays.
Because it yields a large amount of pretzels, this dish might take up a lot of room. Make sure you have enough room and cutting boards or trays on hand.