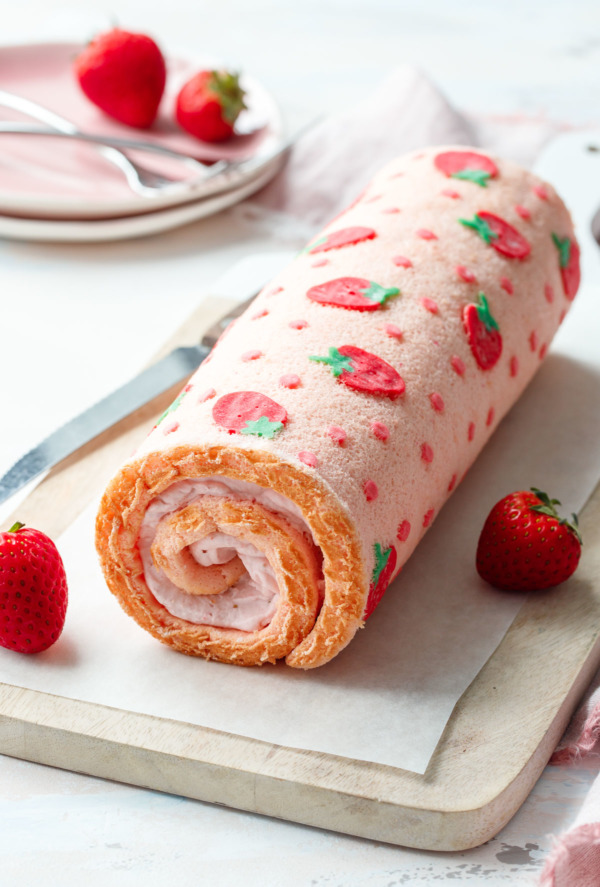
Roll into strawberry season with this delightful strawberry cake roll! This recipe features a delicate almond sponge cake adorned with an adorable strawberry design and generously filled with luscious strawberry whipped cream.
Patterned cake rolls, often found in Japanese cuisine, are indeed a culinary marvel. They not only captivate the eye with their intricate designs but also satisfy the palate with their delectable flavors. The best part is that they are relatively easier and less time-consuming to make compared to elaborate layered cakes. So, you can enjoy the beauty and taste of this strawberry cake roll without the fuss!

Table of Contents
Strawberry Cake Roll
If you’re the kind of baker who desires to craft visually stunning cakes that leave a lasting impression on your guests but prefers to avoid the intricacies of layer cakes, you should definitely explore the world of Japanese-style patterned cake rolls.
This elegant cake style enables you to fashion intricate designs directly into the cake, eliminating the need for elaborate frosting techniques.
While this method does involve some basic piping skills (which improve with practice), the truth is, even if you opt for something as simple as piping polka dots across the cake, the end result will be absolutely charming and delightful.

For my initial attempt, I went for a more abstract strawberry design with a pink background, green squiggles, and yellow “seeds.” While it turned out quite cute, it ended up resembling an Easter egg more than a strawberry. To make matters worse, my first roll’s filling was a strawberry marshmallow concoction that, although delicious, oozed out of the ends of the roll like sticky lava.
Take 2.
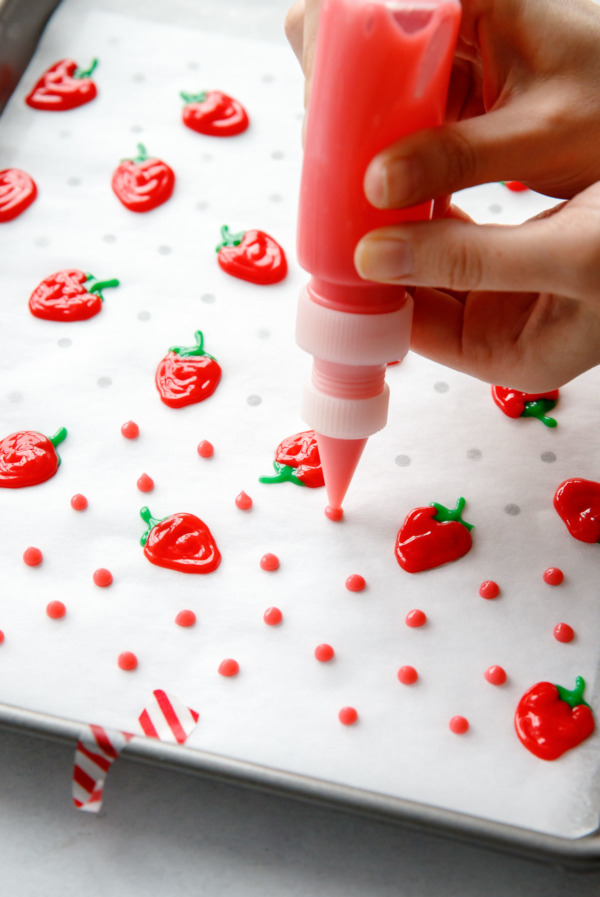
Since I needed to redo the cake anyway to rectify the filling mishap, I decided to revamp the design. I chose dots instead of squiggles (easier to pipe) and simplified the red berries, leaving no room for misinterpreting the flavor of this cake roll.
The cake batter paste imparts an almost embossed texture to the pattern, as it cooks up slightly firmer than the surrounding sponge. It’s a neat effect, though it can be a bit tricky to cut because the paste ends up firmer than the sponge cake itself (tip: use a serrated knife to gently saw through the larger shapes). Alternatively, plan a design that allows you to cut in between the piped shapes.
Those little bubbles that formed in the berries were a complete accident, but don’t they look like tiny seeds?
Pro Tip: To prevent your cake roll from flattening into an oval shape, refrigerate it in a large cardboard mailing tube with a diameter of about 3.25 inches. I personally used a cardboard tube that originally housed a whiskey bottle, and it worked perfectly.
Strawberry Cake Roll Ingredients
For Paste:
- 2 tablespoons / 30 g unsalted butter, softened (softer than room temp, but not melted)
- 2 ½ tablespoons / 30 g granulated sugar
- ⅓ cup / 40 g cake flour, sifted
- 1 large / 30 g egg white
- food coloring
For Cake:
- 3 large eggs, separated
- 6 tablespoons / 75 g granulated sugar, divided
- 1 tablespoon vegetable oil
- 1 ½ tablespoons / 23 g whole milk
- ½ teaspoon almond extract
- ½ teaspoon kosher salt
- ⅔ cup / 67 g cake flour*, sifted
- food coloring
For Filling:
- 1 cup / 240 g heavy whipping cream
- ¼ teaspoon unflavored powdered gelatin
- ½ ounce / 14 g freeze-dried strawberries
- 3 tablespoons / 38 g granulated sugar
- 1 tablespoon / 8 g powdered sugar
How To Make Strawberry Cake Roll
To make this patterned cake roll, follow these steps:
- Preheat your oven to 350 degrees F (175 degrees C). Lightly butter or grease the bottom and sides of a 15 by 10-inch jelly roll pan and line it with parchment paper (if you’re using a design template, place it under the parchment paper or trace it onto the back of the parchment paper with thick pencil lines).
- Prepare the design paste: Mix the butter and sugar together until you get a smooth paste. Add flour and mix until partially incorporated, then add the egg white and mix until smooth. The paste should have a buttercream-like consistency. Divide the paste into three bowls and add food coloring as desired.
- Transfer the pastes into piping bags fitted with small round piping tips. Pipe your desired design onto the parchment paper, starting with the green, then the darker pink berries, and finishing with the lighter pink dots. Place the pan in the freezer to allow the design to set while you prepare the rest of the batter.
- In a mixing bowl, whisk together the egg yolks and 1/4 cup sugar until the sugar is dissolved and the yolks lighten in color. Drizzle in the vegetable oil while whisking constantly until incorporated. Then whisk in the milk, almond extract, and salt. Add food coloring as desired.
- Sprinkle sifted cake flour over the batter and fold until incorporated.
- In a clean mixing bowl or the bowl of a stand mixer fitted with the whisk attachment, beat the egg whites until frothy. Add the remaining 2 tablespoons of sugar and beat on high speed until the whites hold medium-stiff peaks.
- Fold a third of the egg whites into the batter to lighten it, then add the remaining egg whites and fold until just incorporated.
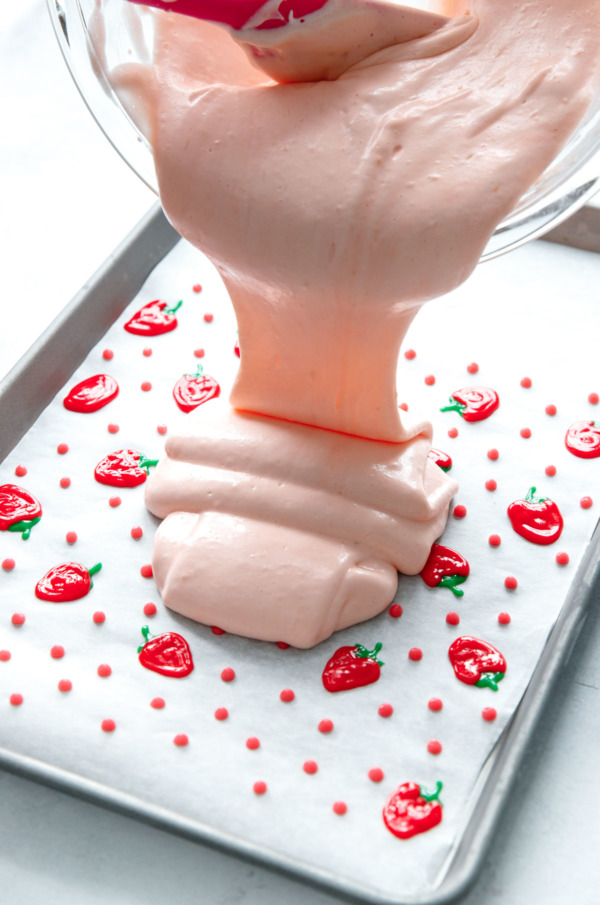
- Pour the batter over the frozen design, spreading it into an even layer using a large offset spatula. Bang the pan on the countertop a few times to remove any air bubbles and level out the top.
- Bake for about 10 minutes or until the top is springy and the edges are just starting to brown.
- Remove the cake from the oven and carefully invert it onto a piece of parchment paper backed by a solid surface like a large cutting board. Peel off the parchment paper backing, revealing the design. Dust a clean tea towel generously with powdered sugar and place it on top of the cake. Flip the cake over so the design is facing down.
- Starting with the side of the cake without the design, carefully roll up the warm cake in the towel. Rolling it while warm will give the cake a ‘muscle memory’ and allow you to roll it up later with the filling without it cracking.
- Let the rolled cake cool for about 1 hour or until completely cool to the touch.
- Meanwhile, prepare the filling by sprinkling gelatin over 1 tablespoon of cool water and letting it soften for 5 minutes. Microwave the mixture in short, 5-second increments until the gelatin is completely dissolved and liquefied. Let it cool slightly.
- In a food processor or clean coffee/spice grinder, pulse freeze-dried strawberries together with sugar until very finely ground.
- Place whipping cream in the bowl of a stand mixer fitted with the whisk attachment. Beat on medium speed until frothy, then add powdered sugar and increase to medium-high speed. Beat until the paddle starts to leave trails in the cream.
- Mix a spoonful of the partially whipped cream into the bowl with the melted gelatin until completely incorporated, then, with the mixer running on low, add this back to the bowl with the rest of the cream. Add the strawberry sugar mixture and increase the speed to medium-high, beating until the cream holds medium-stiff peaks.
- Carefully unroll the cake and remove the towel. You may need to hold it with your hand as it will try to roll back up.
- Spread the filling into a thin, even layer over the entire cake, leaving about 1/2 inch bare at the far end. You may not need all of the filling, depending on how thick a layer you want.
- Gently roll up the cake, taking care not to use too much pressure, lest the filling squeeze out the sides.
- Wrap the cake roll tightly in plastic wrap and refrigerate it for at least 2 hours or overnight, until the filling is set. You can use a cardboard tube to keep the bottom from flattening out as it chills.
- To serve, cut the cake roll into slices with a sharp serrated knife. The design parts may be firmer than the cake itself, so it’s best to cut gently using the weight of the knife without sawing back and forth or pressing down.
- Enjoy your patterned cake roll! It will keep, tightly wrapped and refrigerated, for up to 3 days.